Solve the ERR_CONNECTION_REFUSED Error
By Prosanjit Dhar
January 22, 2025
Last Modified: January 6, 2026
You might come across the ERR_CONNECTION_REFUSED message once while browsing a website. Actually, it’s a connection failed error message that says your browser is unable to establish a connection with the targeted server.
However, this problem is not as severe as it looks. Even a non-technical can easily resolve it with appropriate tips and tricks.
So, let’s have a quick glance at the ERR_CONNECTION_REFUSED error and then move to the main part.
What is ERR_CONNECTION_REFUSED?
ERR_CONNECTION_REFUSED is an error message that occurs when your browser is unable to connect to a website’s server. It means that the server has refused the connection request.
This typically happens if the server is down, or unreachable, or the connection request is refused. However, other factors like network misconfigurations, DNS issues, or firewall restrictions, can also trigger this error.
So, without any further ado, let’s start the solution of this error.
How to fix ERR_CONNECTION_REFUSED
ERR_CONNECTION_REFUSED error isn’t specified for any particular reason or browser. So, you might need to try a few different methods to get the solution.
1. Check if the website is down
Start with checking if the website is down for everyone or just you. You can use free tools like DownDetector or IsItDownRightNow to check the website’s status.
If the site is down, you’ll need to wait for the server administrators to resolve the problem. Otherwise, proceed with the next steps.
2. Try accessing the website from another device
If the server isn’t down, the second potential solution is to test the website on a different device. This helps pinpoint whether the issue lies with your original device or the network.
If the error occurs only on the original device and not on the secondary one, the possible causes could include:
- Internet device issues.
- Outdated browser cache and cookies.
- Network firewall or router blocking the connection.
- Incorrect proxy settings.
- Outdated or malfunctioning DNS.
- Hosts file conflicts.
- ISP-related issues or regional restrictions.
By identifying whether the issue persists across devices, you can narrow down potential causes and troubleshoot more efficiently.

3. Restart your router and modem
Sometimes, issues can arise with the router’s connection to your Internet Service Provider (ISP). Restarting the router re-establishes this connection.
Also, these routers often store temporary network data (like DHCP leases) that may become corrupted over time.
Therefore, restarting your internet or Wi-Fi router can be the easiest but most effective solution for ERR_CONNECTION_REFUSED.
- Turn off your wifi router and modem.
- Wait for 30 seconds then turn it on.
- After the connection stabilizes, try to browse the site.
If you haven’t got your expected solution then the problem might be a little more advanced and you need to follow the upcoming procedures.
4. Clear your browser cache and cookies
Every time you visit a website, a little scrap of info gets stored in your browser’s memory including corrupt cookies. So at one point it all gets clattered and makes your browsing slow.
Some simple steps can help you rule out corrupt cookies or cached-out error pages.
- Go to your browser settings and click on privacy and security.
- Then click on delete browsing data and select all three options.
- Now simply click delete data to clear all your browsing history and cookies.
This primary technique can initially fix ERR_CONNECTION_REFUSED with many other errors actually. But if it doesn’t then you move on to the next steps.
5. Disable firewall and antivirus temporarily
Firewalls and antivirus software are essential for monitoring and blocking potentially harmful traffic. However, they can sometimes block legitimate websites due to misconfigured rules or mistakenly identifying them as potential threats.
So, disabling them for a certain period can solve this ERR_CONNECTION_REFUSED problem for you.
Disabling firewall and antivirus on your Windows
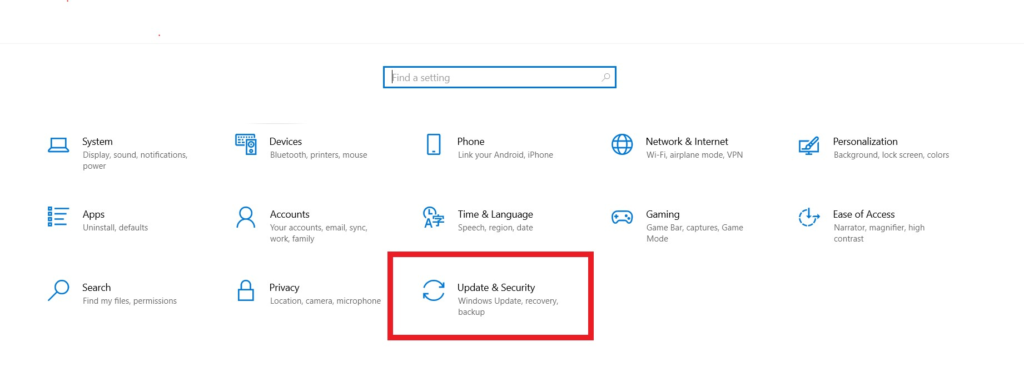
- Open Settings on your Windows, then go to Update & Security.
- On the left menu, click Windows Security and go to Firewall & network protection.
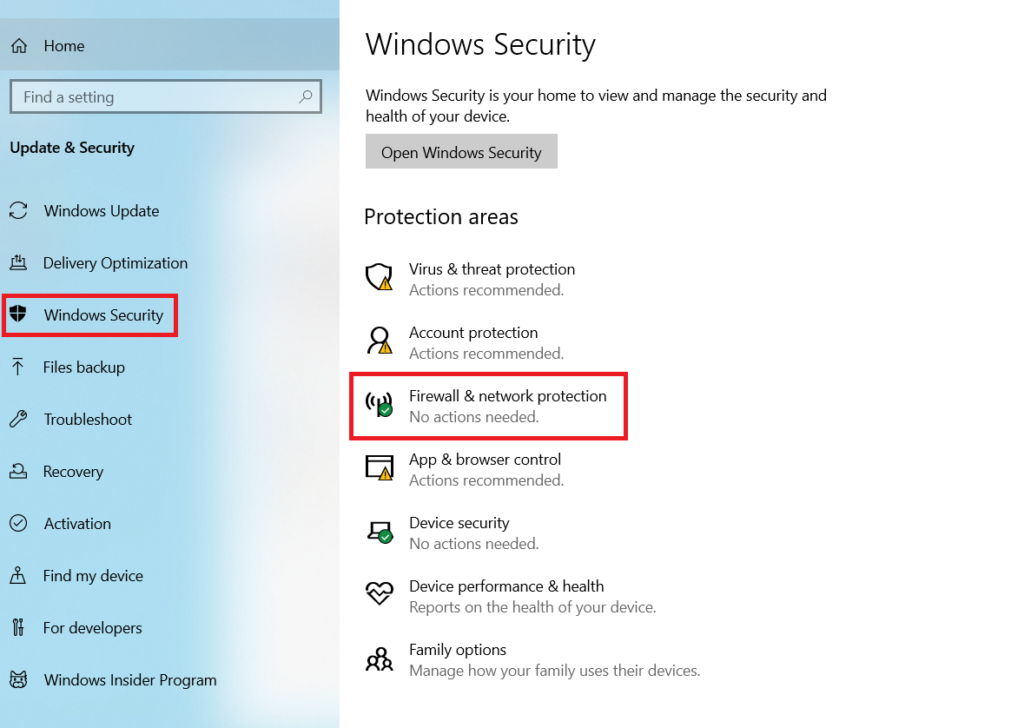
- Now under the Firewall & network protection, turn off each protection from domain network to public network.

After disabling the firewall, try reloading the page to check if the error is gone.
Disabling the firewall and antivirus proxy on your Mac
- In System Settings, go to Network.
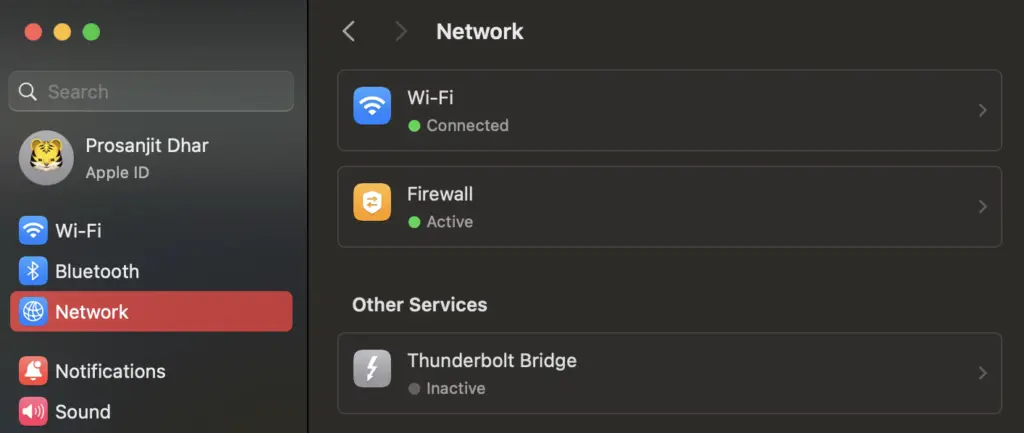
- Go into the Firewall protection.
- Then turn off the projection.
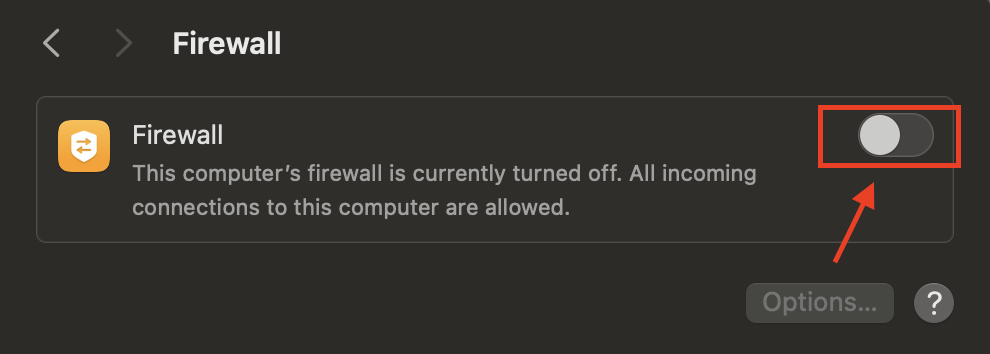
Now, try reaccessing the website to see if the error is resolved.
6. Check your proxy settings
Sometimes the wrong proxy settings could be the cause of this error. This is a pretty rare case, especially for the client side. But sometimes it can interfere with DNS requests.
So, let’s disable the proxy also and see what happens.
Disabling the proxy on your Windows
- Open Settings on your Windows, then go to Network & Internet.
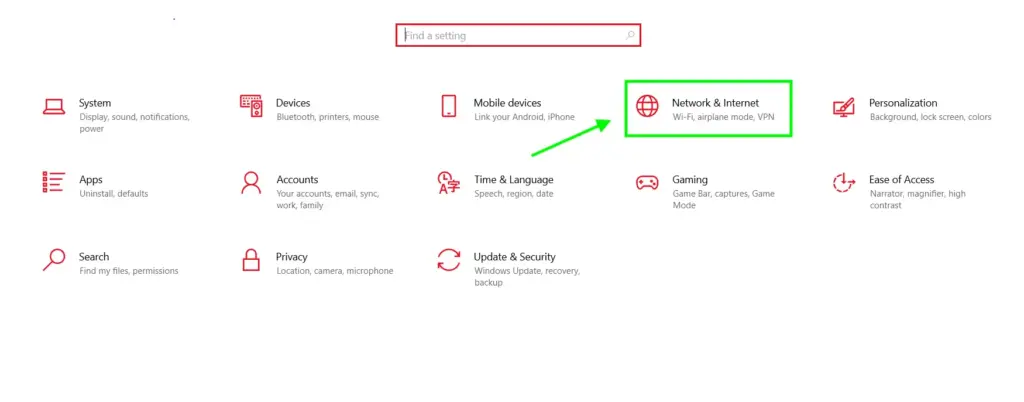
- On the left menu, click Proxy.
- Under Automatic proxy setup, toggle Automatically detect settings to Off.
- Under Manual proxy setup, toggle Use a proxy server to Off.
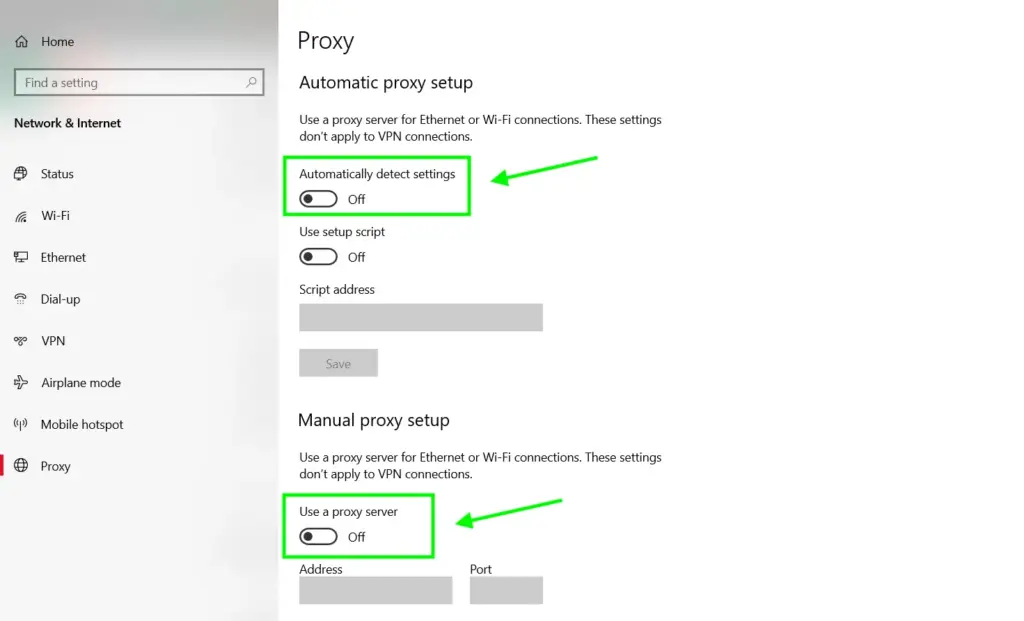
After disabling the proxy, try reloading the page to check if the error is gone.
Disabling the proxy on your Mac
- In System Settings, go to Network.
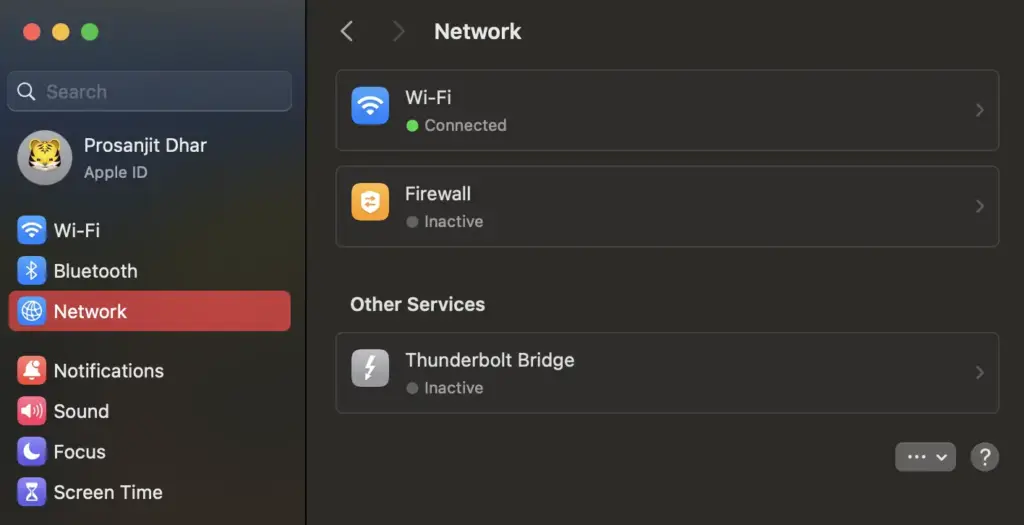
- Select your active connection (Wi-Fi or Ethernet) and click Details.
- Now, go to the Proxies tab, and uncheck all the boxes, such as SOCKS Proxy or Auto proxy discovery.
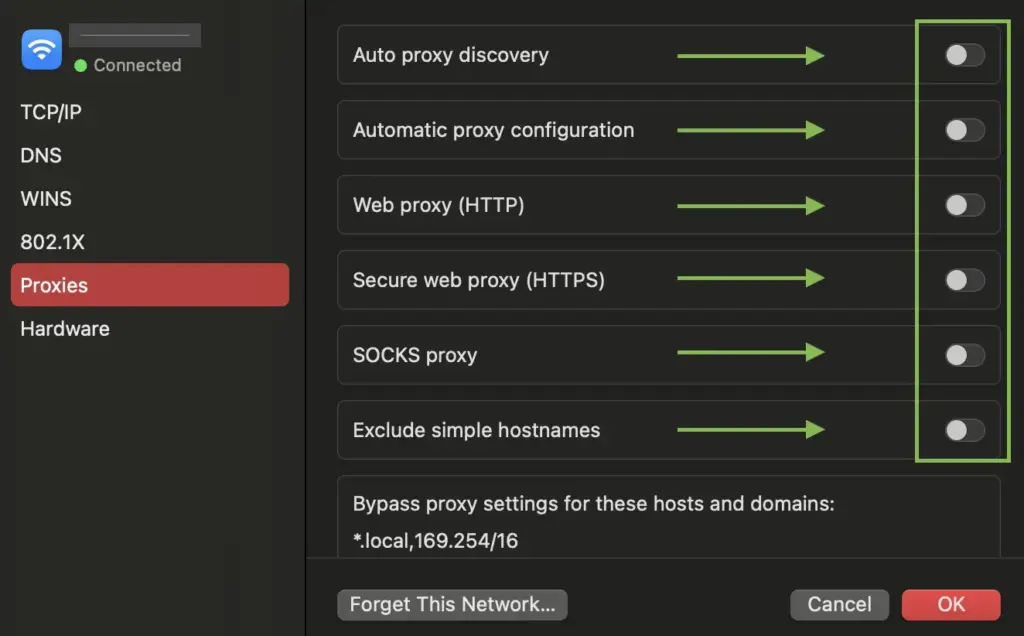
- Click OK to apply the changes.
Now, check if the error is gone, or move to the next solution.
7. Flush your DNS cache
Like browser cache, DNS stores the websites’ IP addresses you’ve browsed previously. If the IP addresses are outdated, they might send you to the wrong address while browsing.
That’s why you need some spring cleaning in your DNS. So, let’s check it on Windows first and then on Mac.
Flush DNS and renew the IP address on Windows:
- Open your Command Prompt:
- In the Command Prompt window, paste the following command after C:\WINDOWS\system32> and press enter to remove outdated or incorrect DNS entries:
ipconfig/flushdns - After flushing DNS, paste the following command to release current IP address assigned to your system by the DHCP:
ipconfig/release- Once that’s done, enter the following command to obtain fresh IP:
ipconfig/renew - Then enter this command to manually set or update DNS servers for troubleshooting or network configuration:
netsh int ip set dns- Lastly, reset the Windows Sockets (Winsock) catalog to default settings by the following command:
netsh winsock resetWhat you’re doing here is essentially troubleshooting and updating your IP address in your DNS cache.

Once you’ve done this, restart your computer and reload the website to check if the error is there.
Flush DNS and renew IP address on Mac:
- Open your Terminal application:
- Press Command + Space together to open the Spotlight Search.
- Type Terminal and open the application.
- Paste the following command and press enter to reset and restart the mDNSResponder:
sudo killall -HUP mDNSResponder - And then enter your Password.
- Restart your device and reload the page to see if it works.

If you’re still seeing the ERR_CONNECTION_REFUSED error message then go ahead for the next fix.
8. Check your hosts file
Check if the host file is modified. If you have modified the host’s file then you should revert it. It must just be that the website you are trying to access might be blocked on your local hosts file.
Check and edit hosts file on Windows
- Open the Search box and type Notepad.
- Open it by selecting Run as administrator option.
- Then navigate to File and click on Open.
- Change the file filter from Text Documents to All Files.
- Enter the path below in the file name bar and select the hosts file. This file will show a list of blacklisted websites below the last line, using the hashtag symbol.
- If the domain name and the IP address of the targeted website are there, then remove them and click Save.

Now, check if the error is gone.
Check and edit host files on Mac
- Again open your Terminal application:
- Then press Command + Space together to open the Spotlight Search.
- Type Terminal and open the application.
- Enter the following command and write your password to open the hosts file:
sudo nano /private/etc/hosts- Now delete the domain and IP address if it’s listed there.
- Then press Command + O to rewrite the hosts file and hit return to confirm the changes.
- Lastly, click command + X to close the hosts file.

Restart your Mac and browse the website again to check if the Fix ERR_CONNECTION_REFUSED has yet been solved or not.
9. Contact your ISP provider
If nothing else works, the problem could be with your Internet Service Provider (ISP). Sometimes, ISPs block access to certain websites due to regional restrictions, legal concerns, or their policies.
So, if the site is on their restricted list, you have to contact your ISP provider and do the following things.
- Contact your ISP’s support.
- Explain the error and troubleshooting steps taken.
- Ask about any known issues or restrictions.
- Request assistance in resolving the connection problem.
Wrapping up
Issues like ERR_CONNECTION_REFUSED can be frustrating, but it’s usually fixable through one or more of these methods. Start with the simpler solutions and work your way through more complex fixes if needed.
However, if you struggle with the advanced parts, you might consider help from a technical professional. They can provide more specific guidance based on your unique situation.
Start off with a powerful ticketing system that delivers smooth collaboration right out of the box.








Leave a Reply