
What is Email Piping and Why?

By Rasel Siddiqe
May 17, 2022
Last Modified: January 6, 2026


Customers can reach out to you in a variety of ways. Sometimes it’s for convenience and for others it’s just the way they know. Whichever the case, as a support agent it’s essential to keep all doors open. Email piping is one way you can make it easy for both customers and agents.
In this article, we’ll be looking at what email piping is, why you need it and how you can have email piping for your support team.
What is email piping?
Email piping is the process where emails are converted into support tickets on a support portal and can be accessed without having to log on to the email account. This works by linking your email account to your ticket system so that support request emails can be viewed directly from the ticket system.
Email piping streamlines the process of manually checking all support channels by bringing them all into one dashboard. Agents will no longer need to check the ticket system and email inbox separately.
Provide customer solutions through emails right from your tickets dashboard.
Why is email piping important?
Email piping is essential for any support team due to a number of reasons. We’ll look at the most basic ones for now,
Email is essential
Email is by far the most trusted and used method for commercial communications. People prefer to use email for technical communications. For this very reason, it’s absolutely essential to have an email inbox for support queries.
Email is very effective for back and forth communication which support interactions usually are. Most importantly it’s easier for customers to keep track of their support conversations inside their email inboxes. Hence, an email inbox for support tickets is a must-have.
Now, having to check email inboxes separately is not convenient for support agents. This is why forwarding emails directly to your support system is the best idea.
Synchronization
The second reason to have email piping is the fact that it keeps your support team in sync with your customer queries. It’s not really efficient to designate an agent to only check for email inboxes nor is it smart to go back and forth between your ticket system and email inbox.
Email piping syncs your email inbox to your support system automatically. This way support agents can check and respond to all support queries regardless of where they were submitted.
No registration hassle
Some customers might not want to create an account to ask trivial questions about your product or services. Email piping lets them communicate with your support team without having to log on to your website.
This is actually one of the prime reasons you need to keep email as a customer service channel. More importantly, you need to enable email piping to make the process streamlined and hassle-free.
How Fluent Support’s email piping works
Fluent Support is a self-hosted customer support desk that offers email piping for all its Pro users. The way it works is pretty straightforward. All you need is to enable forwarding from your email service provider and link it to Fluent Support.
Fluent Support employs Amazon’s Lambda Cloud Processing service to manage and delegate email forwarding from different sites.
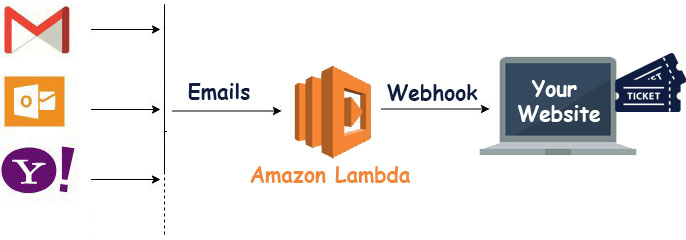
Information forwarded to Amazon Lambda is transmitted using the MIME standard protocol and is processed automatically. Amazon has its own privacy policy for using Lambda and your information is subject to those policies when using email piping on Fluent Support.
Setting up email piping in Fluent Support
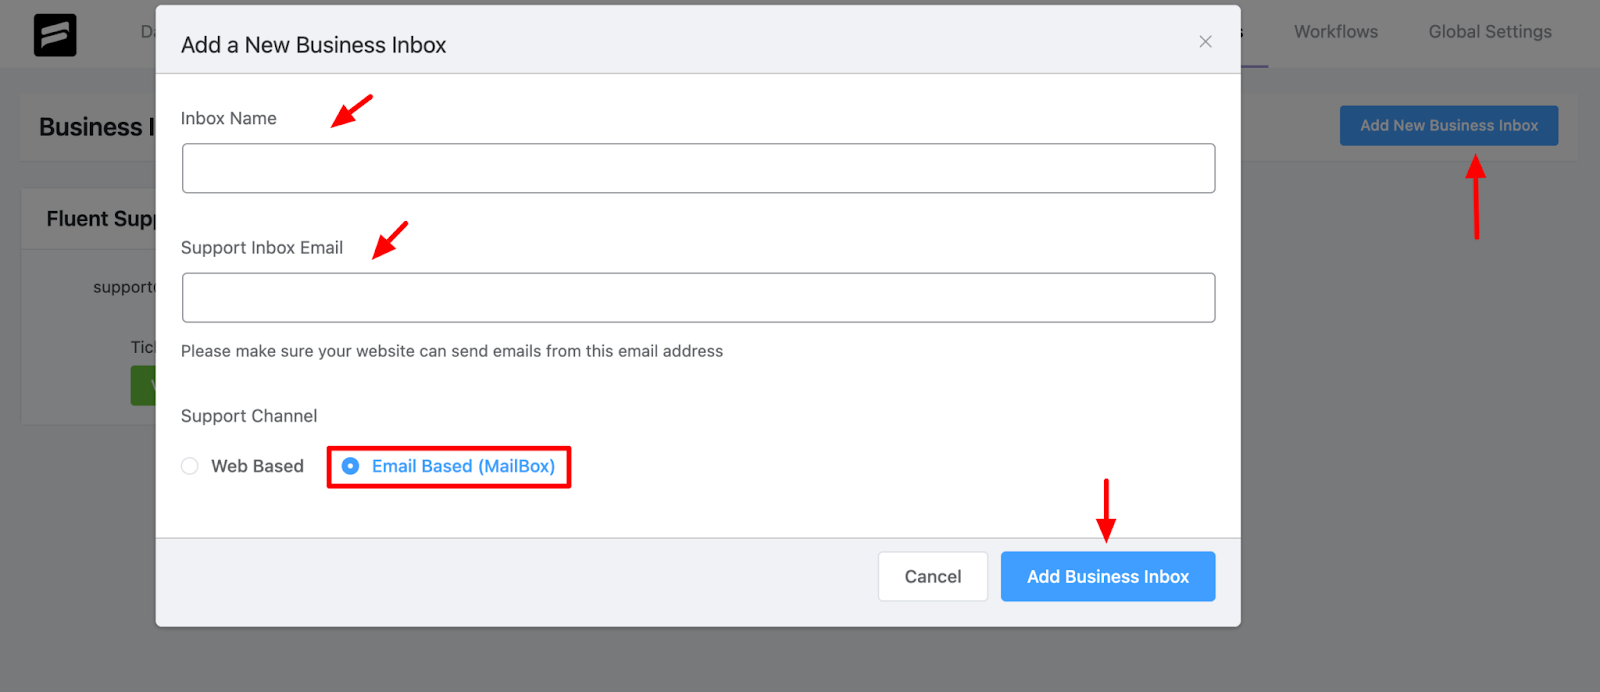
To set up Fluent Support’s email piping you need an email-based inbox setup. This inbox is where the emails will be forwarded from your support email.
In order to set up email piping head to Business Settings and click Add New Business Inbox. In the following pop-up window, you have to add the name of the inbox and the email address that will send the emails from.
It’s very important that your server can use this email id to send emails. Lastly, you’ll have to select the Email-based mailbox and click Add Business Inbox.
After creating the Business Inbox now you have to configure the inbox to receive emails. To do this click on the View Settings button.
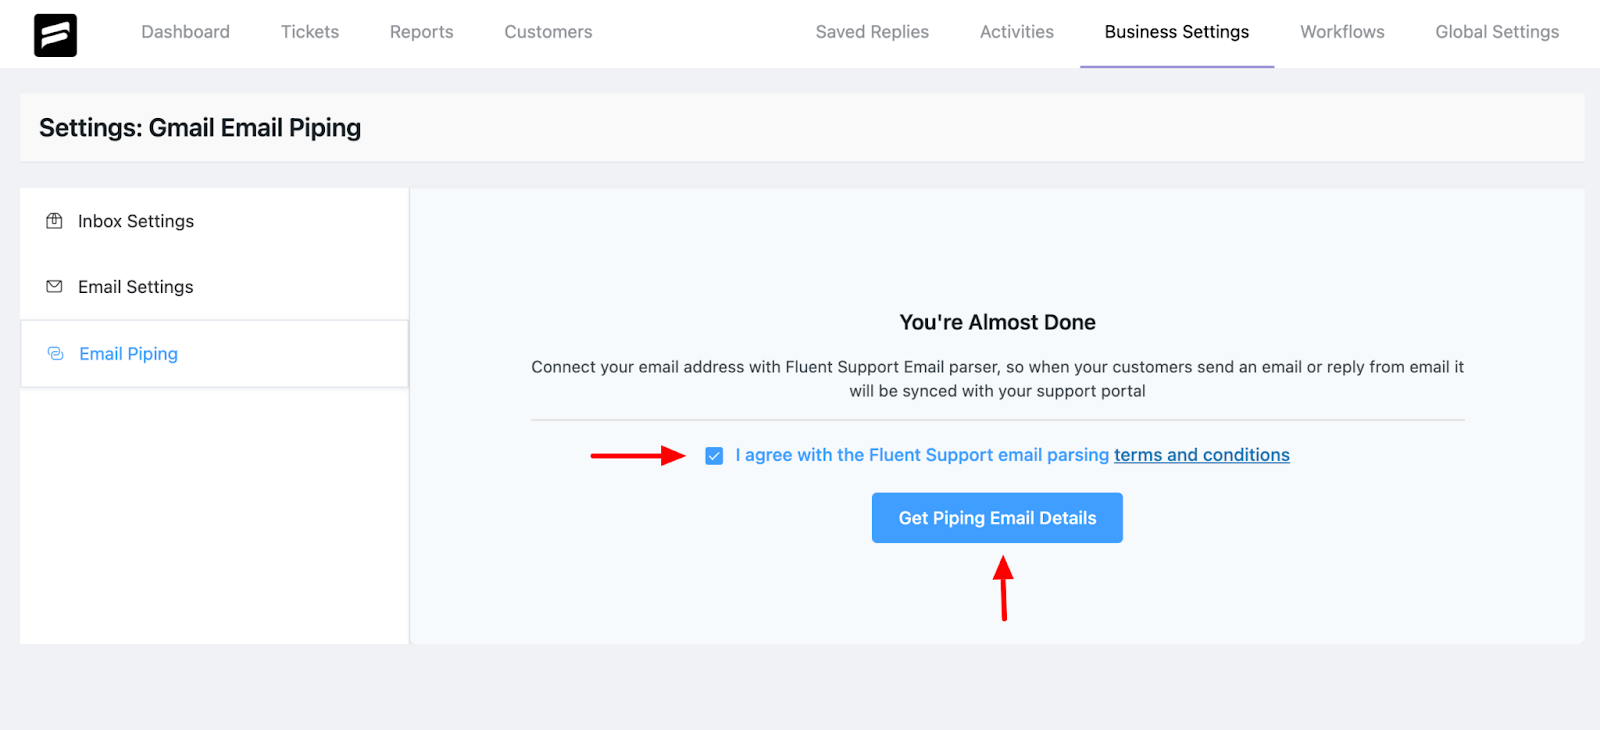
Next, select the Email Piping settings tab from the left-hand sidebar. Here you’ll have to agree to the Email piping terms and policy to enable email piping settings. Now you just have to click on the Get Piping Email Details button.
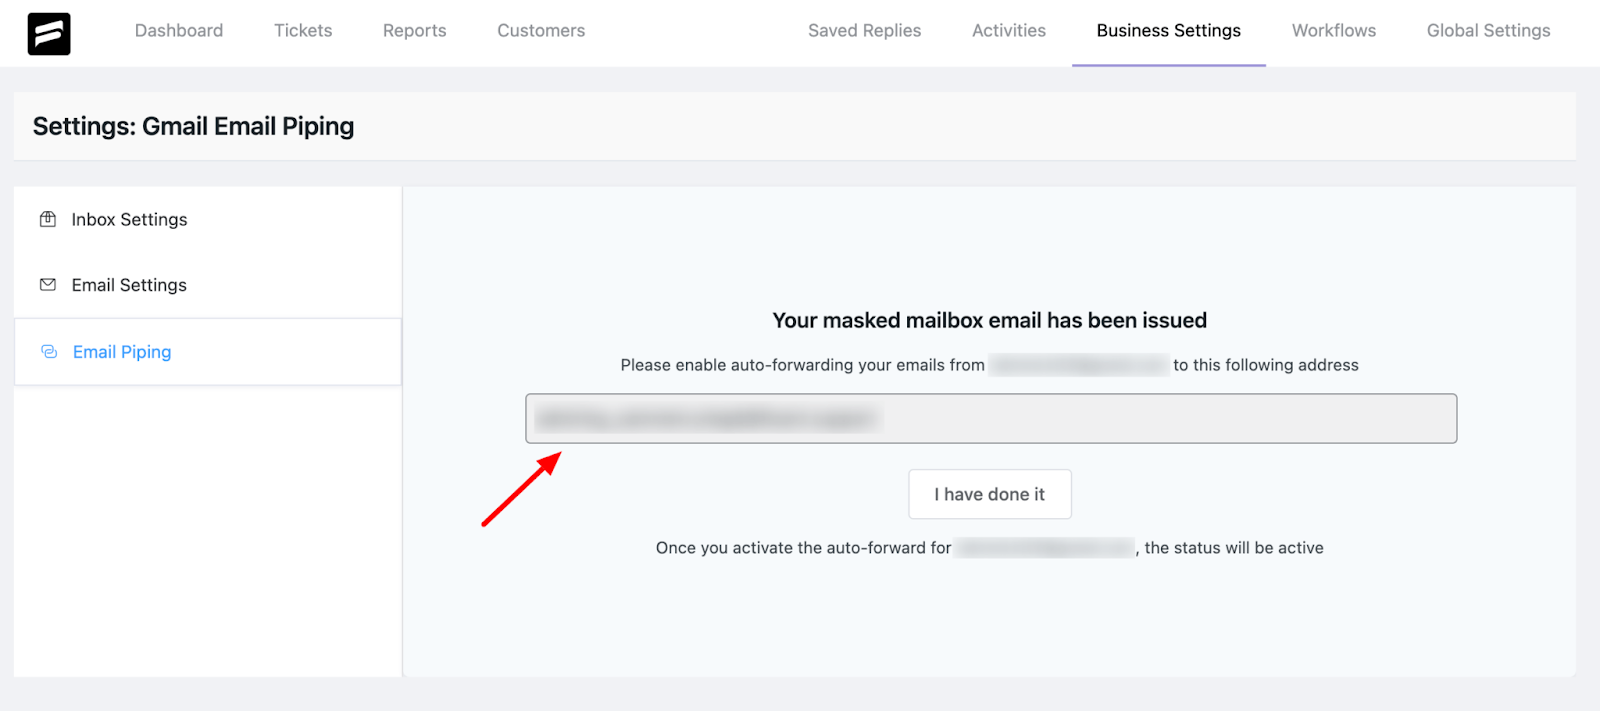
In the following screen, Fluent Support will generate an email forwarding link. This link will be used to forward emails from your inbox to Fluent Support.
Enabling Email Forwarding: Amazon WorkMail
Now to complete the process you need to configure your email provider to forward emails. We’ll show you Amazon Workmail in this article.
You can find further details for Google Workspace, Outlook Web Access, and Yahoo Mail too. We’ll cover them in more depth in later articles.
To create an email forwarding rule in your Amazon Workmail follow the steps below,
In the Amazon WorkMail web app, click the gear icon in the upper-right corner. Click on Email rules, and select New.
The New email rule dialog box will appear. Enter a name for the rule and ensure that the Active rule check box is ticked.
Next, go under Conditions, open the When the message list, and choose Is received from option.
Choose the Select sender(s), and select the sender whose messages you want to forward.
In this case, it will be the email that you used for setting up the email inbox in Fluent Support.
Next, choose To, make sure the sender’s email address is in that box, then click Ok.
To configure forwarding settings, go to Actions, open the Then list, and choose the Forward the message to option.
From the list Select recipient(s) link. Choose the recipients you want to forward to. In this case, the recipient link will be the email forwarding link generated by Fluent Support.
That returns you to the New email rule dialog box, and the sender or senders’ email address should appear in the Select recipient(s) list.
Keep in mind that Amazon WorkMail doesn’t forward bounce emails or emails rejected by a recipient’s email server.
Common issues: Email piping not working
While you might have configured everything properly, there still maybe issues that prevent you from tapping into the benefits of email piping.
One of the recurring issues with email piping is email not being parsed, either on the client end or from the server side. The most common reasons for these issues can be attributed to,
Disabled REST-API
If your WordPress REST-API feature is disabled, it causes issues with email parsing and receiving tickets via the parser. Try enabling it if your email piping isn’t creating tickets properly.
Cloudflare bot fight mode
This fight mode feature lets websites limit the bot traffic. However as the feature is automated it can sometimes confuse parsed emails as bot activity and blocks it. Disabling Flight mode can solve this issue.
Security plugin
Security plugins that block third-party connections can also prevent parsed emails from creating tickets on your dashboard. Read the Security documentation carefully to avoid conflicts.
Server security enabled
Servers can also deny parsed emails based on domain scores and the parsing sevice involved. Some servers prevent IMAP and third-party parsing to prevent data breaches.
If you’re piping is not working even when the above solutions we’re implemented your server security could be the primary issue. Contact your hosting porivder about disabling thew security or changing the measures.
Wrapping up
So that’s it, folks. Follow these steps to enable email piping on your Fluent Support installation. Let us know in the comments if you get stuck.
Until next time, happy serving!
Start off with a powerful ticketing system that delivers smooth collaboration right out of the box.
Related Articles
What Is Sales Support? Why You Need It
Sales support keeps deals moving and customers happy…401 Error: What It Means and How to Fix It
A 401 error means the server rejected your…


Leave a Reply