How to Fix ‘ERR_CACHE_MISS’ in Chrome (10 Proven Tactics)

By Md. Sajid Sadman
April 28, 2025
Last Modified: April 29, 2025


Ever come across the “ERR_CACHE_MISS” error and got stuck while using the Chrome browser?
Well, we’ve all been there. It’s annoying, confusing, and sometimes feels like a dead end.
Hey, don’t you worry. It’s not as bad as it seems.
In this blog, we’ll explain what it is, why it happens, and how to fix it step by step.
So, are you ready to deal with the error? Let’s dive in.
What does ‘ERR_CACHE_MISS’ error mean?
The ‘ERR_CACHE_MISS’ error is a common issue in Google Chrome that occurs when the browser cannot access or retrieve cached data for a webpage.
Normally, browsers store cached files—like images, scripts, and other website elements to speed up loading times. So, instead of downloading everything again, Chrome pulls these files from local storage. But when something goes wrong, this error appears.
There are several reasons why this might happen.
One common cause is outdated or corrupted cached data. If a website updates its content but your browser still tries to load the old version, Chrome might fail to fetch the correct files.
This results in a mismatch, causing the ‘ERR_CACHE_MISS’ error.
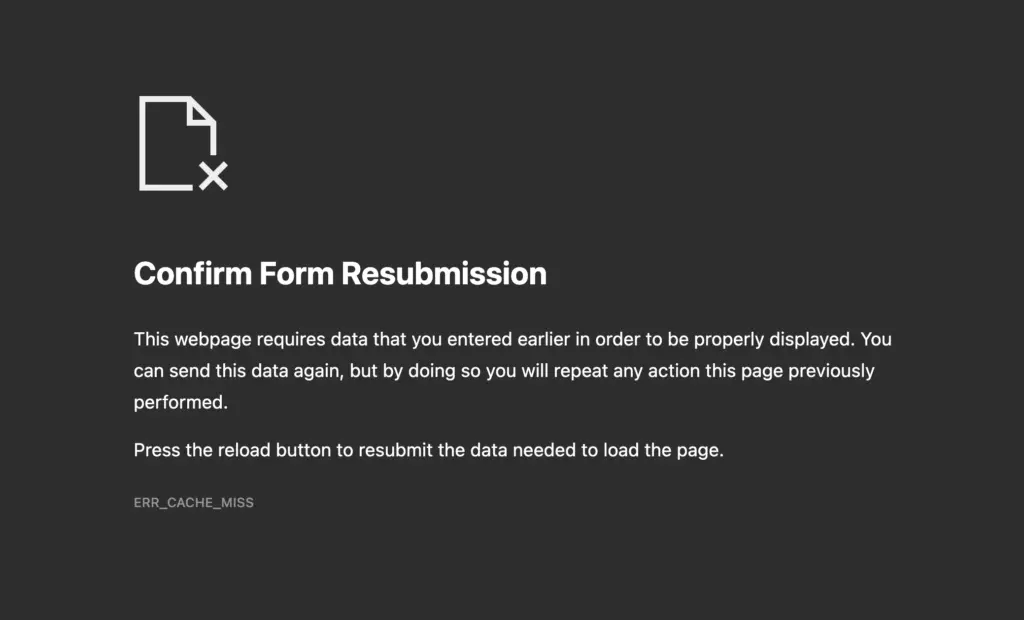
Another frequent trigger is form resubmission. If you fill out a form and then hit the refresh or back button, Chrome may block the page from reloading to prevent duplicate submissions.
That’s why you often see this error with a message like “Confirm Form Resubmission.”
It’s not a bug. It’s actually a built-in feature to stop unintended duplicate actions.
Sometimes, browser extensions or misconfigured settings can also interfere with caching. Certain extensions modify how Chrome handles stored data, which may lead to conflicts.
In some cases, even website-side issues, like incorrect cache settings or coding errors, can contribute to the problem.
Well, there are several variations of this error, but they all essentially mean the same thing.
Let’s overview the variations.
- ERR_CACHE_MISS
- CONFIRM FORM RESUBMISSION ERR CACHE MISS
- NET::ERR_CACHE_MISS
- NET ERR_CACHE_MISS
- ERR_CACHE_MISS FIX
Let’s explain ‘ERR_CACHE_MISS’ error in the simplest example possible.
Think of it like using an expired ticket to enter a movie theater. The system expects a valid ticket (cache), but when it doesn’t match the records, you’re denied entry.
Similarly, Chrome expects to load a site from cache, but when it can’t, it throws the ‘ERR_CACHE_MISS’ error.
How to fix ‘ERR_CACHE_MISS’ in Chrome (10 proven tactics)
Here comes the most crucial section of this blog: 10 proven tactics to fix the ‘ERR_CACHE_MISS’ error.
We’ve explained each tactic simply and straightforwardly, so even if you’re not technically inclined, that won’t be a problem.
Just move forward boldly without hesitation.
1. Reload the page
In most cases, a simple page reload is all you need to fix the ‘ERR_CACHE_MISS’.
Your Chrome browser might have temporarily failed to fetch the cached data, and a quick refresh can fix that. Click the refresh button or press F5 (Windows) / Command + R (Mac) to reload the page.
If that doesn’t work, try a hard refresh.
This forces Chrome to ignore cached files and fetch fresh data from the server. You can do this by pressing Ctrl + Shift + R (Windows) or Command + Shift + R (Mac).
This is especially useful if outdated or corrupted cache files cause the error.
If a simple refresh didn’t work, don’t panic. There are still plenty of fixes to try. The next logical step is to restart your browser and see if that helps.
2. Restart your browser
Sometimes, browsers get stuck with minor glitches. Perhaps a fresh start could clear things up and resolve the ‘ERR_CACHE_MISS’ error.
First, completely close the Chrome browser (don’t just minimize it). On Windows, right-click the Chrome icon in the taskbar and select “Exit.” On Mac, click Chrome in the top menu and choose “Quit Google Chrome.”
For a more thorough restart, open Task Manager (Ctrl + Shift + Esc on Windows) or use Command + Option + Esc on Mac to bring up the Force Quit window. From there, close all Chrome processes. You can also use Activity Monitor for deeper cleanup if needed. This makes sure Chrome fully shuts down in the background.
Now, relaunch Chrome and try loading the page again.
Note: If you don’t want to deal with all these steps, you can easily restart your Chrome browser with a URL. Just type “chrome://restart” in the address bar and hit Enter. (Boom, Chrome restarts on its own.)
If any of these steps fixed the issue, you’re all set (and can breathe easy). If not, you may go one step further to delete and reinstall the Chrome browser (not recommended, though).
3. Clear cache and browsing data
Still seeing that ‘ERR_CACHE_MISS’ error?
It might be your browser cache messing things up. Let’s investigate whether your browser cache or data is the culprit.
Chrome stores cached versions of websites to load them faster. But if those files get old or corrupted, they can cause weird issues like ‘ERR_CACHE_MISS’ or others.
In that case, by clearing the browser cache and data, you could erase those old files and give your Chrome browser a fresh start.
And don’t worry. It won’t remove your saved passwords, bookmarks, autofill data, or other essential elements. Instead, it’s likely to fix the error you’re experiencing.
To do this, click the three dots at the top right of your Chrome browser. From the dropdown, select “Delete browsing data.”
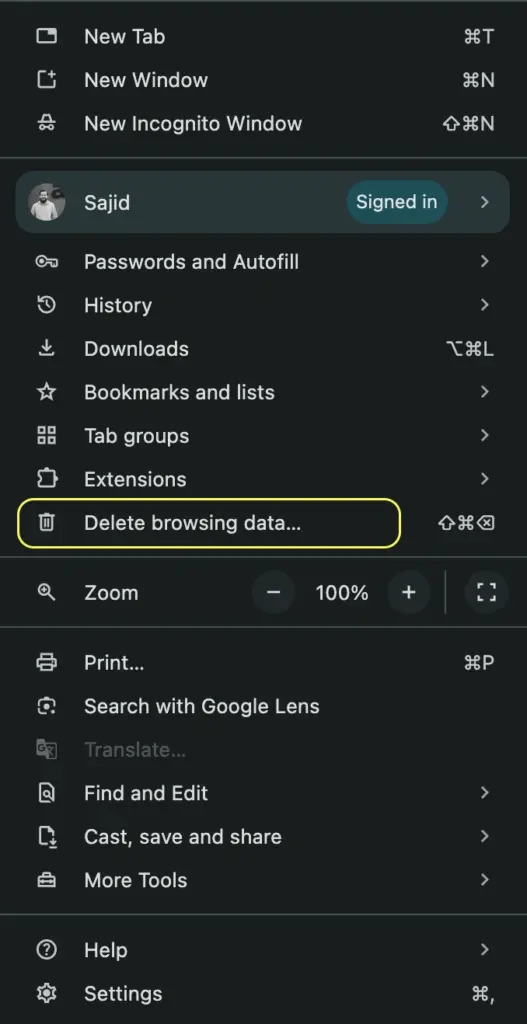
If “Delete browsing data” doesn’t appear directly, follow this: Settings > Privacy and security > Delete browsing data.

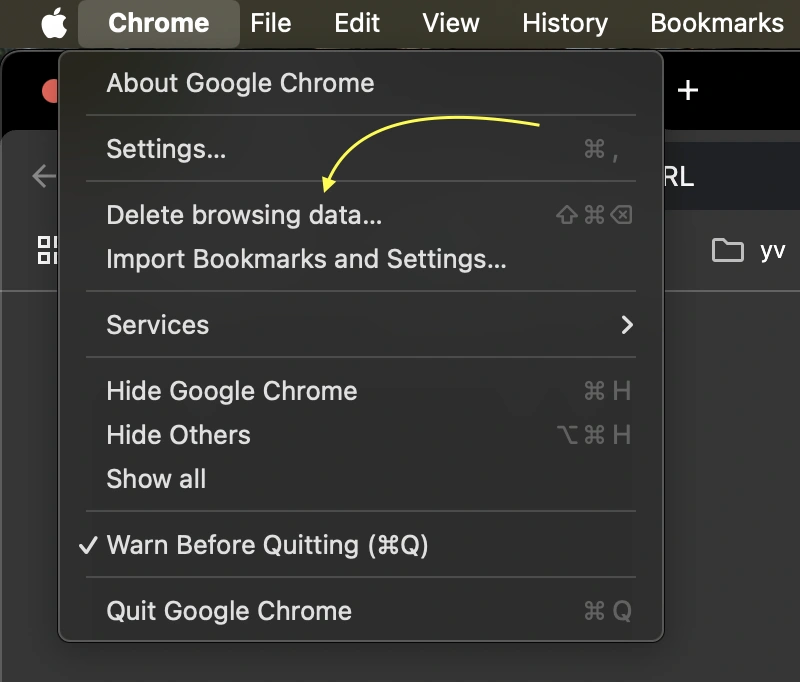
On Mac you will also have another way: Click on Chrome from the top-left of your screen, then select “Delete browsing data” directly from there.
If you prefer shortcuts, use Ctrl + Shift + Delete on Windows, or Command + Shift + Delete on Mac.
Or, directly paste this URL: chrome://settings/clearBrowserData
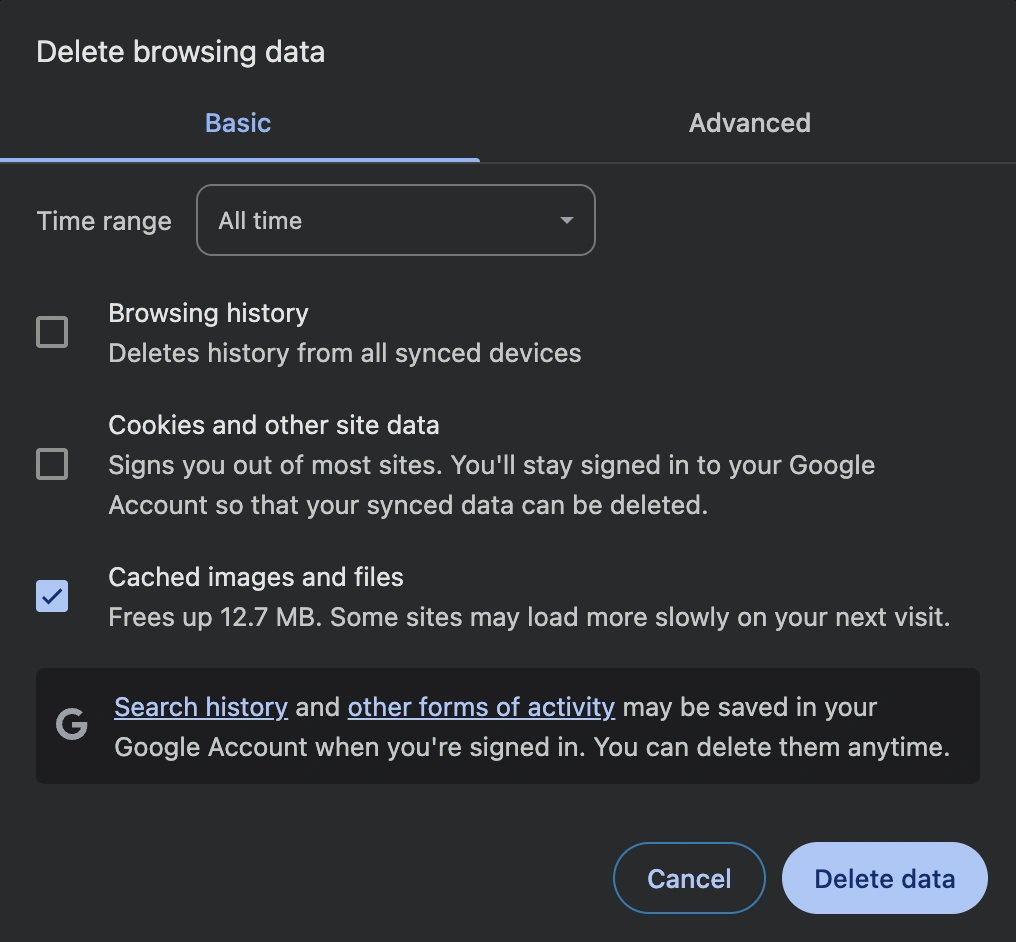
Now, when the “Delete browsing data” pop-up appears, you’ll see two tabs: Basic and Advanced. Stick with Basic for now.
From the Time range dropdown, choose “All time.” This ensures that all cached data is completely cleared (no leftovers).
Must check the box “Cached images and files.” That’s the one we want. You can leave the others unchecked if you don’t want to lose history or cookies.
Click Clear data and let Chrome do its thing. It just takes a few seconds.
Now try reloading the page again. If it still throws the same error, don’t worry. We’re just getting warmed up. Up next, let’s check that internet connection of yours.
4. Disable the browser cache system
Disabling the browser cache system is another simple trick for dealing with the browser cache and resolving the ‘ERR_Cache_Miss’ error.
Clearing the cache manually isn’t enough in some cases. Chrome might still try to load parts of the site from memory. To avoid this, you can turn off caching temporarily using DevTools.
Here’s how to do it:
- On Windows, press F12 to open DevTools.
- On Mac, press Command + Option + I.
Once the DevTools panel appears, follow these steps:
- Click on the Network tab in DevTools.
- Check the box that says “Disable cache.”
- Don’t close DevTools (this part is super important).
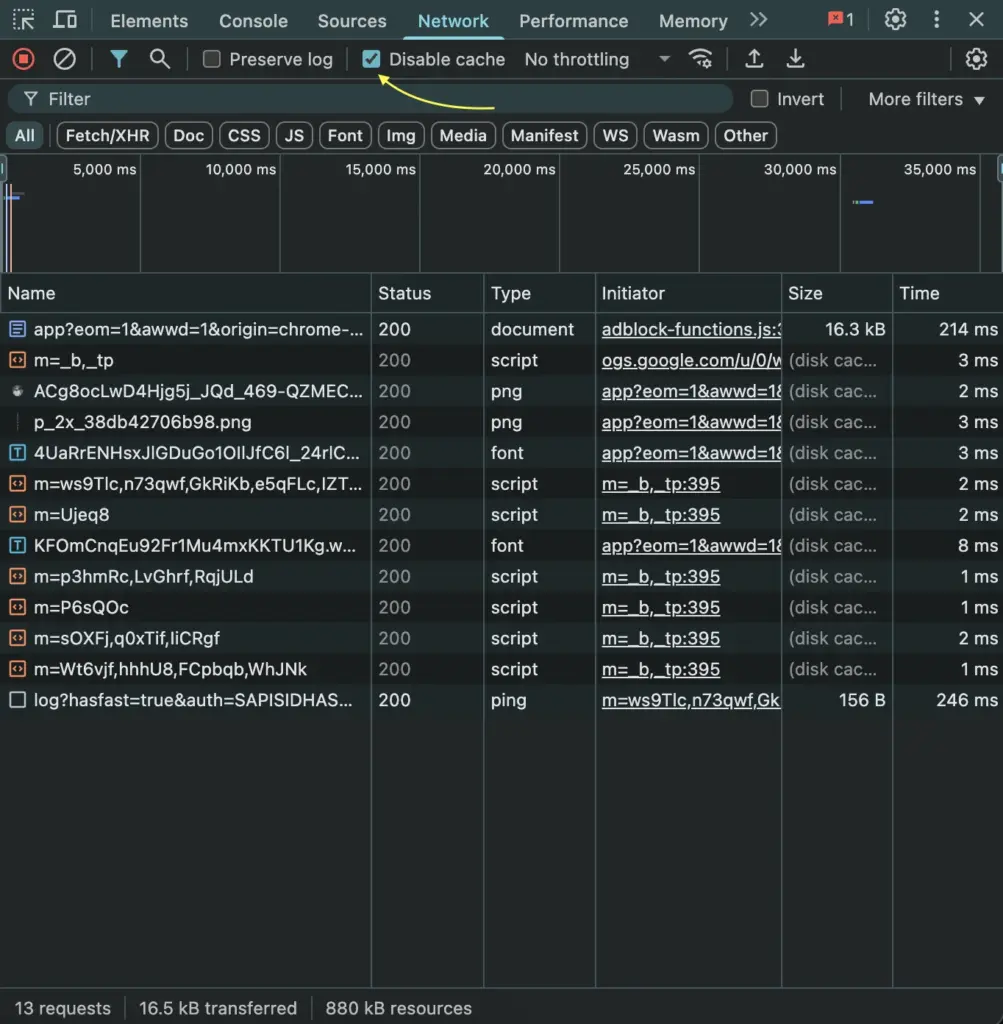
Okay, refresh the page (hard refresh is recommended). Chrome will now skip using cached files and fetch everything from the website’s server.
It’s the best way to ensure you view the most up-to-date version of any page.
Reminder: As soon as you close the DevTools panel, caching will start again. So, make sure to keep it open during testing or troubleshooting.
5. Disable browser extensions
If the cache fix didn’t work either, something else might be the reason. Maybe it’s the Chrome extensions that you’ve installed.
Well, even handy tools (extensions) can sometimes cause problems.
Some of them might interfere with website loading, especially ad blockers, privacy tools, or security add-ons.
And, this could trigger the infamous ‘ERR_CACHE_MISS’ error.
Now let’s figure out how to deal with these extensions to fix the error.
Simply, click the three-dot menu in the top-right corner of Chrome → hover over Extensions → click Manage Extensions. Or type this in your address bar and hit Enter: chrome://extensions/
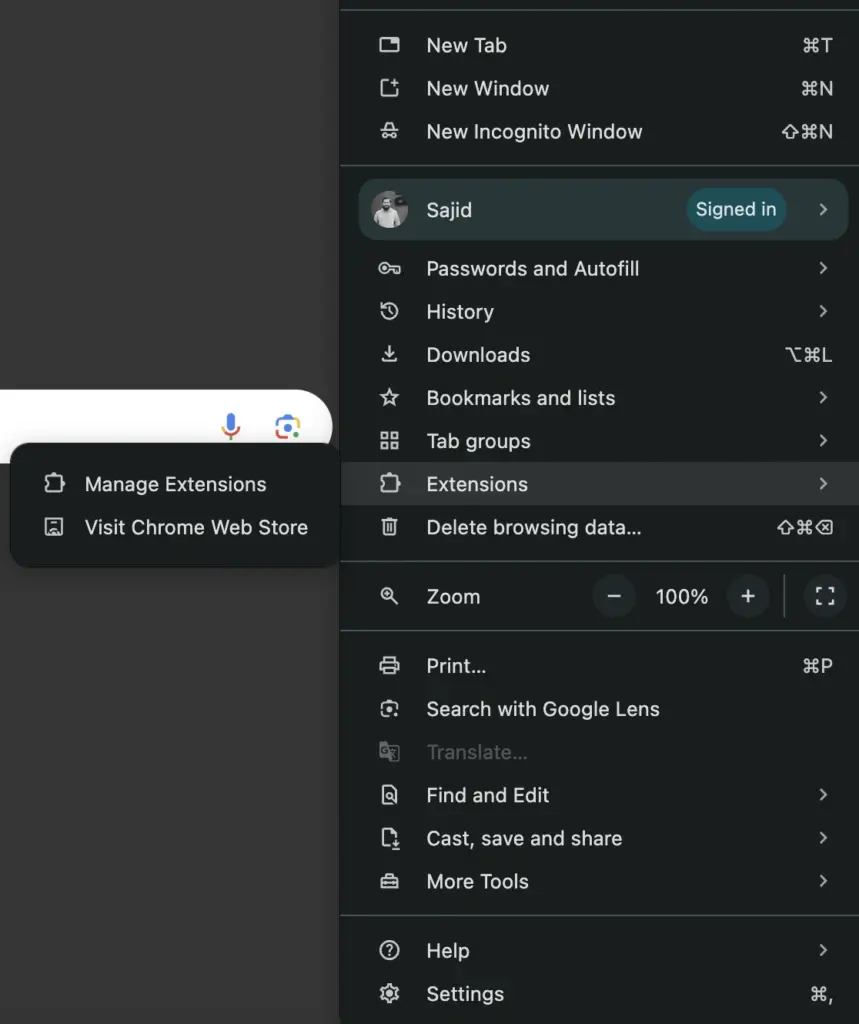
After this, you will land on the extension page. From here, toggle the switch off for each installed extension. This disables them temporarily.

Now, refresh the page that was showing the error. If the page loads fine now, bingo! One of those extensions is the culprit.
To determine which one it is, re-enable your extensions one by one and refresh the page after turning each one back on.
To figure out which one it is, re-enable them individually and refresh the page after activating each.
If the error reappears after enabling a specific extension, you’ve found the troublemaker. Consider updating, reinstalling, or removing it entirely.
And if nothing changes, no worries. Let’s move on to the next step in your ‘ERR_CACHE_MISS’ fix journey.
6. Check for Chrome updates
Well, it might be time to upgrade Chrome (if you’re using an older version).
Outdated versions of Chrome can have bugs or compatibility issues that mess with the cache’s functionality. So, checking for updates is a quick win.
Let’s look into how you can update your Chrome browser (or check for updates).
- Click the three-dot menu in the top-right corner.
- Hover over Help and click About Google Chrome.
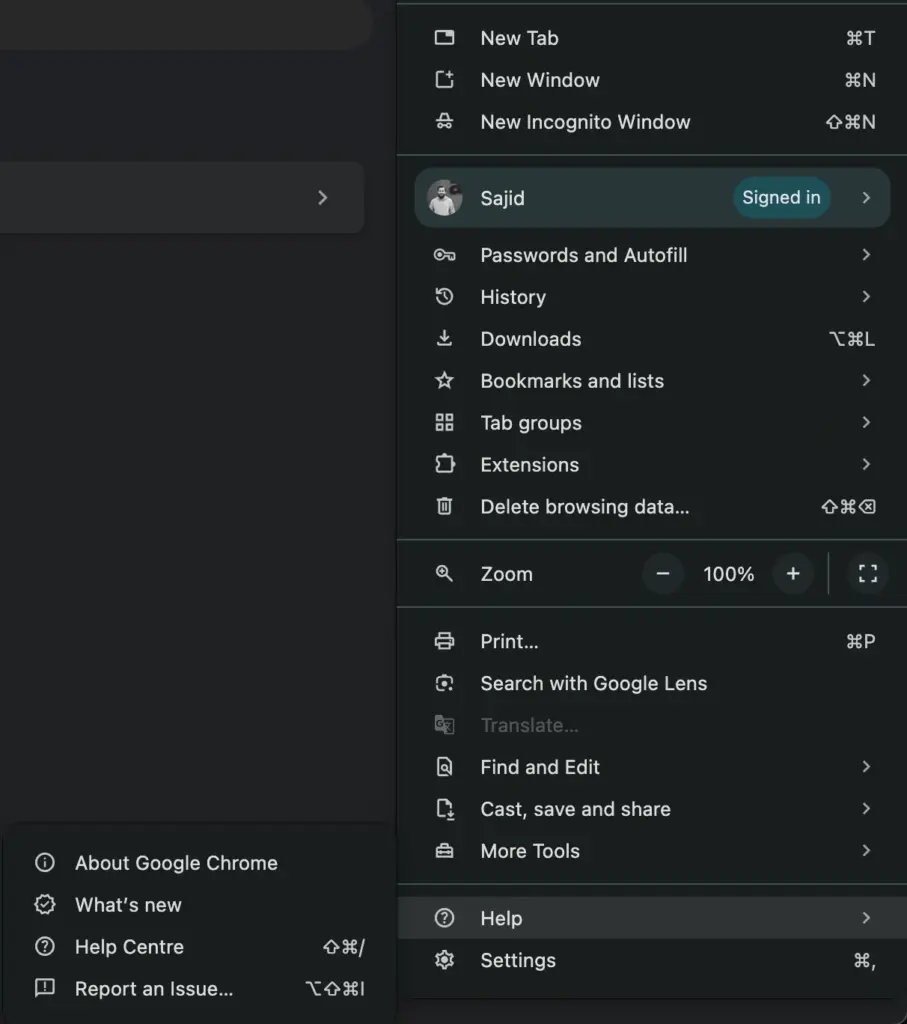
- Or click Settings and scroll all the way down. At the very bottom, you’ll find “About Chrome”. Click it to land on the update page.
- You can also go straight to the update page by entering this in the address bar: chrome://settings/help.
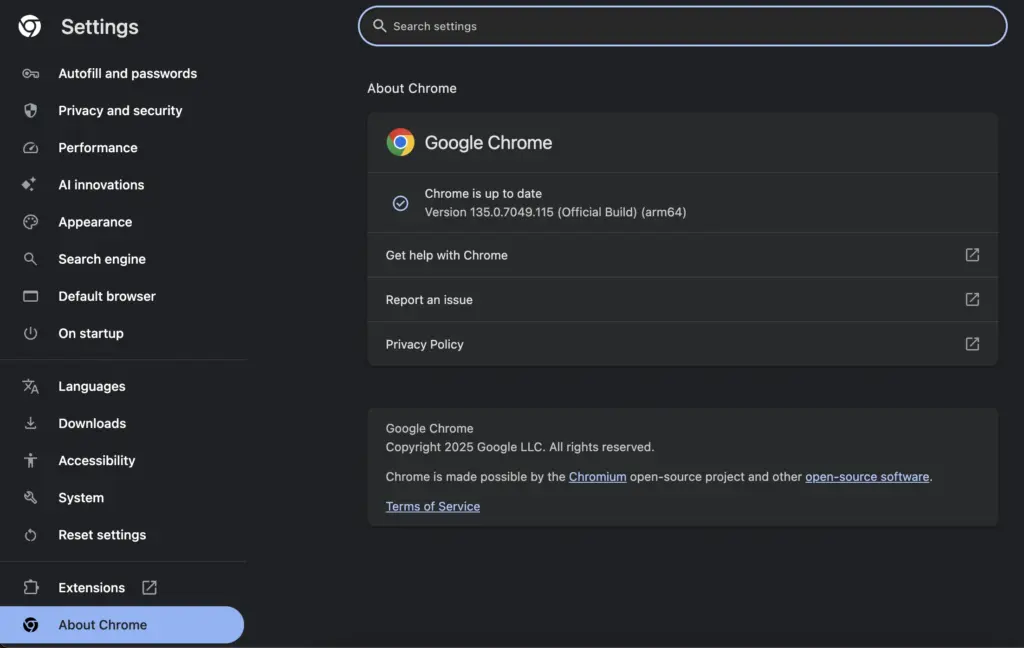
- Chrome will now check for updates automatically. If an update is available, it’ll start downloading right away.
- Once done, click Relaunch to finish the update.
That’s it.
Updating the browser will ensure you’re running the latest version with the newest fixes and performance improvements.
Now, open the same web page you were trying to access. If an outdated Chrome version caused the ‘ERR_CACHE_MISS’ error, it should be gone.
What if it persists? No stress. We’ve got four more fixes lined up.
Let’s move on.
7. Reset your Chrome settings
When nothing else works, resetting Chrome might be one of the solutions.
Over time, extensions, plugins, or even accidents might change your Chrome settings. A reset clears out all the weird (and possibly unwanted) changes and restores Chrome to its clean default state.
You need to try it out now. So, get straight to the process:
- Click the three-dot menu at the top right.
- Go to Settings.
- From the left sidebar, select Reset settings.
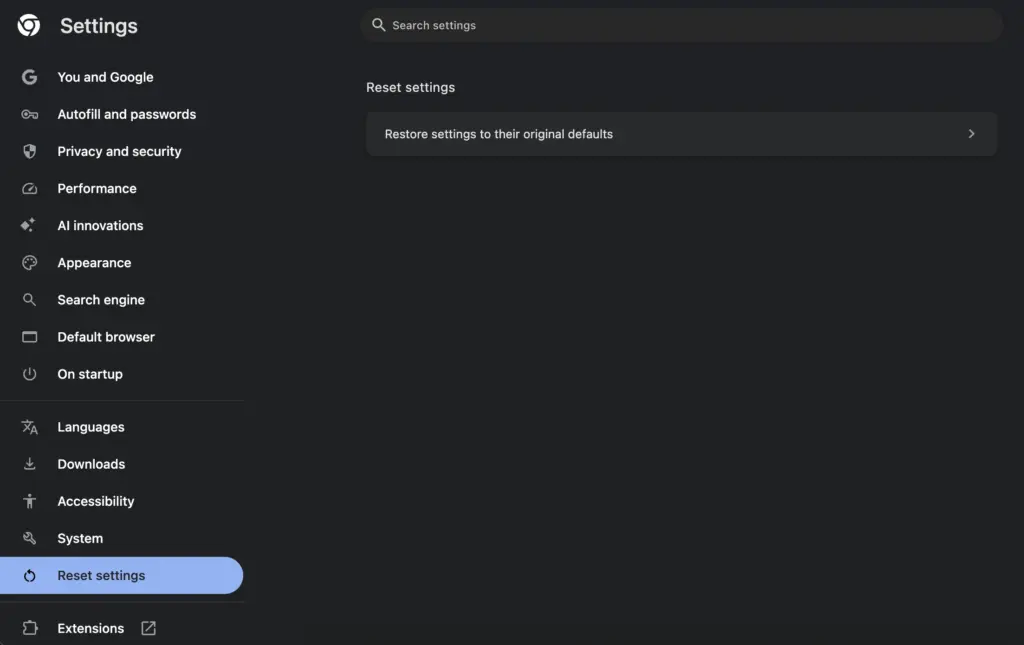
- Then click ‘Restore settings to their original defaults’.
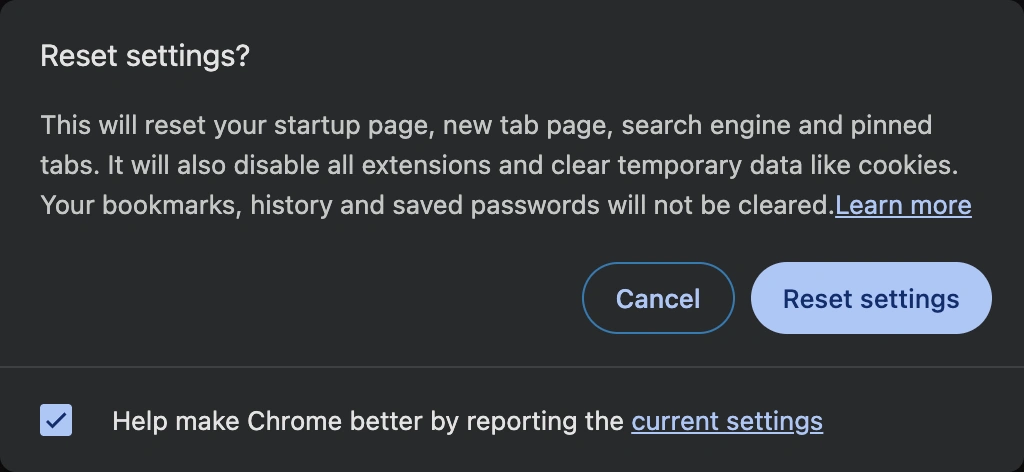
- You’ll see a confirmation box. Hit Reset settings again.
Simple.
Want to get there faster? Just copy and paste this into your address bar:
chrome://settings/reset
No worries.
Resetting Chrome settings will not delete your saved passwords, history, or bookmarks. It will just reset things like the homepage, new tab settings, and search engines.
After the reset, restart your browser and give that page another go.
Still seeing the ‘ERR_CACHE_MISS’ error? Hang tight. We’ve still got more solutions to try next.
8. Reset your network settings
Sometimes, Chrome is not the real troublemaker. Your system’s network settings might be causing the mess.
Over time, your device may pick up incorrect network settings or store outdated connection information that prevents websites from loading correctly. Resetting your network can help clear out the junk and start fresh.
Let’s reset your network to eliminate any weird configurations or broken connections.
For Windows Users:
1. Click the Start menu (bottom-left corner) and type cmd.
2. Right-click Command Prompt and choose Run as administrator.

3. Now, a black window will appear.
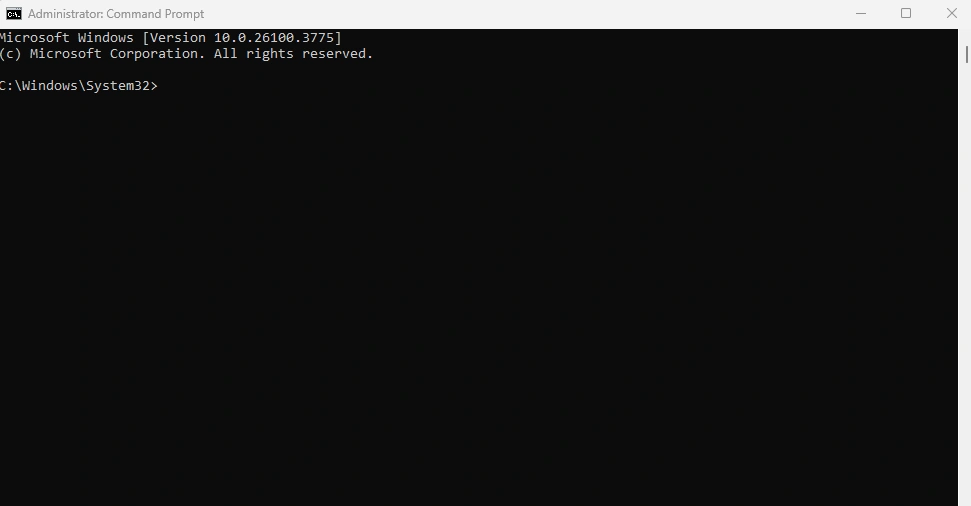
4. Copy and paste (or type) these lines one by one and press Enter after each:
netsh winsock reset
netsh int ip reset
ipconfig /release
ipconfig /renew
ipconfig /flushdns
Don’t worry. You’re just telling Windows to forget its old internet settings.
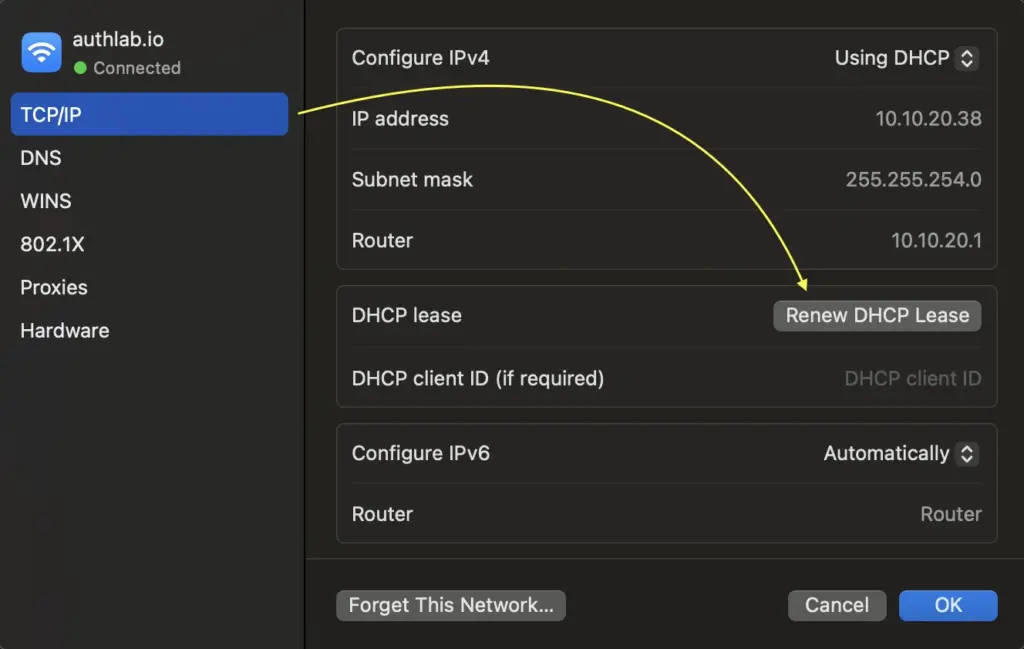
For Mac Users:
1. Open System Settings (or System Preferences, depending on your version).
2. Choose Network, then click on your active connection (like Wi-Fi).
3. Hit Details (or Advanced) and go to the TCP/IP tab.
4. Click Renew DHCP Lease. This refreshes your internet connection.
Now that your general network settings are refreshed, there’s one more thing you might want to check — your DNS settings.
A misconfigured or slow DNS can also mess things up. Changing it to something more reliable (like Google’s public DNS) often helps.
So, let’s get straight to the process.
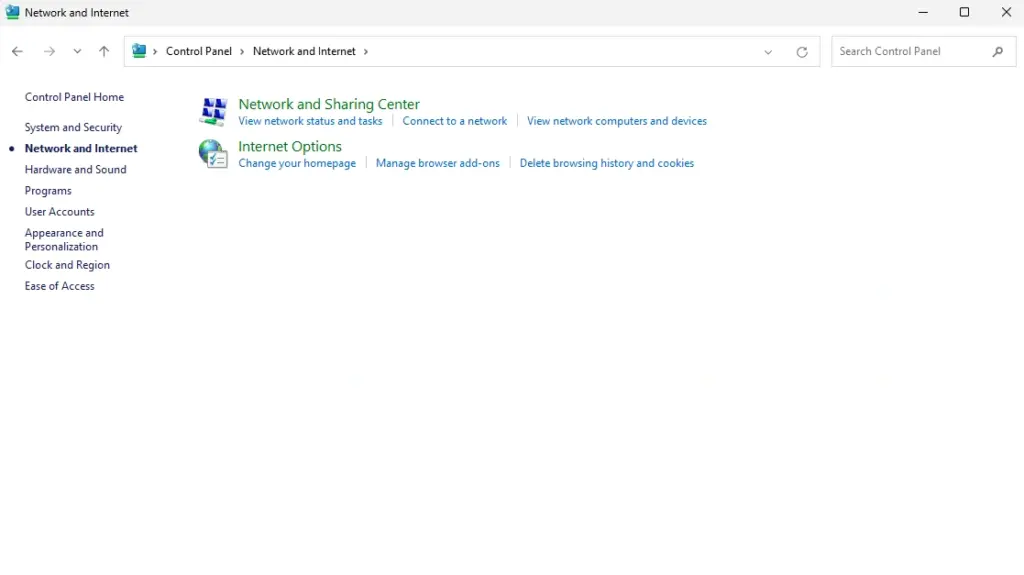
For Windows users:
1. Open your Control Panel.
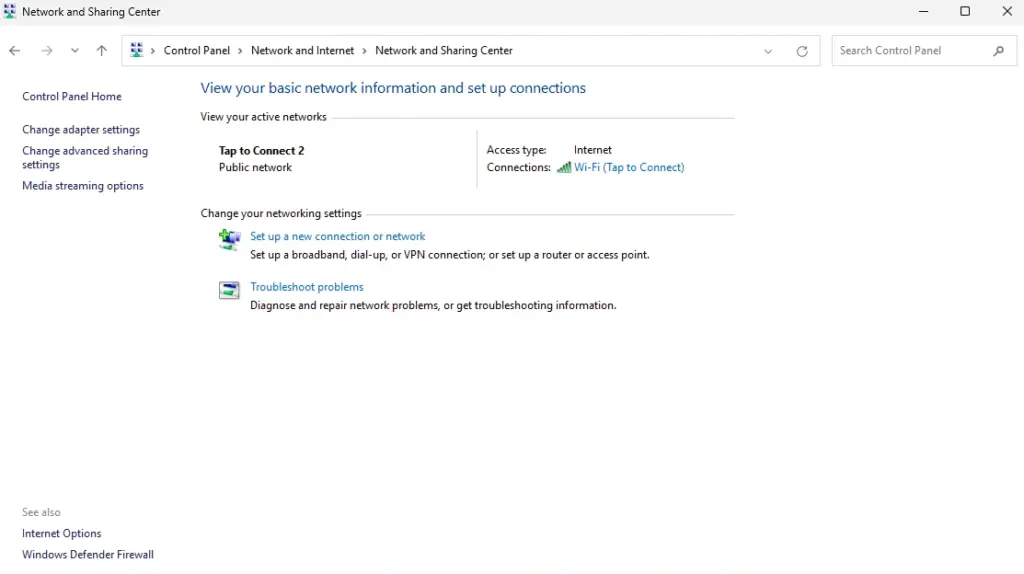
2. Go to Network and Internet > Network and Sharing Center.
3. Click Change adapter settings (on the left).
4. Right-click your Wi-Fi (or Ethernet) connection and choose Properties. You will get a pop-up option there.
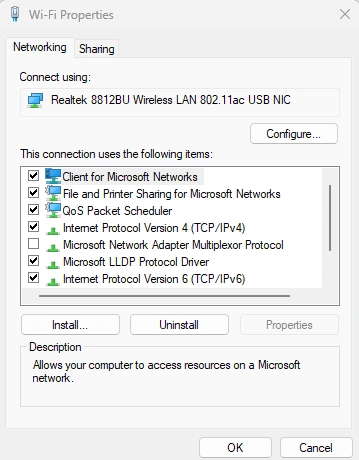
5. Double-click on Internet Protocol Version 4 (TCP/IPv4). Another pop-up will appear for it.
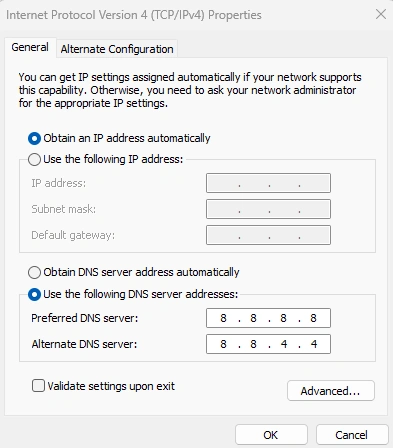
6. Select Use the following DNS server addresses and type in:
- Preferred: 8.8.8.8
- Alternate: 8.8.4.4
7. Hit OK to save.
If you wanna go for even faster browsing, use Cloudflare’s DNS instead:
- 1.1.1.1 and 1.0.0.1
8. Finally, restart your computer. That’s it!
For Mac users:
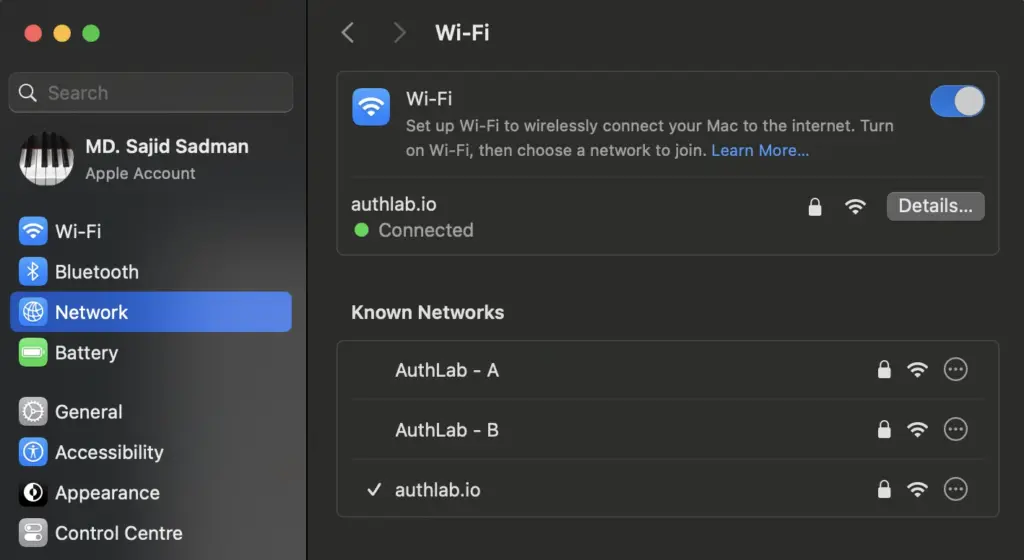
1. Open System Settings > Network.
2. Pick your network and click Details.
3. Head to the DNS tab.
4. Click the + and enter:
- 8.8.8.8
- 8.8.4.4
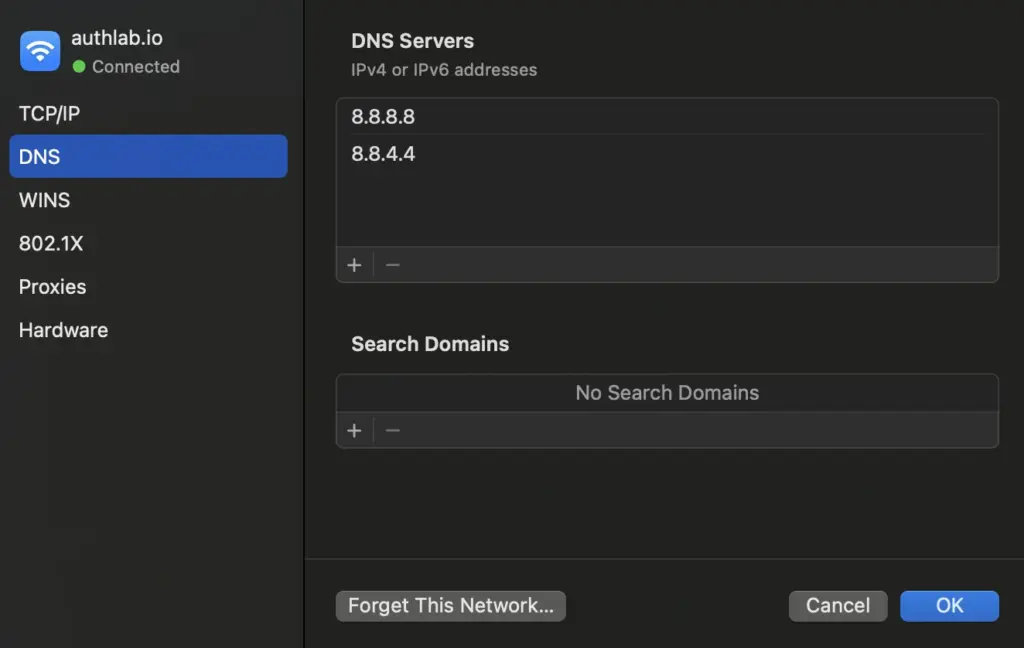
5. Press OK and then Apply.
Once you’ve completed the network reset and DNS update, relaunch Chrome and visit the page that showed the error.
If it were a network-related glitch, the error should be solved.
9. Use incognito or private mode
Next up: go for incognito or private mode.
Your regular browsing session saves extra stuff, like cookies, cache, or form data, which can cause problems loading a page.
Using Incognito mode (or Private mode on other browsers) helps you test if that’s what’s causing the ‘ERR_CACHE_MISS’ error.
Here’s how to open it:
On Windows: Press “Ctrl + Shift + N”.
On Mac: Press “Command + Shift + N”
Or, click the three-dot menu (top-right in Chrome) and select New Incognito Window.
Now, revisit the same page. If it works here, it confirms that your cached data or browser extensions are to blame.
If this actually happens, at least you’ll know Chrome isn’t the problem. It’s just your browsing session causing issues.
In that case, what should you do?
- Clear your browser cache and cookies.
- Deal with extensions.
- Restart Chrome.
All of these methods discussed above, you know.
10. Consult the hosting provider
If you’ve tried all the browser-related fixes and that ‘ERR_CACHE_MISS’ error still sticks around, your website’s server might be the real culprit.
Sometimes, server-side caching, misconfigured headers, incorrect Content Security Policy (CSP) rules, or broken SSL/TLS certificates can block Chrome from loading a page properly.
This is especially common if the issue only happens on one specific site (like your own) and not others.
So, what should you do?
Reach out to your hosting provider’s support team. Tell them exactly what’s happening and mention the error message. Share details like:
- The exact error you’re getting
- Which page shows the problem
- When it started happening
- What you’ve already tried to fix it (our suggested fix)
- If it happens for all visitors or just you
So, they’ll be able to check your site’s server logs, caching layers (like Varnish or Cloudflare), and other configurations (technical terms they know) that might be messing things up behind the scenes.
If you’re using a managed WordPress host, they might even have built-in caching systems or firewall rules that you can’t control yourself. The support team can adjust those for you.
And once they’ve done their part, revisit your site and check if the issue is resolved.
Wrapping up
And that’s it.
You’ve just walked through all the proven ways to fix Chrome’s ‘ERR_CACHE_MISS’ error. If you ever face it again, you know exactly what to do.
There’s no need to stress out next time. Just follow these steps, and you’ll fix it like a pro.
Lastly, thanks for taking the time to read this blog.
Start off with a powerful ticketing system that delivers smooth collaboration right out of the box.
Related Articles
Consumer Behavior: Types, Factors, and the Buying Decision Process
Consumer behavior is how and why people choose,…Klarna News: AI Just Got Demoted, Here’s What We Learned
In 2024, Klarna’s CEO told the world his…

Leave a Reply