How to Setup a Support Ticket System in WordPress?

By Md. Sajid Sadman
January 20, 2026
Last Modified: January 20, 2026


There are multiple ways to set up a support ticket system in WordPress. Tools like Fluent Support, Awesome Support, and JS Help Desk are commonly used to manage customer requests in a more structured way.
In this guide, we’ll walk through the complete setup process using Fluent Support as the example. You’ll see how to configure a support ticket system step by step, from ticket intake and lifecycle setup to agent management and basic automation.
The goal is not just to install a plugin, but to set up a support system that stays organized, scales with your workload, and remains easy to manage over time. The setup logic explained here applies across most WordPress ticketing tools, so you can adapt it to your own workflow even if you use a different solution.
What you should decide before setting up a ticket system?
Before installing any plugin or configuring settings, a few decisions need to be clear. These choices shape how your support system works later. Skipping them usually leads to confusion, rework, and inconsistent support handling.
Once these decisions are clear, setting up the ticket system itself becomes much simpler and more consistent.
Once these decisions are clear, the setup becomes straightforward. Next, we’ll walk through the full process using Fluent Support, showing how each choice turns into a working support system in practice.
The steps apply broadly to WordPress ticketing tools, but we’ll use Fluent Support to demonstrate them clearly.
You may explore Fluent Support’s feature before reading the setup guide.
Step-by-step: How to set up a support ticket system in WordPress (using Fluent Support)
The steps below follow the actual order a support ticket system depends on to function properly. Each step affects how tickets are created, how they move through the system, and how responsibility is assigned to agents.
Complete the setup in sequence. Skipping steps or configuring things out of order often leads to unassigned tickets, unclear statuses, and broken workflows once real requests start coming in.
Step 1: Install and activate Fluent Support
The first step is getting Fluent Support installed and active on your site. As mentioned earlier, this walkthrough uses Fluent Support to demonstrate the setup.
You can start with the free version or upgrade to Pro later. Both follow a clean and predictable installation flow.
Install the free version
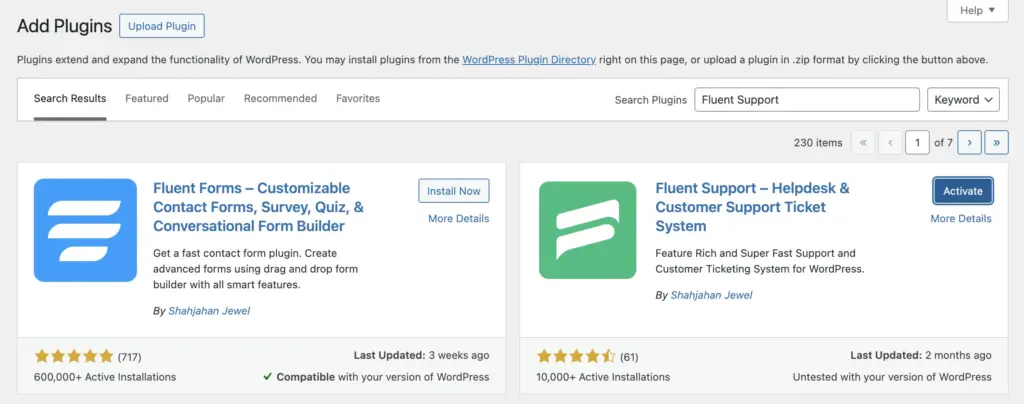
From your WordPress dashboard, go to Plugins → Add New.
Search for Fluent Support, then click Install Now and Activate.
Once activated, Fluent Support adds a dedicated support area inside WordPress. This creates the core structure needed to start receiving and managing tickets.
At this stage, don’t change any settings yet.
The goal here is simple. Confirm the plugin is installed, active, and visible in your dashboard.
You’ll now see a Fluent Support menu in WordPress. This is where tickets, inboxes, agents, and workflows will live.
Note (for Pro users):
Fluent Support Pro works as an add-on. The free version must remain installed and active for Pro to function properly.
Install and activate Fluent Support Pro
If you’re using Fluent Support Pro, the upgrade happens by uploading the Pro add-on and activating it with a license key.
From your WordPress dashboard, go to Plugins → Add New → Upload Plugin.
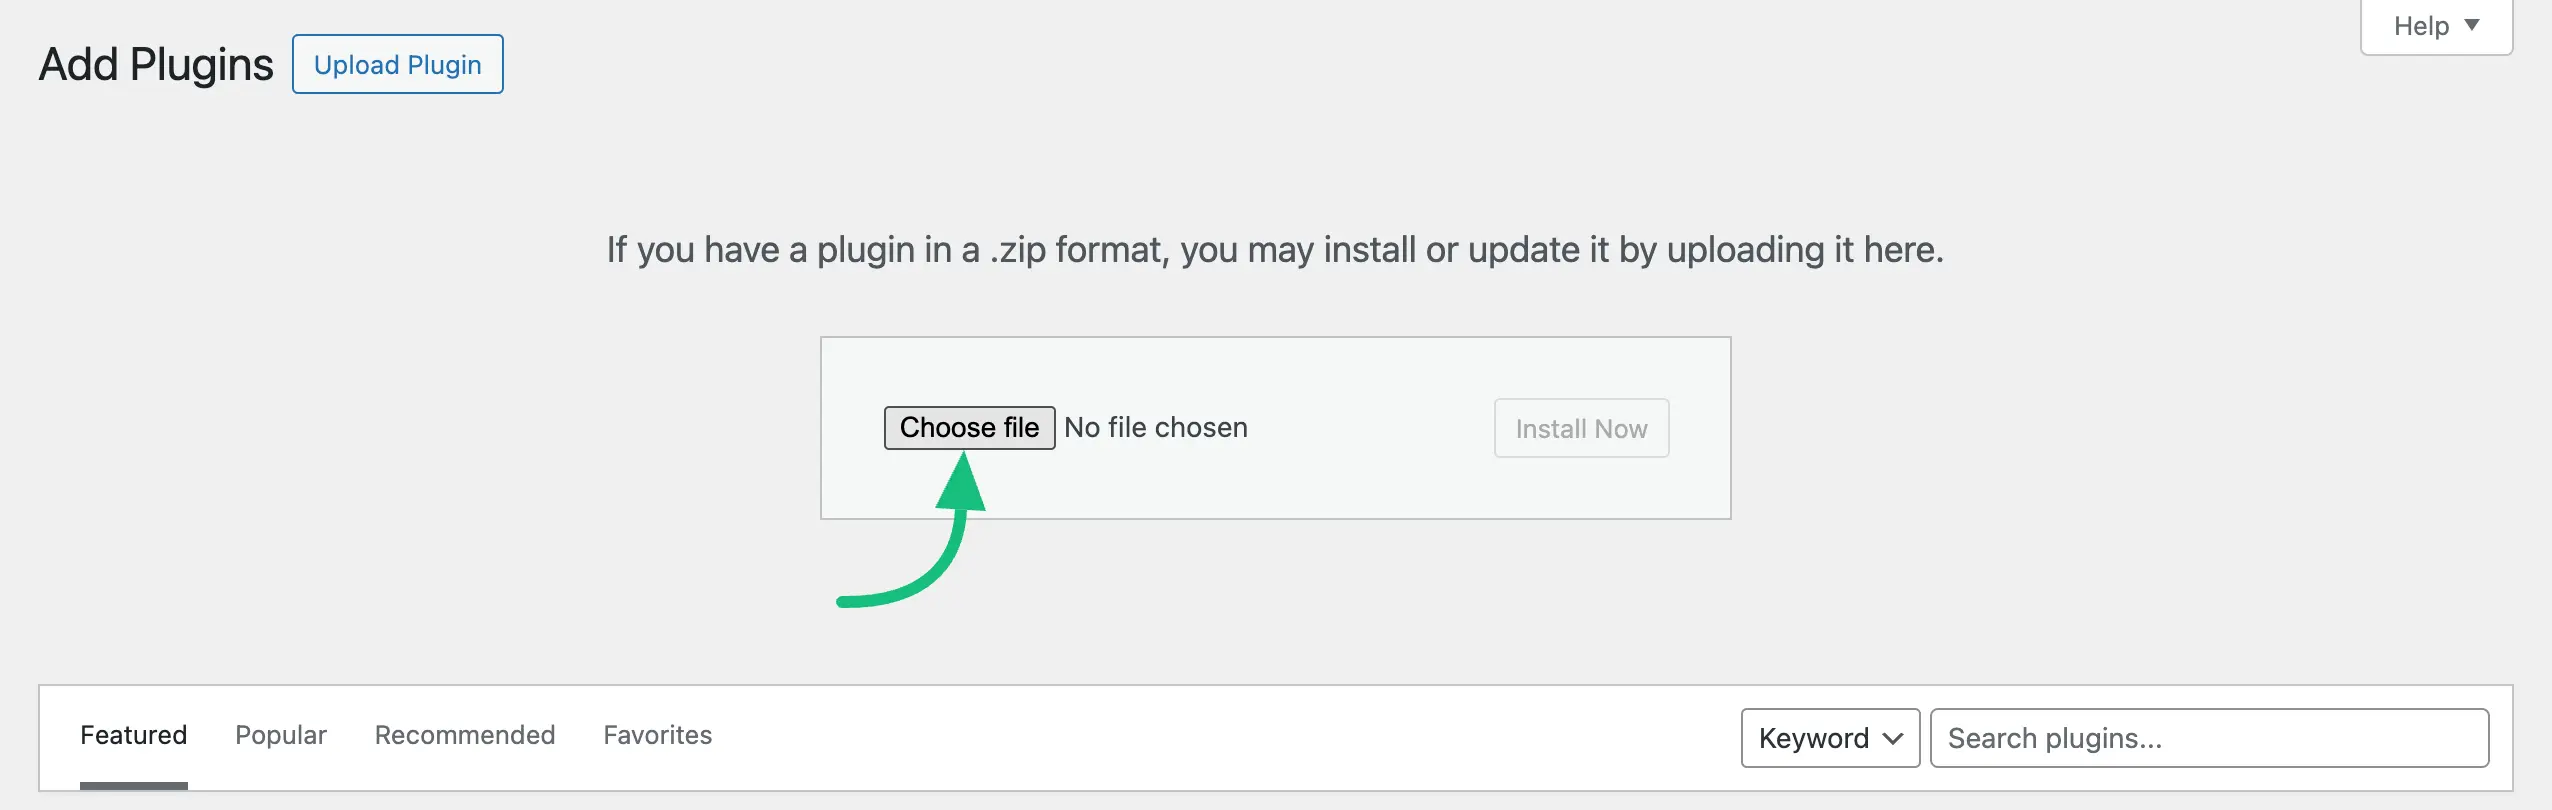
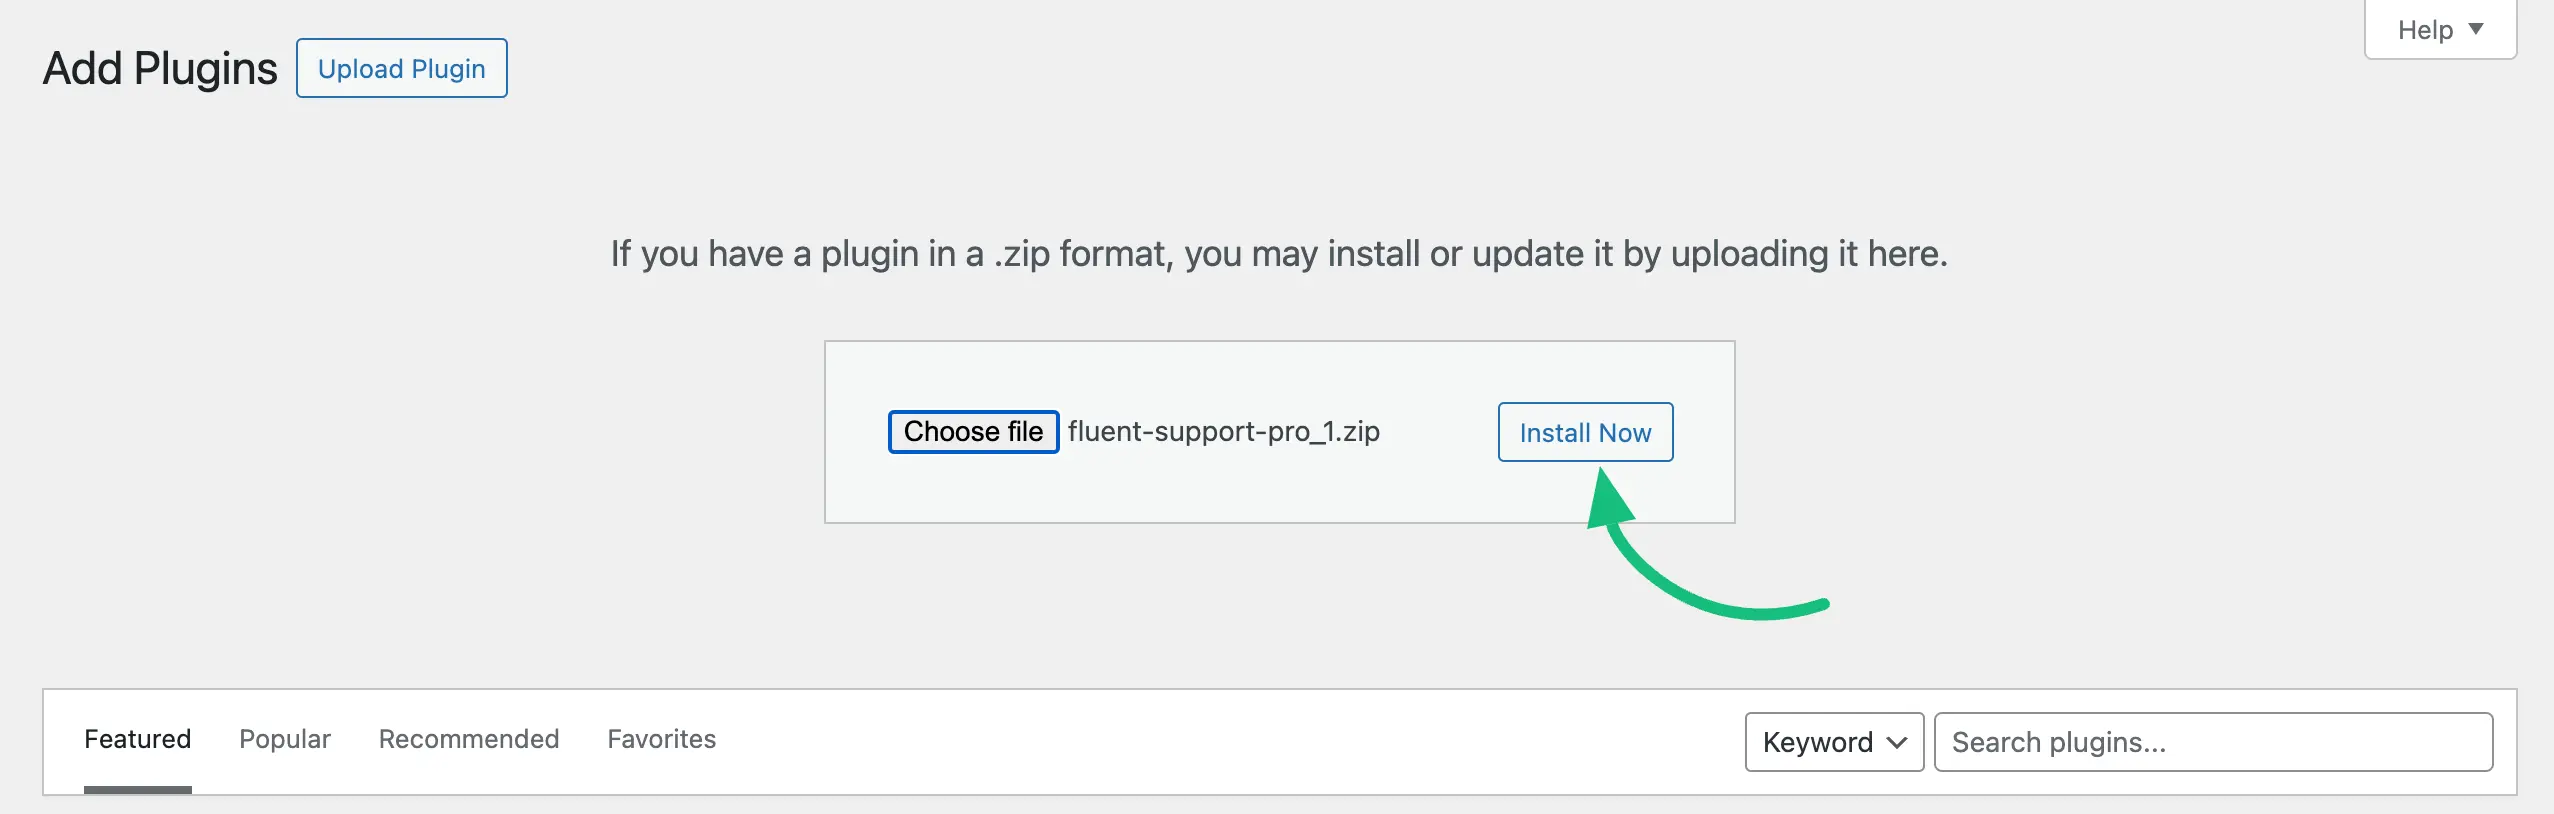
Upload the Fluent Support Pro ZIP file, install it, and activate the plugin.
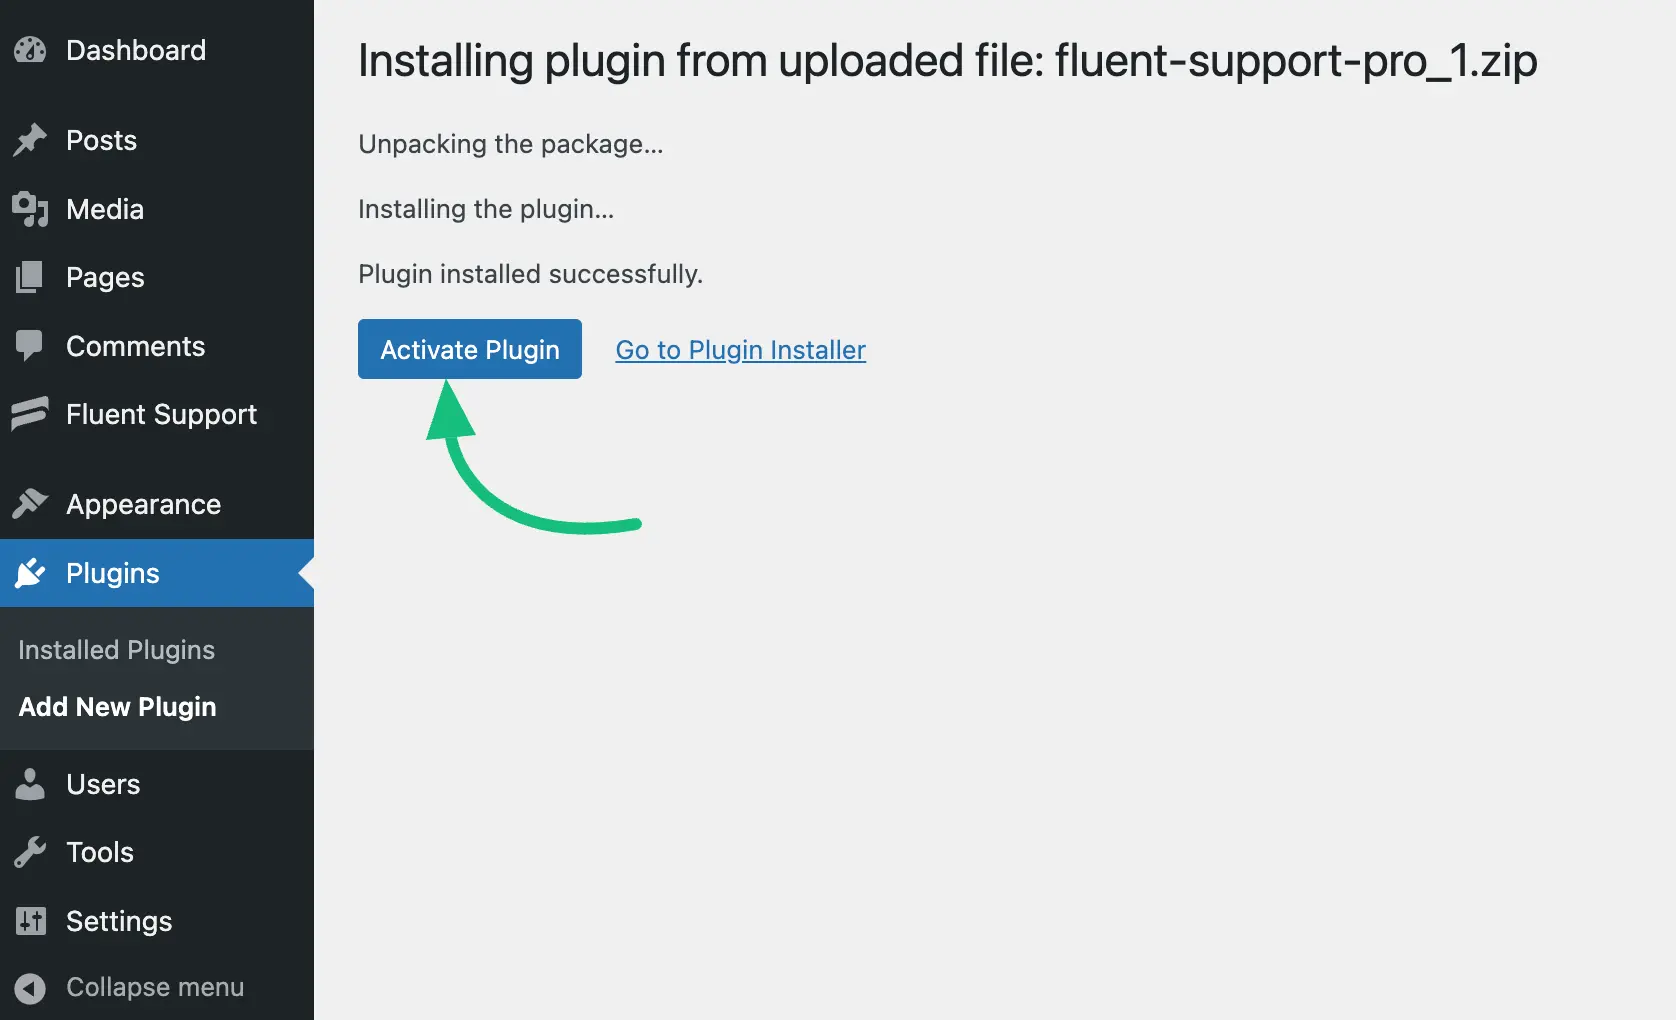
After activation, open Fluent Support → Global Settings → License Management, paste your license key, and verify it.
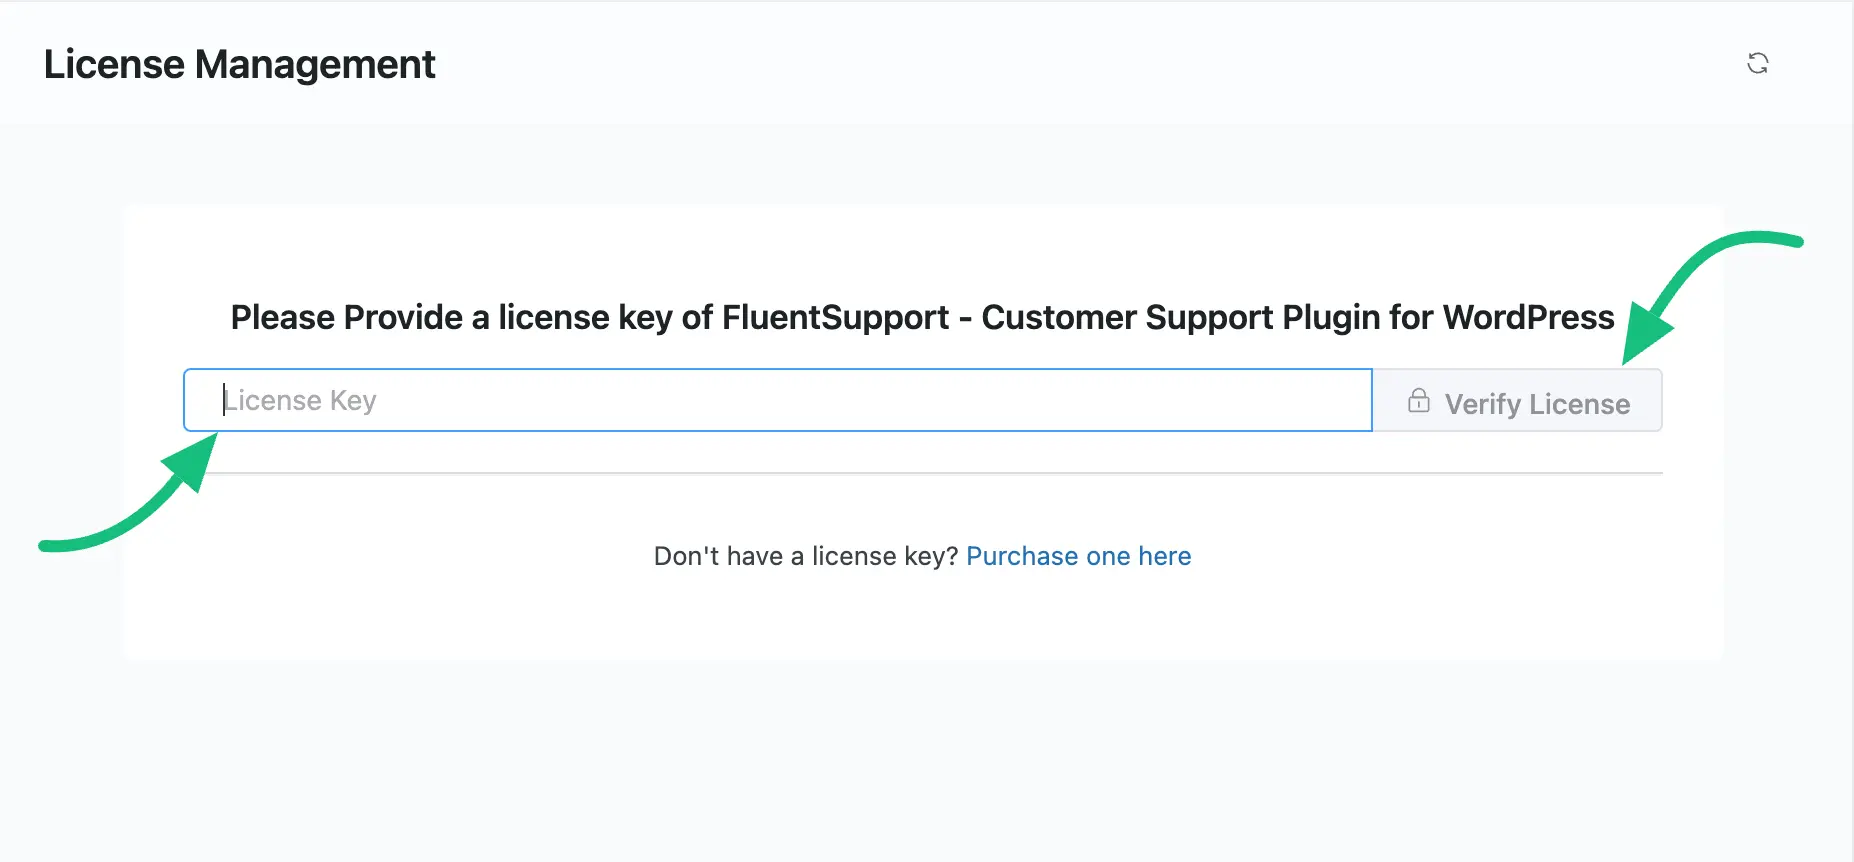
Once verified, all Pro features become available automatically.
There’s no need to adjust settings yet.
At this point, Fluent Support is fully installed and active. The system is ready. Next, you’ll shape how tickets enter and move through your support workflow.
Step 2: Set up how tickets enter your system
With Fluent Support active, the next decision is defining how customer requests become tickets.
Most modern WordPress ticketing systems handle ticket intake through inbox-based structures, often called business inboxes or mailboxes.
In Fluent Support, this is also called a Business Inbox. A Business Inbox determines how tickets are received and where they appear, whether they arrive by email or from your website. It lets you serve multiple support channels from a single, organized interface.
Before configuring email or web ticket ingestion, you need to create a Business Inbox. Fluent Support offers two types of Business Inbox:
- Web-Based for support portal forms only
- Web and Email-Based (Mailbox) if you want tickets from both email and web forms to go here
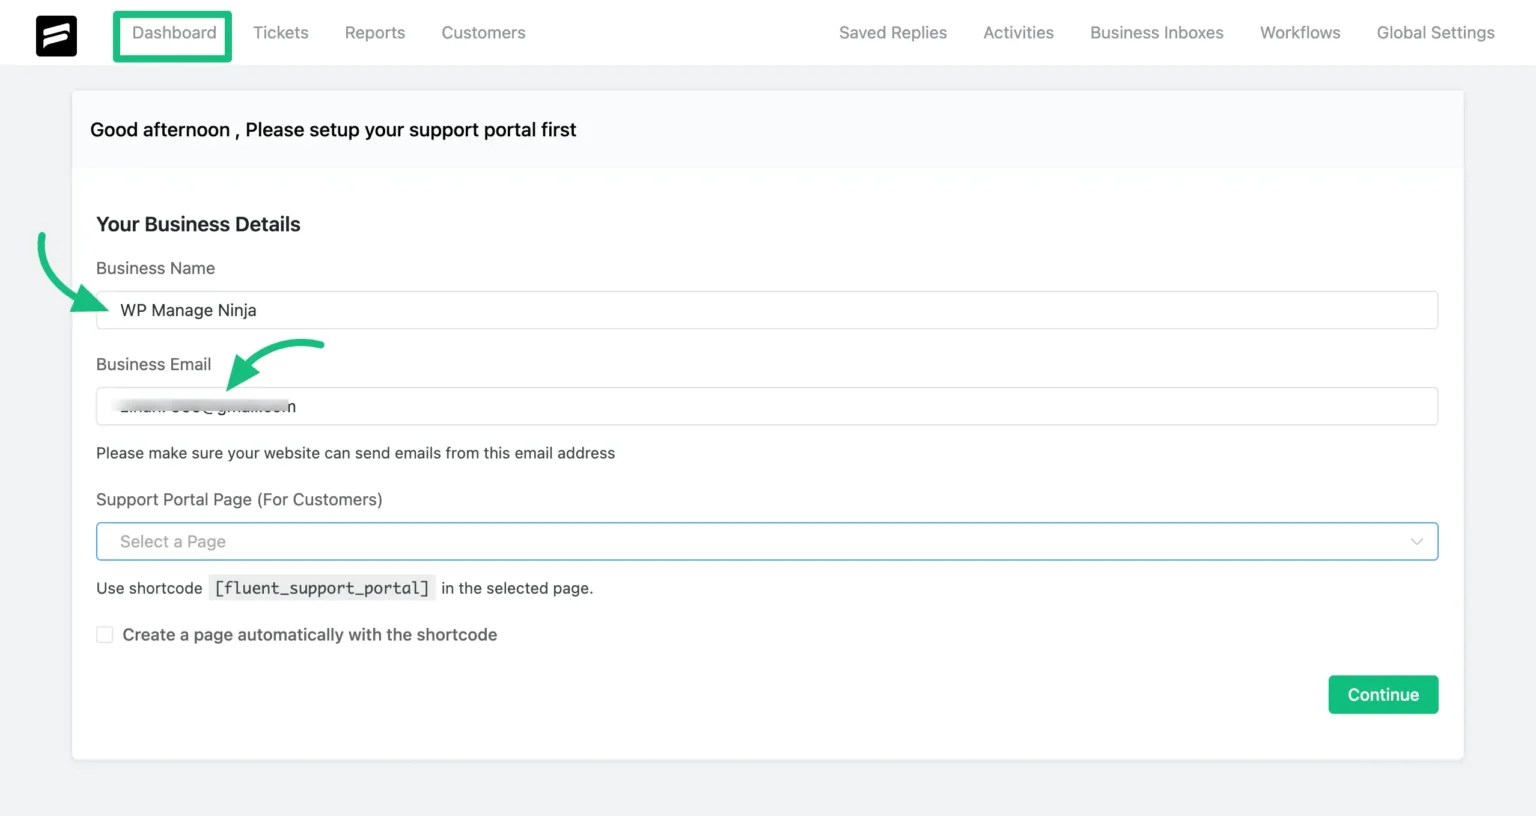
You will get the suggestion to create an initial business inbox when you first land on Fluent Support’s Dashboard.
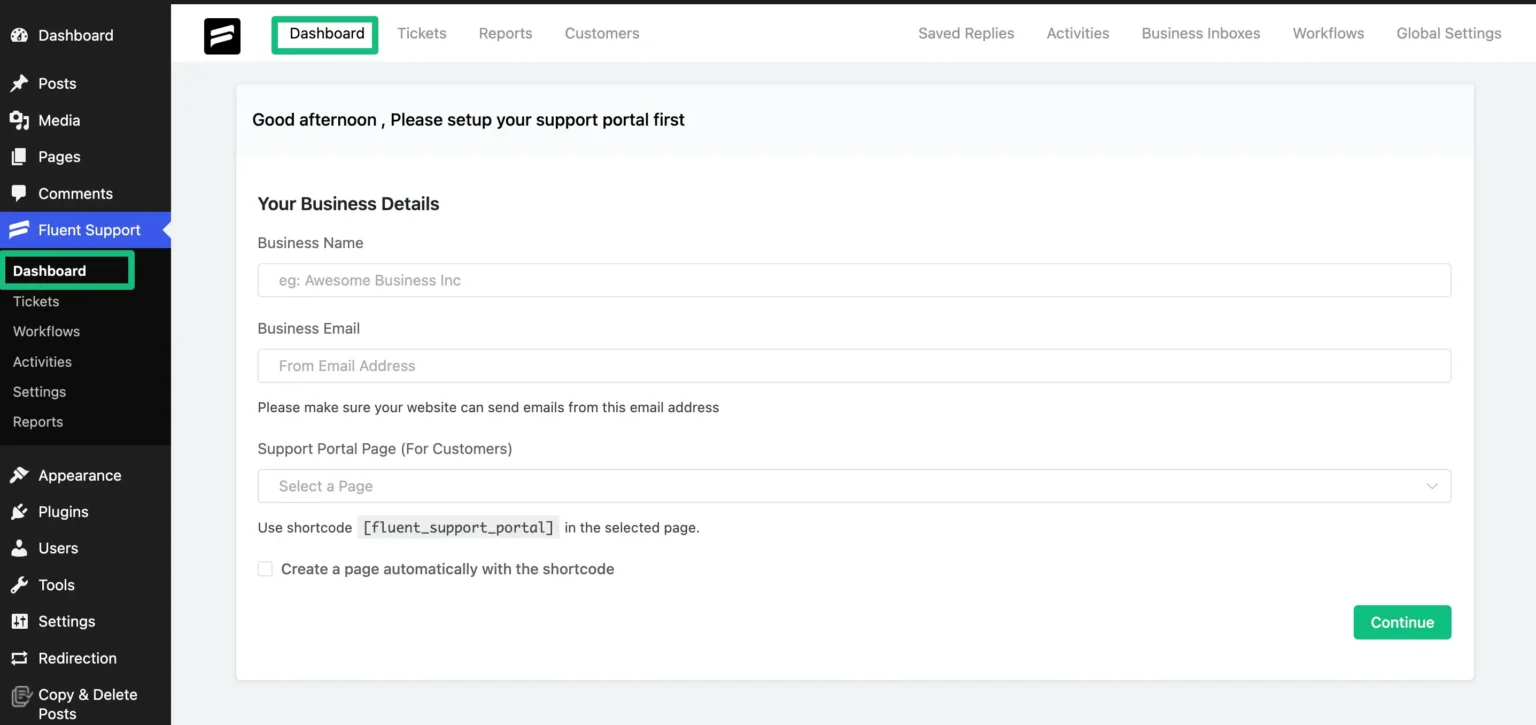
Here, you’ll be asked to provide the required details to set up your support portal. This includes basic business information and selecting where the portal should appear on your site.
You have two options:
- Use an existing page
Select a page from the dropdown, then copy the provided shortcode and paste it into that page. - Create a new page automatically
Enable the option to let Fluent Support create a dedicated support portal page with the shortcode added automatically.
Once the page is selected and the information is filled in, click Continue.
At this point, Fluent Support does two things:
- Activates the support portal on your website
- Automatically creates a web-based Business Inbox and connects it to the portal
Also, you can Paste the Shortcode anywhere on any Page of your site according to your choice.
Step 2.1: Web-based ticket setup (support portal)
Web-based ticket setup allows customers to submit support requests directly from your website through a support portal. In Fluent Support, this works by connecting a web-based Business Inbox to a portal page using a shortcode.
Create a web-based Business Inbox
1. Start by creating a Business Inbox specifically for web-based tickets.
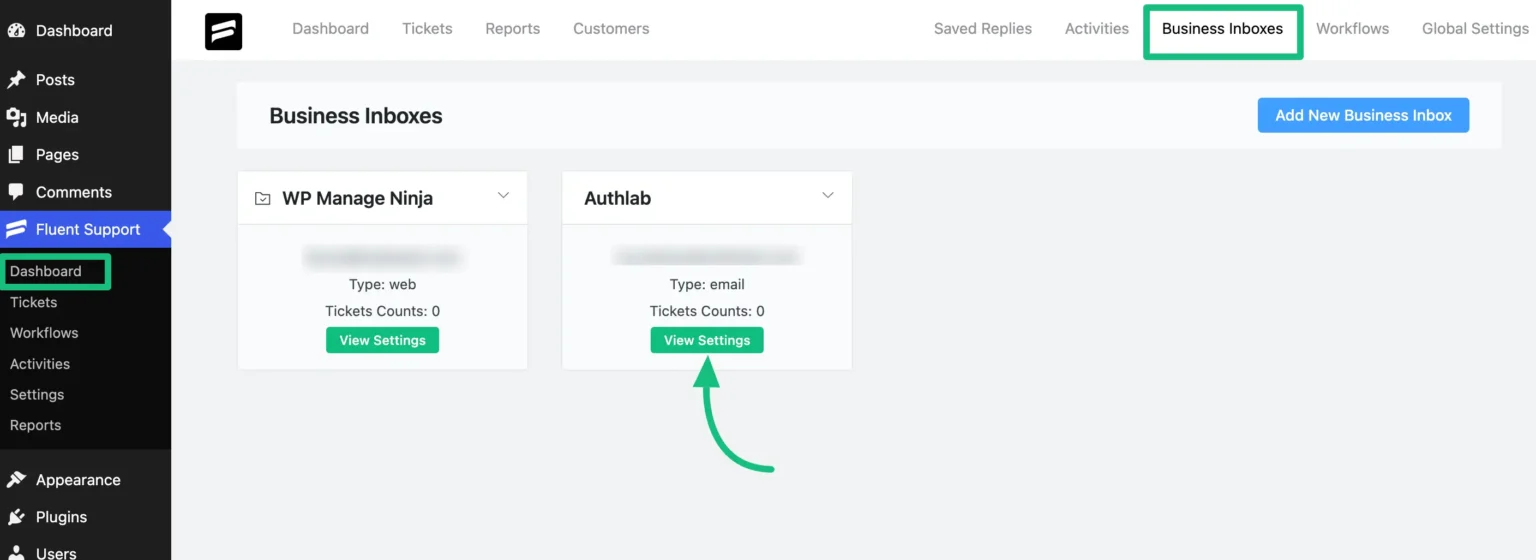
2. From your WordPress dashboard, go to Fluent Support → Business Inboxes.
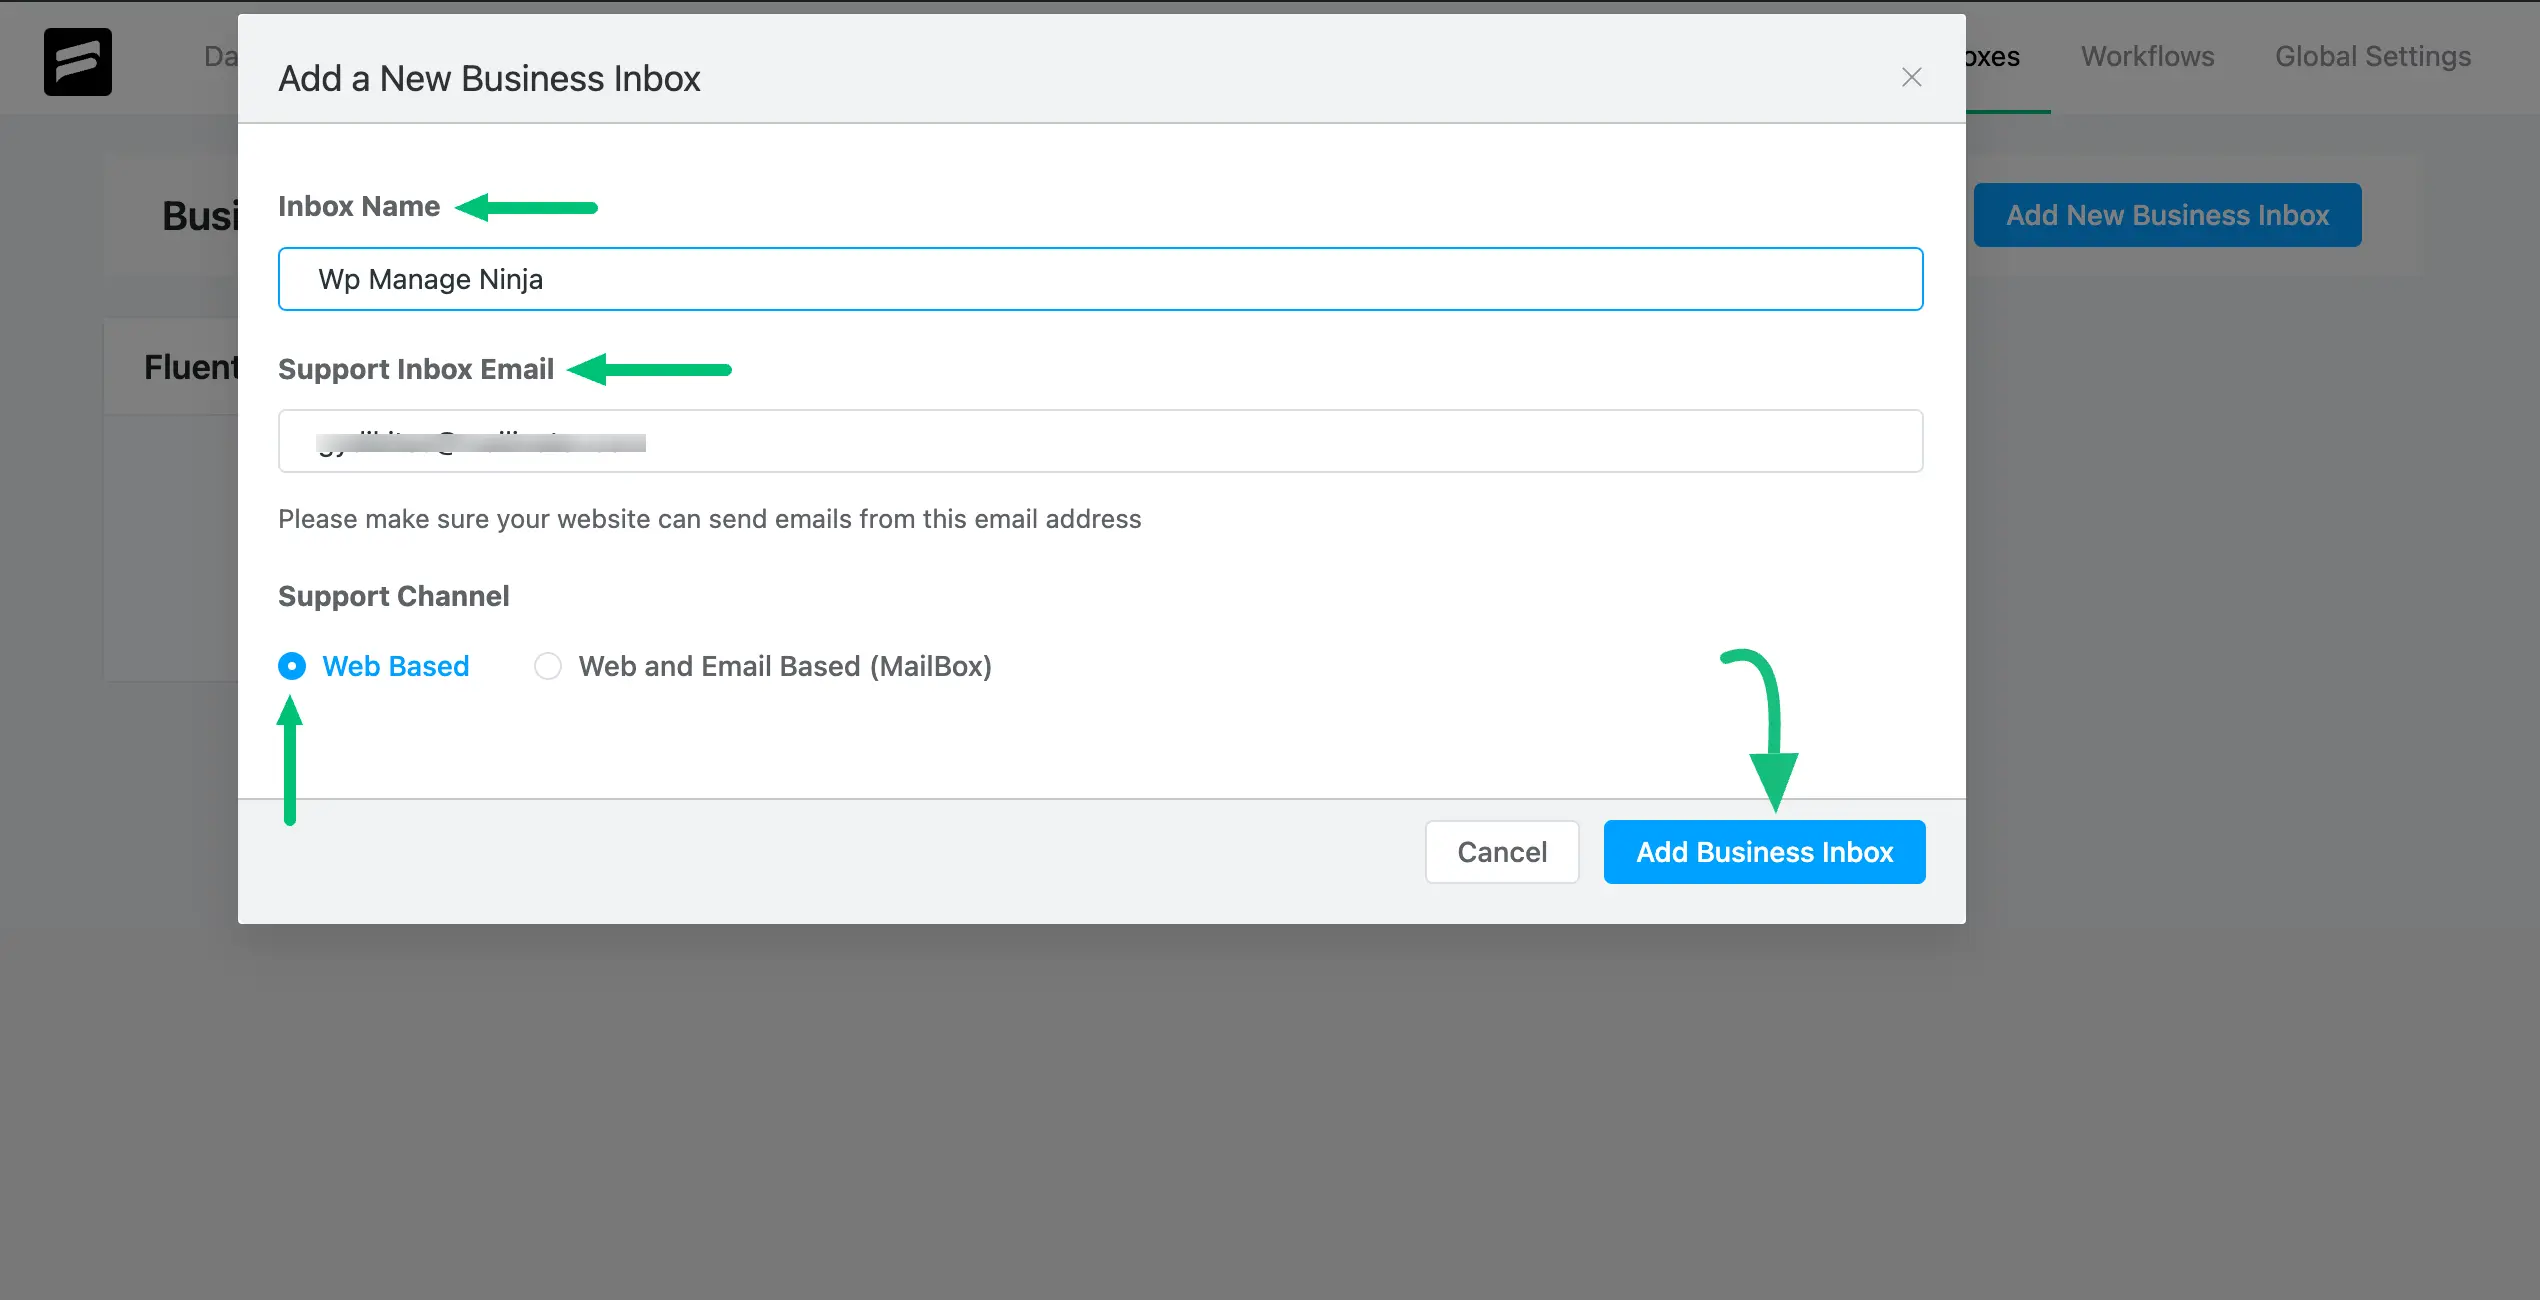
3. Click Add New Business Inbox.
4. Enter a name for the inbox. This usually reflects the purpose, such as “Customer Support” or “Website Support”.
5. Select the Support Channel as Web-Based.
This ensures the inbox only accepts tickets from your website and not from email.
6. Click Add Business Inbox to complete the setup.
At this point, you have a web-based Business Inbox ready to receive tickets.
Now you need to connect it to a support portal page.
Set up a support portal for a specific Business Inbox
Fluent Support lets you create a support portal for any Business Inbox using a shortcode. This is especially useful when you manage multiple inboxes or want full control over where tickets are submitted from.
Go to the page where you want to display the support portal. This can be an existing page or a newly created one.
Paste the following shortcode into the page:
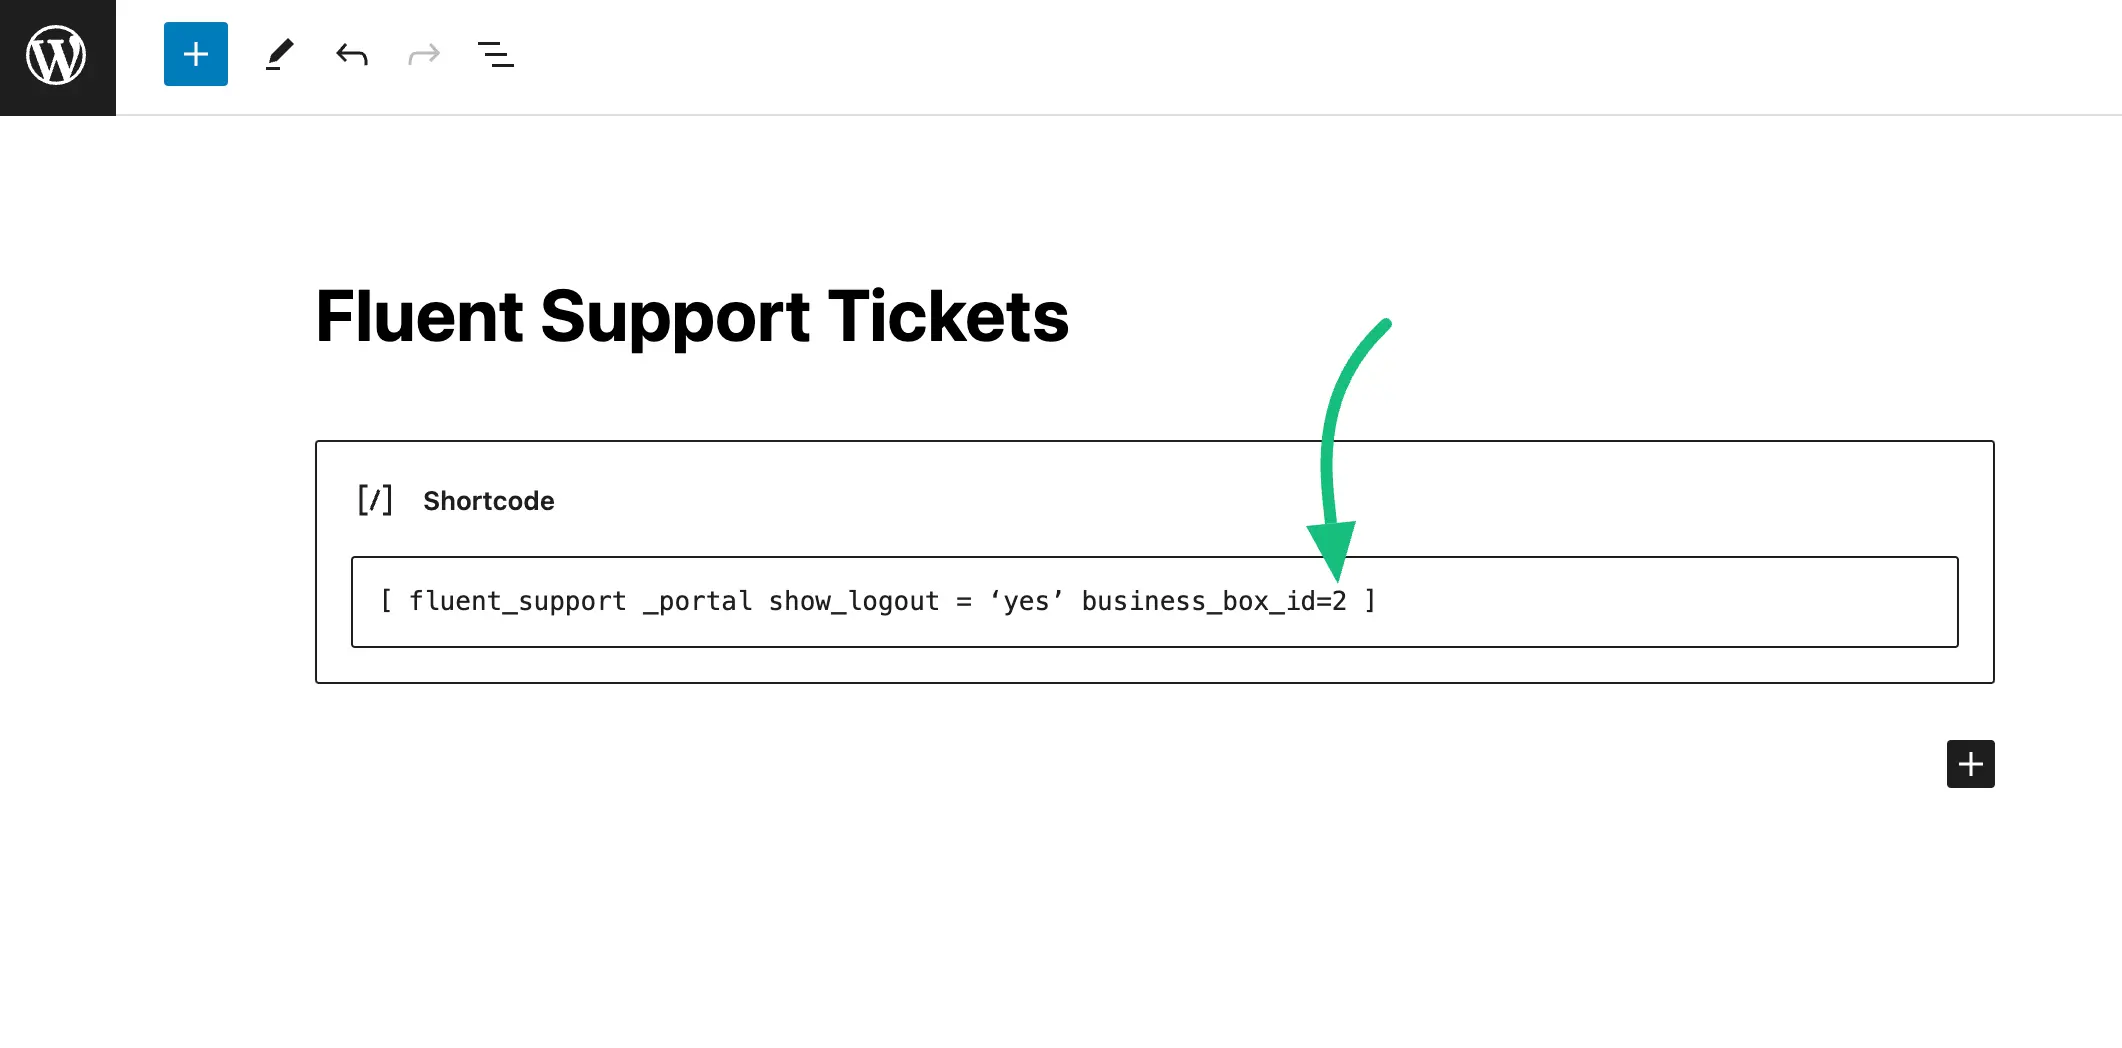
Shortcode: [ fluent_support _portal show_logout = ‘yes’ business_box_id=2 ]
Remember, instead of 2 (business box ID), use your own Business Box ID from your chosen business inbox.
Find your Business Inbox ID
To get the correct Business Inbox ID:
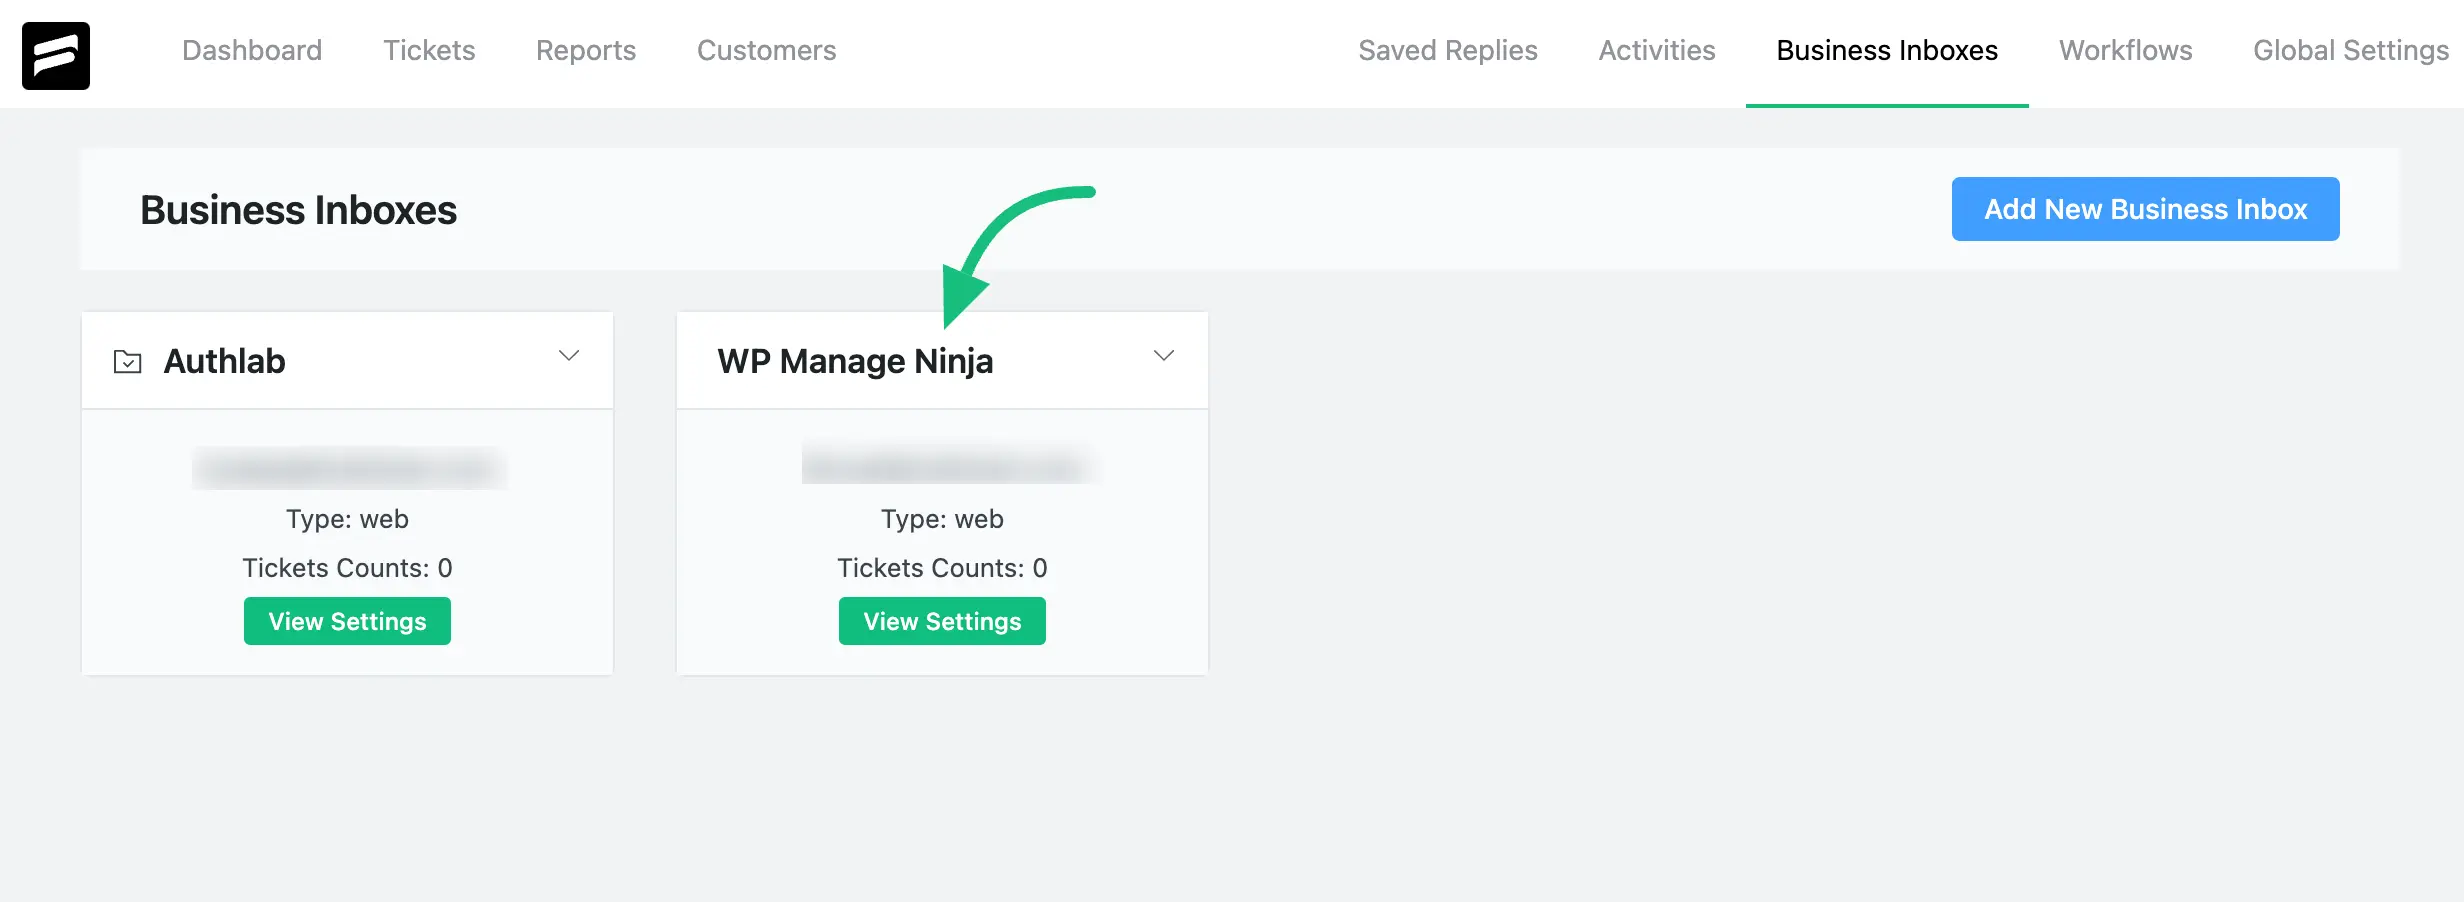
Go to Fluent Support → Business Inboxes.
Click View Settings on the inbox you just created.
Look at the browser URL.
You’ll see a number in the URL that represents the Business Inbox ID.
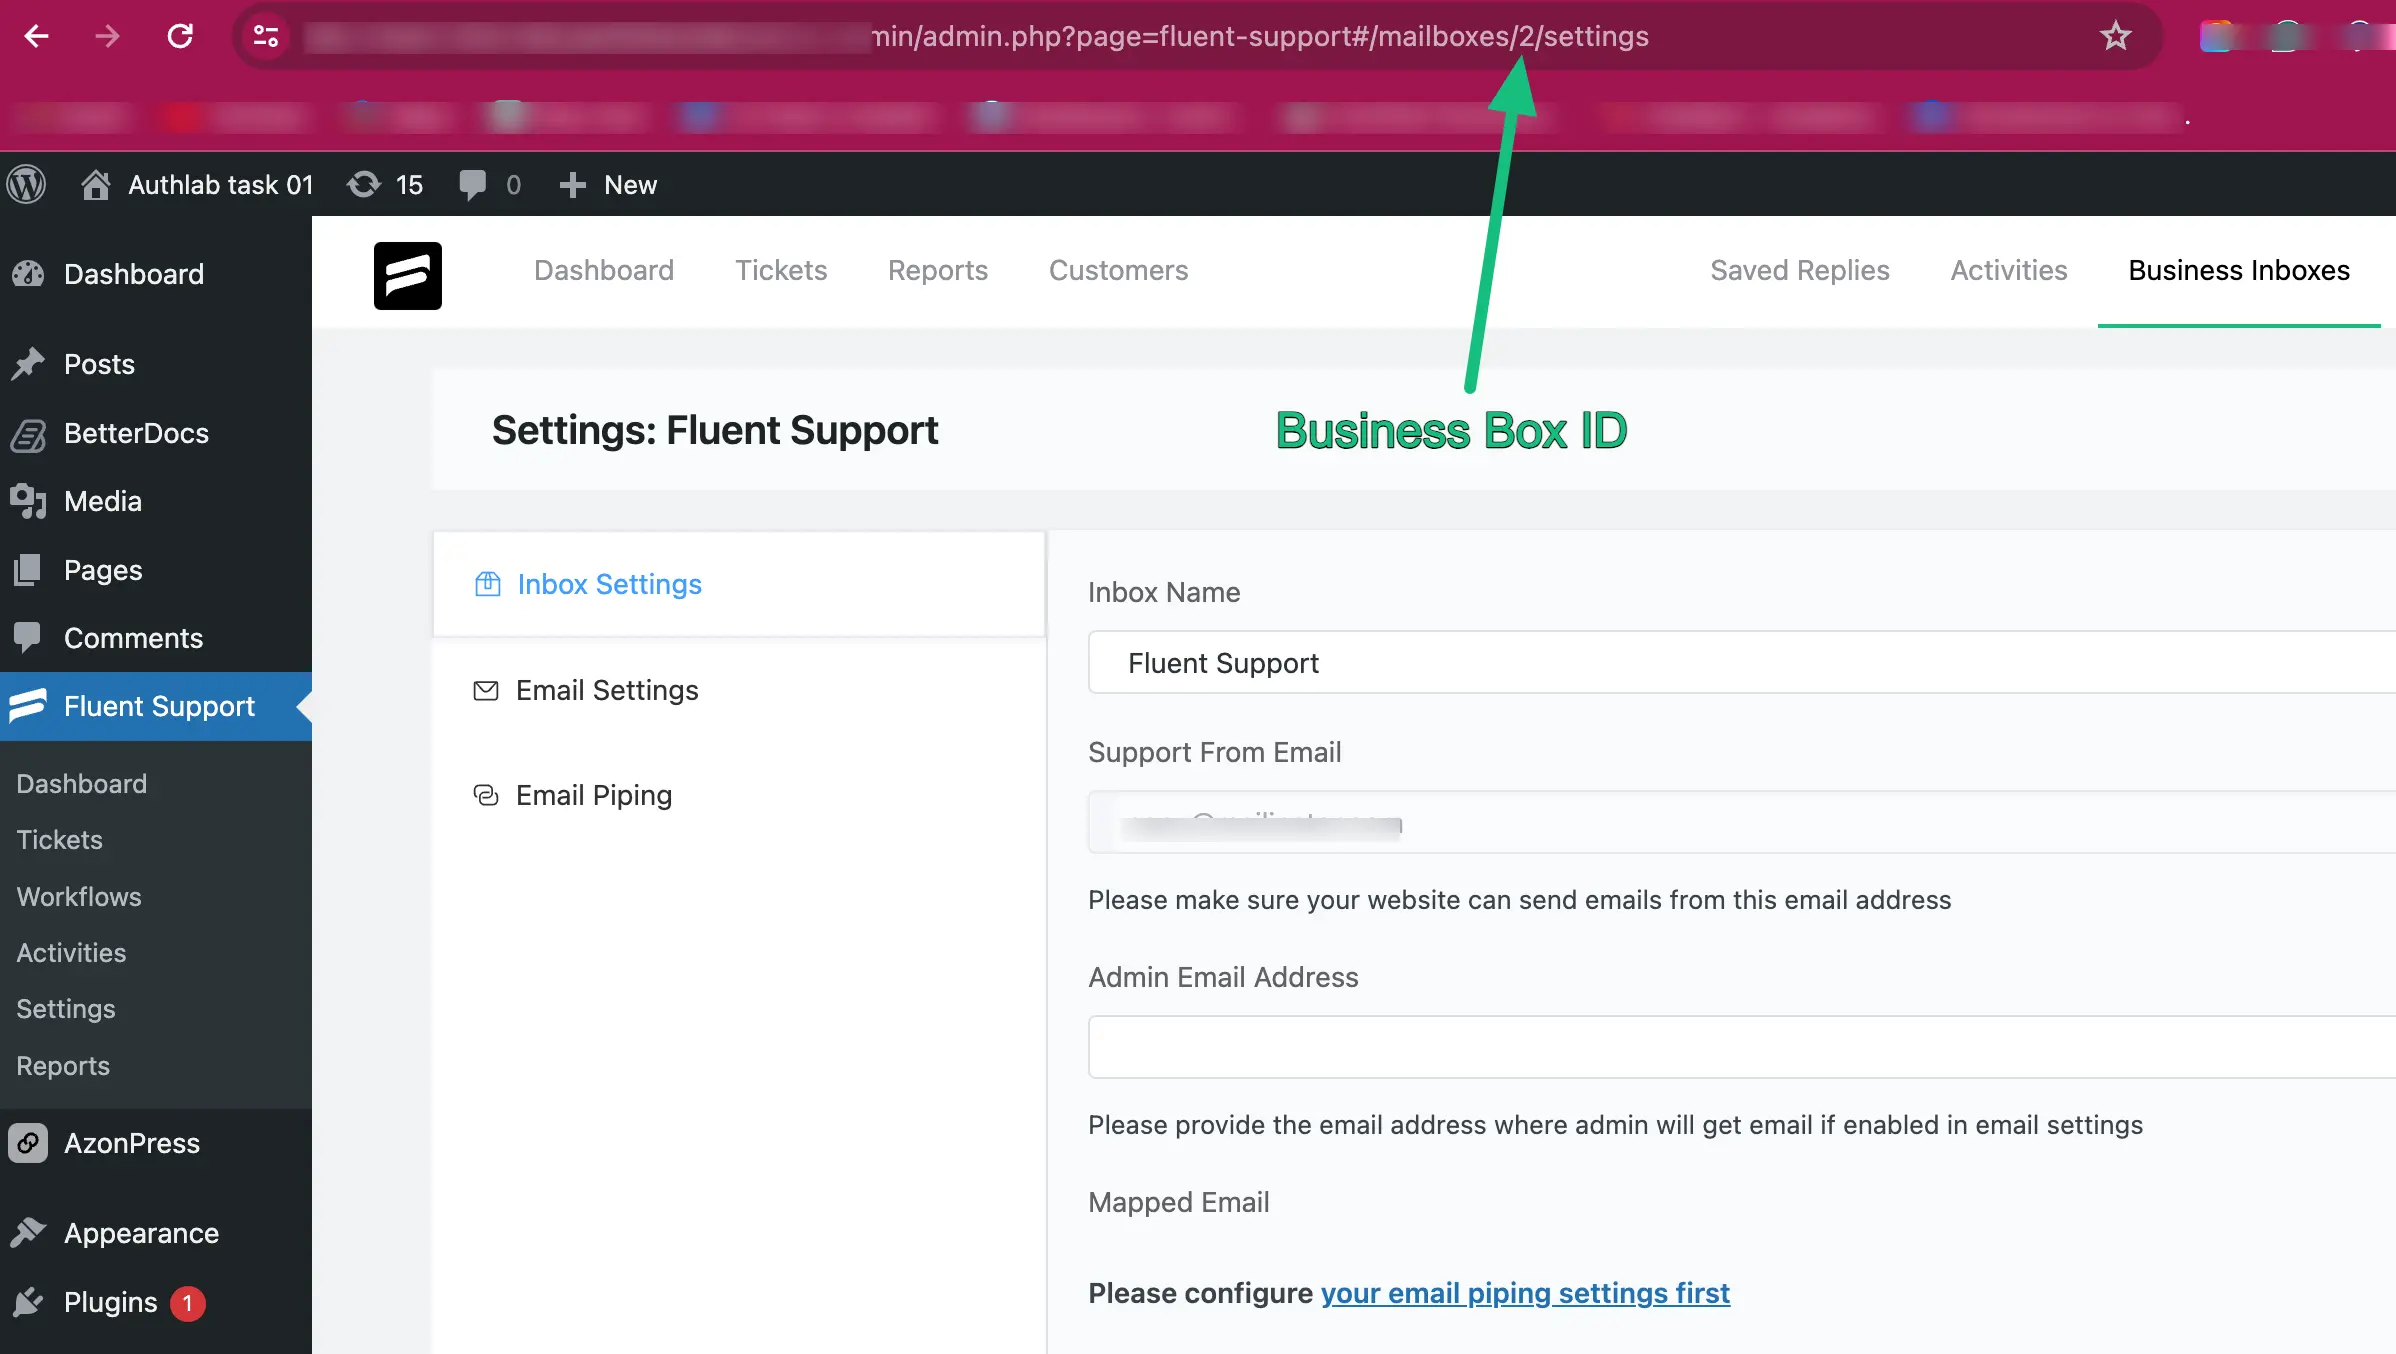
Copy that number and use it in the shortcode.
Once the shortcode is placed and the page is published, that page becomes the support portal for the selected Business Inbox.
What happens after setup
From this point forward:
This setup is ideal when you want structured ticket submissions, better context at the point of entry, and clear routing inside your support system.
With web-based ticket intake configured, your system is now ready to accept customer requests directly from your site in a controlled and predictable way.
Step 2.2: Email-based ticket setup
Email-based tickets allow customer emails to enter your support system as structured tickets instead of living in a shared inbox.
In Fluent Support, email intake works through email piping. This setup connects your support email address to a Business Inbox so every incoming email becomes a ticket automatically.
Before starting, make sure:
- You created a Web and Email-Based (Mailbox) Business Inbox
- Fluent Support Pro is active (email piping is a Pro feature)
Enable email piping for the Business Inbox
Go to Fluent Support → Business Inboxes from your WordPress dashboard.
Locate the inbox you created for email support and click View Settings.
Inside the inbox settings, open the Email Piping section.
You’ll first be asked to accept the email piping terms. This step is required to activate email handling for the inbox.

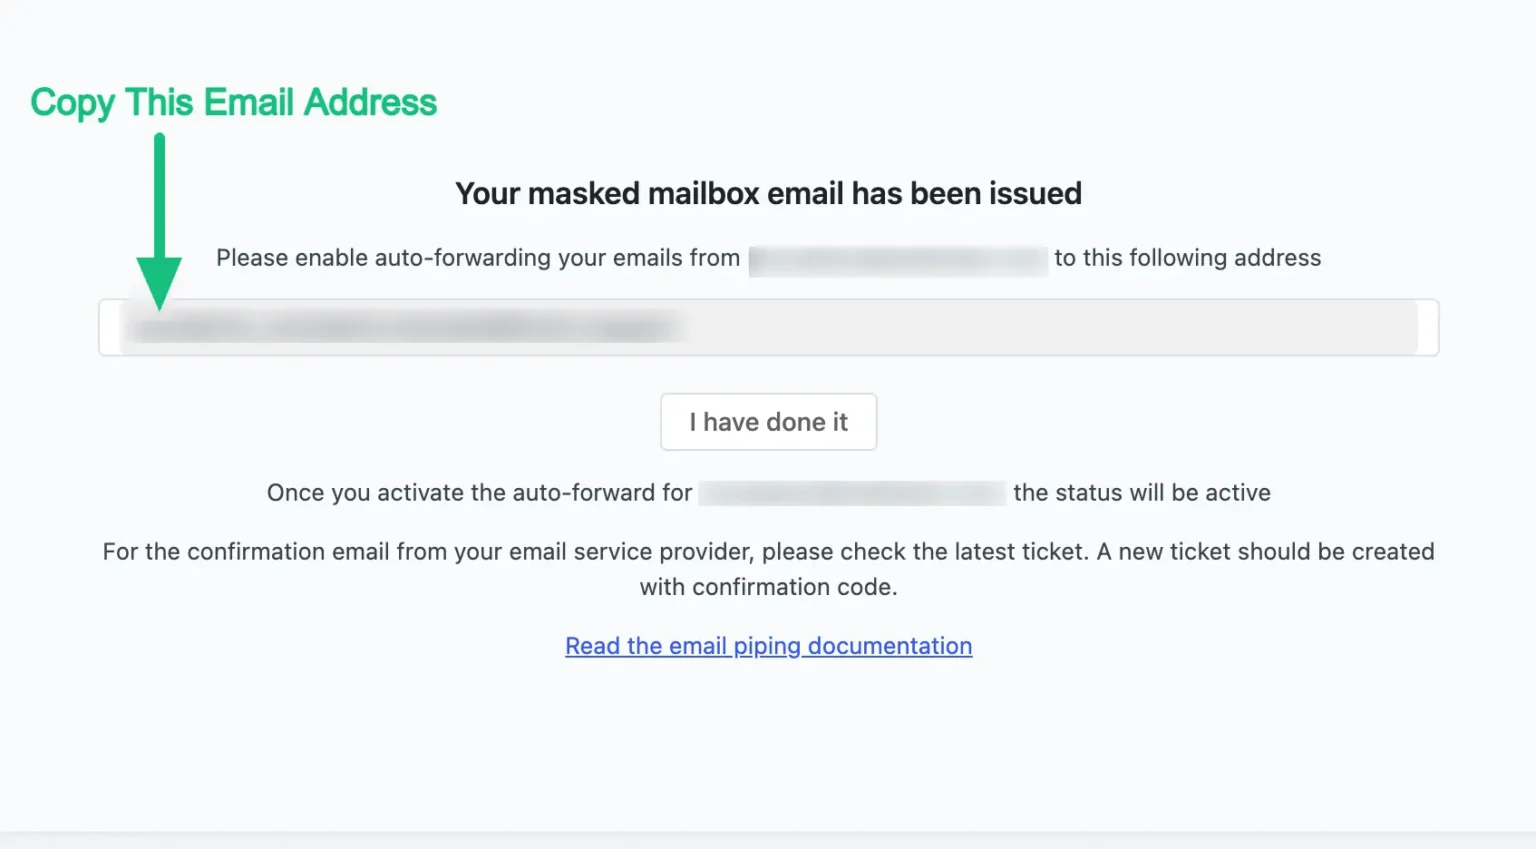
Once accepted, Fluent Support generates a unique email piping address for this inbox. This address is where all support emails need to be forwarded.
Now copy the Mailbox Email address from Fluent Support to configure auto‑forwarding for your other email accounts.
At this point, Fluent Support is ready to receive emails. The next step happens inside your email provider.
Forward your support emails to Fluent Support
Now go to the email account you use for customer support. This could be Gmail, Microsoft 365, Zoho Mail, or any other provider.
Set up email forwarding or redirection so that all incoming emails sent to your support address are forwarded to the Fluent Support piping email generated earlier.
This step ensures:
- Every customer email becomes a new ticket
- Replies stay attached to the original ticket
- Support conversations move out of email clients and into the ticket system
Note: Depending on your email provider, you may need to confirm forwarding. Fluent Support may also send a verification email, which will appear as a ticket during setup.
Verify ticket creation
After forwarding is configured, send a test email to your support address.
If everything is set up correctly:
From this point forward, agents should respond from inside Fluent Support, not from their email inbox. Replies sent from the ticket will continue the same email conversation without breaking the thread.
Why this setup matters?
Email support often breaks when emails are handled outside the system.
With email piping in place:
- No support emails are missed
- Conversations stay tied to a single ticket
- Reporting, SLAs, and workflows remain accurate
Once email-based ticket intake is working reliably, you can move on to configuring web-based ticket submission through the support portal.
Step 3: Add agents and define permissions
Once your ticket intake is working (email and/or web), the next critical step is deciding who on your team will actually handle those tickets and what they’re allowed to do. In Fluent Support you add agents and then control their level of access through permissions.
Add support staff (agents)
Agents are the people who will read, reply to, and manage tickets inside Fluent Support. These must be existing WordPress users before they can be added as agents.
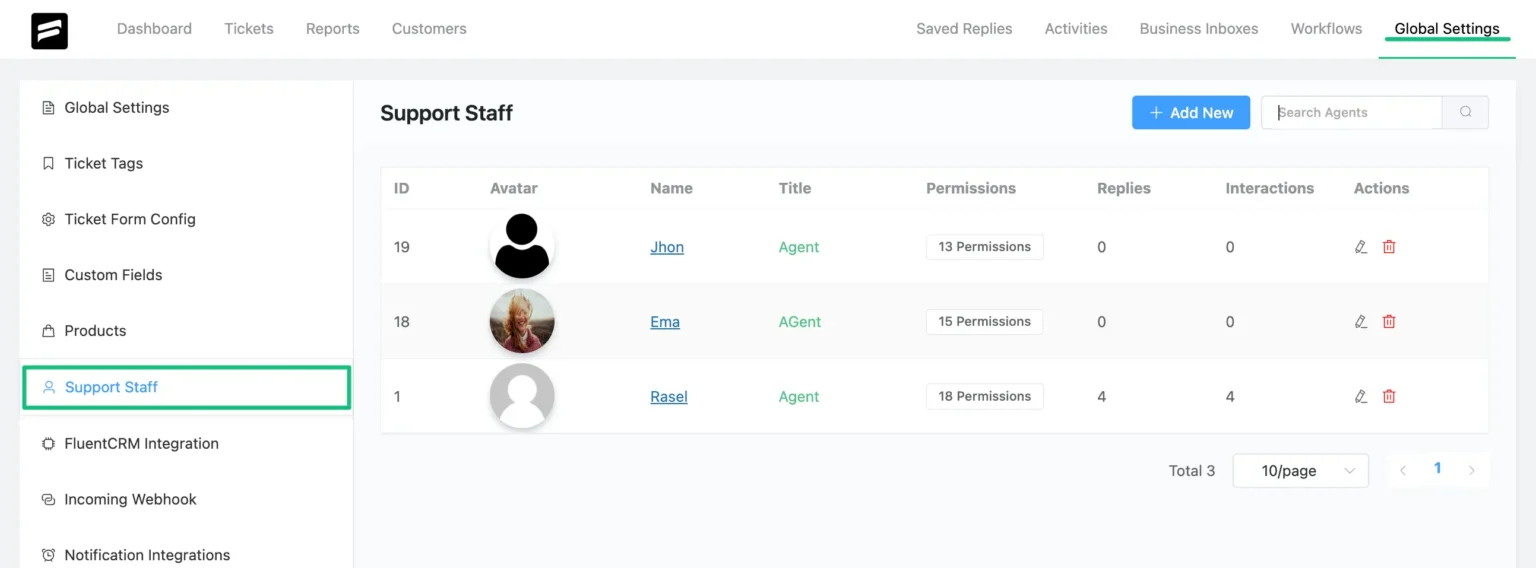
1. In your WordPress dashboard, go to Fluent Support → Global Settings → Support Staff.
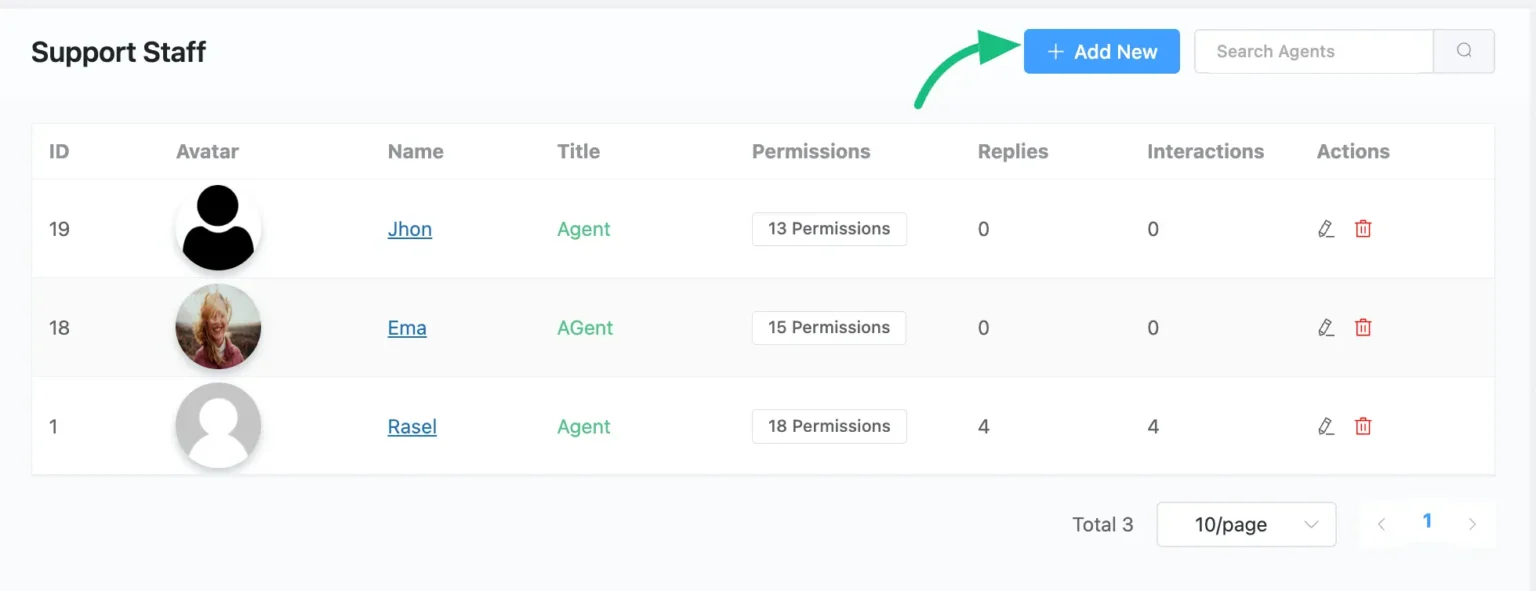
2. Click Add New.
3. A pop-up appears. Enter:
- Email (the agent’s WordPress user email)
- First Name
- Last Name
- Title (ex: Support Agent or Tier 2)
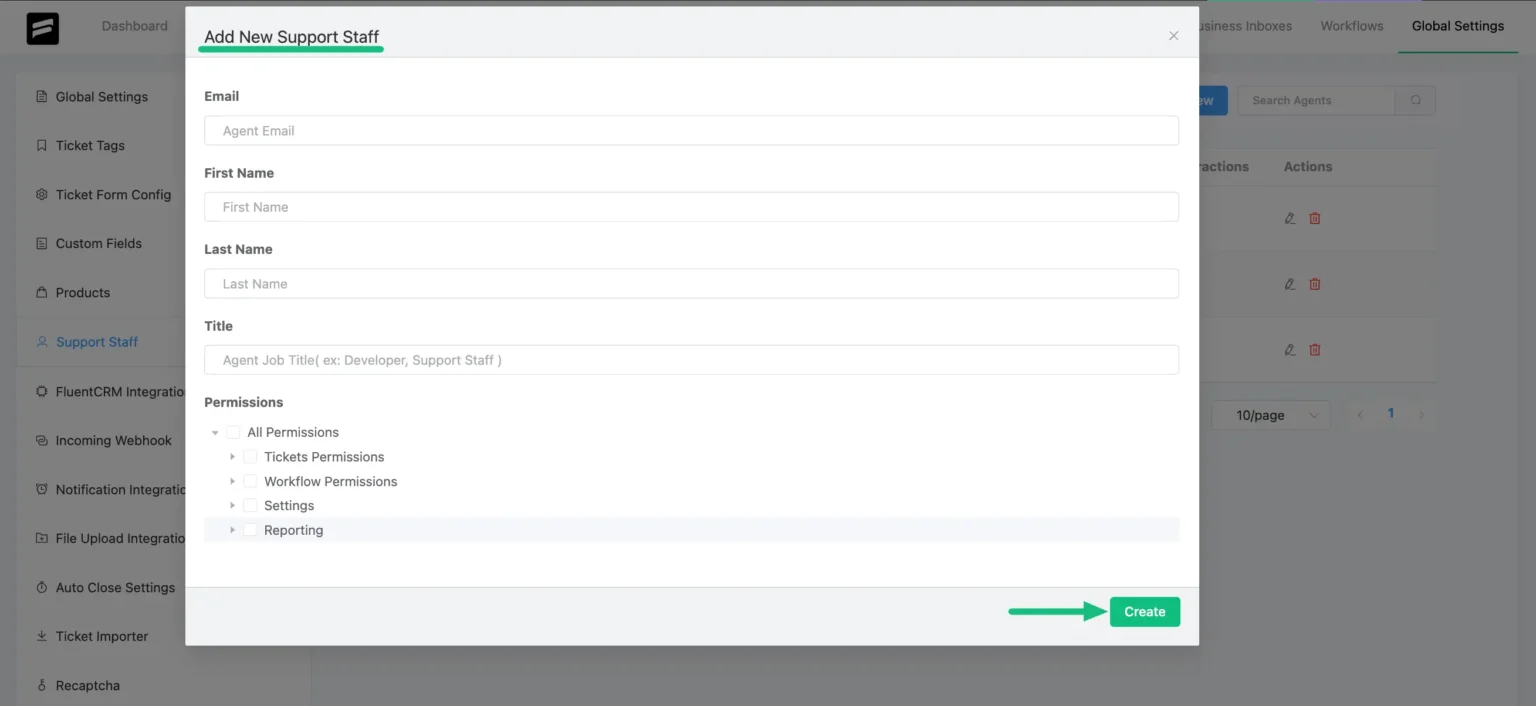
4. Click Create to save the agent.
Repeat this for each team member who should handle tickets. Fluent Support lets you add as many agents as you need without extra cost.
Control what each agent can do
After adding agents, you decide what they’re allowed to manage inside Fluent Support. Permissions let you tailor roles so each agent can only see and act on what they need, nothing more.
To edit permissions for an agent:
1. Go to Fluent Support → Global Settings → Support Staff.
2. Find the agent and click the edit (pencil) icon.
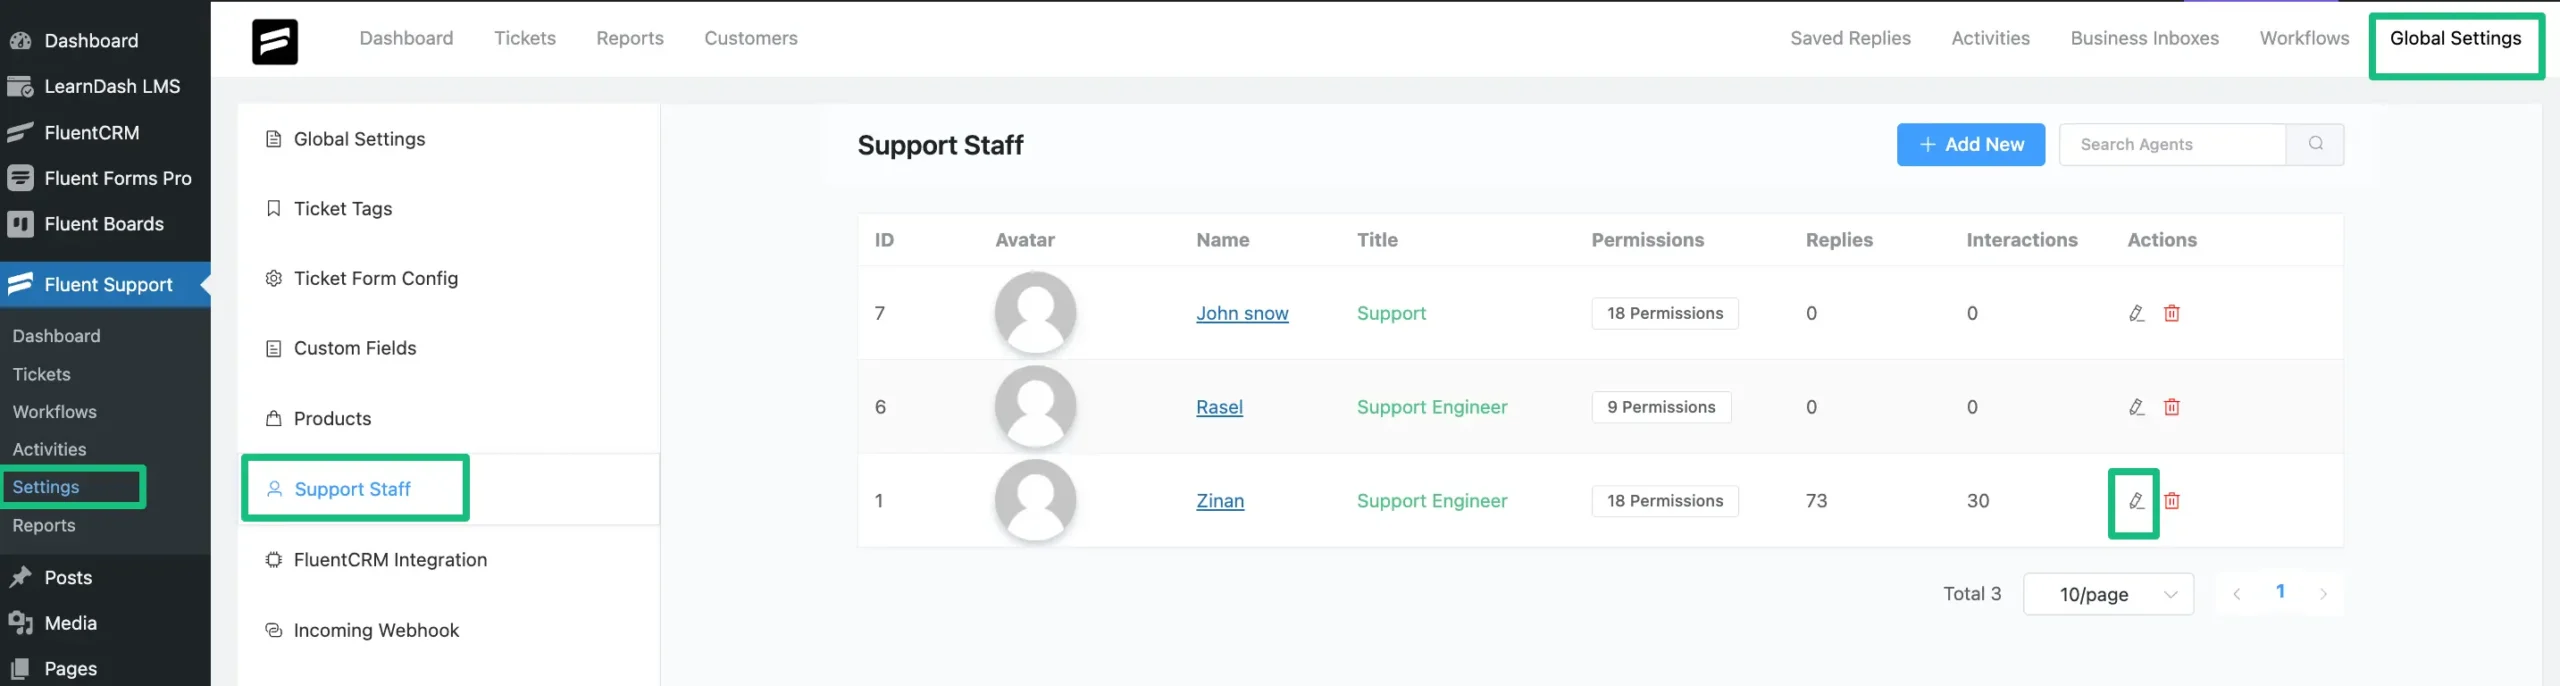
3. Scroll to Permissions.
4. Enable or disable permission checkboxes according to what you want them to access.
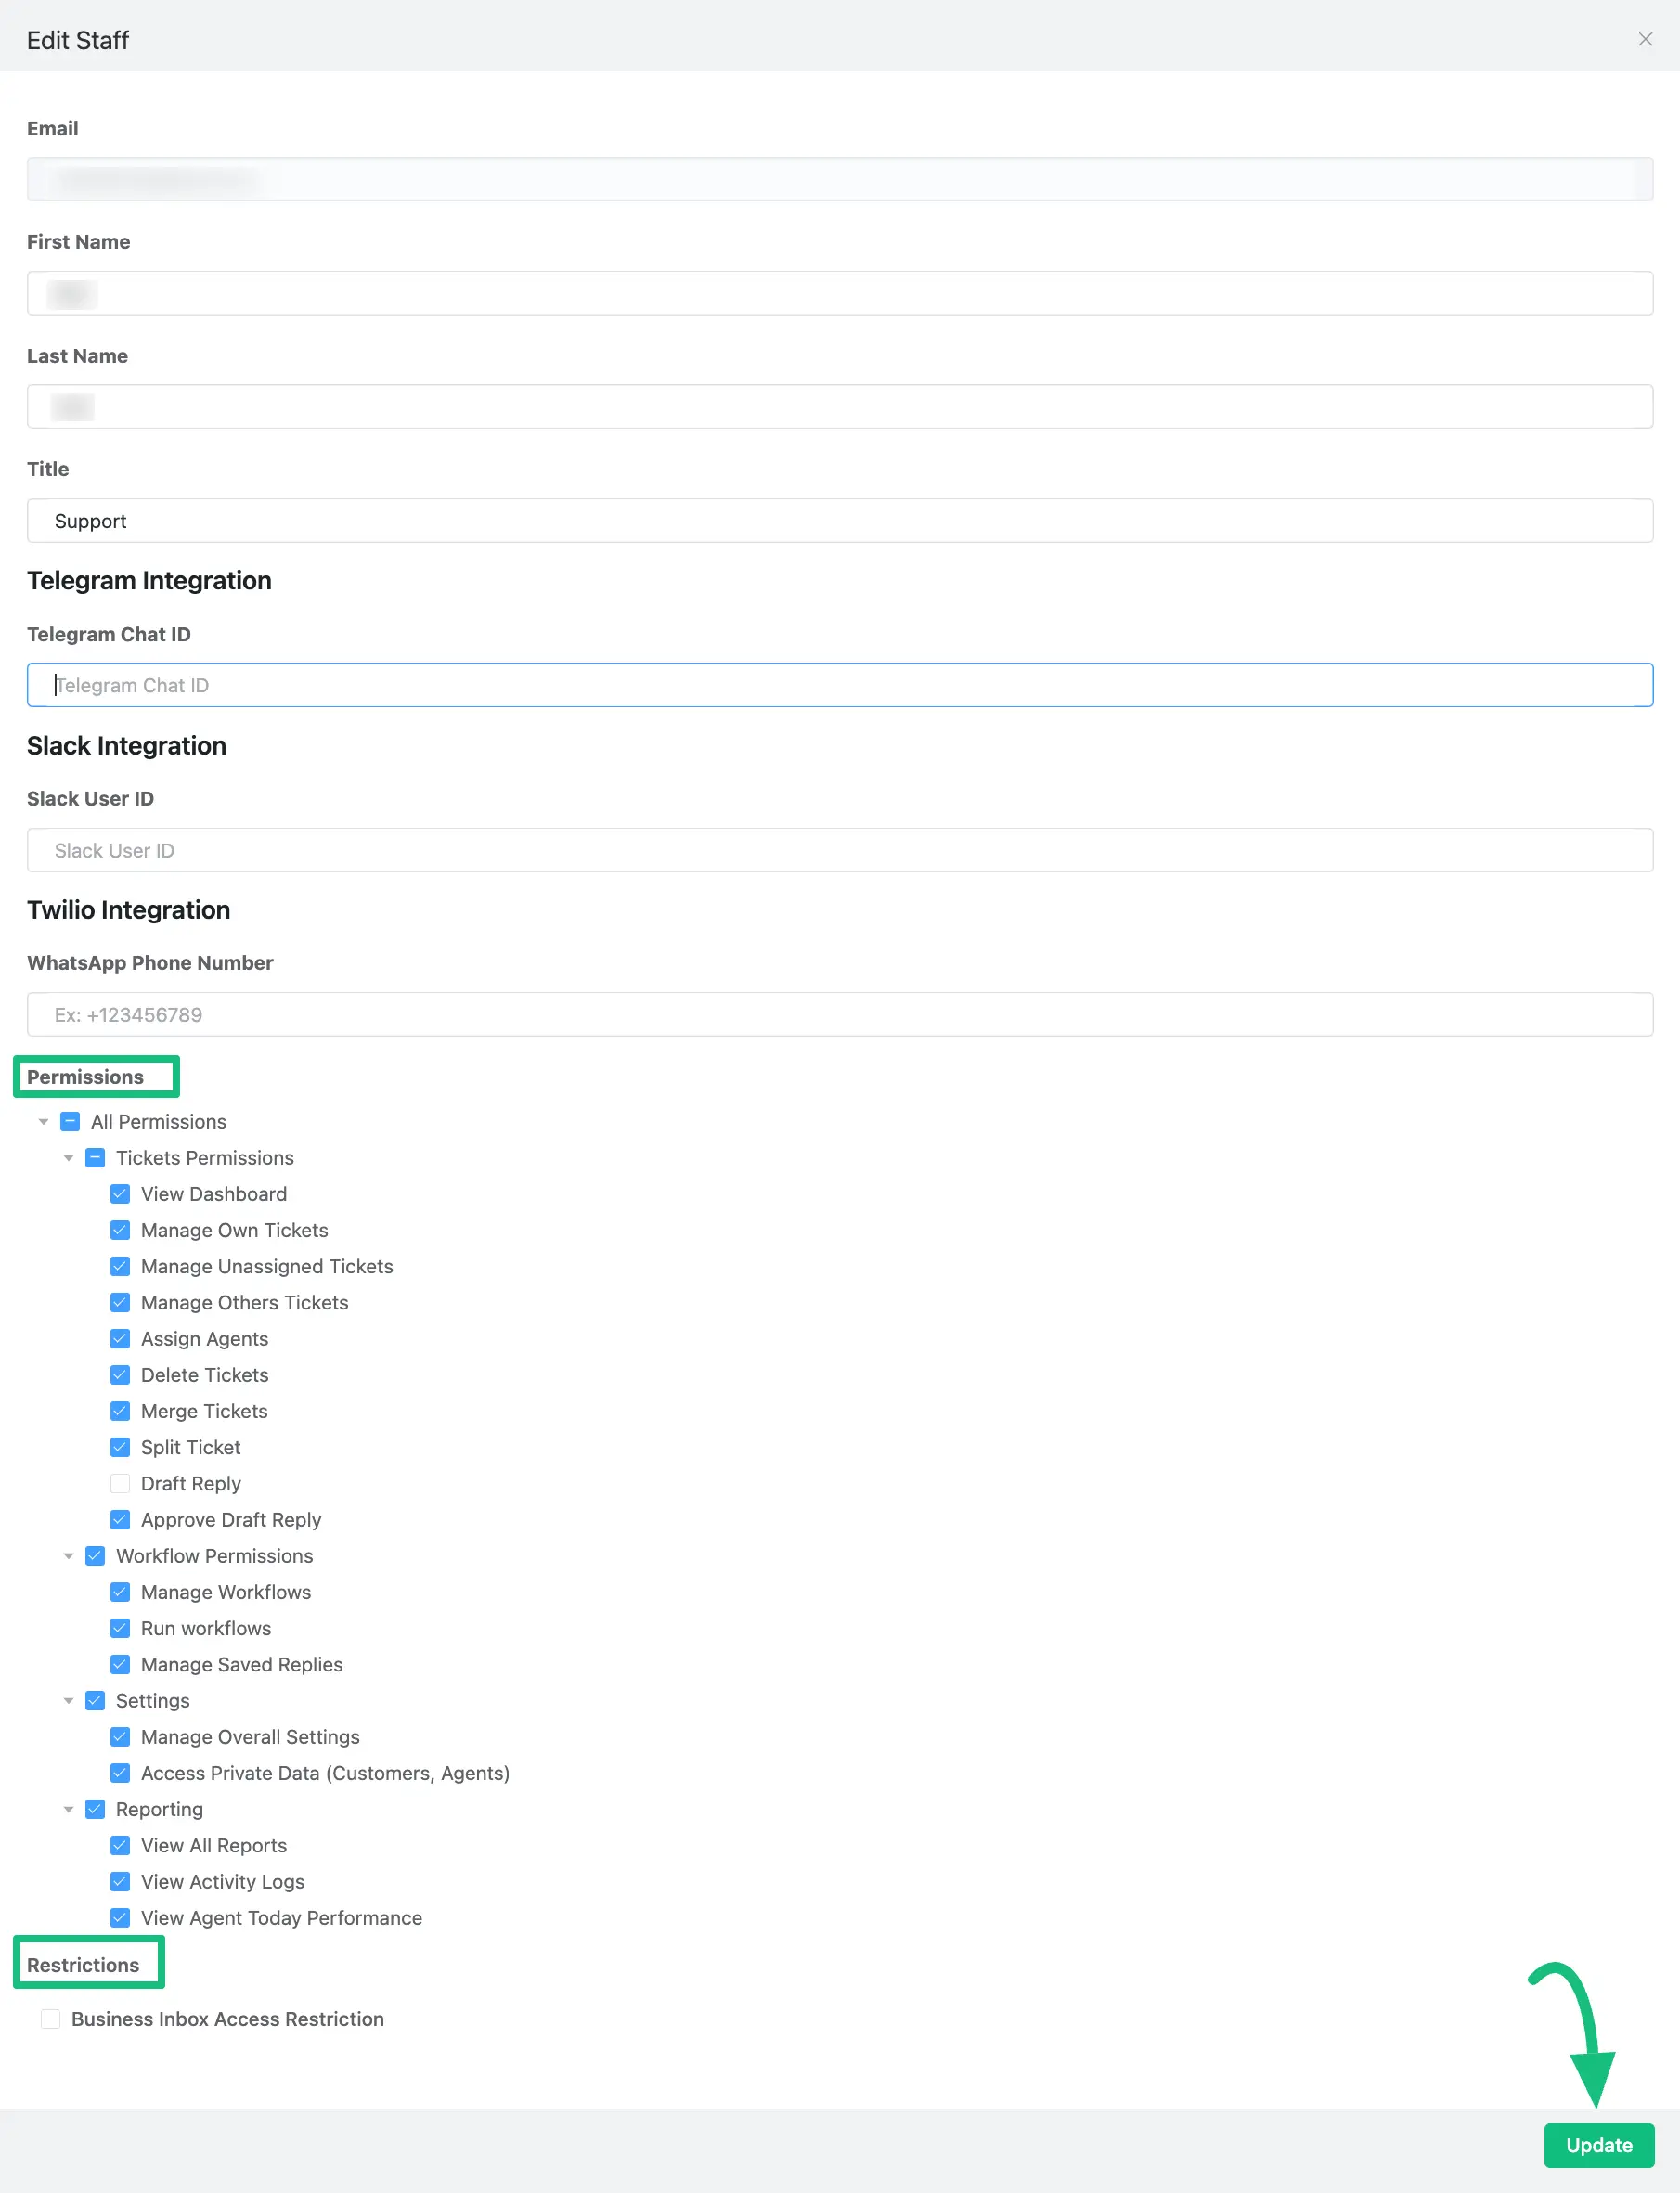
5. Click Update to save changes.
What permissions you can control
Fluent Support lets you control what each agent can see and do, without overcomplicating the setup. At a high level, permissions cover:
- Ticket access and actions
Viewing tickets, replying, assigning, merging or splitting conversations - Workflow and productivity tools
Running workflows and using saved replies - Settings and data access
Access to inbox settings, customer data, and system-level options - Reporting visibility
Viewing reports, activity logs, and agent performance data - Inbox-level access
Restricting agents to specific Business Inboxes so they only see relevant tickets
For initial setup, you only need to decide who handles tickets and who manages the system. Everything else can be refined later as your team grows.
Why this matters
A ticketing system without clear agent roles quickly becomes chaotic. When each agent has the right scope of access:
- There is clear ownership over tickets
- Agents aren’t overwhelmed by unrelated tickets
- Reports are more accurate
- Sensitive settings remain protected
This control layer makes your support operations more predictable and efficient as your team grows.
Step 4: Set up ticket structure and response assets
At this point, tickets are entering the system and agents can access them. Now the focus shifts to how tickets are handled day to day.
This step is about making sure agents work with clarity, replies stay consistent, and collaboration does not break down as ticket volume grows.
1. Connect products to tickets
If your business supports products, services, or plans, tickets should clearly reflect that.
Fluent Support lets you create products that act as categories for organizing your tickets. Agents and customers can associate a ticket with a product, giving immediate context about what the issue relates to without needing follow-up questions.
How to create products
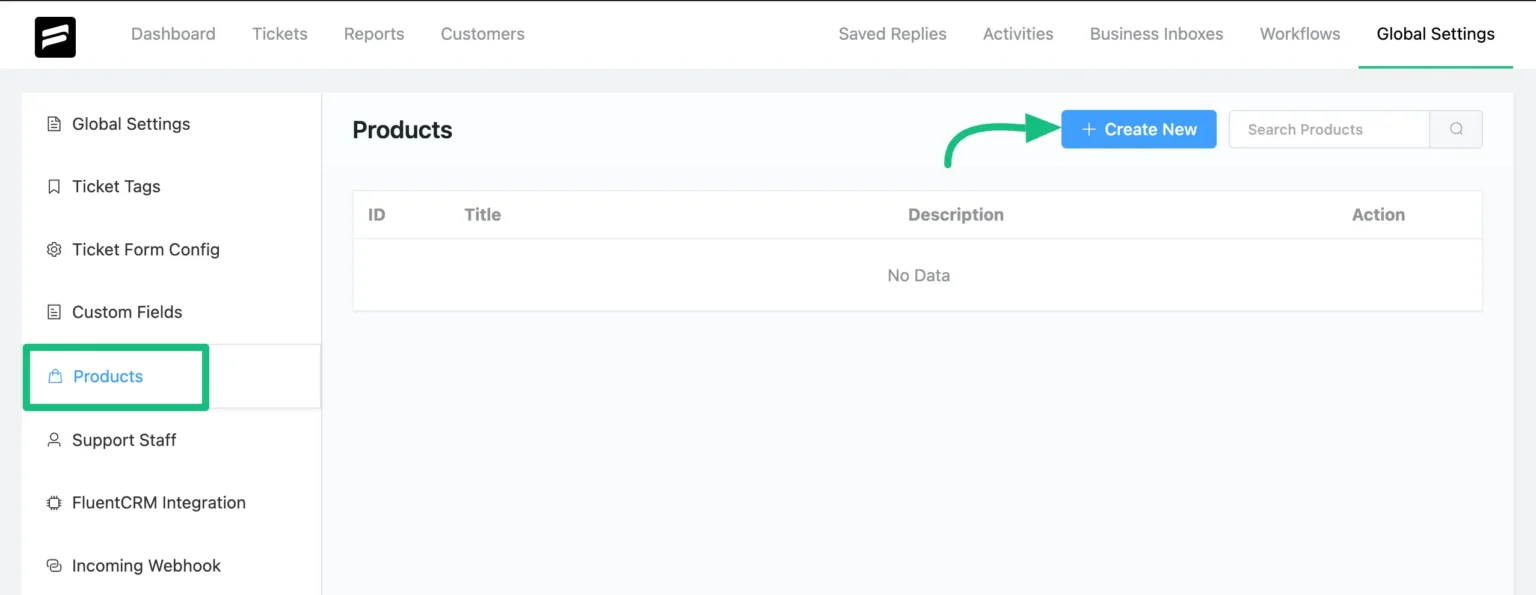
1. Go to Fluent Support → Global Settings in your WordPress dashboard.
2. Select Products from the left sidebar.
3. Click + Create New.
4. Enter a Title and optional Description for the product.
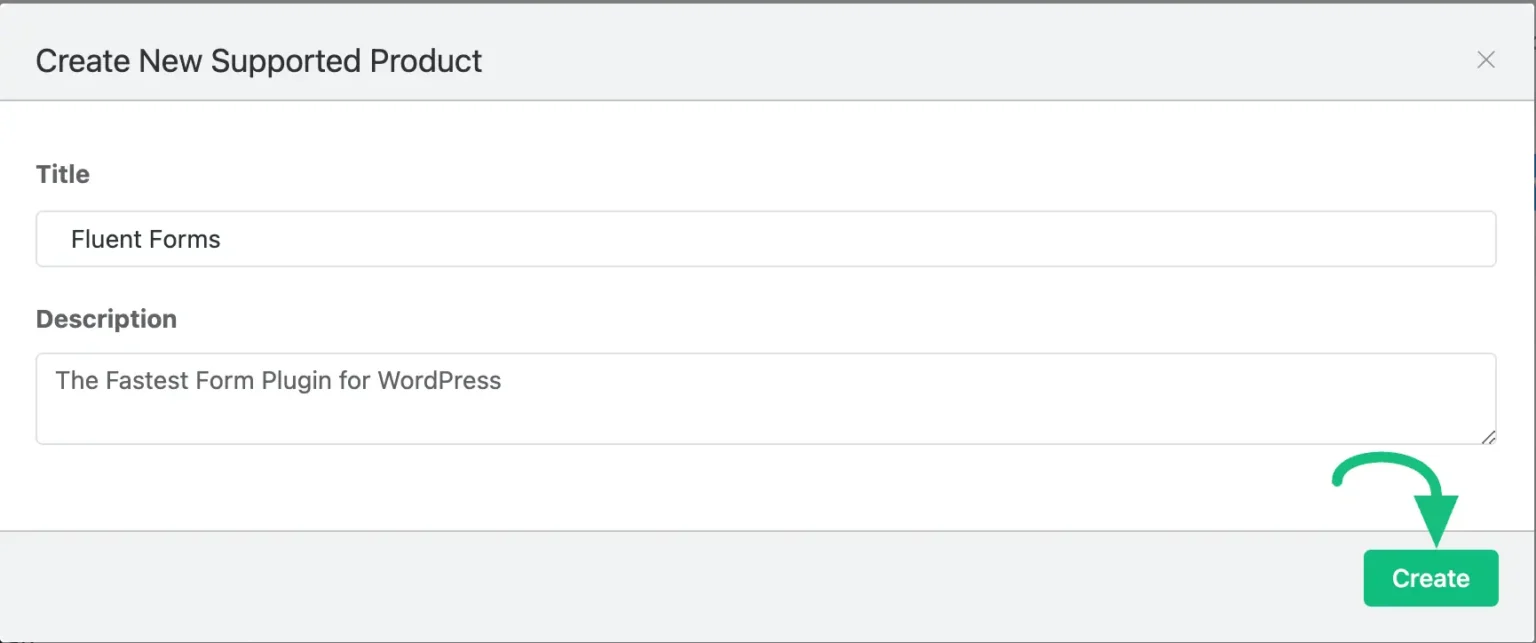
5. Click Create to save it.
Once products are set up, they can be selected:
- By customers when submitting tickets via the support portal, and
- By agents inside the ticket view while managing support requests.
This helps keep conversations focused and avoids confusion, especially when supporting multiple offerings or variations of your products.
2. Create saved replies for consistent responses
As part of preparing your system for real usage, you should define how agents respond to common scenarios in a consistent way.
Saved replies in Fluent Support let you predefine response templates that agents can insert while replying to tickets. This reduces manual typing and ensures important information is communicated accurately every time.
Saved replies are best used for:
- Standard explanations or instructions
- Policy-related responses
- Known troubleshooting steps
- Common follow-up or closing messages
How to create saved replies
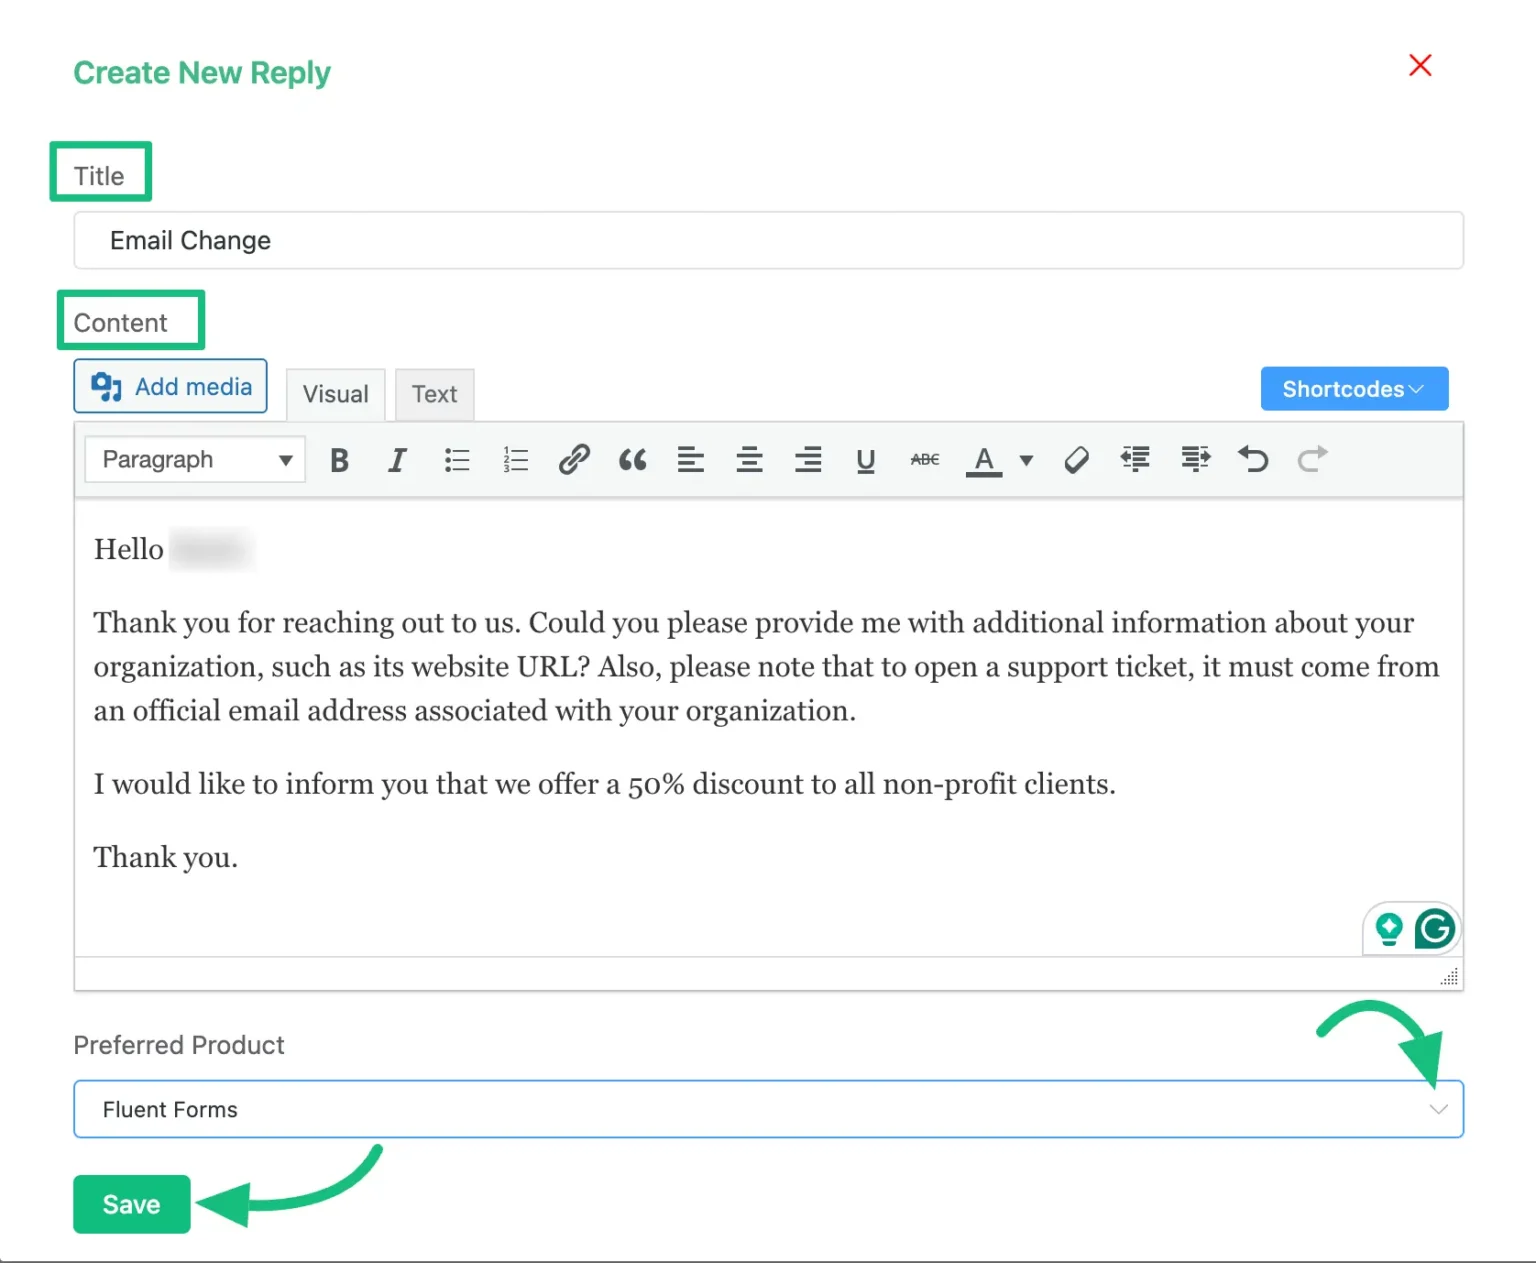
To set up saved replies:
- Go to Fluent Support → Saved Replies from your WordPress dashboard.
- Click Add New.
- Enter a clear title so agents can quickly identify the reply.
- Write the response content as it should appear in customer replies. (You can also)
- Save the reply.
When responding to a ticket, agents can insert a saved reply and adjust it if needed before sending.
Saved replies are not meant to replace thoughtful responses. They exist to standardize the baseline so agents can focus on resolving the actual issue instead of rewriting the same explanations repeatedly.
3. Set up ticket tags for early classification
After products and saved replies, the next setup element is ticket tags.
Tags are lightweight labels that help you classify tickets beyond products. They don’t replace products or categories. They add clarity.
Tags are useful for identifying things like issue type, request nature, or recurring patterns that cut across products.
Examples might include:
- billing
- bug
- feature-request
- login-issue
The key is to define tags before tickets start piling up, so agents aren’t inventing labels on the fly.
How to create ticket tags
To set up tags in Fluent Support:
1. Go to Fluent Support → Global Settings from your WordPress dashboard.
2. Open the Tikcet Tags section.
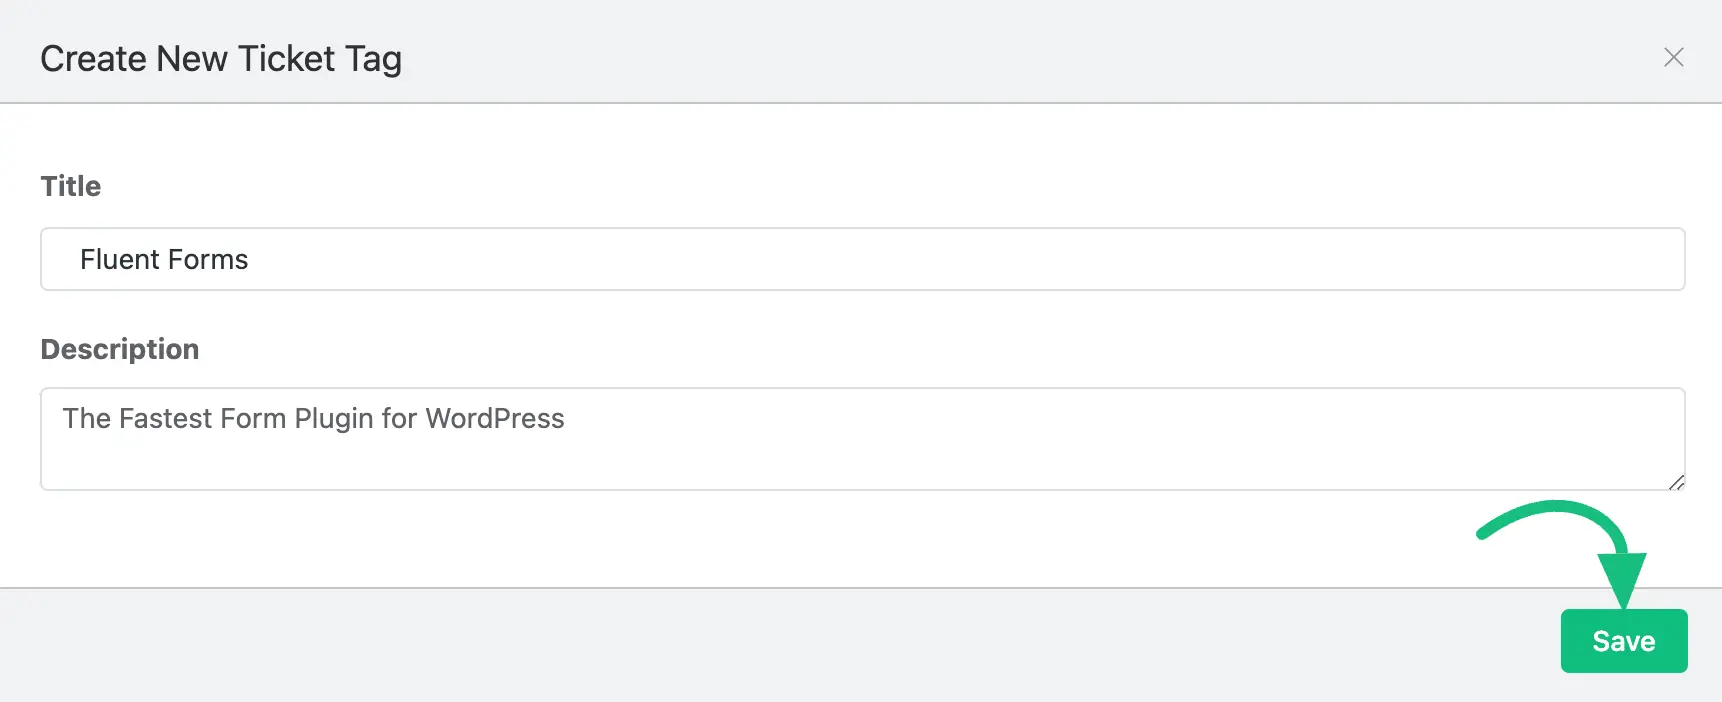
3. Click Add New Tag.
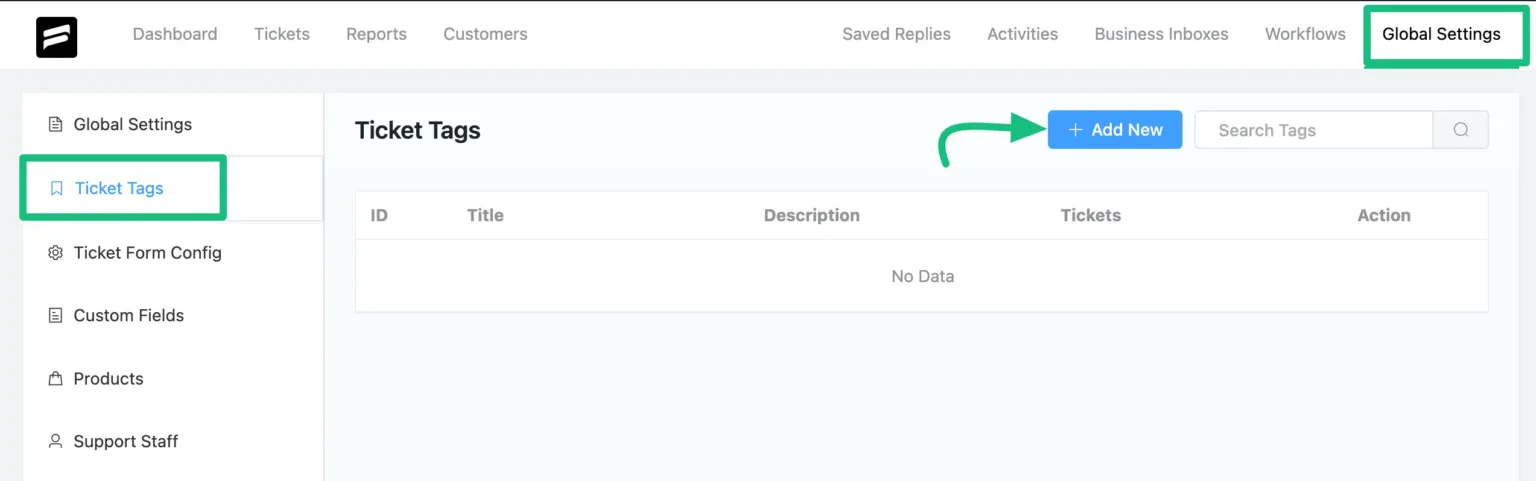
4. Enter the tag name you want to use.
5. Save the tag.
You can create as many tags as you need, but it’s better to start small. A short, controlled list keeps classification consistent from day one.
Once tags are created, they become available inside the ticket view. Agents can apply them while reviewing tickets, and they can later be used for filtering, reporting, or automation.
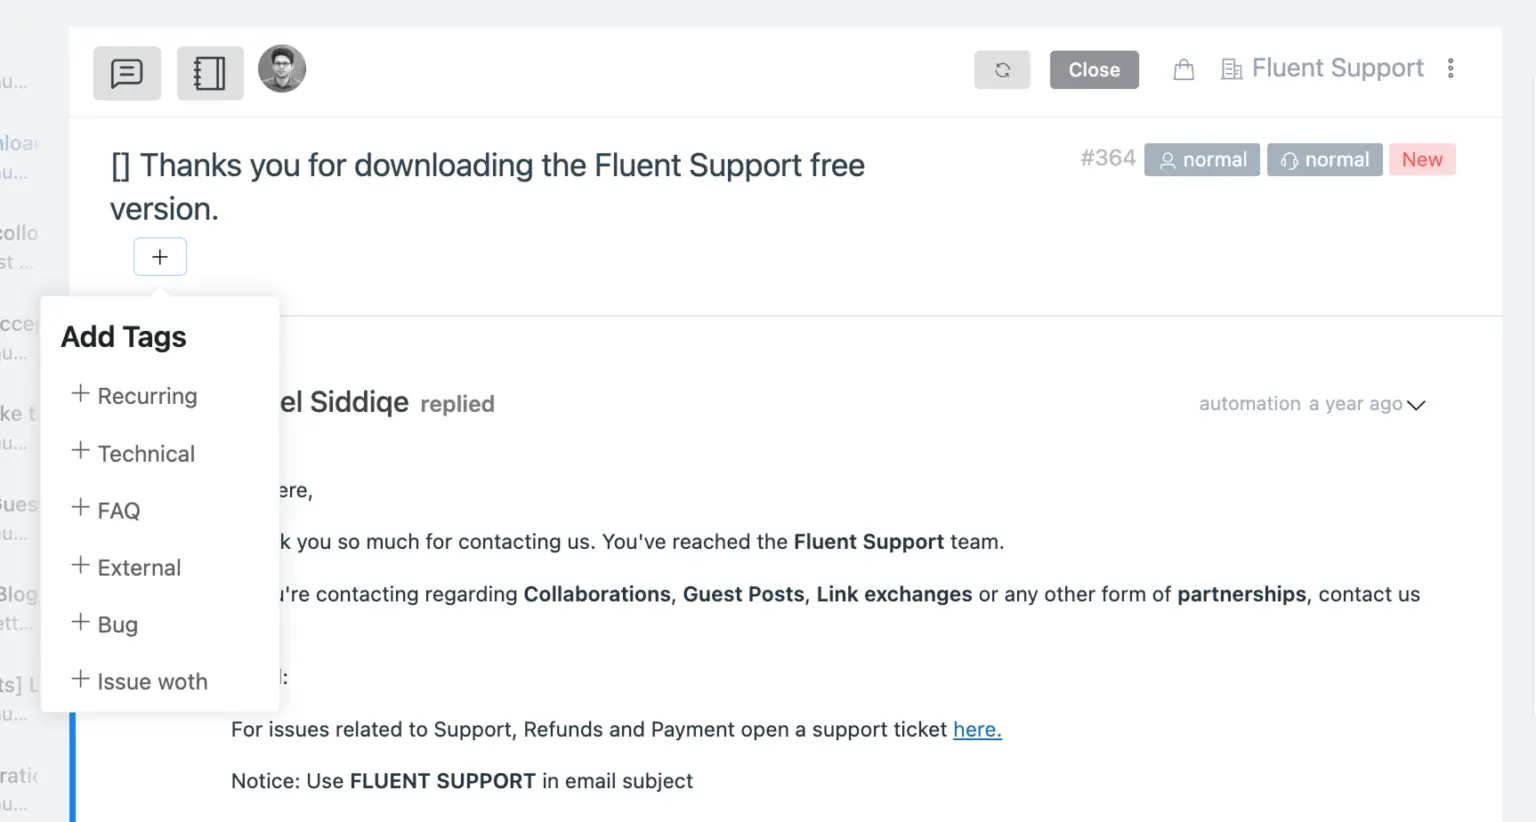
At setup time, the goal is simple: Define the tags your team will rely on so tickets stay organized as volume grows.
Step 5: Set up workflow automation
At this stage, tickets are flowing into the system, agents are assigned, and ticket data is structured.
What usually slows teams down next is repetition.
The same actions happen over and over. Tickets get assigned to the same team. Tags are added manually. Status changes follow predictable patterns.
Workflow automation exists to handle these repetitive actions automatically so agents can focus on resolving issues instead of managing tickets.
Most WordPress ticketing systems support workflow automation in some form. The structure is generally the same. A trigger happens (or manually), and one or more actions run.
Fluent Support follows this same model and provides two types of workflows, each serving a different purpose.
1. Manual workflows
Manual workflows are actions that agents trigger intentionally from inside a ticket.
They do not run on their own and do not depend on conditions.
This makes them useful for actions that require human judgment, where automation would be risky or premature.
In Fluent Support, manual workflows are designed to standardize common actions that agents perform repeatedly, without forcing those actions to happen automatically.
Common use cases include:
- Assigning or reassigning a ticket after reviewing the issue
- Adding internal notes during escalation or handoff
- Applying tags once the ticket context is clear
- Closing or updating tickets using a consistent process
Instead of performing multiple actions one by one, agents can apply a predefined workflow with a single click.
How to set up a manual workflow in Fluent Support
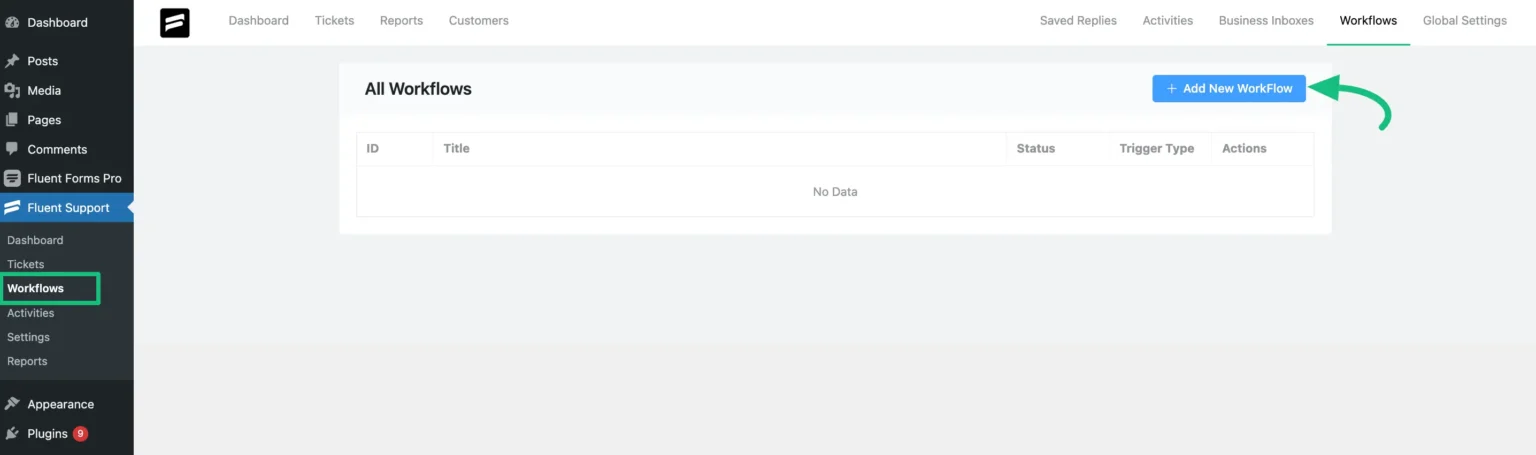
1. Go to Fluent Support → Workflows in your WordPress dashboard
2. Click Add New Workflow
3. Select Manual Workflow as the workflow type
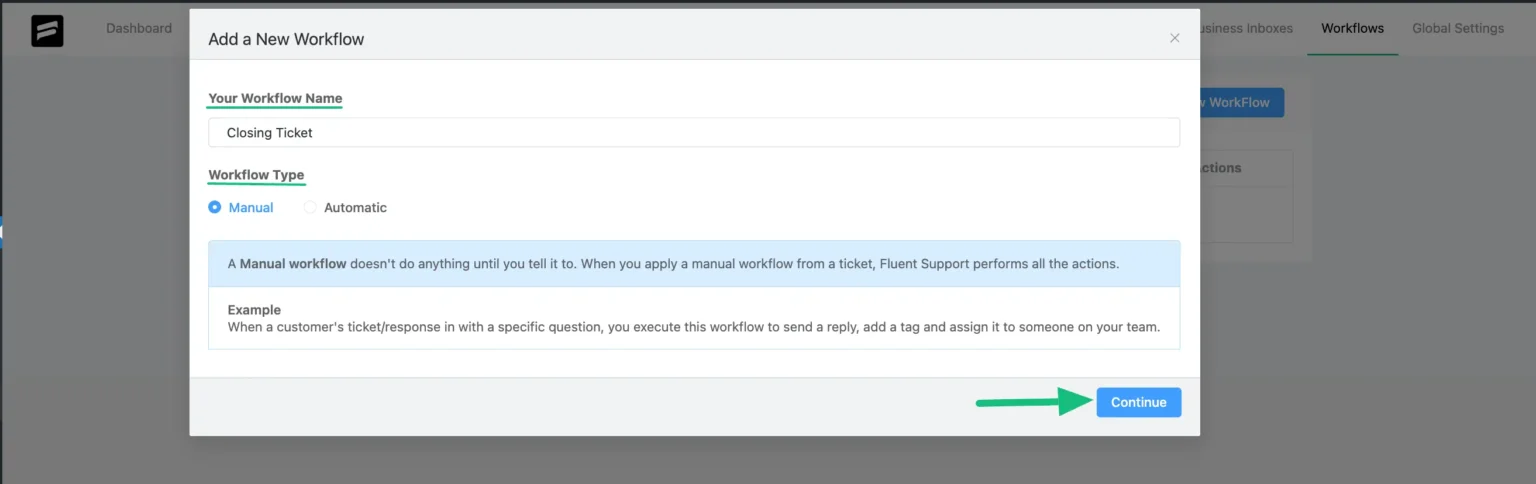
4. Enter a clear workflow name that reflects the action it performs
Example: “Escalate to Technical Team” or “Closing Ticket”
5. Add action you want the workflow to execute.
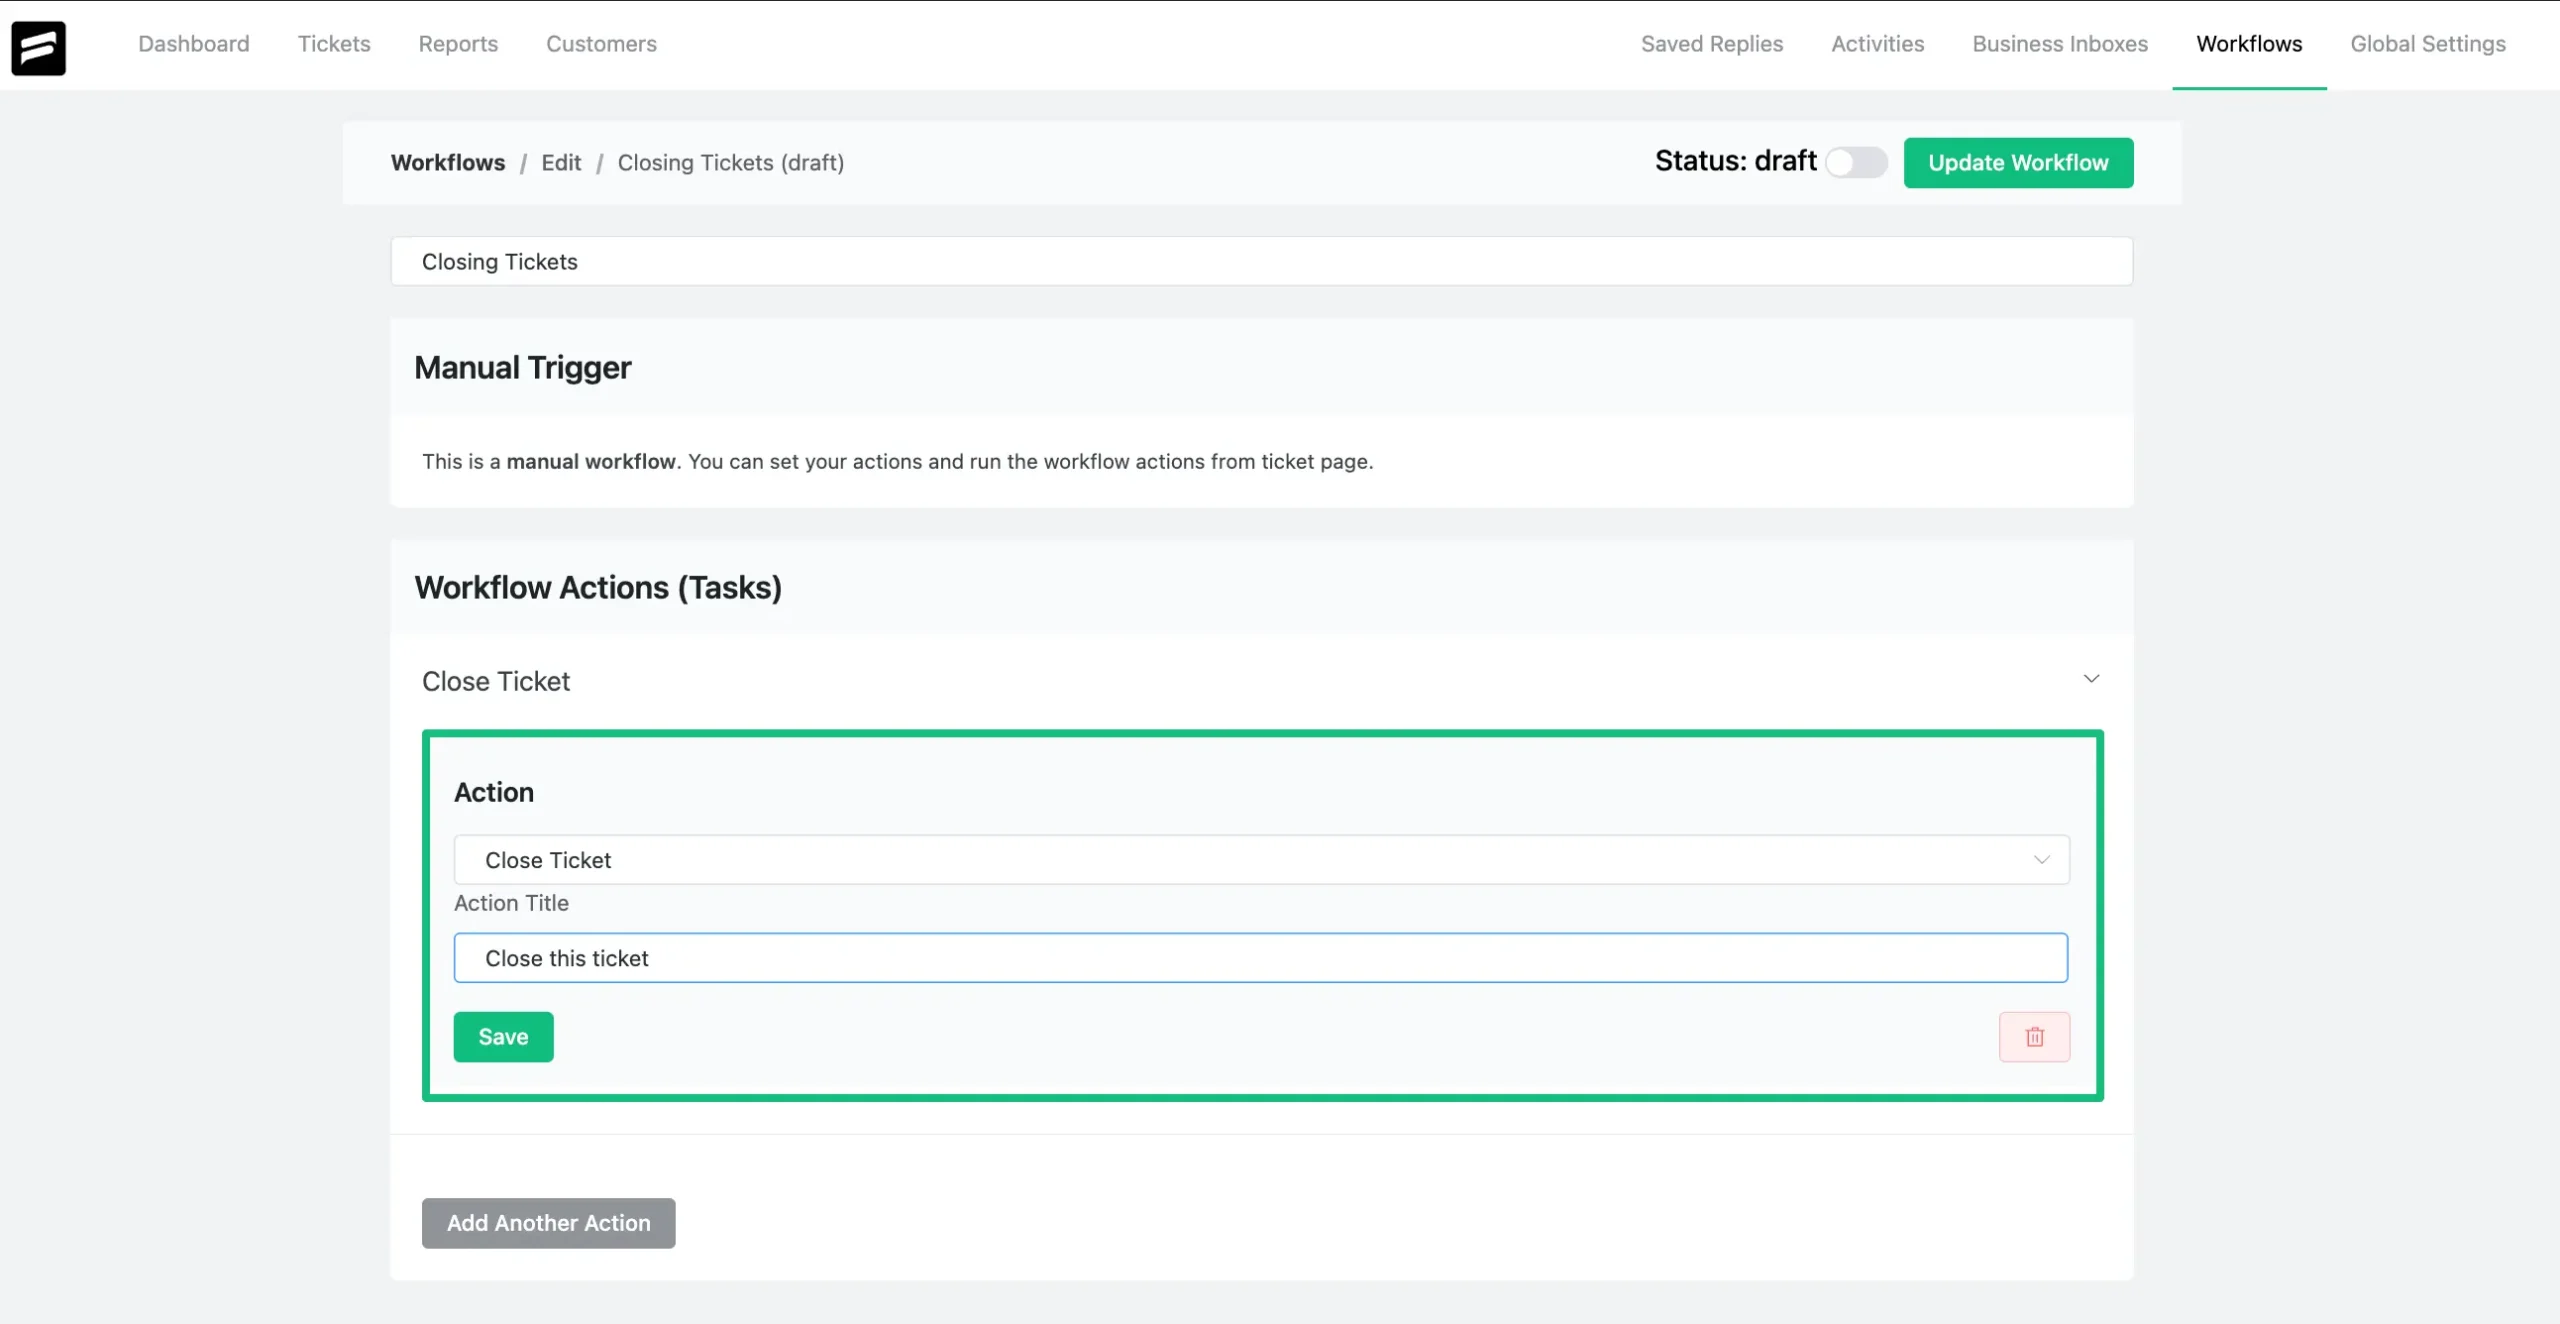
6. You can add multiple actions according to you need.
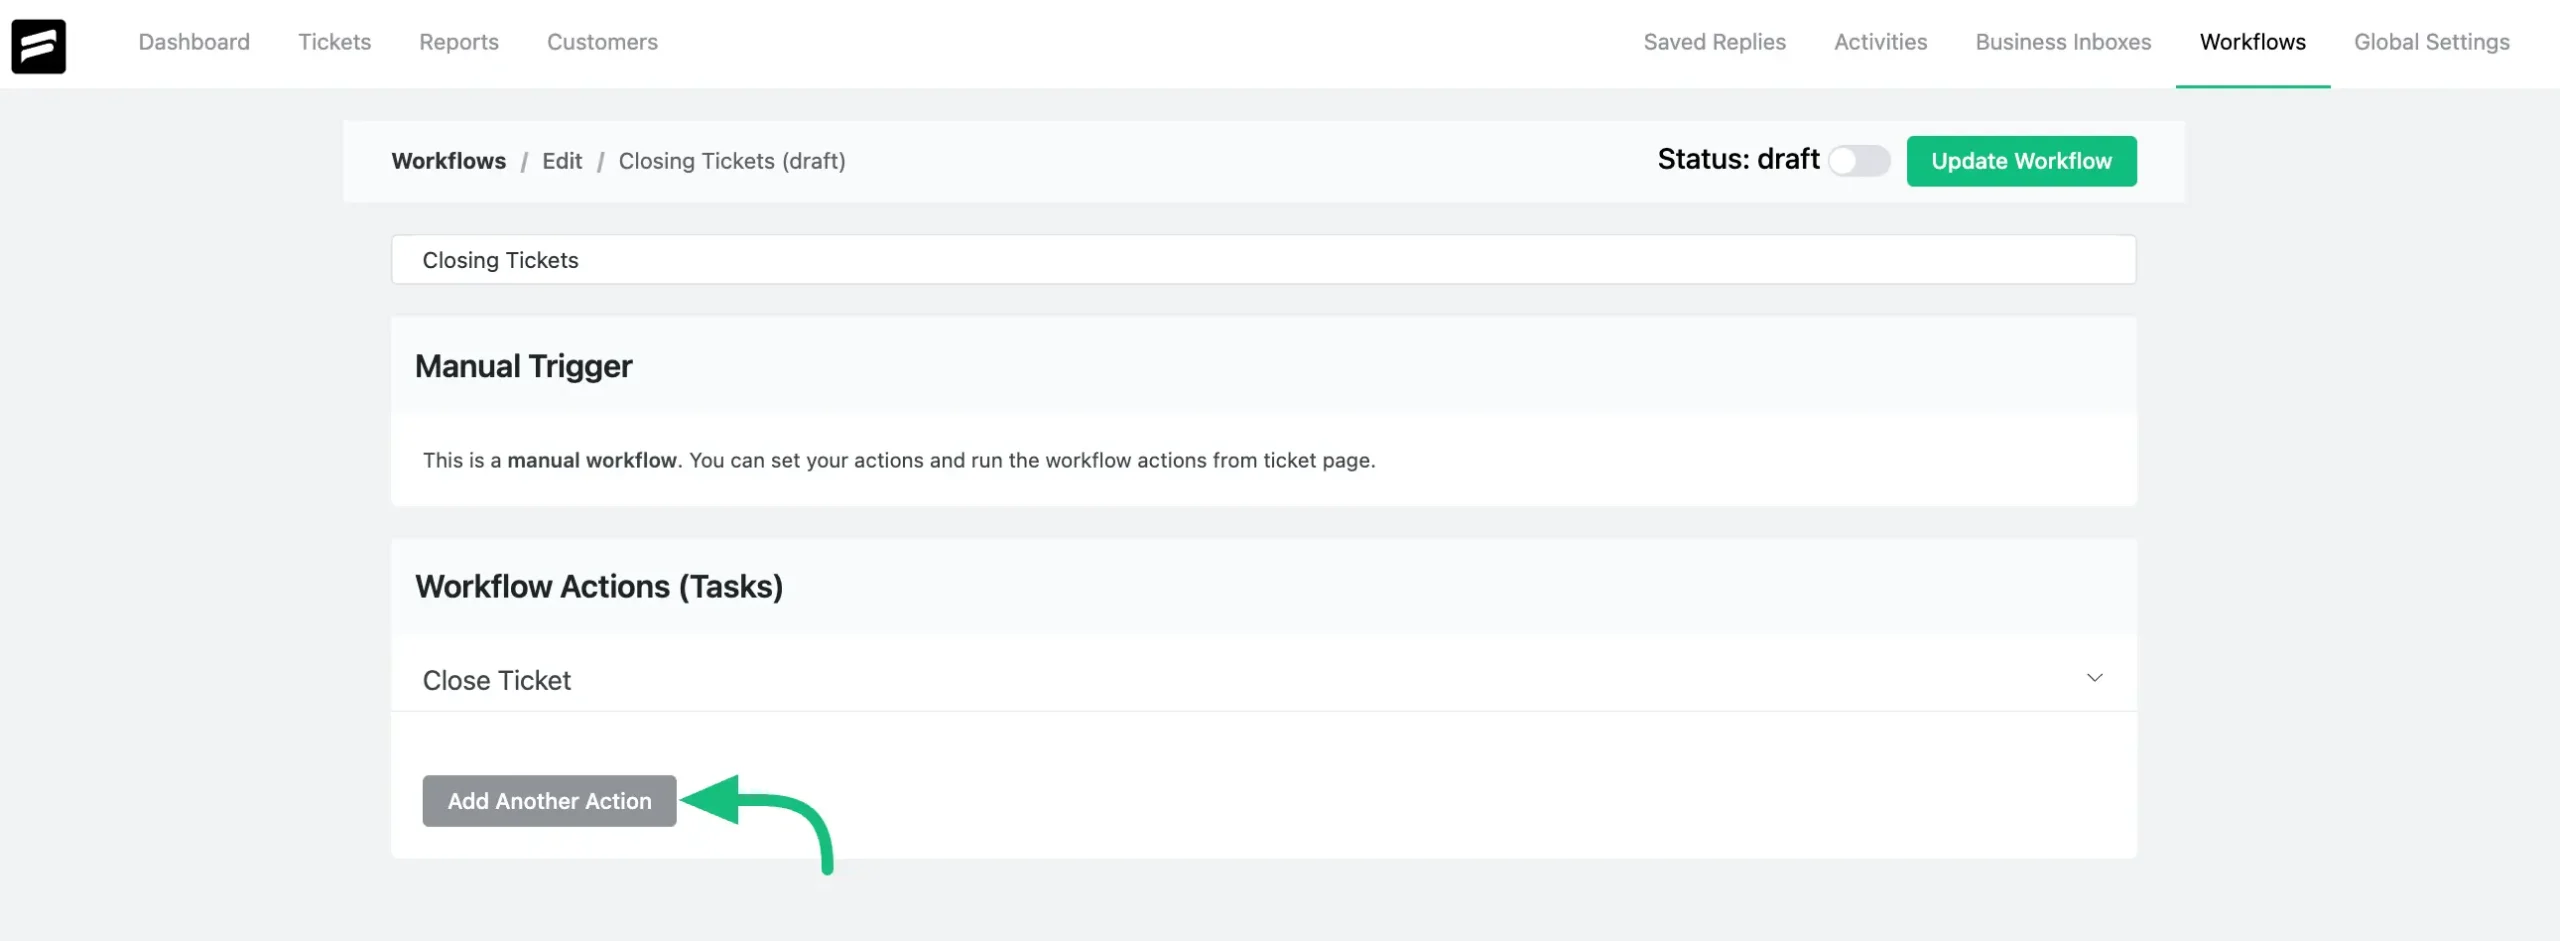
7. Once you’ve defined the actions, enable the toggle at the top-right to publish the workflow.
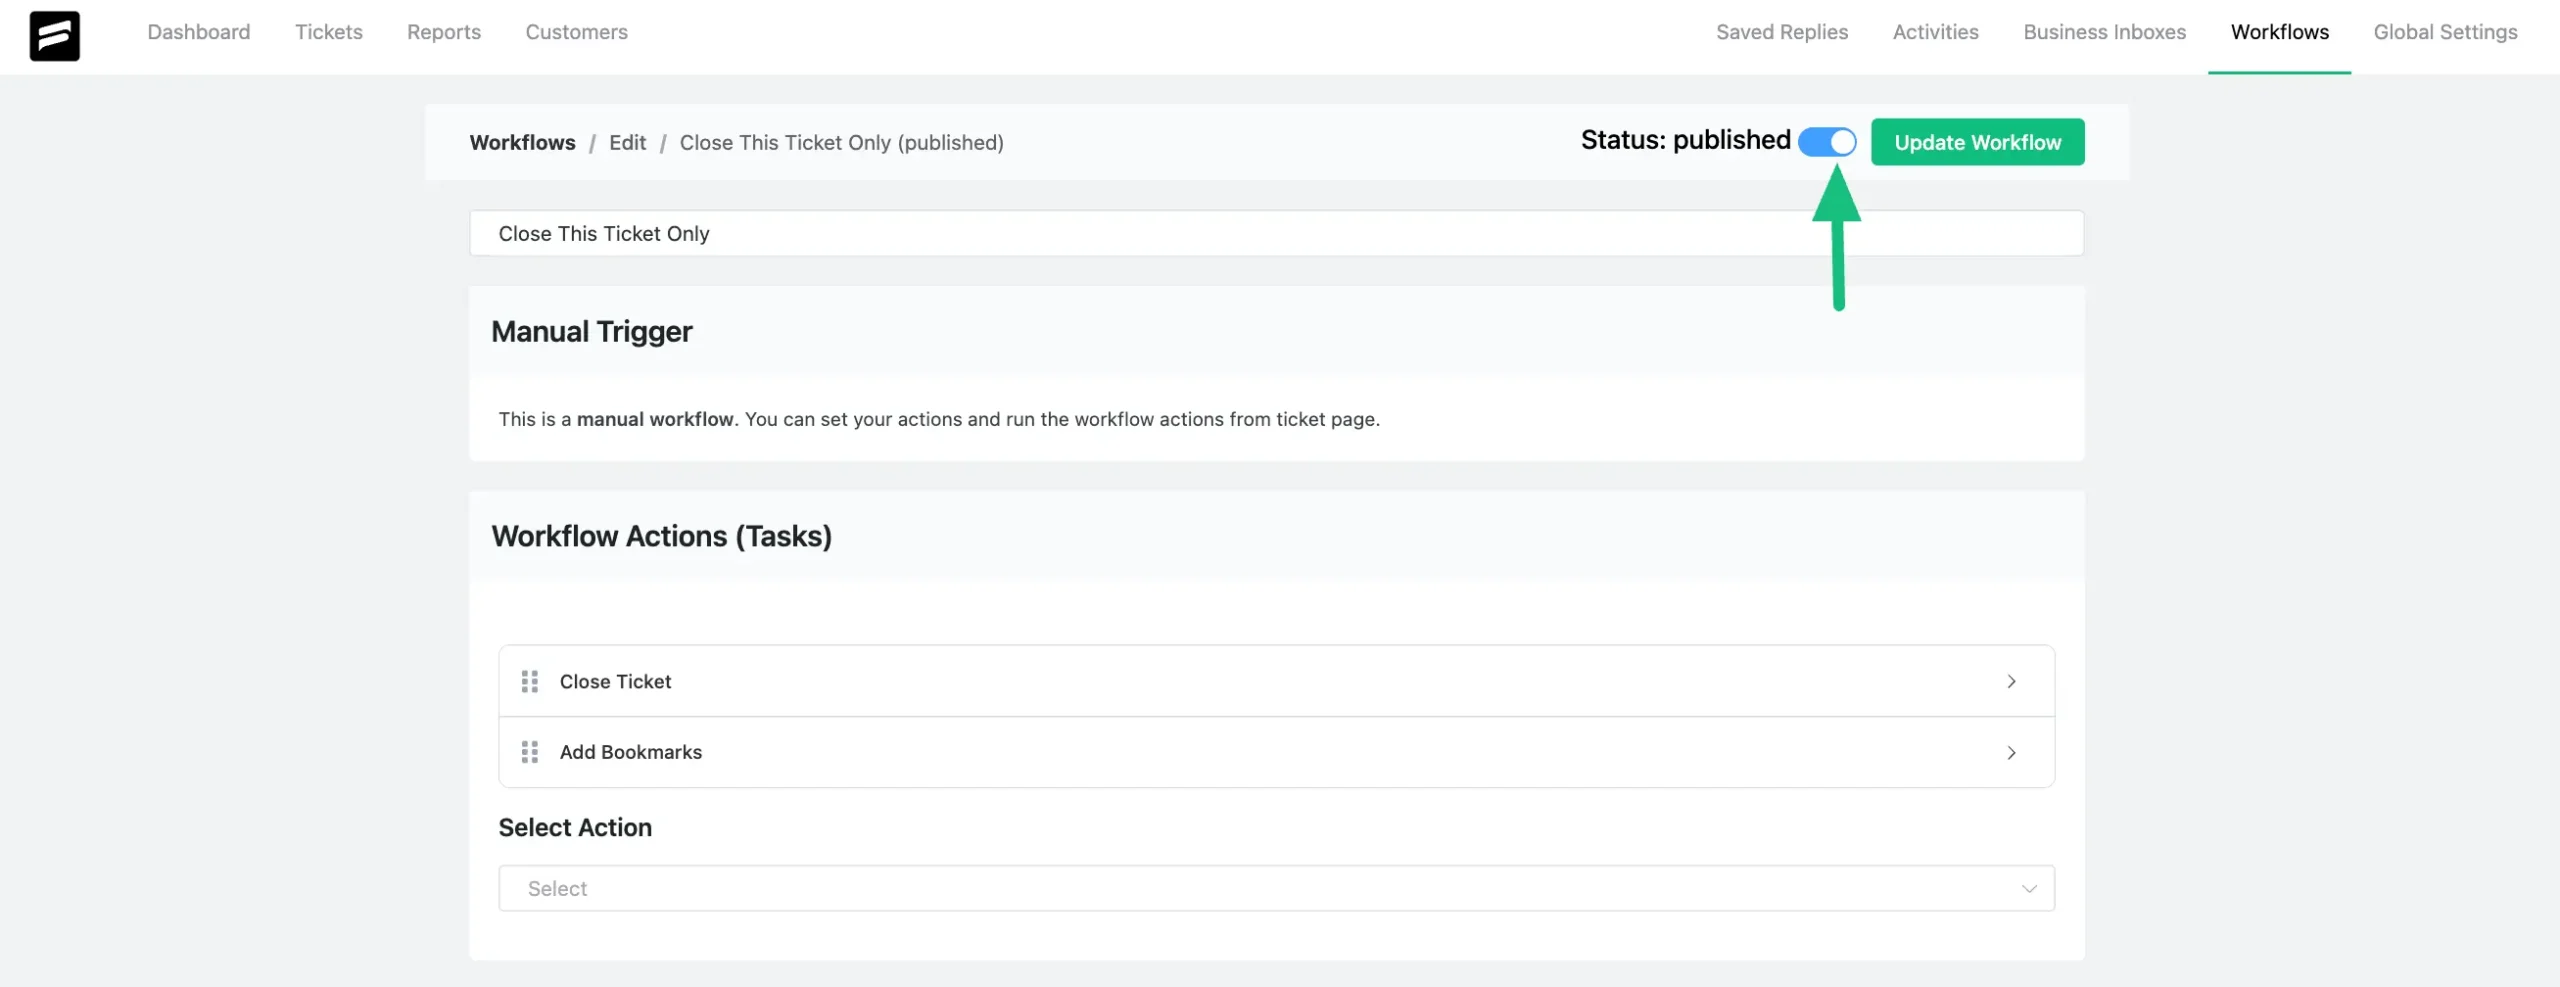
If the toggle remains off, the workflow stays in draft mode and won’t run.
Whenever you make changes, click Update Workflow next to the toggle to save and apply them.
Once saved, the workflow becomes available inside the ticket interface. Agents can manually apply it whenever the situation calls for it.
When manual workflows make sense?
Manual workflows are best used when:
- The action should not run for every ticket
- The decision depends on context
- An agent needs control over timing
They are not meant to replace automation.
They exist to reduce repetitive clicks while keeping decision-making in human hands.
This balance is important during setup, especially before your support process fully stabilizes.
2. Automatic workflows
Automatic workflows run without manual intervention.
They trigger when specific events happen and perform actions based on defined conditions so your agents don’t have to repeat the same tasks manually.
Most modern WordPress ticketing systems offer workflow automation that lets you act on ticket events automatically. Fluent Support uses this same model with flexible triggers, conditions, and actions that apply directly to your support tickets.
In Fluent Support, an automatic workflow consists of:
The three triggers:
When setting up an automatic workflow, you first choose the event that should start it:
- On Ticket Creation – runs right after a new ticket is submitted
- On Customer Response – runs when the customer responds
- On Ticket Closed – runs after a ticket is marked closed
How conditions refine execution
Conditions control when a workflow actually runs even after its trigger fires. For example:
- Only run if the ticket is from a certain inbox
- Only run if the product is X
- Only run if a custom field matches a value
- Only run if the message content contains a keyword
You can combine conditions using “AND” and “OR” logic to target specific scenarios.
Actions you can automate
Once conditions are met, Fluent Support lets you choose one or more actions for the workflow:
- Add a response
- Assign an agent
- Add an internal note
- Close a ticket
- Add or remove tags
- Change the mailbox
- Remove a ticket
- Trigger outgoing webhooks
- Bookmark or unbookmark tickets
Multiple actions can be chained together and reordered to create complex behavior without agents clicking multiple places.
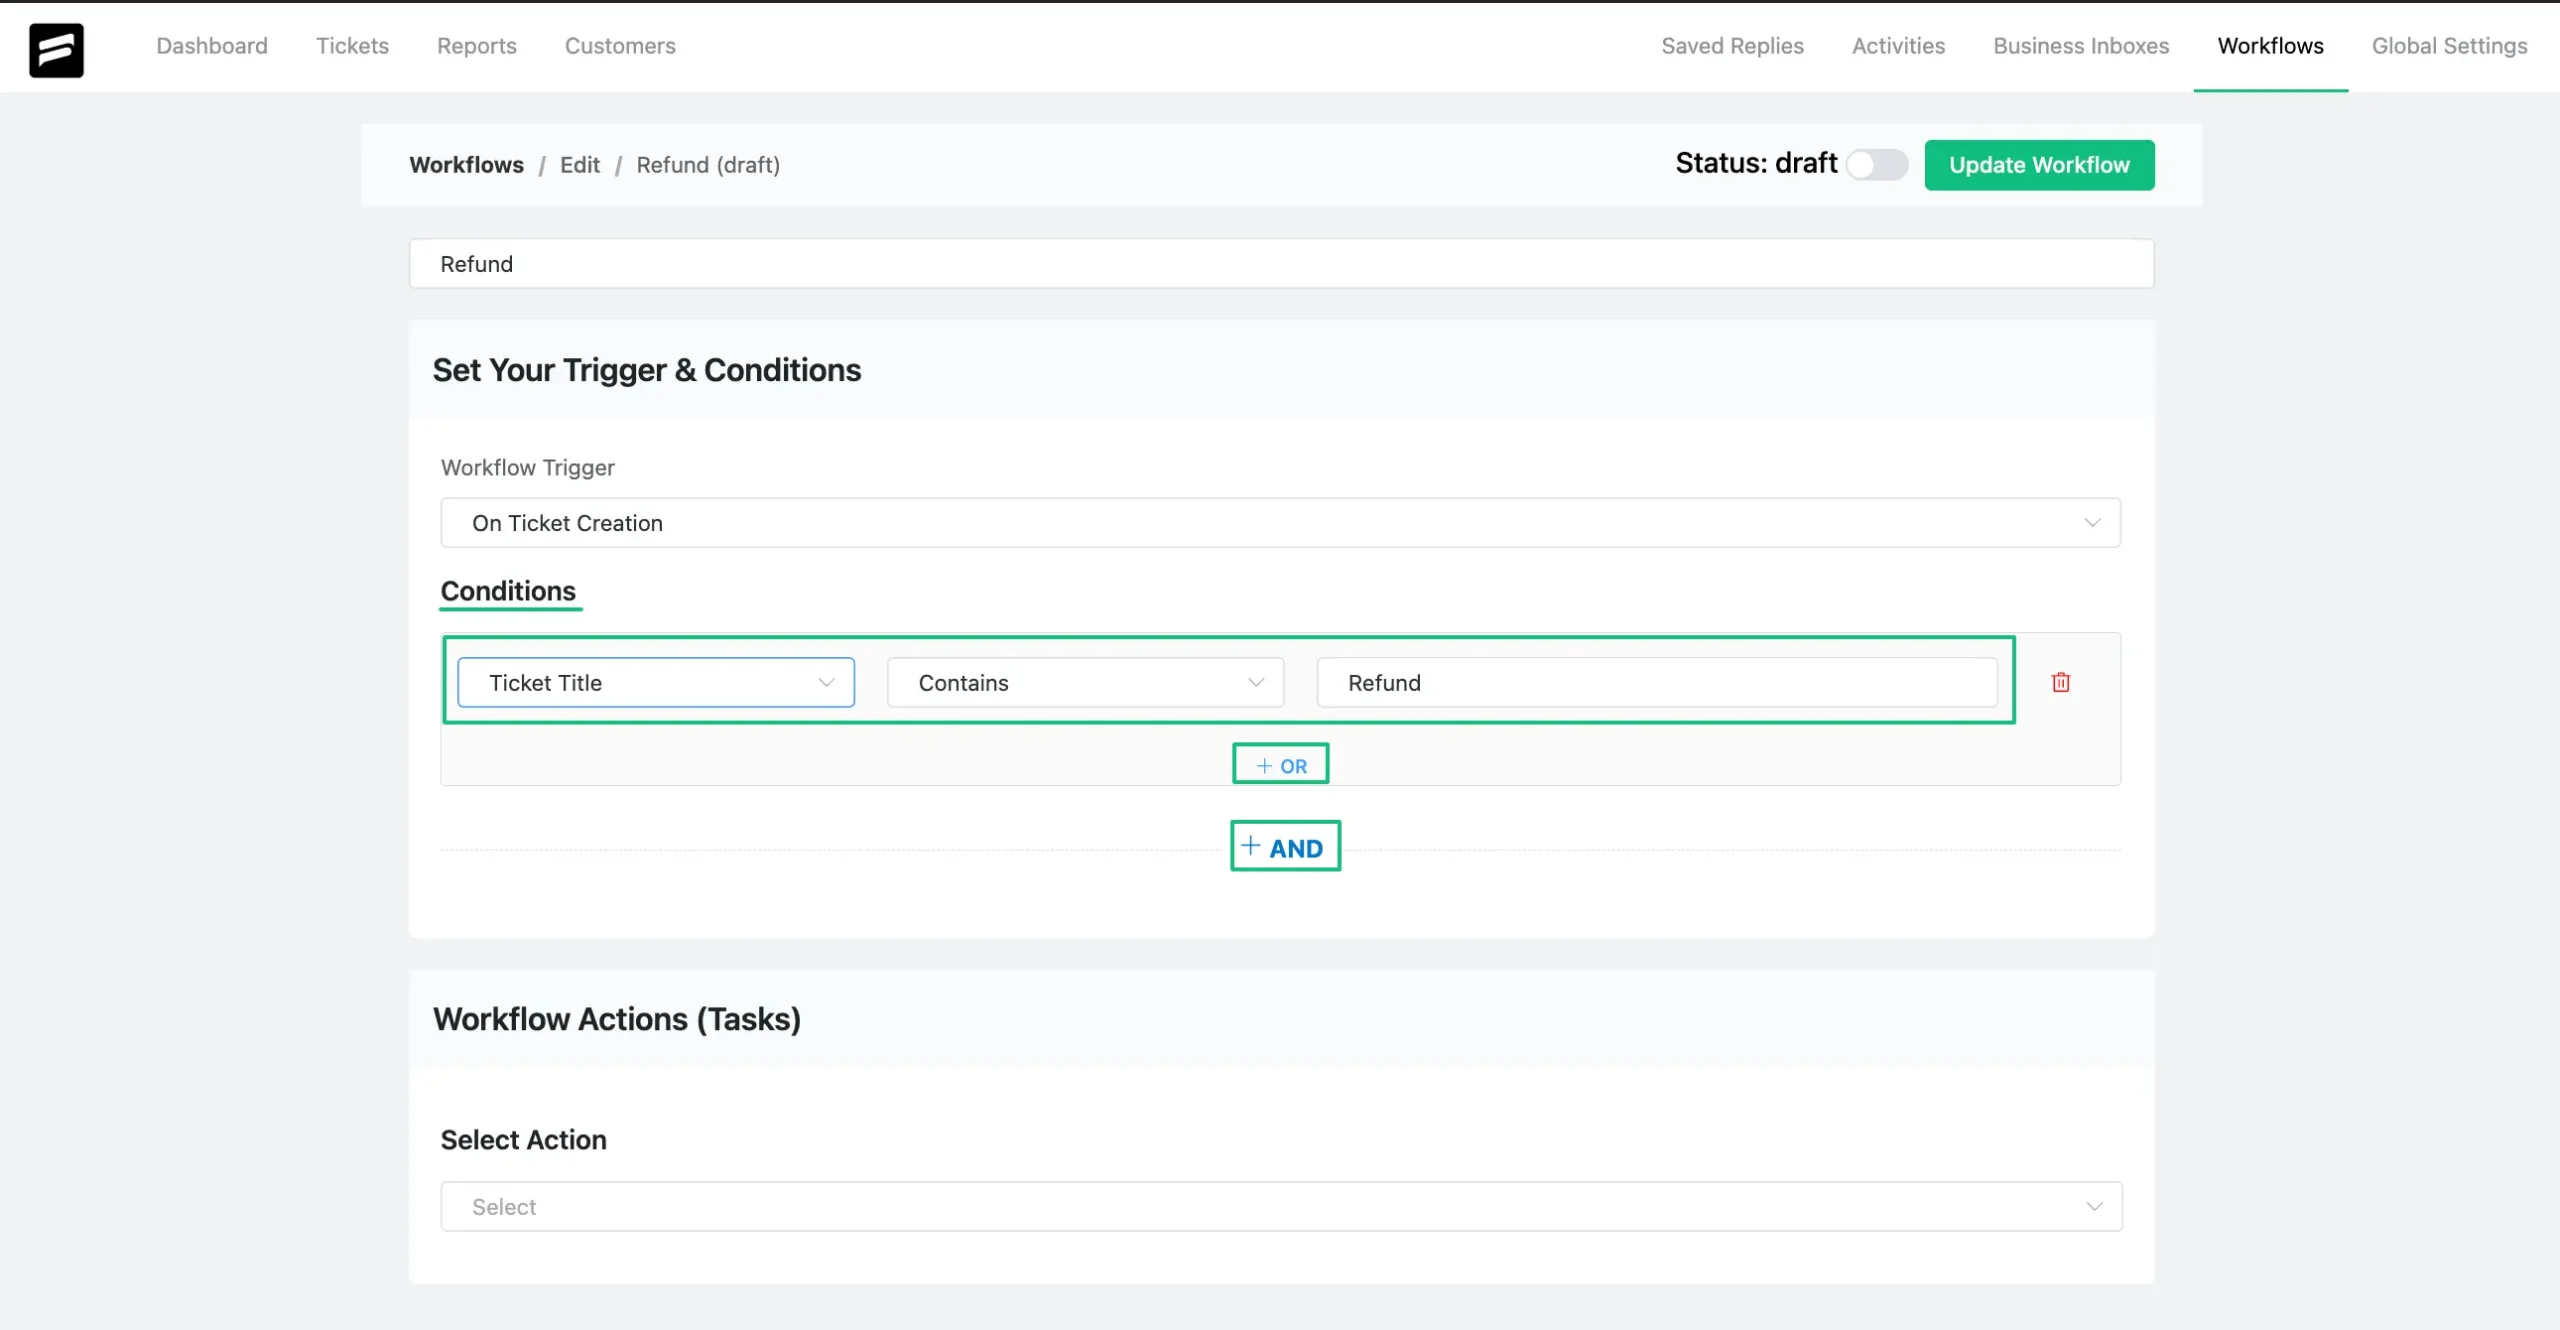
How to set up an automatic workflow
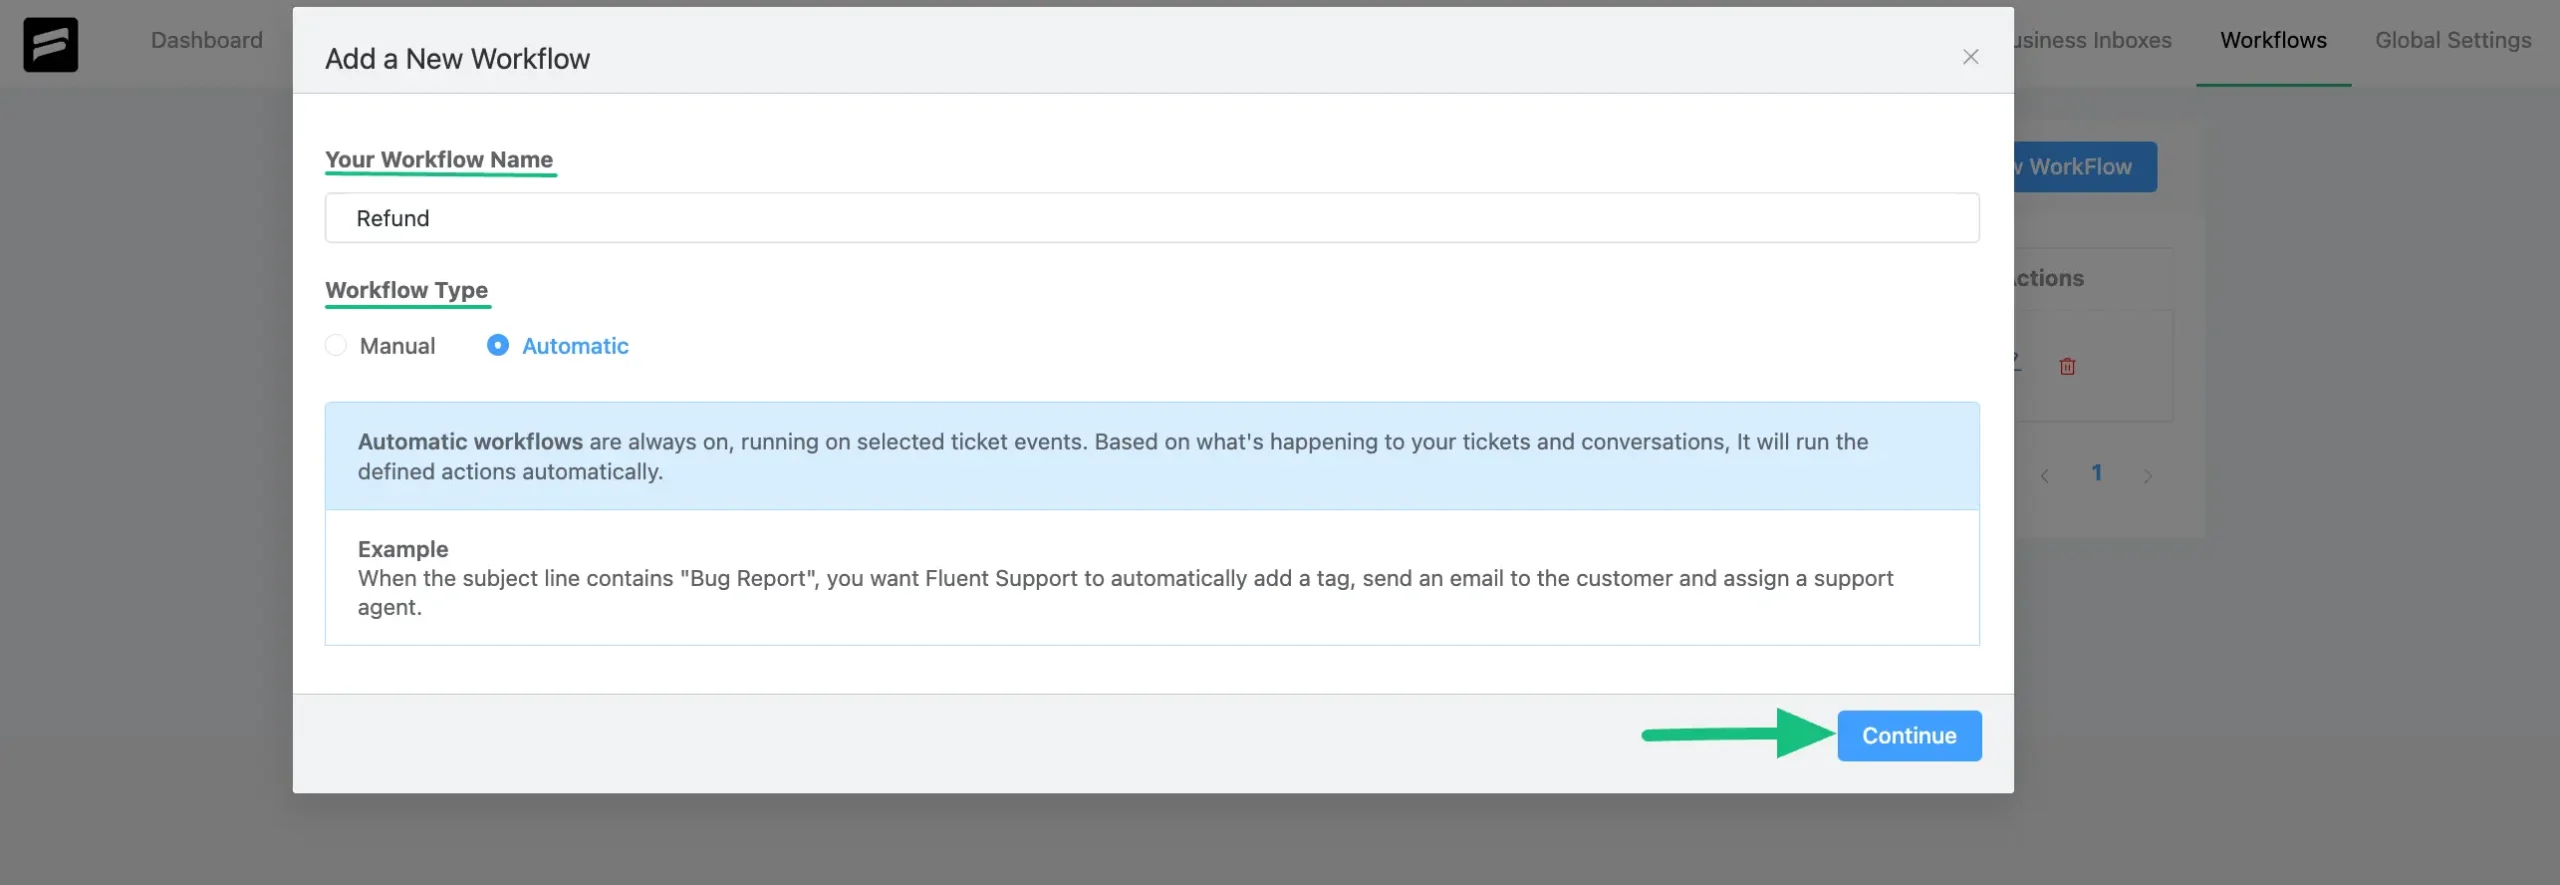
From your WordPress dashboard, go to Fluent Support → Workflows and click Add New Workflow.
Give the workflow a clear name and select Automatic as the workflow type.
Next, choose the trigger event that should start the workflow. For example, you might select “On Ticket Creation” if you want the automation to run as soon as a new ticket is submitted.
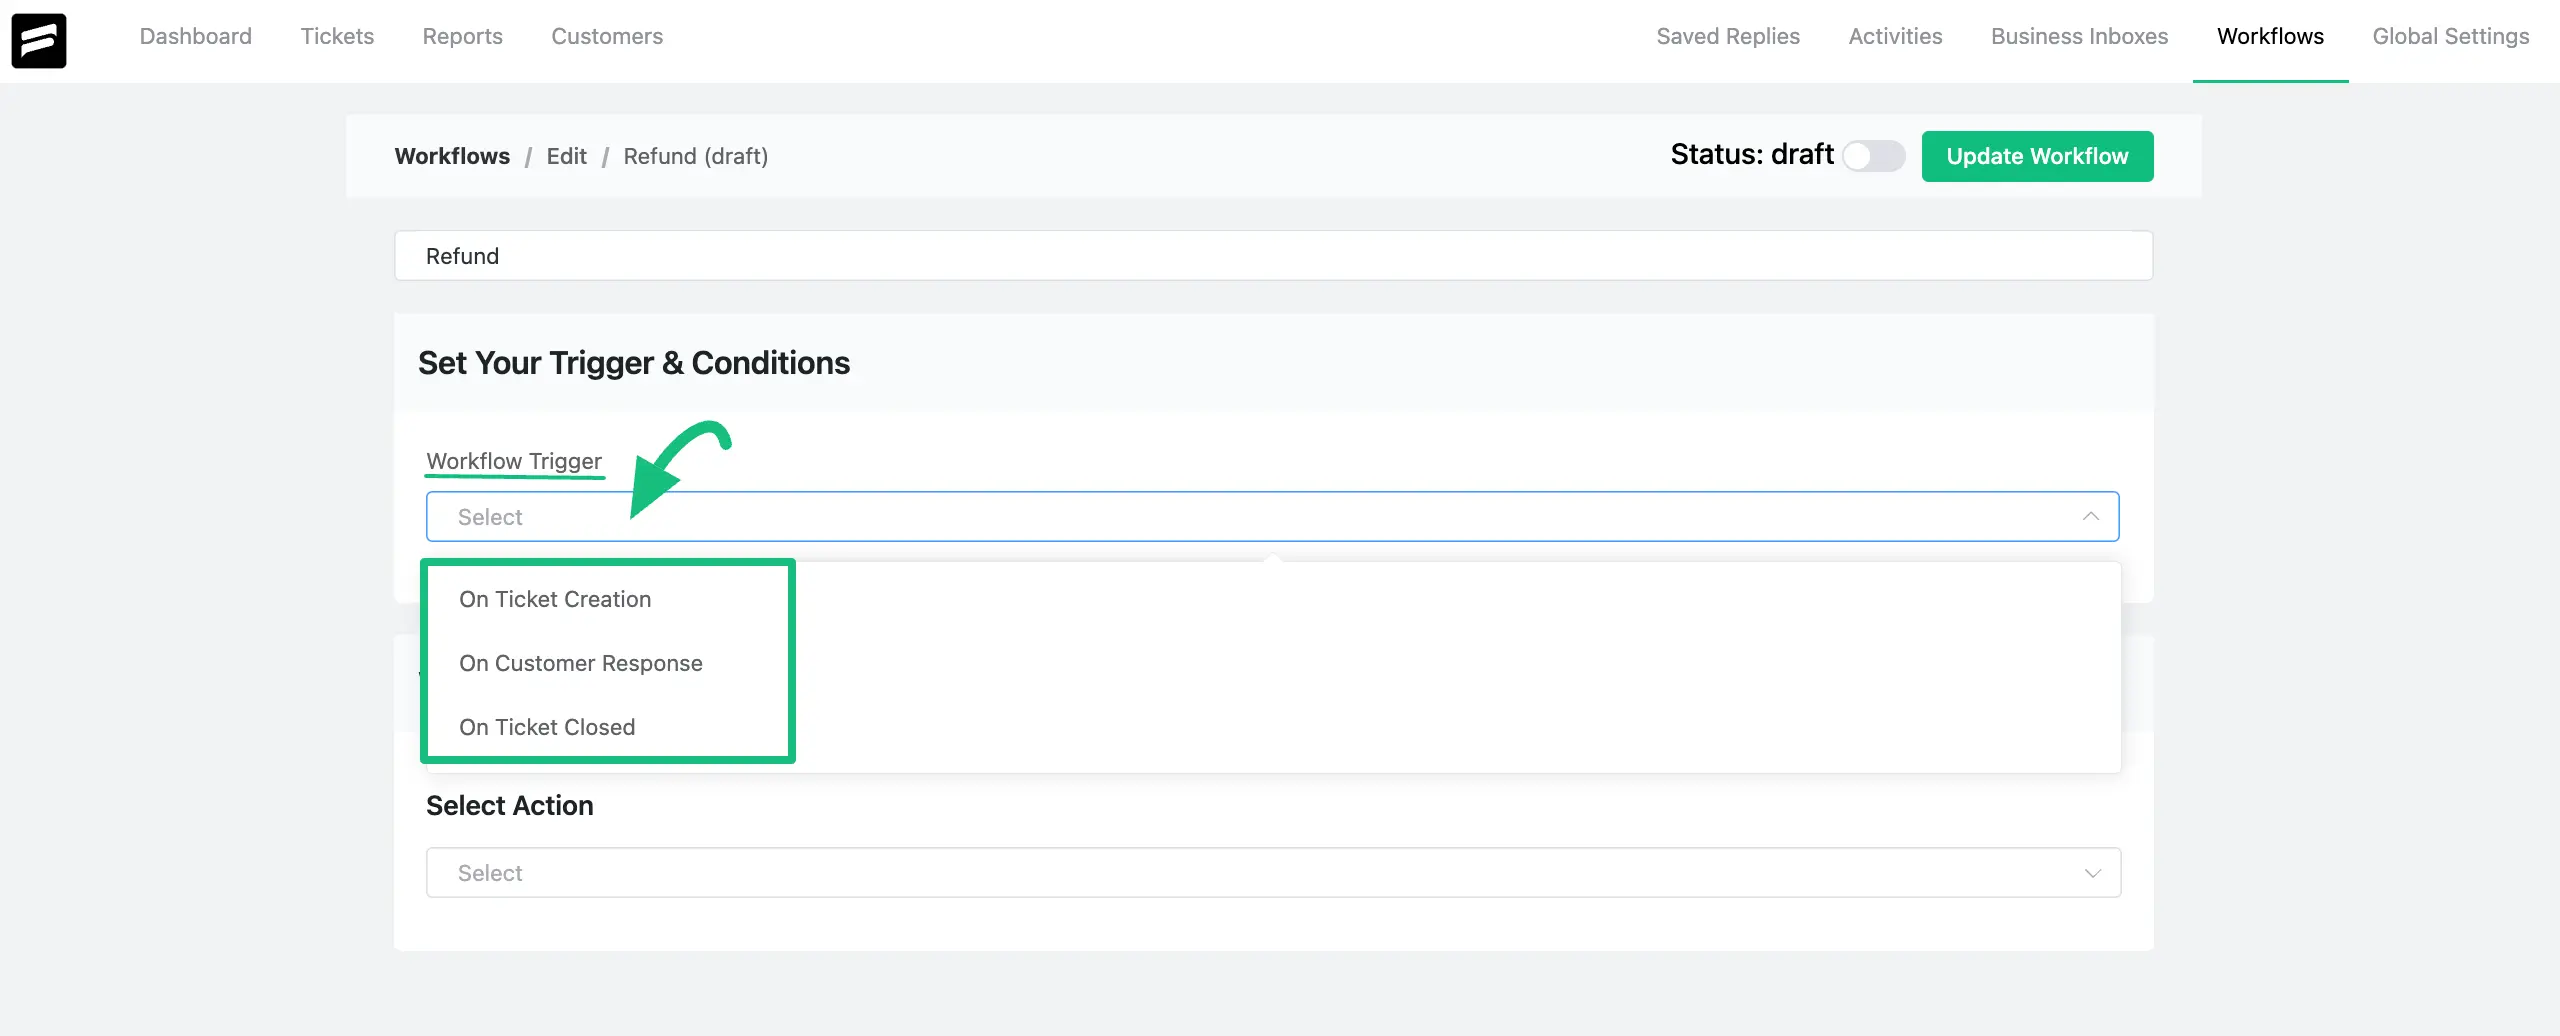
After that, define conditions to control when the workflow should apply.
Conditions help ensure the automation only runs for the right tickets, such as those from a specific inbox, product, or matching certain criteria.
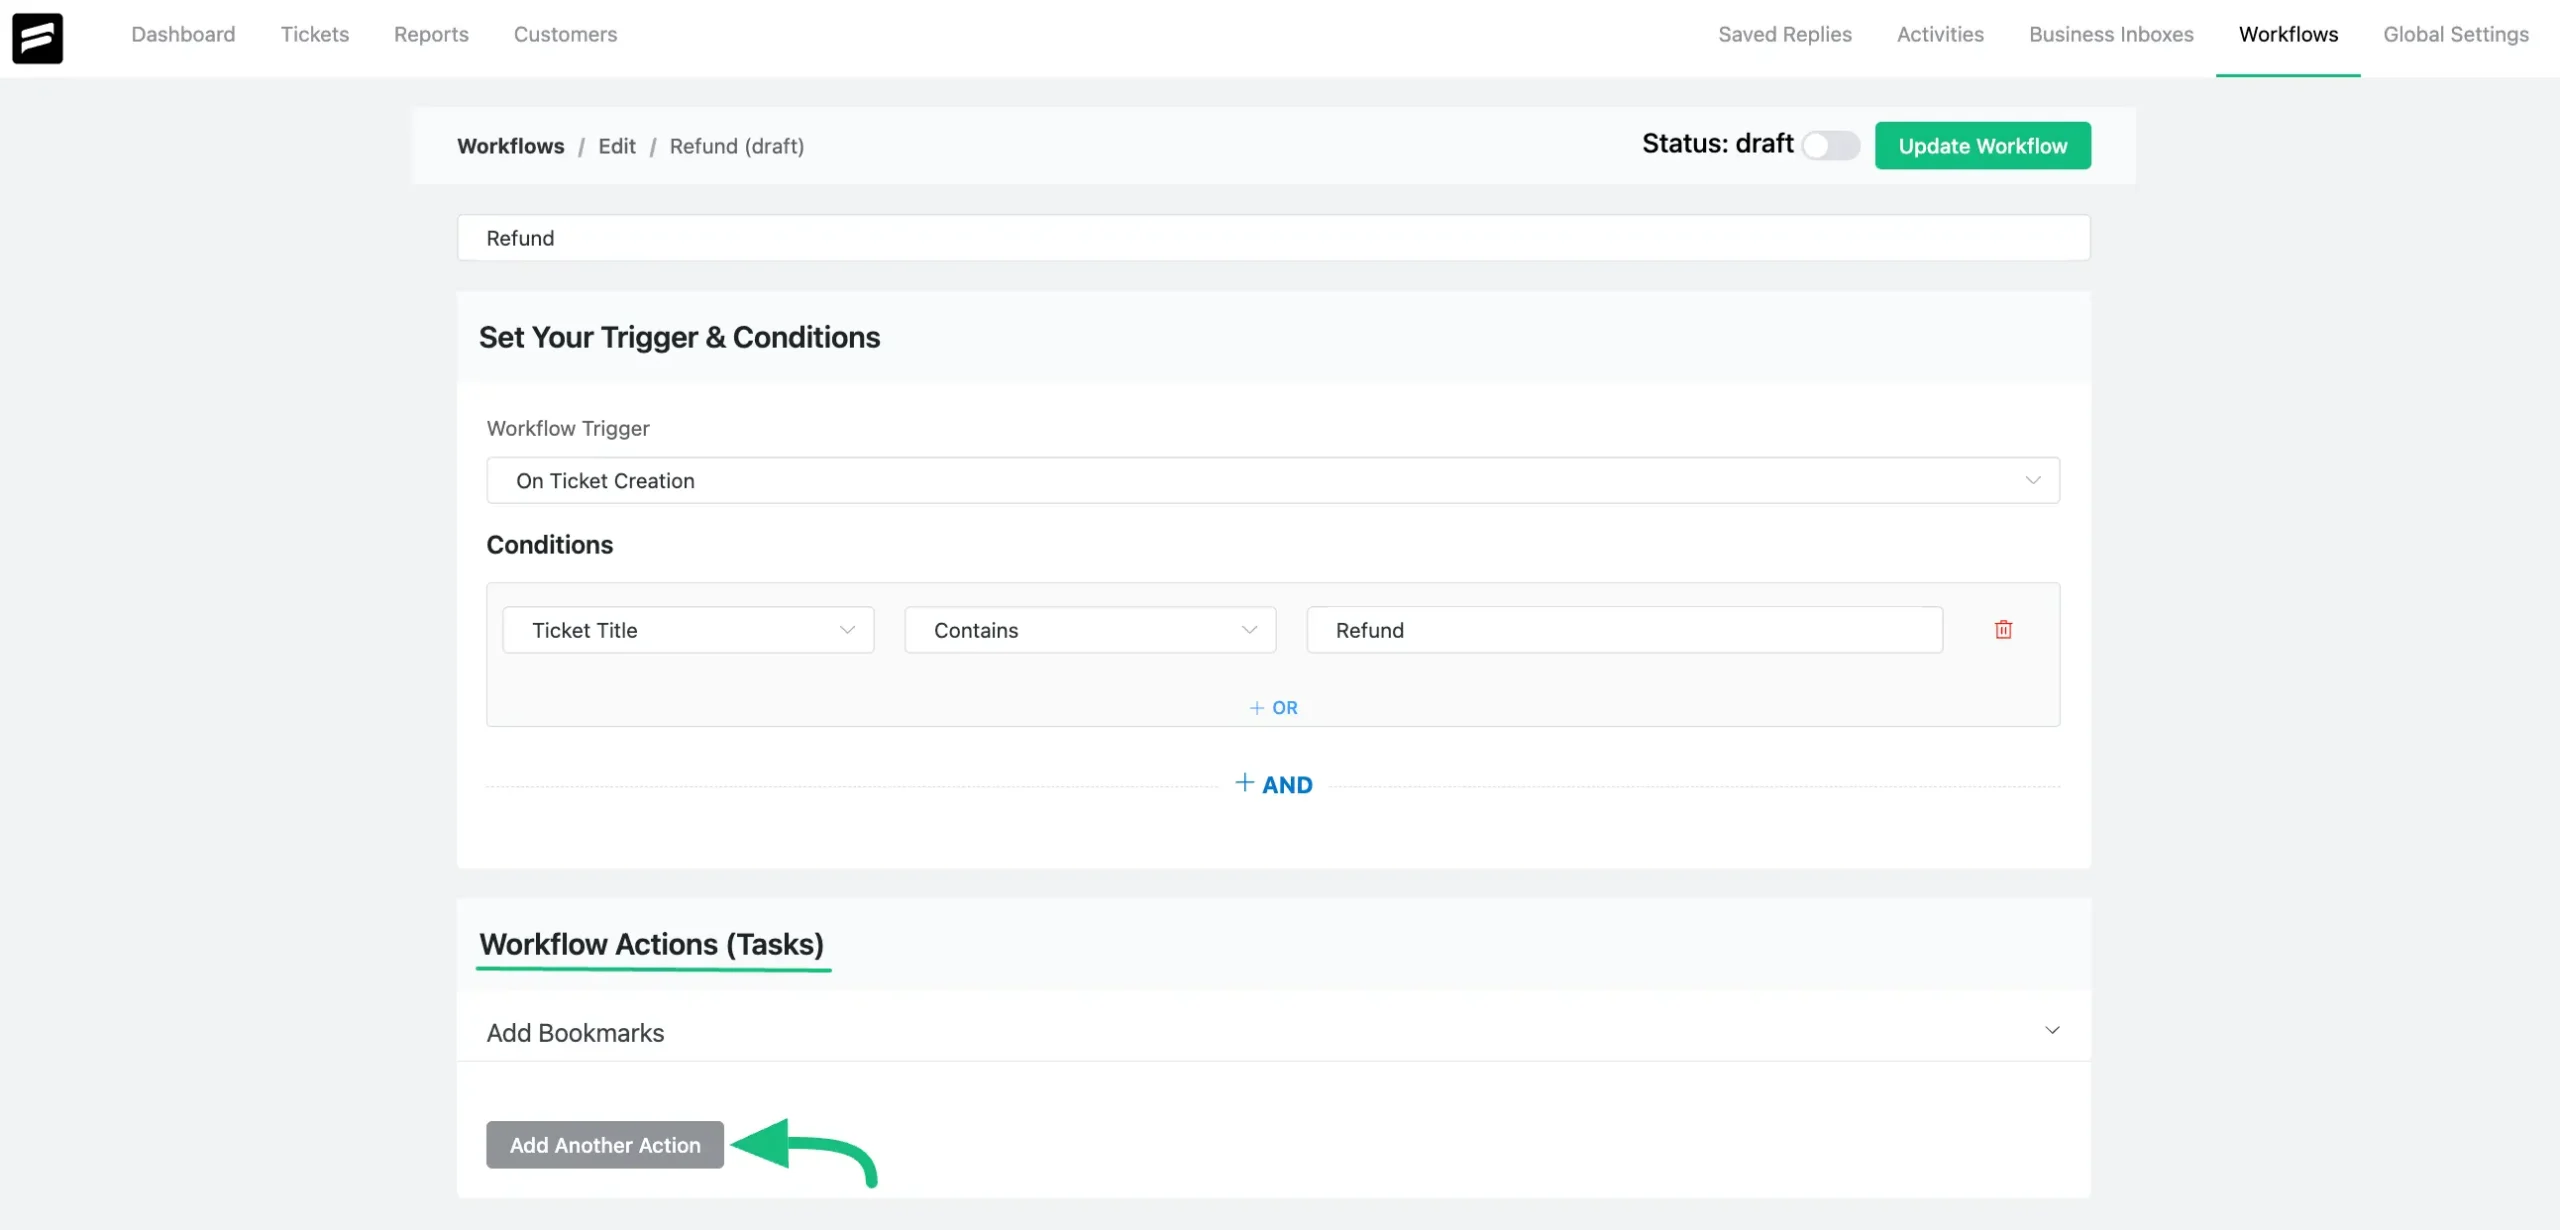
Then, add the actions you want the workflow to perform.
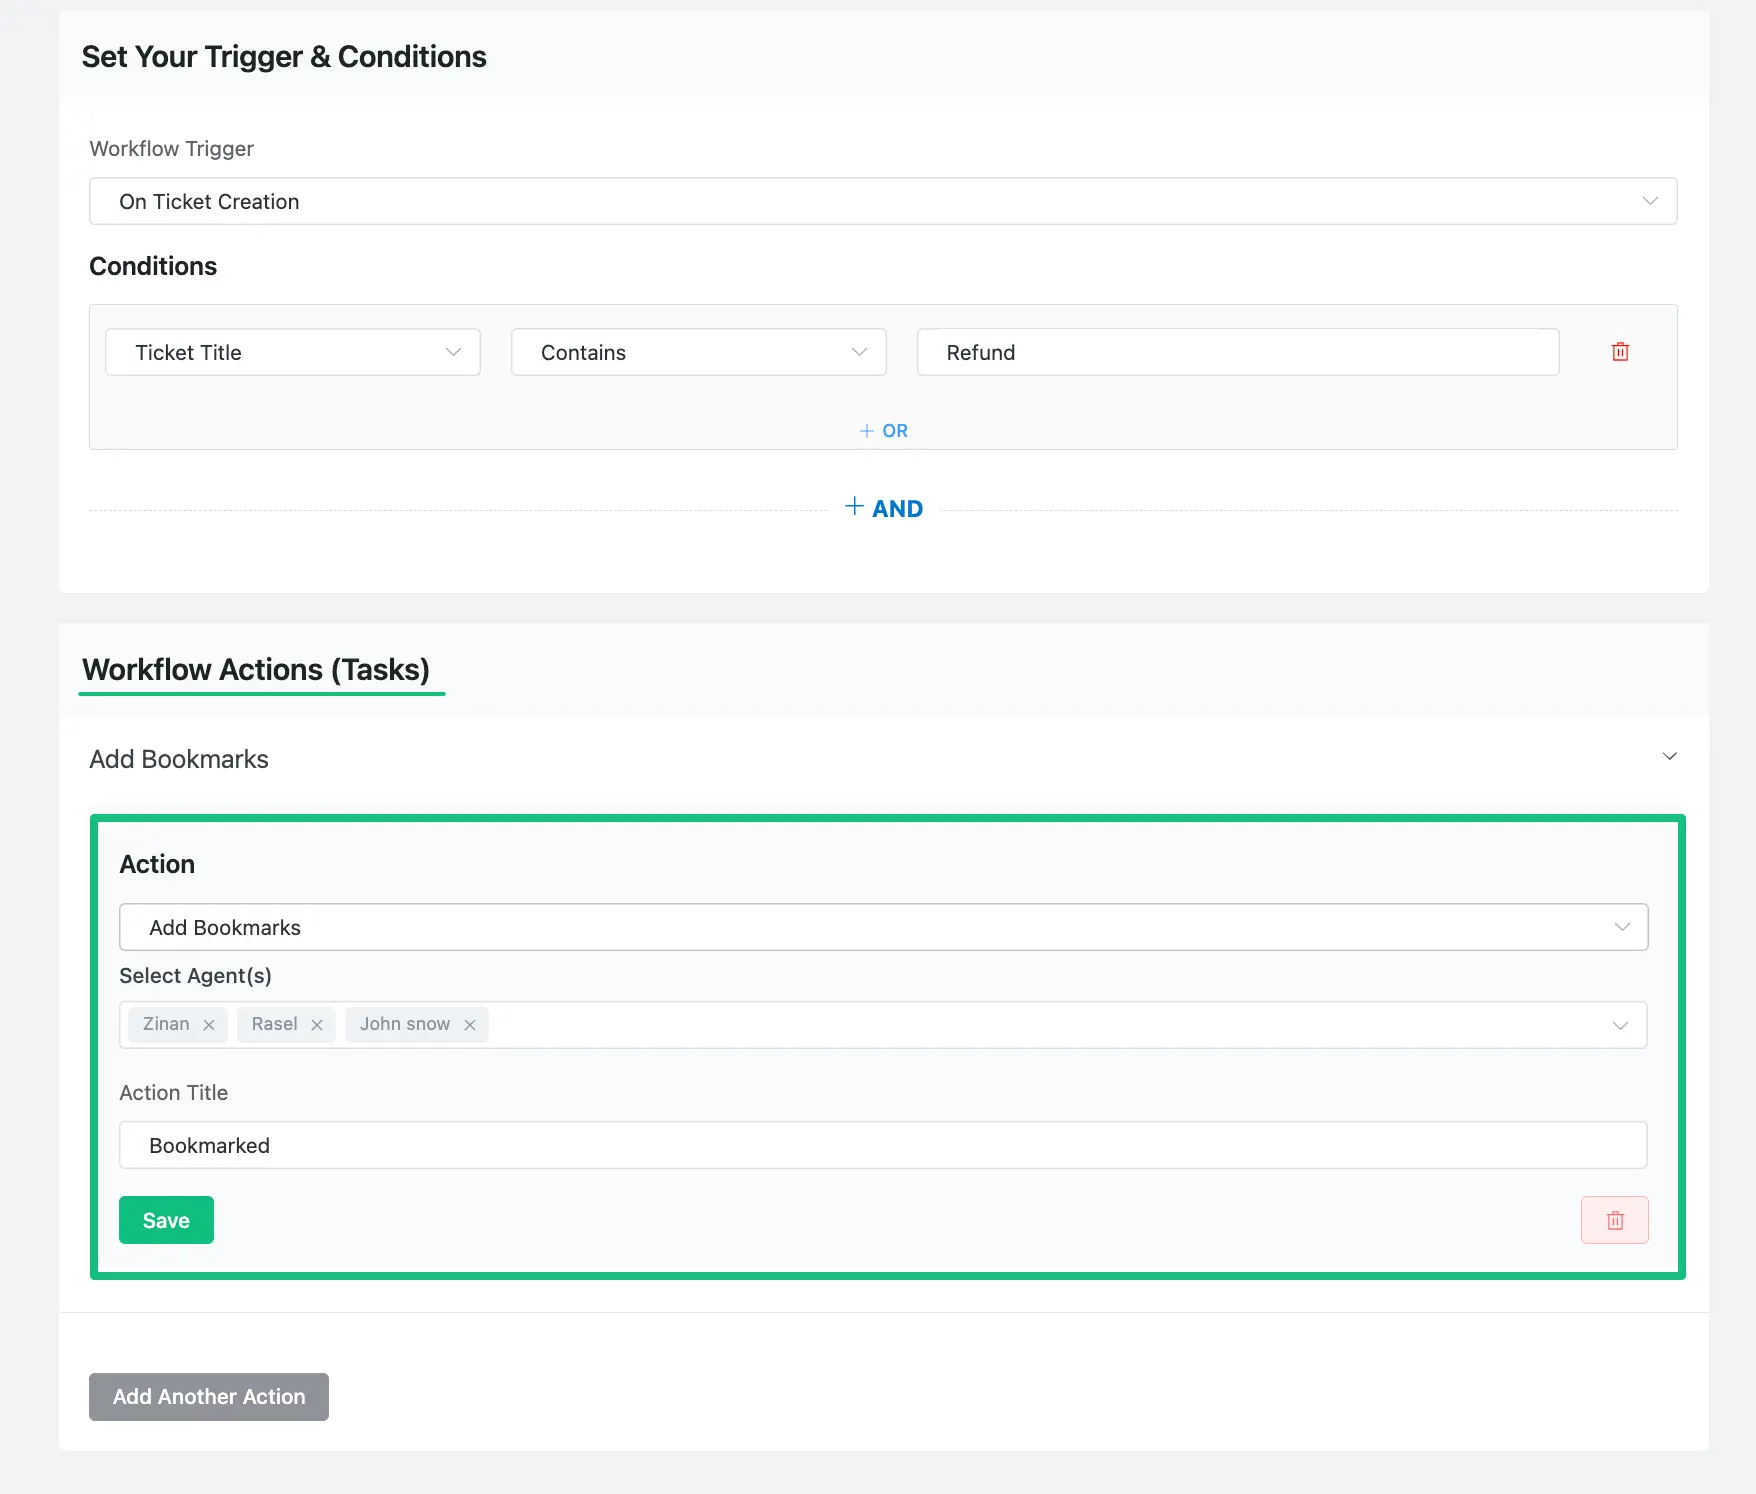
You can include multiple actions in a single workflow, such as assigning an agent, adding a response or internal note, applying tags, or updating the ticket status.
Once everything is configured, enable the workflow using the toggle at the top and click Update Workflow to apply it.
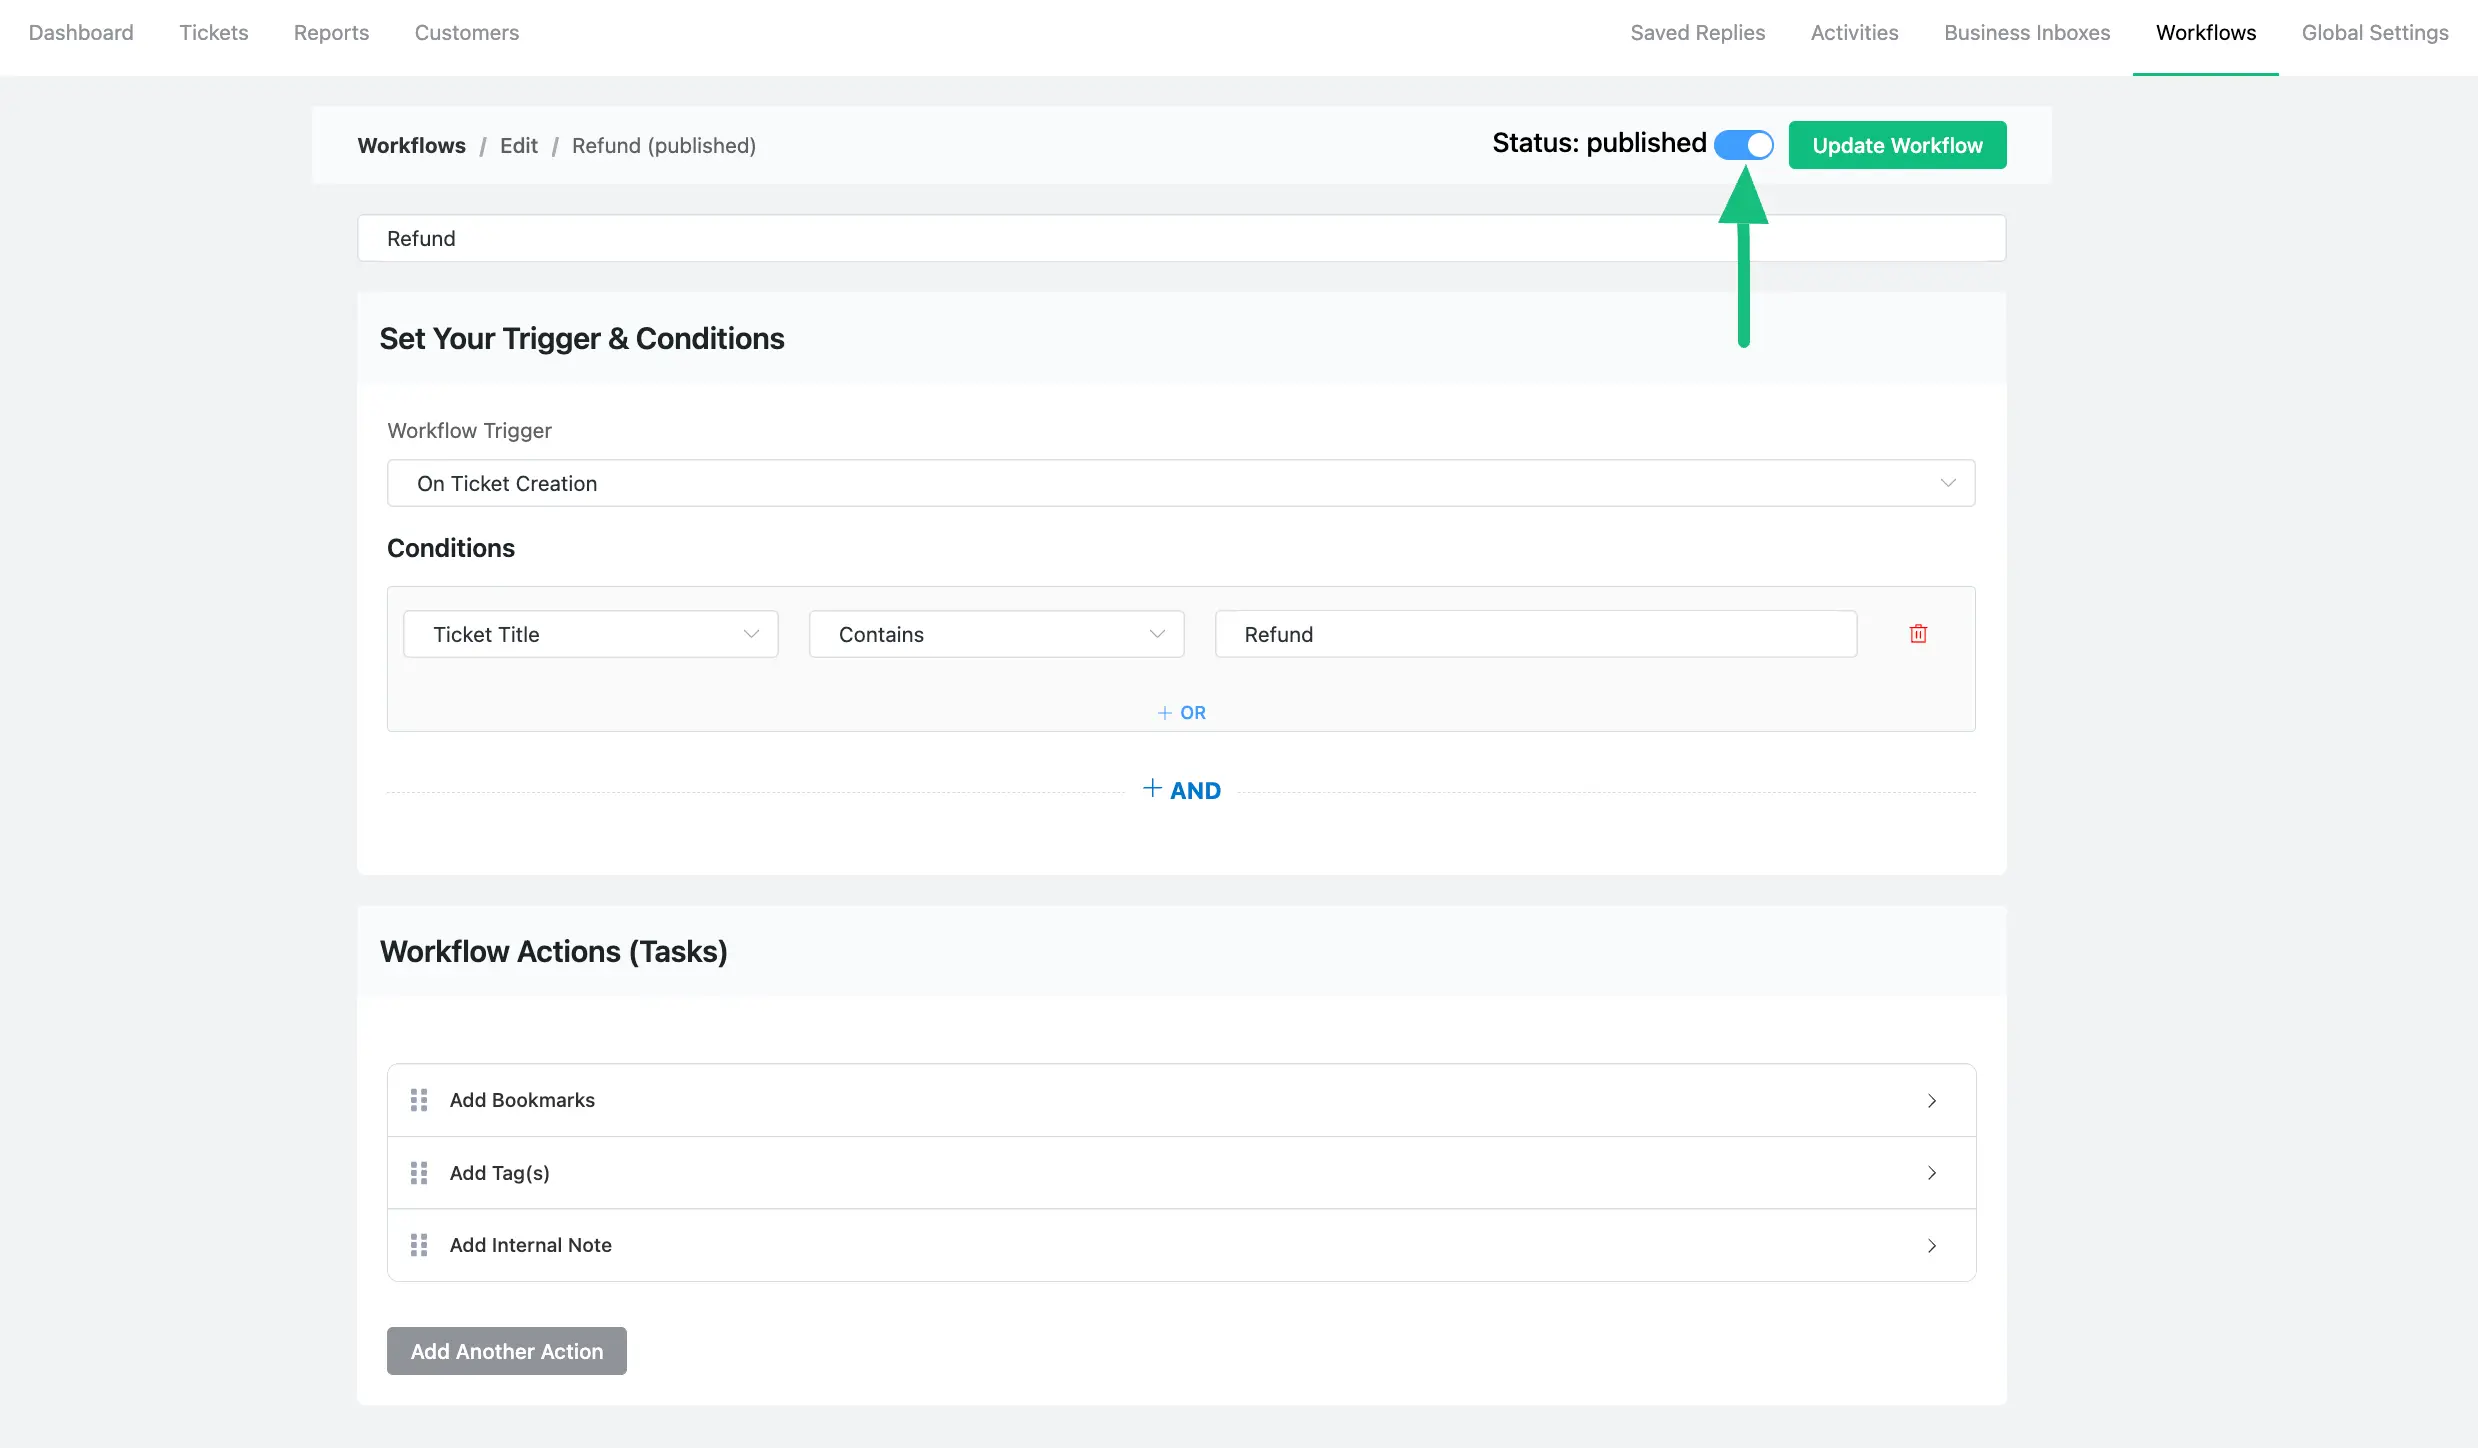
The workflow is now active and will run automatically whenever the trigger occurs and all conditions are met.
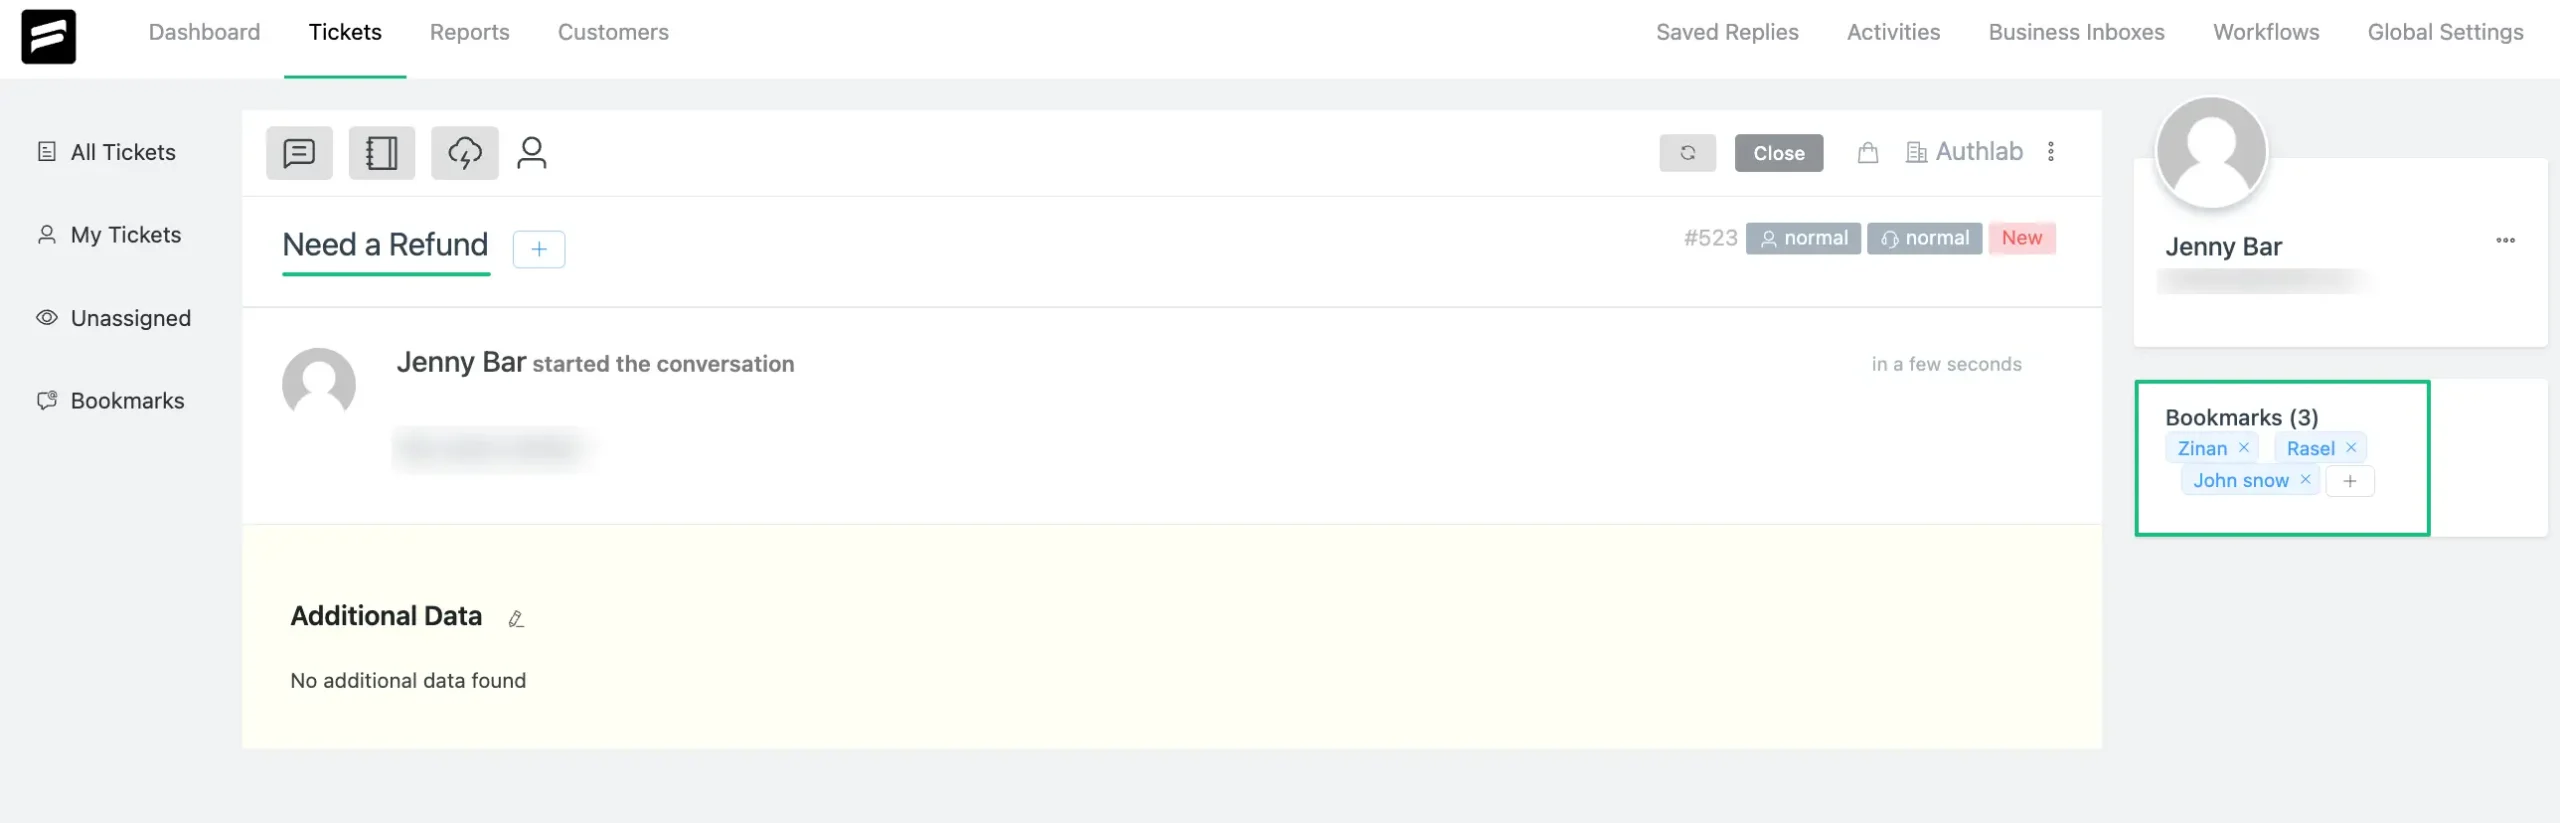
For example, we created a workflow that triggers when a ticket is created, checks whether the ticket title contains the word refund, and then automatically bookmarks the ticket.
As soon as a customer submits a ticket with refund in the subject, the system applies the bookmark instantly.
Step 6: Validate the system with real tickets
At this stage, the system is configured. Now you confirm that it actually works the way support teams expect it to.
This step is not about testing features. It’s about verifying flow.
Setup Support Ticket System in WordPress
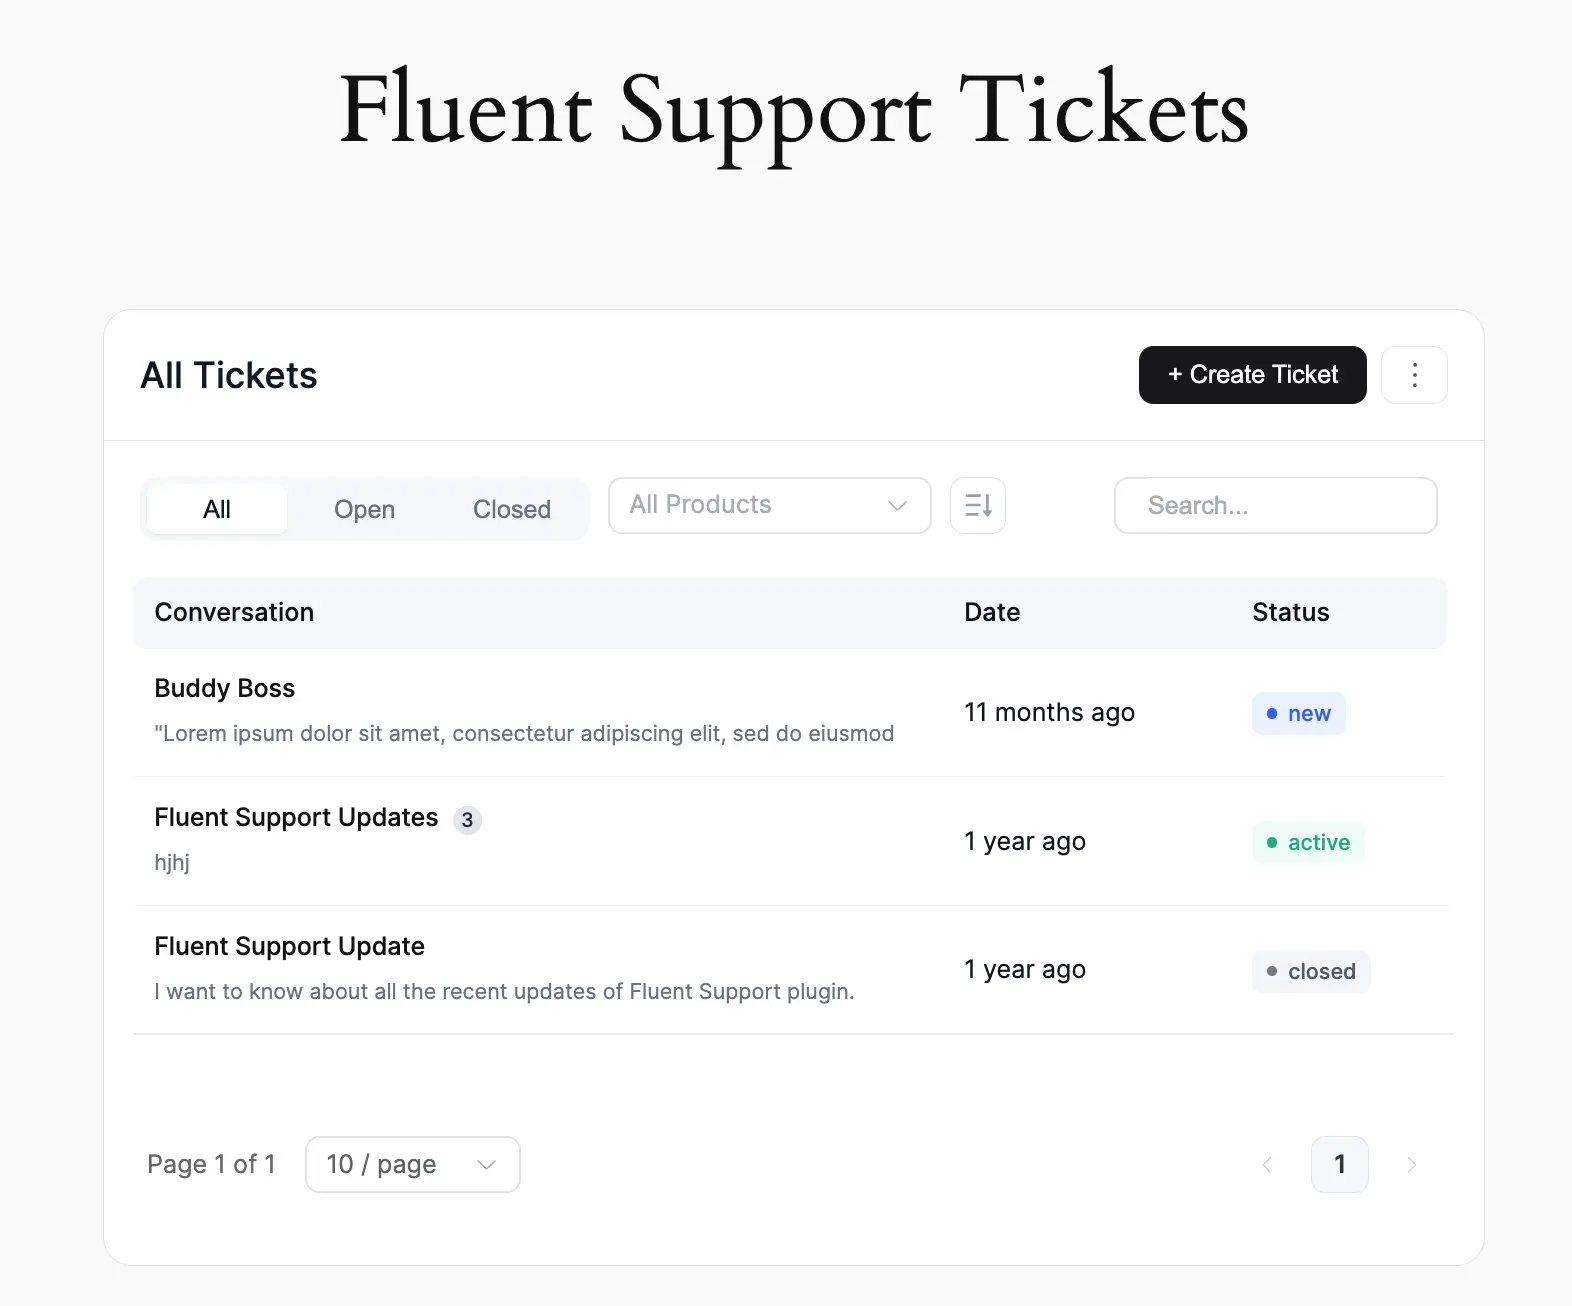
Start by creating a ticket from the customer’s point of view.
Open the support portal page on your site and submit a test request using the form. Fill in the fields you configured, such as product, issue type, or any custom fields.
Once submitted, check the following inside Fluent Support:
- The ticket appears in the correct Business Inbox
- Required fields are captured properly
- Any default tags, products, or workflows apply as expected
If something feels unclear at this stage, it usually means the intake structure needs adjustment, not the agent workflow.
Submit a test ticket via email
Next, send an email to the support address connected to your email-based Business Inbox.
Confirm that:
- The email is converted into a new ticket
- The subject and message appear correctly
- Replies stay inside the ticket thread
- Automated actions like tagging or assignment trigger if configured
This validates that email is no longer operating as a separate support channel.
Reply, update, and close the ticket as an agent
Open one of the test tickets and respond as an agent.
Use this moment to verify:
- Saved replies insert correctly
- Tags and products can be added without friction
- Manual workflows run when triggered
- Automatic workflows execute on the right events
Finally, resolve and close the ticket. Confirm that the status updates correctly and the ticket moves through the expected lifecycle.
Step 7: Optimize after launch (what to adjust once real tickets arrive)
Once real customers start submitting tickets, patterns show up quickly.
This step is not about adding new tools. It’s about tightening what you already set up.
At this point, your goal is control, not expansion.
Review incoming ticket quality
After a few days of real usage, open recent tickets and check:
- Are customers providing enough context?
- Are agents still asking the same follow-up questions?
- Are tickets landing in the right Business Inbox?
If tickets feel vague, refine your support portal fields or add a custom field that captures missing information upfront.
Refine tags and products based on reality
Initial tags and products are assumptions. Real tickets tell you what actually matters.
Merge unused tags, rename unclear ones, and introduce new tags only when you see repeat patterns. The same applies to products.
The goal is faster scanning, not taxonomy perfection.
Adjust workflows based on agent behavior
Watch how agents work inside tickets:
- Are they manually doing the same steps repeatedly?
- Are certain tickets always reassigned the same way?
- Are some tickets always escalated?
If yes, that’s where automatic workflows should evolve.
If not, keep automation minimal.
Automation should follow behavior, not force it.
Check reporting for blind spots
Once tickets close regularly, open reports and look for:
- Tickets that stay open too long
- Reopened tickets
- Inbox or product overload
These are lifecycle problems, not agent problems.
Use reports to fix structure, not to monitor people.
Lock the system before scaling
Before adding more agents, channels, or automations, make sure:
- Ticket intake is consistent
- Agents follow the same flow
- Workflows behave predictably
A stable system scales cleanly. An unstable one multiplies confusion.
Some last words
Once the core setup is complete, the next layer depends on the ticketing system you choose: integrations.
At a basic level, every ticket system works the same. Tickets come in, agents respond, and workflows keep things moving. Where tools start to differ is how much context they can pull into the ticket itself.
Some systems keep tickets isolated. Others connect tickets with the rest of your site.
Fluent Support falls into the second category.
It integrates with common WordPress tools like WooCommerce, form plugins, membership systems, LMS platforms, and CRM tools. When these integrations are active, tickets carry real context. Agents can see what a customer purchased, submitted, enrolled in, or interacted with, directly inside the ticket view.
This doesn’t change how the system is set up.
It changes how efficiently tickets are handled once volume increases.
Integrations are not required on day one. The setup you’ve completed so far is enough to run support properly. But as requests grow more specific, integrations reduce back-and-forth, shorten resolution time, and prevent support from becoming reactive again.
At that point, the ticketing system stops being just a place to reply and starts functioning as part of your overall workflow.
Wrapping up
This guide covered the basic setup required to run a support ticket system in WordPress.
At this point, the system is functional. Tickets can be submitted, routed into inboxes, assigned to agents, and handled using consistent rules. That’s the minimum structure needed for day-to-day support to work without manual tracking or scattered communication.
This is not an advanced configuration. It’s the foundation.
While this walkthrough used Fluent Support for demonstration, the overall setup flow applies to most WordPress ticketing plugins. Inbox creation, intake channels, agent access, and basic automation follow a similar pattern across tools.
Once real tickets start flowing, you’ll see where adjustments are needed. Some teams refine workflows. Others add more fields, automation, or inbox separation. Those decisions should be driven by volume and usage patterns, not assumptions.
If your goal was to move from unmanaged requests to a controlled support process, this setup is enough to get there.
Start off with a powerful ticketing system that delivers smooth collaboration right out of the box.
Related Articles
Customer Service Metrics: 11 KPIs, Formulas, and Benchmarks
Customer service metrics are KPIs that measure your…What Is Complaint Management? How to Handle It Right
Learn what complaint management is, processs, complaint types,…


Leave a Reply