What Is Ticket Escalation, And What Are The Rules For It?

By Md. Ariful Basher
December 28, 2023
Last Modified: November 13, 2025


As per a report, an agent gets around 21 technical tickets per shift. WPManageNinja, the parent of Fluent Support, gets an average of 2,000 tickets per month. All of these are technical tickets. So, every now or then, ticket escalation happens.
We will start with the ticket escalation meaning.
What is ticket escalation?
Ticket escalation is a process where an agent routes a customer support ticket to a higher-level support agent for a faster and more efficient resolution.
In simple words, ticket escalation means handing over the ticket to a senior with more experience or expertise on the issue.
What is the escalation process?
Before we get into the process of escalation, let’s explore how many steps there are to escalate a ticket.
Steps of ticket escalations
For escalation, you can divide this whole path into four steps. We are going to call the steps tier. And just like developers, we will start with zero.
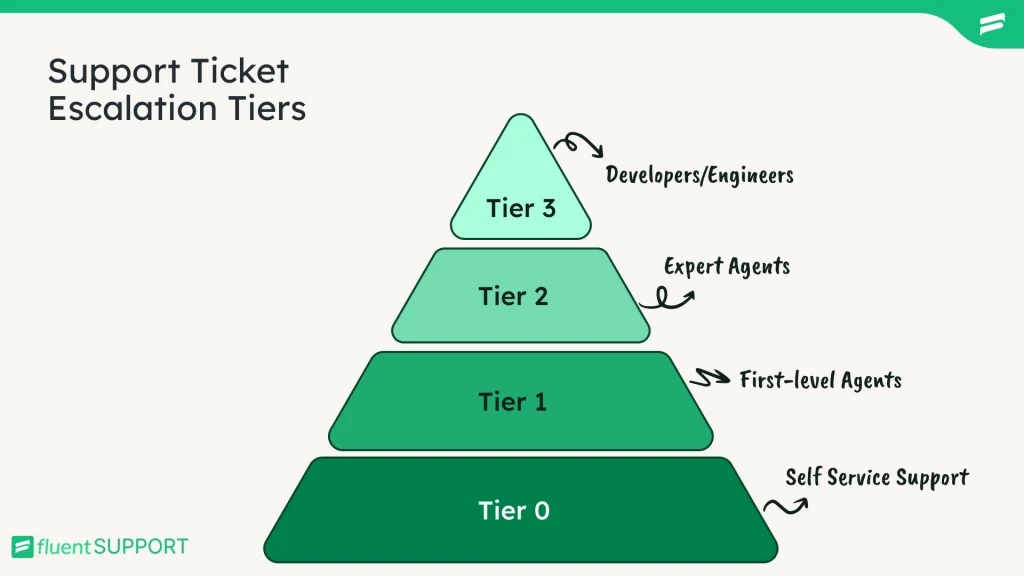
Tier 0: In this step, customers are going to use documentation, support videos, FAQs, and chatbots to educate themselves and find out the solution to the issues.
Tier 1: This is the step where the customer reaches out to the support agent, asking for help. At this level, support agents mainly deal with basic issues. Most of the tickets at this stage are recurring.
Tier 2: In this step, agents are more experienced and experts in a particular area. So, they usually handle non-recurring tickets. Tickets that are more time-sensitive or may need expert-level technical knowledge to solve.
This tier can have more than one team in it. It depends on the company’s structure or the problem itself.
Developers/Engineers: Finally, let’s say the customer requested something more personalised, a custom feature for particular issues. At this point, a support agent might not have that level of access to add the custom feature.
Developers of that product need to get involved to solve the issues by adding the requested feature for the customer. This step is not that common. Only in some special cases do developers get involved in the support process.
Developers may get involved if the solution to the issues requires work on the core of the product. But again, normally, this step is not that common.
Process of ticket escalation
Now we have the full picture of the ticket escalation path. Let’s see what the formal process is for escalating a ticket from an agent’s end.
- Cross-check the ticket escalation criteria. Most of the company has predefined these criteria.
Common criteria to escalate a support ticket- Exceed the response time for any unfortunate reason.
- Limited troubleshooting access.
- Limited authority to solve issues.
- Limited knowledge or expertise.
- A new feature request
If any of the criteria are met, an agent can escalate the ticket.
- Next, consult with the supervisor and engage the escalated team. With the help of the supervisor, assign an agent from the escalated team. Start the documentation by mentioning all the reasons to escalate and the assigned agents.
- Immediately inform the customer that the ticket has been transferred to the expert team to look after it. Do not use any terms that can create confusion for the customer. Be honest and clear.
- Collaborate with the escalated agent and follow up on the progress. Keep your customers updated about the progress. If it’s possible, provide an estimated duration to get the solution from the escalated team.
But also be aware that the provided time should be realistic. Otherwise, it can reduce the satisfaction score.
- After the customer gets the proper solution, ask for feedback and close the ticket.
- For further follow-up, you can reach out to the customer again after a certain period of time and ask for feedback.
Ticket escalation by Fluent Support
Fluent Support, the best WordPress helpdesk system on the market, has some nifty tricks to escalate support tickets. You can do it in two ways.
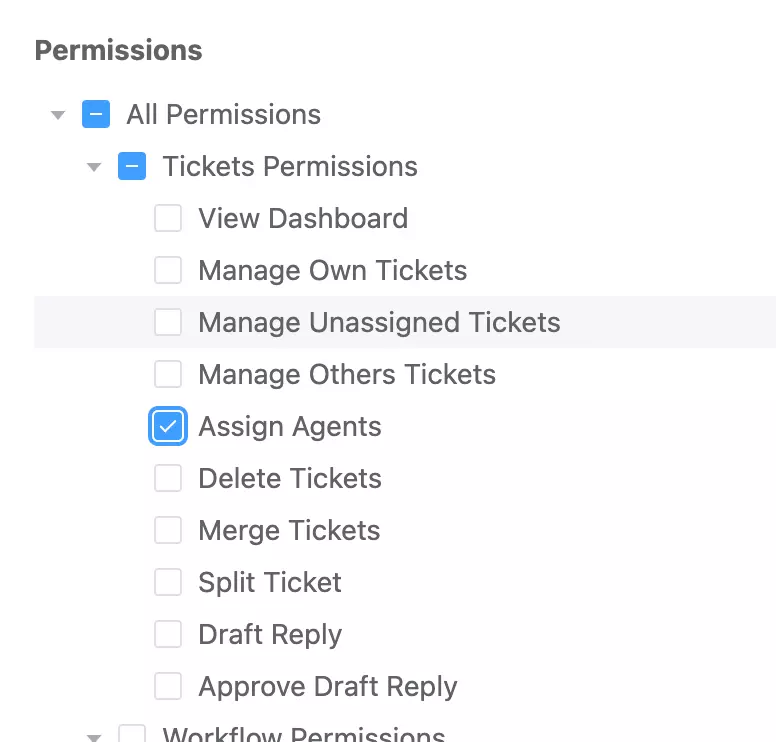
Manual Escalation: in Fluent Support, you can give permission from the admin level to assign the ticket to another agent. If you, as an agent, request an escalation, your supervisor can give you permission to transfer the ticket to the escalated team.
Automatic ticket escalation: In Fluent Support, you can create an automation to skip Tier 1 and escalate the ticket directly to Tier 2 or to the developer or engineers.
You can create a trigger for some specific words and apply a condition to it. And against the tigger and condition, you can set an action to run. That action involved assigning an agent from the escalated team by skipping the first-level agents.
You can really fine-tune this trigger and condition with several options in Fluent Support. Set it once, and tickets will be auto-routed without bothering you.
Wrap up
A well-structured customer support system has multiple layers to it. These are defined to streamline customer support. To provide smoother and more effective support, agents need to hand over tickets to experts for faster resolution.
If all the protocols and processes are defined in-house and followed accordingly, ticket escalation will make customers satisfied and loyal.
Related Articles
Consumer Behavior: Types, Factors, and the Buying Decision Process
Consumer behavior is how and why people choose,…Klarna News: AI Just Got Demoted, Here’s What We Learned
In 2024, Klarna’s CEO told the world his…


Leave a Reply