Google PageSpeed Insights: A Beginner’s Guide

By Md. Sajid Sadman
February 7, 2024
Last Modified: July 31, 2025


Google PageSpeed Insights can be a valuable asset in your arsenal for optimizing your web page performance. It benefits you by providing comprehensive insights and recommendations about your website.
Many developers, technical SEO specialists, and site owners are consistently leveraging the benefits of this superb tool.
Well, in this blog, you will find valuable insights about it.
In the first part of this blog, we will cover what Google PageSpeed Insights is and what’s inside of it. Then, in the last part, we will discuss ways to improve the Google PageSpeed Insights score.
Let’s get started.
What is Google PageSpeed Insights (PSI)?
Google PageSpeed Insights (PSI) is a free tool that analyzes webpage performance on both mobile and desktop devices. It diagnoses page performance, accessibility, SEO, and best practices to help improve the overall user experience.

When you enter the URL, it shows scores between 0 and 100 based on the page’s quality. A higher score usually means your page is well optimized and efficient.
But if not, then your webpage might need an immediate optimization. And to do that, let’s understand overall PageSpeed Insights first.
Understanding the Google PageSpeed Insights Report
When you start analyzing your web page in PSI, you will encounter various terms and report metrics related to the performance and optimization opportunities of your web page.
If you are not familiar with them or don’t know about the functionalities, then it will be difficult for you to harness the advantages of this tool.
Keep reading this blog, in this section, we have covered a basic interpretation of it.
Core Web Vitals
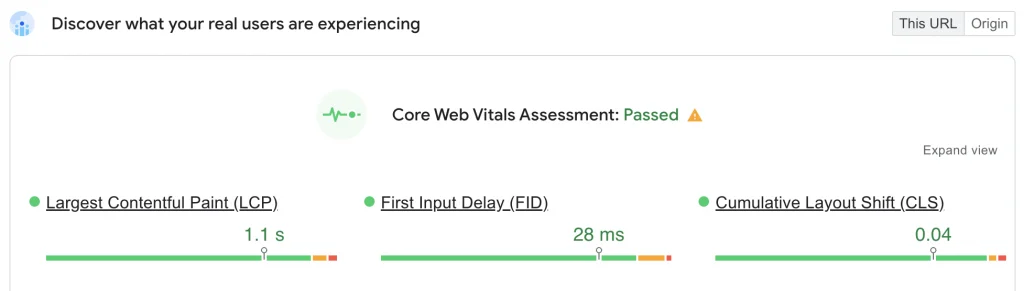
In the first step, Google PageSpeed Insights will show you the Core Web Vitals Assessment. It shows you whether you have passed or failed the assessment test.
For your information, Core Web Vitals is a set of three metrics that measure a web page’s performance, responsiveness, and visual stability.
Let’s know the three metrics, or elements, of it.
- Largest Contentful Paint (LCP): LCP indicates the time it takes for a web page to load the largest piece of content. Google suggests 2.5 seconds or less to have LCP.
- First Input Delay (FID): FID measures the time from when your visitors first interact with your web page. Google recommends striving to have a FID of 100 milliseconds or less for a better user experience.
- Cumulative Layout Shift (CLS): CLS quantifies the visual stability of your web page. A low CLS indicates that your website is pretty delightful. In this manner, Google suggests maintaining a score of 0.1 or less to provide a smooth UX.
Additionally, there are three more notable metrics you need to understand.
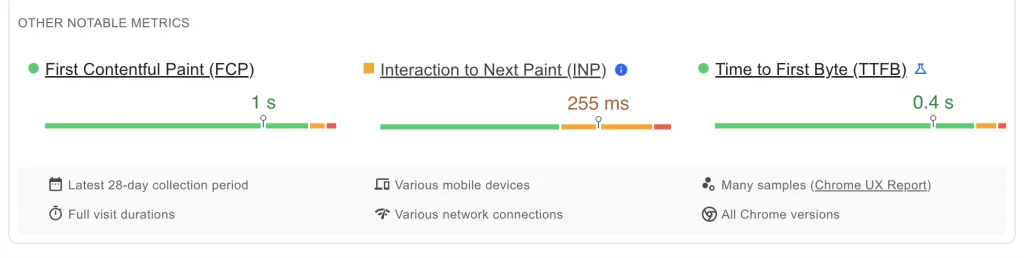
- First Contentful Paint (FCP): FCP means the amount of time it takes for a web browser to display the first content on your web page. The content can be text, image, or any other visible element. Google says achieving FCP within 1.8 seconds or less.
- Interaction to Next Paint (INP): This metric assesses how quickly your web page handles user interaction. Note that INP is a pending Core Web Vital metric that will replace First Input Delay (FID) on March 12, 2024. According to Google’s suggestion, an INP below or at 200 milliseconds indicates that your web is pretty responsive.
- Time to First Byte (TTFB): TTFB indicates how long a web browser takes to create a connection to the server and download contents. Google says to strive to have a Time to First Byte of 0.8 seconds or less.
Diagnose performance issues
Below the Core Web Vitals, you will find a section “Diagnose performance issues.”

Here, Google PageSpeed Insights provides you with scores in the following categories:
- Performance: Provides an overall score for your web page. It shows how well your website functions in terms of speed and optimization.
- Accessibility: Evaluates different aspects of making your web content suitable and accessible for users with disabilities.
- Best Practices: Indicates how well your page maintains industry-standard web development practices. The more you adhere to them, the higher your score will be.
- SEO: Scoring at the top in this category indicates that you have followed the basics of search engine optimization (SEO).
Right below every category, you will notice the most effective thing for your website. These are the recommendations from Google PageSpeed Insights.
Following the recommendations, you can easily overview the areas for improvement and head towards optimization.
Obviously, these recommendations will help reduce page load times. There is a description of the problem with each recommendation and opportunities to solve it.
5 best ways to improve your Google PageSpeed Insights score
So, you are in the most crucial section of this blog.
In this section, you will get to know our hand-picked five effective and easiest ways to improve your Google PageSpeed Insights score.
Keep reading.
Optimize your image format
Large images are indeed the major cause of increased web page load time and a lower PSI score.
When you use images that are not properly optimized, they consume excessive bandwidth and take longer to download.
If you are in the same loop, then stop that practice right away. Don’t hurt your web page.
We have solutions for it.
Image file formats, like WebP and AVIF, are lightweight and appropriate for your web pages. They load more quickly than other commonly seen file formats like PNG or JPEG.
Well, we will suggest you go for WebP. Google developed this file format, and it performs exceptionally well.
In fact, this file format is nearing becoming the new default. Users are flocking to this format as it reduces file size without sacrificing quality.
Considering the statement, choose WebP for your web page.
If you are contemplating within your mind, “Damn, I already have plenty of large-sized images on my site. Should I have to replace all the images?”
Fortunately, you don’t have to do this.
Popular plugins like Smush, Imagify, or EWWW Image Optimizer can be your advocates to get rid of this situation.
Just install any of these plugins as per your preferences and follow the user guidelines to convert any of your images to WebP without sacrificing image quality.
Speed up your server response time
Reducing the initial server response time means lowering your site’s Time to First Bite (TTFB).
For your information, TTFB refers to the time it takes to make a connection with the server to receive data.
Reducing TTFB means you will have an improved UX, and your users will experience less time to load your website content. As a result, your bounce will decrease, and you will benefit from higher user engagement and retention.
As we mentioned earlier, Google recommends reducing your server’s response time to under 200 milliseconds.
A slow TTFB hurts your page load time as it delays the time to receive the data from the server.
- Pick the correct web hosting service that ensures fast servers and low latency.
- Choose lightweight themes for your site like Astra, Cadence, or Twenty Twenty-Four. Also, keep your theme updated.
- Identify the slow and un-updated plugins and try to find an alternative or keep them updated.
- Use the latest version of PHP.
- Integrate a Content Delivery Network (CDN) into your website to spread out all your site’s resources to multiple servers. Fortunately, hosting providers are including CDN in their packages.
Minify resources (HTML, CSS, JavaScript)
Another principal factor for reducing load time and improving PSI score is to minimize your resources, like HTML, CSS, and JavaScript.
Yes! HTML, CSS, and JavaScript are central components for the web design and functioning of a website. However, an unoptimized use of them can significantly slow down your website.
So, taking action to compress resources and reduce file size ASAP can be a great move to get a better result. Interestingly, it’s a low-effort and high-reward opportunity.
Here, minification refers to repairing and erasing unnecessary data and characters from your website without altering its functionality.
The process includes:
- Removing white space
- Minify comment
- Removing unused code
- Shortening the variable name or finding an opportunity for shortened renaming
You can use some popular plugins like Minify HTML, LiteSpeed Cache, Hummingbird, etc. to make your effort easier. Or you could try out some code minifier tools.
Explore our suggested tool and follow the plugin guidelines to pick yours.
Leverage browser caching
Leveraging browser caching is an optimization technique that indicates how to store and remember previously loaded resources.
That means when a visitor travels to a new page of your website, resources like logos, headers, and footers won’t need a reload.
In this technique, previously loaded resources are stored for a specific period for that particular visitor. As a result, for every new page visit, your users experience fast browsing on your website.
Now let’s talk about how you can leverage browser caching on your website.
An effective plugin named W3 Total Cache can be your supportive assistant. It claims to give you a 10x improvement in your site performance.
Moreover, you can pick the plugin to minify your resources like HTML, CSS, and JavaScript. That means you can attain several outcomes in a single stroke. Try this out to better improve your PSI score.
Avoid multiple-page redirects
You need to use page redirects to forward your traffic from one URL to another when needed. It’s a common practice in managing URLs in the web development sector.
But when you are into improving PSI scores to speed up your website loading, you need to avoid multiple-page redirects. The reason is that page redirection creates additional steps in the user’s journey.
One redirect can significantly impact page speed. And when you are doing it for multiple pages, you are going down the wrong path.
Therefore, focusing on minimizing redirects in every possible way is crucial for making a website faster.
The best practice is to keep the consistency of redirecting straight from the original URL to the newest URL. Through this action, search engines can easily access the right one.
If you want to check if you have multiple redirects, then use SEO tools like SEMrush, Ahrefs, or Moz. These tools will show you multiple-page redirections.
Pick any of these tools according to your convenience and start analyzing.
Go to your WordPress dashboard and start erasing unnecessary redirects and implementing the best practices.
WordPress plugins like Simple Page Redirect, Safe Redirect Manager, or Redirection can be your great assistants. Select whichever you want and go for it ASAP to reduce multiple-page redirects.
Wrapping up
We are confident enough that you now have the basics of Google PageSpeed Insights. Now it’s your time to explore more about it and leverage every opportunity.
Lastly, we appreciate you taking the time to read this blog.
Start off with a powerful ticketing system that delivers smooth collaboration right out of the box.
Related Articles
Error Code 520: What It Means and How to Fix It
Error code 520 means Cloudflare got an empty…Agents, Ninjas, or Gurus? Finding the Right Customer Service Team Names
Customer service team names range from plain titles…

Leave a Reply