How to Add Live Chat in WordPress Website?

By Md. Sajid Sadman
September 29, 2025
Last Modified: September 30, 2025


In this blog, we’re going to cover two simple methods for adding live chat to your WordPress website.
Well, we’ll be using Tawk.to for this walkthrough. FYI, it’s a widely used live chat platform that works well with WordPress.
Here, we’re going to cover two simple methods for adding Tawk.to to your WordPress website.
The first method involves placing the chat widget manually using custom HTML. The second one walks you through the plugin installation process.
Both approaches work perfectly, so you can choose based on your comfort level and preferences.
Yes, by the end of this blog, you’ll have a working chat box on your site that enables you to communicate with visitors in real-time.
So let’s get straight to the processes.
Step 1: Create your Tawk.to account
Head over to tawk.to and sign up for a free account. The registration process is simple and only requires basic information about you and your website.
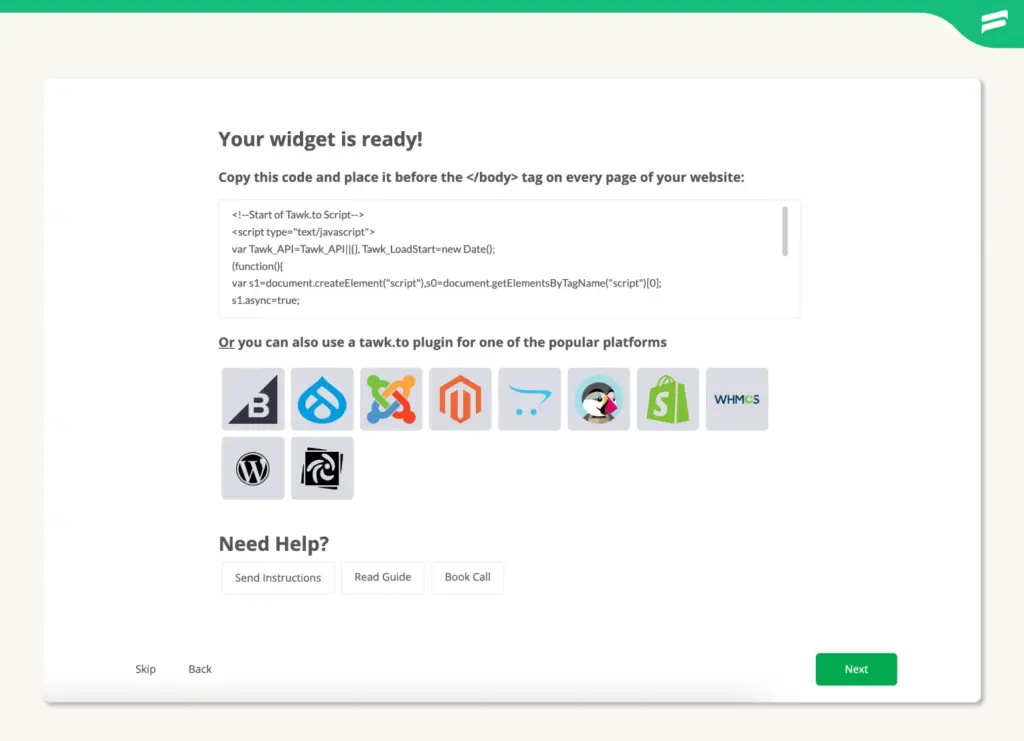
Once you complete the signup and provide your business details, Tawk.to will guide you through a quick setup wizard. At the end of this process, you’ll be given two options: install the plugin or copy the widget code.
For this method, choose the “Copy widget code” option.
Step 2: Add the widget code to WordPress
Now you have copied the code. Move on to your WordPress dashboard to embed it into your site.
Log in to your WordPress Admin panel. From the left-hand menu, go to Appearance → Theme File Editor.
In the upper-right corner, confirm that your active theme is selected. Under Theme Files, click on Theme Footer (footer.php) to open the footer file.
In the editor window, paste the Tawk.to widget code just above the closing </body> tag. This placement ensures the chat widget loads properly across all pages of your site.
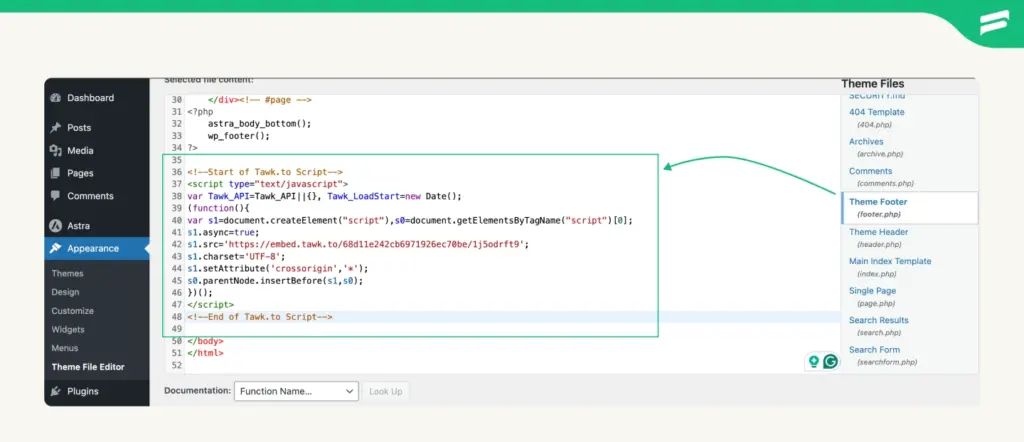
Once you’ve added the code, click Update File to save your changes.
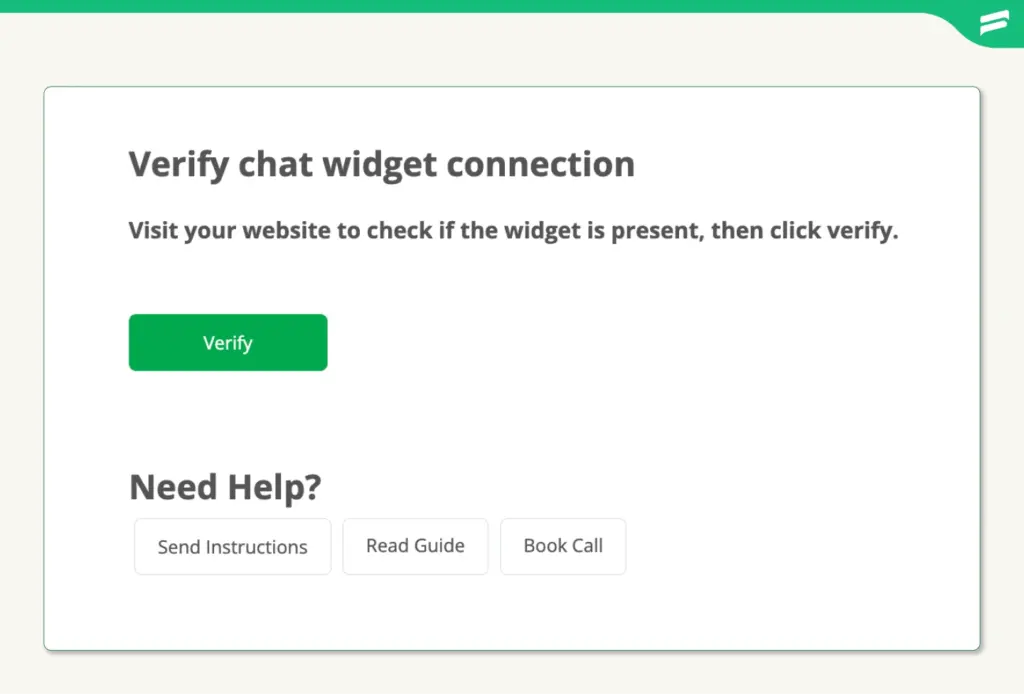
Step 3: Verify and launch your chat widget
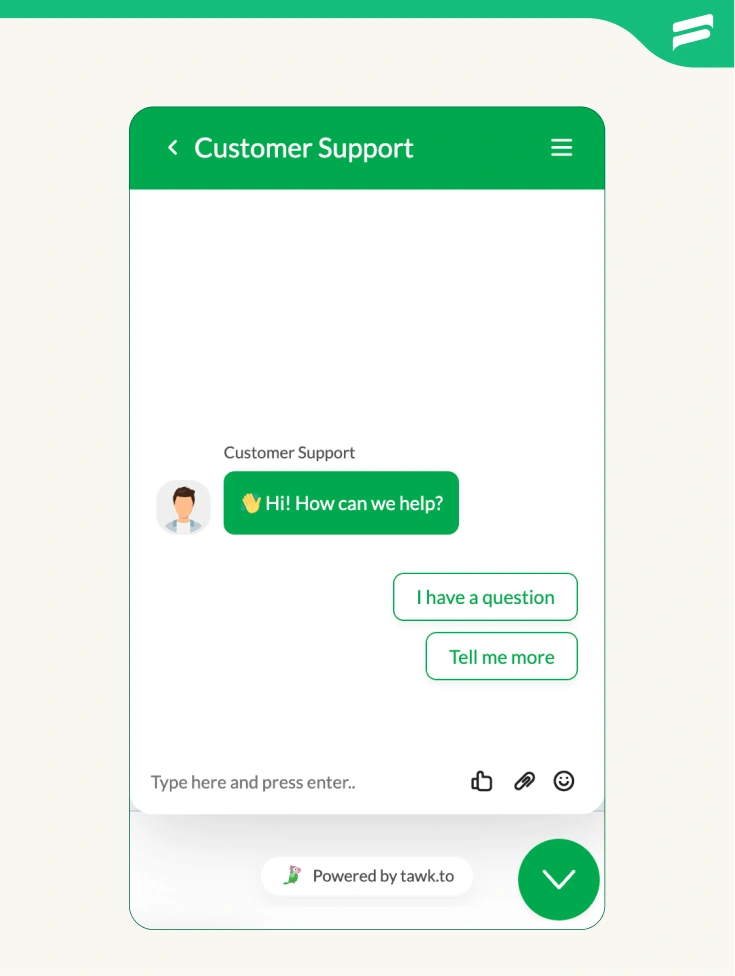
Visit your website and refresh the page. Check if the chat widget appears. By default, it should show up in the bottom right corner of your screen.
Once you confirm the widget is visible, return to the Tawk.to setup screen and click Verify to complete the installation process.
Note: If you run into any issues or the widget doesn’t appear, click the “Need Help?” option. You’ll see three support choices:
After successful verification, you’ll be redirected to your Tawk.to’s dashboard. From here, you can start customizing your widget, managing chats, and exploring additional features.
Finally, revisit your website to double-check that the widget is live and functioning. If it’s showing in the bottom right corner, you’re good to go.
You can always change its position later from the widget settings in your dashboard. We’ll discuss it later in this blog.
Method 2: Using the official Tawk.to plugin
Now let’s explore the plugin method, which many users find more convenient for ongoing management and updates.
Step 1: Complete the initial Tawk.to setup
Just like in the first method, start by creating your Tawk.to account and going through the initial setup. Head to tawk.to, sign up for your free account, and fill in your business details.
When you reach the installation method selection, choose WordPress. This time, you’ll either download the official plugin or note that you can install it directly from your WordPress dashboard.
Step 2: Install the WordPress plugin
We will install it directly from the WordPress dashboard.
In your WordPress admin area, go to Plugins → Add New. In the search bar, type “Tawk.to Live Chat” and look for the official plugin.
Install and activate it, then navigate to Tawk.to in the left sidebar. If you don’t find it on the sidebar, just go to the plugins and search look for the tawk.to.
Just a heads up: You may be reading this blog to make your support system smoother using a live chat plugin. We would like to recommend that you use a customer support plugin along with a chat plugin. Definitely, that will make your customer support system far more efficient. However, if you ask us or research for the best WordPress plugin, Fluent Support will definitely be in the top list. Yes, Fluent Support is actually dominating this niche. So . . .
Step 3: Connect the plugin to your Tawk.to account
Now, go to the plugin settings and find the account login section (avilable on the Account Settings).
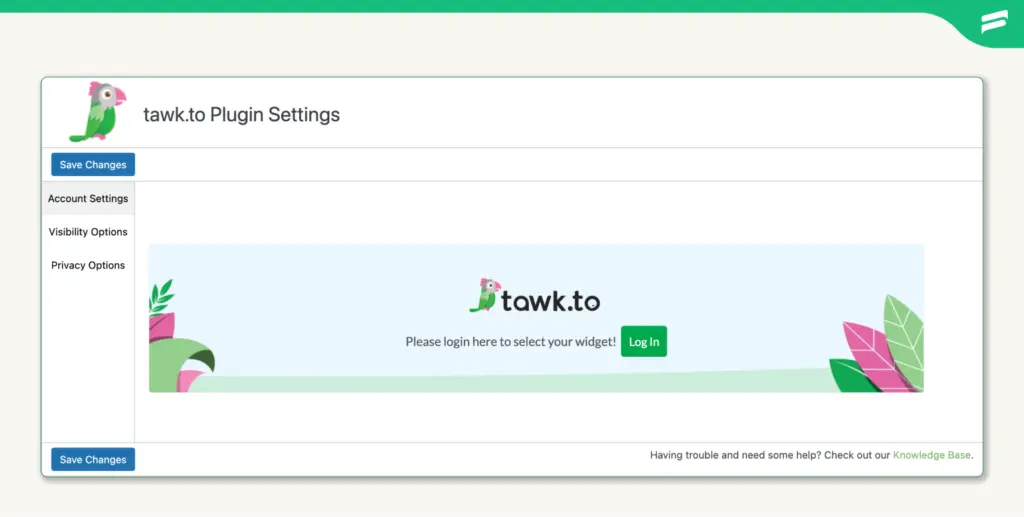
Use the same credentials you used to create your Tawk.to account.
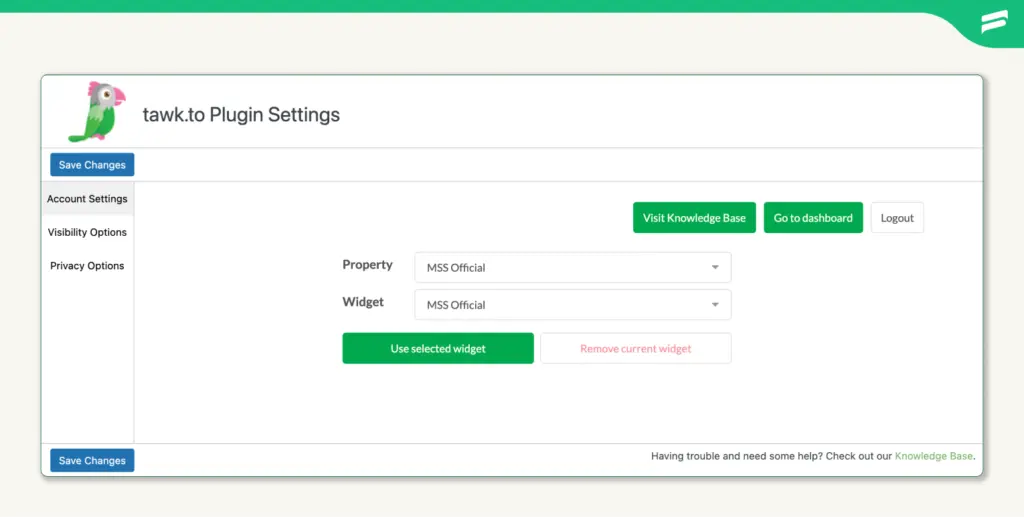
Once logged in, the plugin will automatically detect your available properties and widgets.
Select the property that matches your website and choose the widget you want to use.
Step 4: Configure and activate
After selecting your widget, click “Save” or “Activate.” The plugin will handle the code insertion for you. Yes, you don’t maintain any manual steps in this process.
Now, from here, you can configure additional options like visitor tracking, message routing, and appearance settings directly from your WordPress dashboard. Visibility Options and Privacy Options.
Step 5: Control widget visibility in WordPress (Bonus step)
Once your chat widget is live, you can fine-tune where it appears across your site. Tawk.to offers flexible visibility settings that let you control its presence based on page type, URL, or user flow.
By default, the widget will appear on every page of your WordPress website. But if you want more control, head to the Visibility Options menu in your Tawk.to dashboard.
Exclude on specific URLs
To hide the widget on certain pages, toggle on “HIDE widget only on specific URLs or paths” and enter the full URLs of the pages where you don’t want the widget to appear.
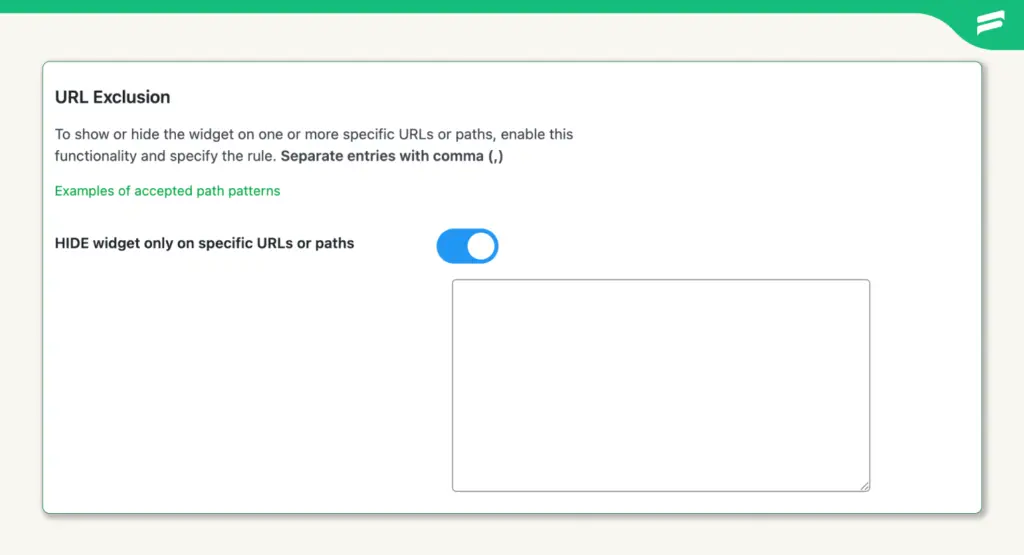
Start by turning off Always show Tawk.to widget on every page. This will reveal a new menu where you can activate the exclusion settings that match your needs.
Include on specific URLs
If you prefer to show the widget only on selected pages, toogle on “SHOW widget only on specific URLs or paths”. Enter the full URLs of the pages where the widget should be visible.
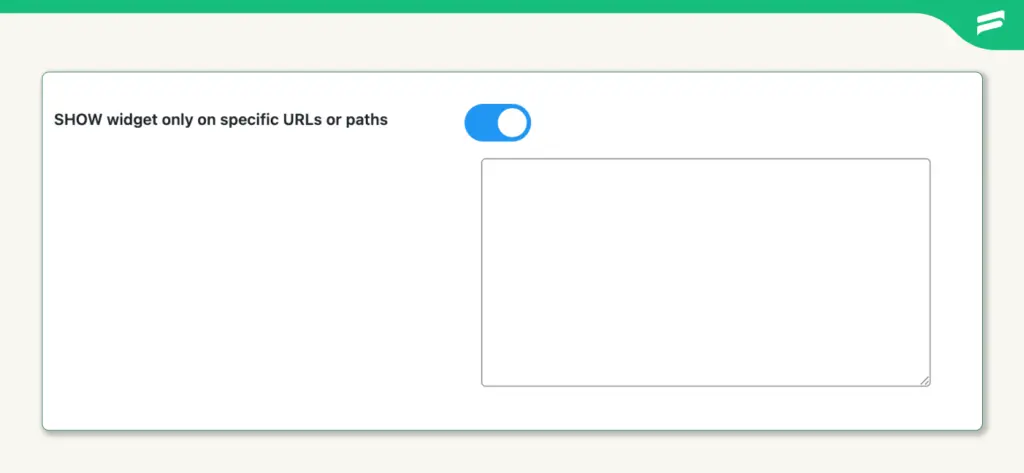
You can list multiple URLs in the textbox. Just separate each one with a comma. This gives you precise control over where live chat is available.
Other visibility filters
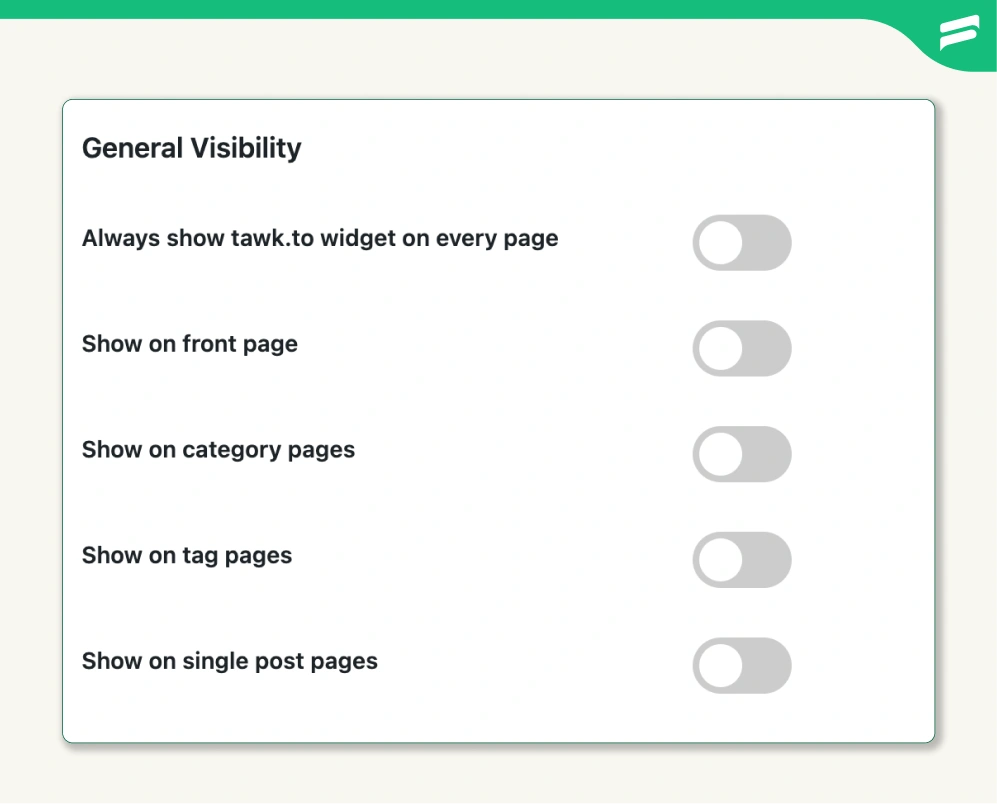
You can also limit the widget to specific page types, such as the front page, category pages, tag pages, or individual post pages.
To use these filters, first toogle off “Always show Tawk.to widget on every page”. Then, in the new menu that appears, toggle on the options that fit your site’s structure and goals.
Mix and match settings
These visibility options can work together. You’re free to combine filters to match your layout and user journey. Whether you want to chat only on product pages or hide it during checkout, Tawk.to gives you the flexibility to decide.
Save your changes
After making adjustments, don’t forget to click one of the Save Changes buttons. This ensures your visibility settings are applied correctly across your site.
Configure your chat widget in Tawk.to
Adding the chat box is just the starting point. To make your chat feel like a natural part of your brand, a few thoughtful settings can help it fit seamlessly into your site. Also, making the configuration according to your preference makes your user experience more and more better.
So, in this section, we’ll walk through the most essential setup options to help you get comfortable inside your Tawk.to dashboard.
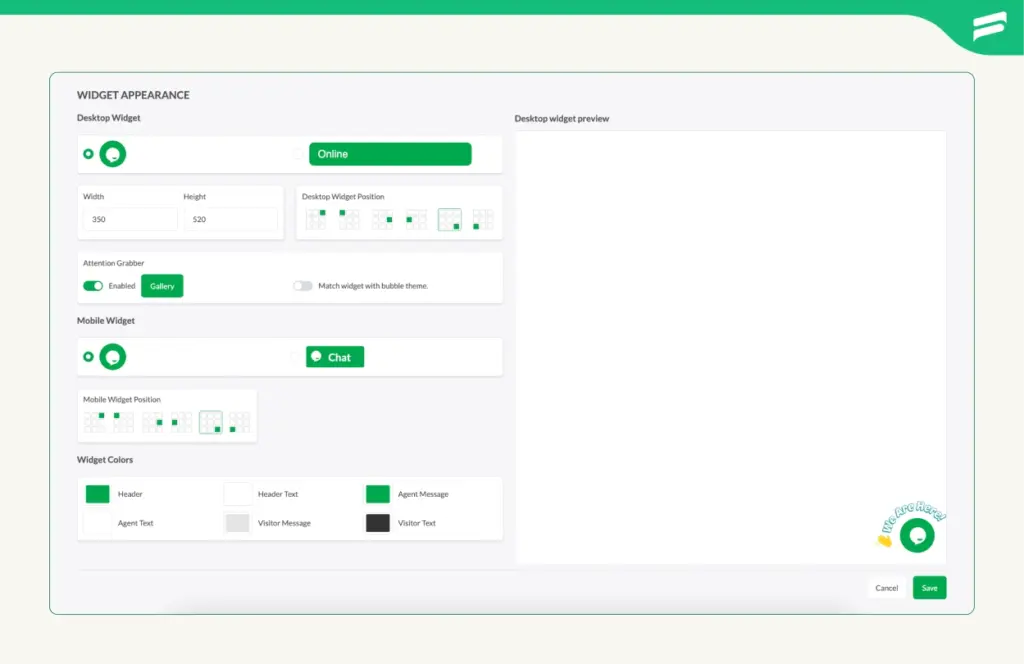
Widget color and position
Your chat widget should feel like a natural part of your website. To make it blend seamlessly with your design, you can customize its color, placement, and visual behavior.
For this, go to Administration, then select Channels, followed by Chat Widget.
Under the Widget Appearance section, you will find options (clickoing on “Advanced”) to change the widget color, size, and position.
Choose a color that matches your brand palette.
Once your widget is styled to match your brand, it’s time to decide where it shows up on the screen.
By default, the widget appears on the bottom right of your site. You can switch it to the bottom left or choose a floating tab style instead.
There’s also flexibility to set different positions for desktop and mobile, so your chat can feel just right across devices.
Plus, you can enable or disable the “Attention Grabber” feature to draw visitor focus.
Also, you can check the gallery to browse and select a template for your attention grabber that mostly fits your style.
These changes update in real time, so you can see how the widget looks before you hit save.
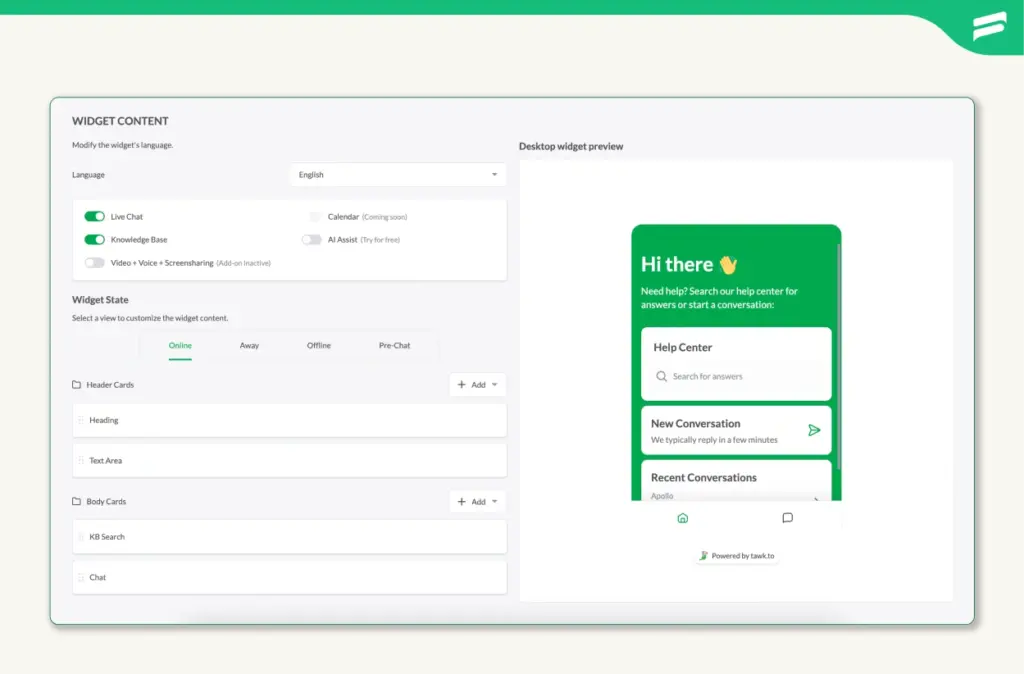
Widget content and card configuration
Beyond basic messaging, Tawk.to lets you design the actual layout and functionality of your widget using cards. These cards guide users to specific actions like starting a chat, searching your help center, or revisiting past conversations.
Go to Administration, then select Channels, followed by Chat Widget.
Scroll to the Widget Content section (right beside Widget Appearance).
Choose the widget state you want to customize: Online, Away, Offline, or Pre-Chat. Each state has its own layout, so you can tailor the experience based on your availability.
Under Widget State, you’ll find two key areas to customize: Header Cards and Body Cards.
On Header Cards, you can configure the heading and text area that appear at the top of the widget. You also have the option to disable them by clicking +Add and toggling off specific elements. If you want to go beyond text, you can include a logo, image, video, or even display your agents.
In the Body Cards section, you’ll find two default options: KB Search and Chat. You can turn these on or off depending on your needs.
To add more content, click +Add and choose from a variety of elements such as a heading, text area, image, video, a list of knowledge base articles, or a featured article block.
These cards help guide users to the right actions, whether it’s starting a conversation or browsing your help content. You can reorder them to match your support flow and make the experience feel intuitive.
Changes made here will reflect instantly in the Desktop Widget Preview on the right. Use this preview to test layout, messaging, and card order before saving.
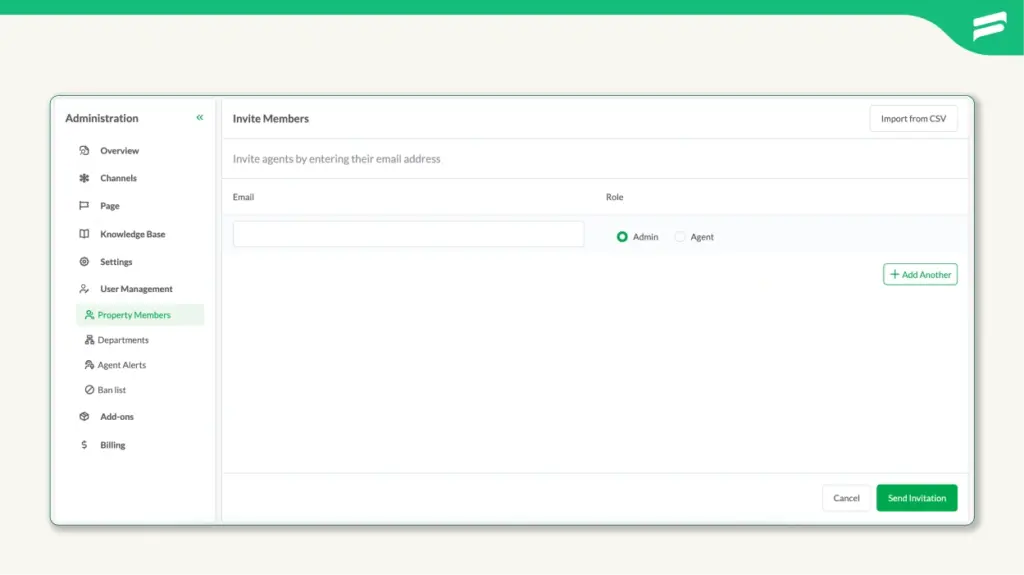
Invite members and add departments
As your support needs grow, you can invite teammates and organize responsibilities. Tawk.to makes it easy to manage access and assign roles.
Go to Administration and select Property Members under User Management. Click Invite Member and enter their email address.
Assign a role as Admin or Agent using the email address and click to Send Invitation.
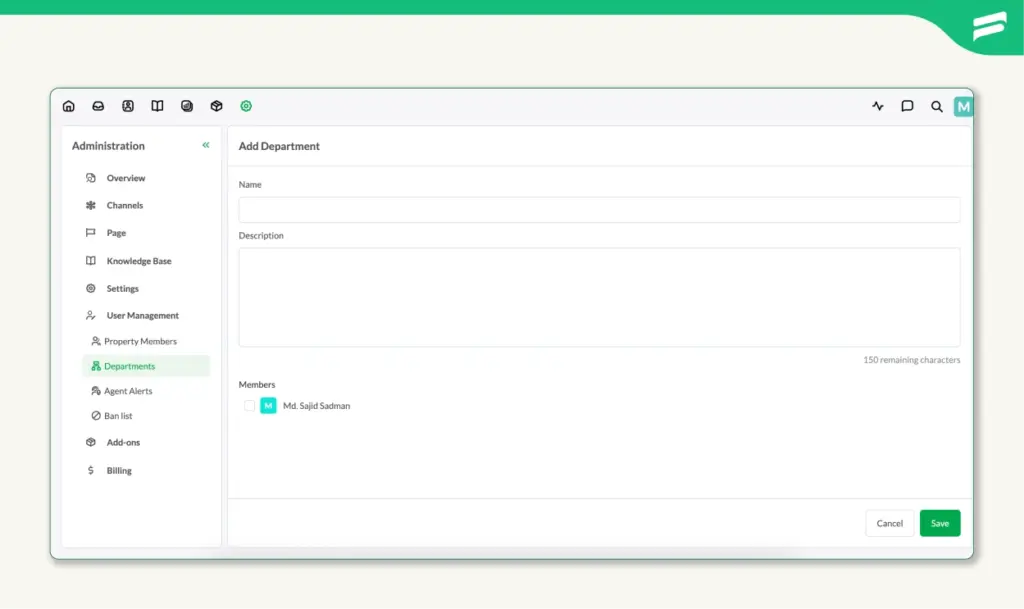
To create departments, go to Administration and choose Departments. Add department names, Description, and add members to the department.
This setup helps distribute the workload and ensures visitors reach the right person.
Availability restriction
This section lets you control when and where your chat widget appears, based on domain, country, and platform. It’s useful for tailoring visibility to specific audiences or devices.
First, look at the glimpse of it below in the image for ideation. Then we will discuss all three options one by one.
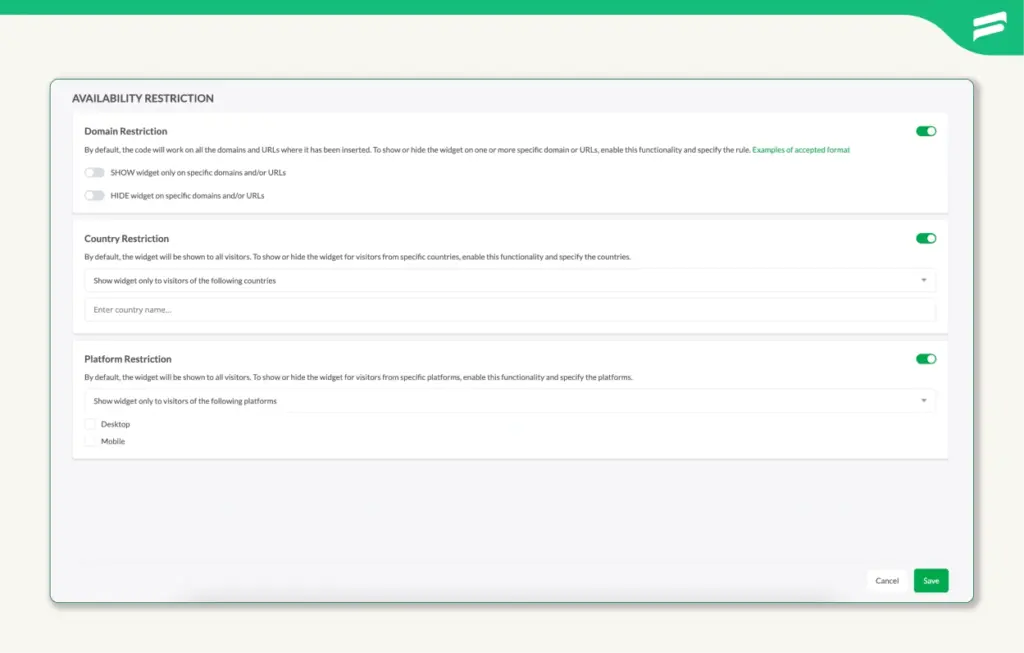
Domain Restriction
Use this to show or hide the widget on specific domains or URLs.
By default, the widget is active on any page where the embed code is installed.
To customize this, toggle Domain Restriction to On.
Choose one of the two options:
- Show widget only on specific domains and/or URLs
- Hide widget on specific domains and/or URLs
Click the “Examples of accepted format” link for guidance on how to enter URLs correctly. Add your domain or page URLs in the input field.
Click Save to apply changes.
Country Restriction
Use this to control widget visibility based on the visitor’s geographic location.
By default, the widget is visible to all visitors worldwide.
Toggle Country Restriction to On to activate this feature.
Once enabled, you can select specific countries where the widget should be shown or hidden.
This is useful for region-specific support or compliance needs.
Click Save to confirm your settings.
Platform Restriction
Use this to manage visibility based on the device or platform your visitors are using.
By default, the widget appears on all platforms.
Toggle Platform Restriction to On.
Choose one of the two options:
- Show widget only to visitors on selected platforms
- Hide widget only from visitors on selected platforms
Select Desktop, Mobile, or both depending on your preference.
Click Save to finalize the configuration.
Wrapping up
So . . . that’s it!
You’ve now got the basics of how to add live chat to your WordPress site using Tawk.to, and also got some basic configuration options for it.
This guide focused on one platform to keep things simple, but you’re not limited to Tawk.to. You may also explore other options, such as Tidio, Crisp, or LiveChat, depending on your specific needs and preferences.
Lastly, thanks for following along. Hope this guide helps you build a chat experience that feels just right for your visitors.
Start off with a powerful ticketing system that delivers smooth collaboration right out of the box.
Related Articles
Omnichannel Customer Support: The Guide for Support Teams
Omnichannel customer support means every channel, agent, and…Help Desk Software Wiki [Explained]
Learn what a help desk software wiki is,…


Leave a Reply