
WordPress Robots.txt: Directives for Good Bots
By Prosanjit Dhar
October 31, 2024
Last Modified: December 12, 2024
Before we talk about the WordPress robots.txt file, let’s first understand what “robots” are.
Robots are search engine bots that move all around the internet. They look for new information on websites and pages. When they find a site, they crawl through it.
They check the content to see how good it is. After this, they index the content, which means it can show up in search results.
Here’s a visualization of the scenario:

But without proper guidance, even the most diligent bot can astray and stumble upon pages that you won’t want.
That’s why you need a robots.txt to navigate them to the appropriate pages of your WordPress.
Let’s dive into the key directives to get you started.
What is a robots.txt file?
The robots.txt is a simple text file to interact with search engine bots. It was first introduced by Martijn Koster in 1994 as the Robots Exclusion Protocol (REP) to guide legitimate search bots on which pages to crawl and which to avoid.
So, whenever bots crawl your site, they check the robots.txt file first. Then explore the pages accordingly with these directives.
This ensures certain parts of your website remain private and less prioritized by search engines.
Over time, major search engines like Google, Bing, etc. adopted this standard to respect the owner’s priority and reduce server load.
Meanwhile, other malicious bots, such as spammers and DDoS attackers, have never complied.
To deal with these malicious bad bots, see our guide to prevent bot traffic from your website.
Why do you need a robots.txt file in WordPress?
Talking about websites, search engines have a crawl budget for each one. If you exceed it, your website won’t be crawled until the next session.
Though, it’s not a huge concern for small WordPress sites. But for larger ones, you have to be cautious about this budget and use robots.txt file to guide them.
You can start this process with just a simple text.
Learn How to Fix the 404 Not Found Errors with a Step-by-Step Guide. Let’s Read!
Locate the robots.txt file in WordPress
WordPress has made it even more simple. You will get a pre-created robots.txt file with every WordPress website.
Just search the robots.txt file in your root directory.
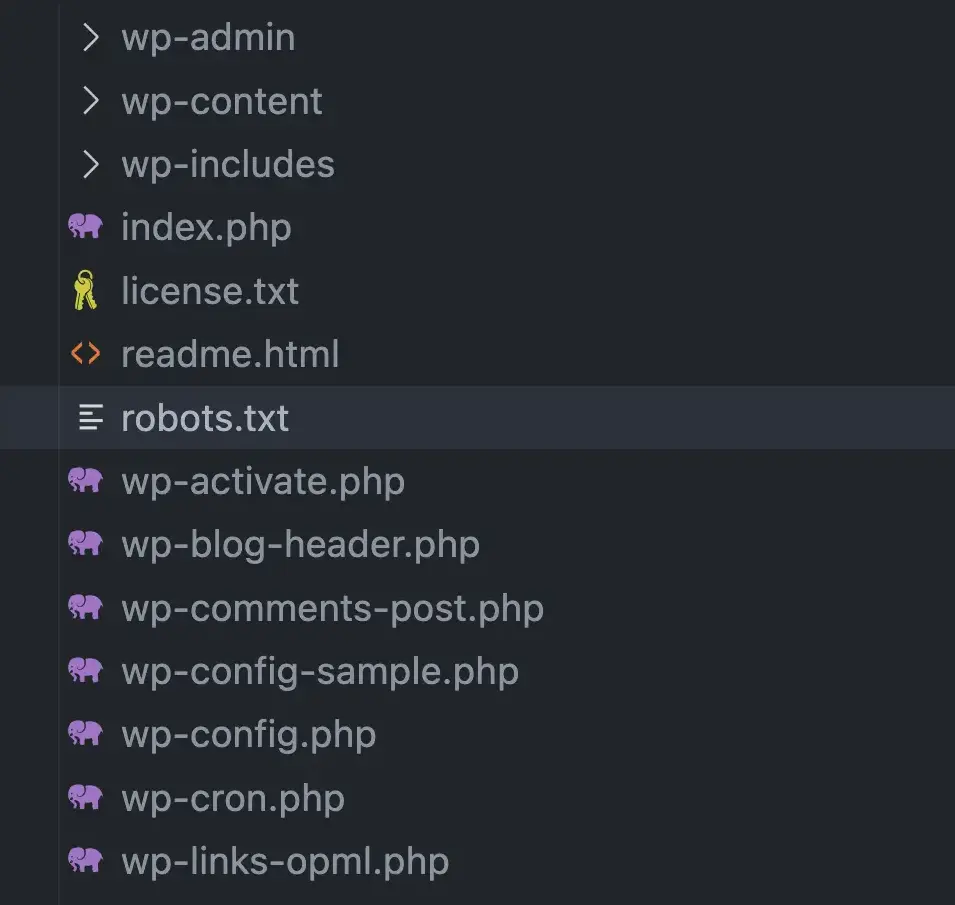
The file will contain a basic WordPress directive like this:
User-agent: *
Disallow: /wp-admin/
Allow: /wp-admin/admin-ajax.php
As it’s an initial file, you need to understand the directives of robots.txt to make your own command.
Directives of robots.txt file for WordPress
When a site owner wishes to guide the web bots they use different directives in the robots.txt files.
So, the bots can follow the directives and explore the pages accordingly.
1. User-agent: This section specifies which bots the following rule will apply.
User-agent: Googlebot        # targets all google services

User-agent: ClaudeBot        # targets all ClaudeBot services

User-agent: *                # targets all web crawlers
2. Disallow: Indicates which pages or directories the web bots should avoid crawling.
Disallow: /private/          # disallow all pages under /private/

Disallow: /                  # disallow all pages and directories

Disallow: /something/        # disallow all pages under /something/
3. Allow: Specifies which pages or directories they are allowed to crawl.
Allow: /public/              # allow all pages under /public/

Allow: /                     # allow all pages and directories

Allow: /something/           # allow all pages under /something/
4. Sitemap: Help bots find all the pages they need to crawl.
Sitemap: http://www.example.com/sitemap.xml # all pages are allowed in the structure5. Crawl-delay: Specifies the delay time (in seconds) between requests made by crawlers. However, it’s not a standardized directive, so many search engine bots (including Google) ignore it.
Crawl-delay: 10 # wait 10 seconds for next crawl6. Comments: You can also add comments to your robots.txt with a hashtag for clarity.
# This section disallows bots from accessing the admin areaYou can apply these directives according to your particular needs. Just be precise with the implementation.
Accidentally blocking a helpful page or search bot could affect the potential traffic and user experience.
Edit robots.txt file in WordPress
You can use both plugins or manual options to edit a robots.txt file in WordPress. However, using plugins can be easier for beginners.
Use a plugin for editing robots.txt
Many WordPress plugins will allow you to edit the robots.txt file without touching the root directory.
Wp Robots Txt is one of them. It’s a free plugin to edit robots.txt files.
You just need to follow this procedure.
- Install and activate the WP Robots Txt plugin.
- Then go to Reading from the settings option.
- You will find the robots.txt content section with some pre-added directives.
- Add your User Agents and Directory Path and select either Allow or Disallow.
- Click Save Changes after you’re done.
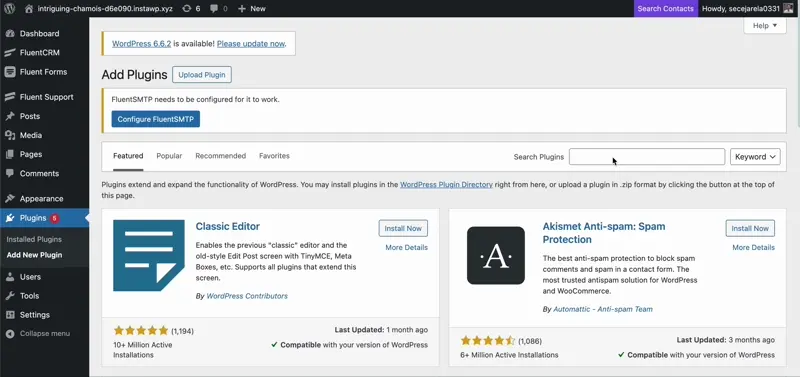
It’s easy to use with minimal effort. But you can always choose the manual route if you’re not a fan of plugins and their potential drawbacks.
Edit robots.txt Manually
If you have access to your site’s root directory, you can find the pre-existing robots.txt file in the public_html folder.
Instead, use a File Transfer Protocol (FTP) client to access and edit this file directly.
- Go to the public_html and search for robots.txt file.
- Right-click on the robots.txt file and select the edit option.
- Add your desired rule in the file and click save.
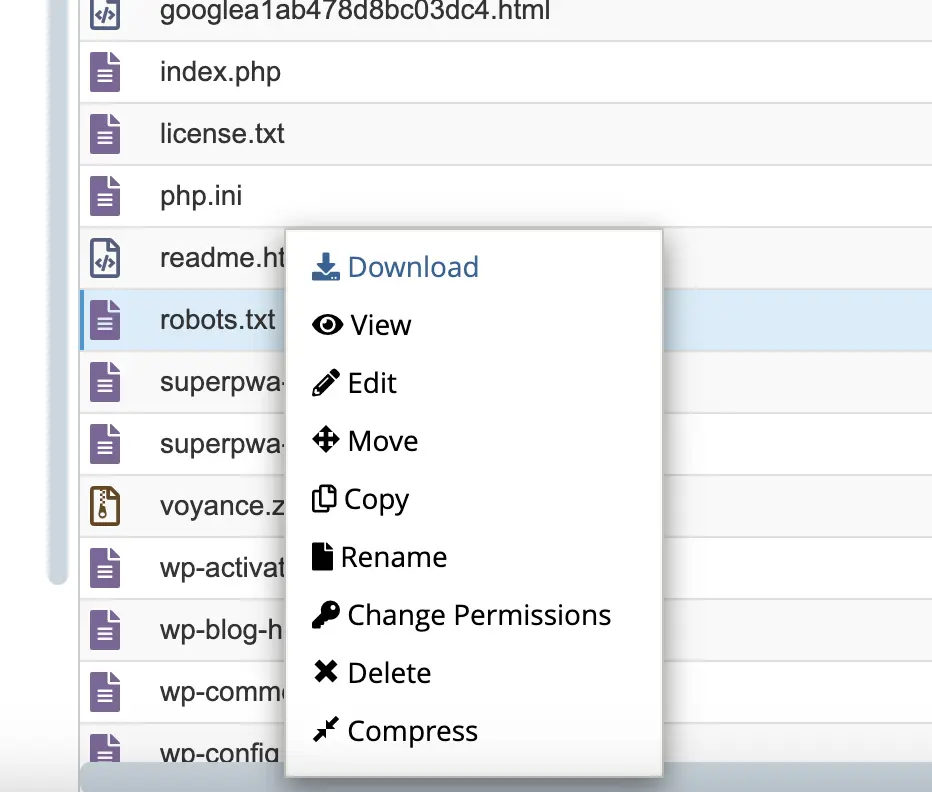
To check the status you can type the /robots.txt after the main URL of your website.
This way you can address which bots can crawl which pages and index them quickly in search engines.
But this isn’t done yet! You can also use the robots exclusion rules more precisely through Robots Meta Tags and X-Robots-Tag HTTP headers.
Robots meta tags for noindex
The Robot meta tag is not a robots.txt file. Rather it’s a meta code to indicate search bots not to index or follow certain pages.
So, it won’t work in non-HTML content like images, text files, or PDFs.
<meta name="robots" content="noindex" />You have to place it inside the header section of an HTML file.
However, you might be wondering how to implement this meta code in a pre-coded template like WordPress.
Let’s guide you to the methods!
1. Using an SEO plugin for meta robots tag
You’re probably familiar with SEO plugins such as Yoast SEO and All in One SEO in WordPress.
These plugins allow to use robots meta tags without harming the page codes.
Here’s how you can do it with Yoast SEO:
- Select the page you want to manage. Then scroll to the Yoast section and find the Advanced Options.
- You may find an option that asks permission to show your content in search results.
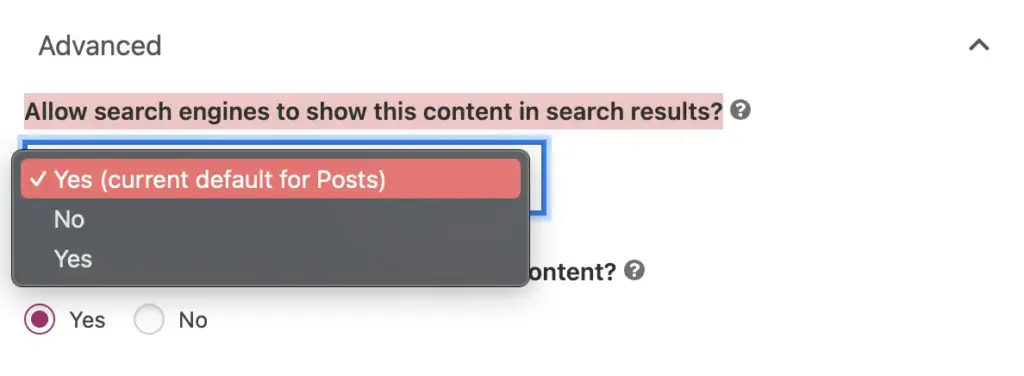
Selecting the “no” option will place a noindex meta code automatically in the selected page.
To confirm everything’s set up correctly, just check the meta tag of robots in the page source.
It’s a straightforward way to take control of how search engines interact with your site.
But if you’ve enough coding knowledge then you can use the Meta Robots Tag for more advanced implementation.
2. Adding meta robots tag manually in your theme File
To add the robots meta tag manually, you can use the WordPress theme editor.
- Go to Appearance > Theme > Editor in your WordPress dashboard.
- Open the header.php file.
- Inside the “<head>” section, add a meta tag like this:
<meta name="robots" content="noindex, nofollow">This tells search engines not to index the page or follow its links.
Important Note: Adding this tag directly into the header can involve every page on your website. To avoid this, use conditional code to specify which pages should or shouldn’t be indexed.
For example, If you are blocking your “About Us” page then the condition will be:
<head>
<meta charset="UTF-8">
<meta name="viewport" content="width=device-width, initial-scale=1.0">
<?php
if (is_page('about-us')) { // Check if the current page is 'yourwebsite.com/about-us'
echo '<meta name="robots" content="noindex, nofollow">'; // Don’t index this page
} else {
echo '<meta name="robots" content="index, follow">'; // Index and follow other pages
}
?>
<title><?php wp_title(); ?></title>
</head>
With this code, the restriction will apply only to the “About Us” page. While the other pages remain untouched.
But there’s another robots tag that works similarly but offers more options as it also includes the non-html files.
X-Robots-Tag HTTP header
You can be more technical and flexible with X-Robots-Tag. This tag allows you to control the indexation of different file types and pages at the server level.
It’s a powerful way to apply the Robots Exclusion Protocol for your WordPress, especially if you want to exclude media files or sections.
Follow the steps to set X-Robots-Tag headers in WordPress.
1. Block non-html files with X-Robots-Tag
The X-Robots-Tag complies at the root level. So, you need to edit the .htaccess file from the root directory.
- In your website’s file manager or via FTP, find and open the .htaccess file.
- Add the following code to instruct search engines not to index certain file types, like PDFs:
<Files "guide.pdf">
Header set X-Robots-Tag "noindex, nofollow"
</Files>
This will tell search engines not to index the pdf file named “guide”. Also, you can use this similar process for PNG, JPG, and other files.
2. Setting X-Robots-Tag for Specific Pages
To block specific pages (like a private policy page) from being indexed, you can add similar instructions:
<Location "/privacy-policy">
    Header set X-Robots-Tag "noindex, nofollow"
</Location>
This setup tells search engines not to index the /privacy-policy page while leaving other pages unaffected.
After saving the .htaccess file, test your site to make sure it’s working as expected. You can use Google’s URL Inspection Tool in the Search Console to confirm that your X-Robots-Tag headers are correctly applied.
Important Note: Be cautious when you are editing a .htaccess file. It’s a root file of your site. So, a single error can break down the entire website. Always make a backup of this file before editing, so you can restore it if needed.
Best robots.txt files used by popular websites
Just in case, you are searching for ideas about how to guide search engine bots more effectively.
No problem. here’s a list of popular websites robots.txt to give you an overview.
During our research on ideal robots.txt files, we discovered some interesting examples of how different websites direct robots.txt.
1. Google
Google’s robots.txt URL: https://www.google.com/robots.txt
User-agent: *
Disallow: /search
Allow: /search/about
Allow: /search/static
Allow: /search/howsearchworks
Disallow: /sdch
Disallow: /groups
Disallow: /index.html?
Disallow: /?
Allow: /?hl=
Disallow: /?hl=*&
Allow: /?hl=*&gws_rd=ssl$
Disallow: /?hl=*&*&gws_rd=ssl
Allow: /?gws_rd=ssl$
Allow: /?pt1=true$
Disallow: /imgres
Disallow: /u/
Disallow: /setprefs
Disallow: /default
Disallow: /m?
Disallow: /m/
Allow:    /m/finance
Disallow: /wml?
Disallow: /wml/?
Disallow: /wml/search?
Disallow: /xhtml?
Disallow: /xhtml/?
Disallow: /xhtml/search?
Disallow: /xml?
Disallow: /imode?
Disallow: /imode/?
2. Bing
Bing’s robots.txt URL: https://www.bing.com/robots.txt
User-agent: msnbot-media
Disallow: /
Allow: /th?

User-agent: Twitterbot
Disallow:

User-agent: *
Disallow: /account/
Disallow: /aclick
Disallow: /alink
Disallow: /amp/
Allow: /api/maps/
Disallow: /api/
Disallow: /bfp/search
Disallow: /bing-site-safety
Disallow: /blogs/search/
Disallow: /ck/
Disallow: /cr$
Disallow: /cr?
Disallow: /entities/search
Disallow: /entityexplore$
Disallow: /entityexplore?
Disallow: /fd/
Disallow: /history
Disallow: /hotels/search
3. YouTube
YouTube’s robots.txt URL: https://www.youtube.com/robots.txt
# robots.txt file for YouTube
# Created in the distant future (the year 2000) after
# the robotic uprising of the mid 90's which wiped out all humans.

User-agent: Mediapartners-Google*
Disallow:

User-agent: *
Disallow: /api/
Disallow: /comment
Disallow: /feeds/videos.xml
Disallow: /get_video
Disallow: /get_video_info
Disallow: /get_midroll_info
Disallow: /live_chat
Disallow: /login
Disallow: /qr
Disallow: /results
Disallow: /signup
Disallow: /t/terms
Disallow: /timedtext_video
Disallow: /verify_age
Disallow: /watch_ajax
Disallow: /watch_fragments_ajax
Disallow: /watch_popup
Disallow: /watch_queue_ajax
Disallow: /youtubei/

Sitemap: https://www.youtube.com/sitemaps/sitemap.xml
Sitemap: https://www.youtube.com/product/sitemap.xml
4. Twitter
Twitter’s robots.txt URL: https://twitter.com/robots.txt
# Google Search Engine Robot
# ==========================
User-agent: Googlebot

Allow: /*?lang=
Allow: /hashtag/*?src=
Allow: /search?q=%23
Allow: /i/api/
Disallow: /search/realtime
Disallow: /search/users
Disallow: /search/*/grid

Disallow: /*?
Disallow: /*/followers
Disallow: /*/following

Disallow: /account/deactivated
Disallow: /settings/deactivated

Disallow: /[_0-9a-zA-Z]+/status/[0-9]+/likes
Disallow: /[_0-9a-zA-Z]+/status/[0-9]+/retweets
Disallow: /[_0-9a-zA-Z]+/likes
Disallow: /[_0-9a-zA-Z]+/media
Disallow: /[_0-9a-zA-Z]+/photo

User-Agent: Google-Extended
Disallow: *

User-Agent: FacebookBot
Disallow: *

User-agent: facebookexternalhit
Disallow: *

User-agent: Discordbot
Disallow: *

User-agent: Bingbot
Disallow: *

# Every bot that might possibly read and respect this file
# ========================================================
User-agent: *
Disallow: /
5. Wikipedia
Twitter’s robots.txt URL: https://en.wikipedia.org/robots.txt
# robots.txt for http://www.wikipedia.org/ and friends
#
# Please note: There are a lot of pages on this site, and there are
# some misbehaved spiders out there that go _way_ too fast. If you're
# irresponsible, your access to the site may be blocked.
#

# Observed spamming large amounts of https://en.wikipedia.org/?curid=NNNNNN
# and ignoring 429 ratelimit responses, claims to respect robots:
# http://mj12bot.com/
User-agent: MJ12bot
Disallow: /

# advertising-related bots:
User-agent: Mediapartners-Google*
Disallow: /

# Wikipedia work bots:
User-agent: IsraBot
Disallow:

User-agent: Orthogaffe
Disallow:

# Crawlers that are kind enough to obey, but which we'd rather not have
# unless they're feeding search engines.
User-agent: UbiCrawler
Disallow: /

User-agent: DOC
Disallow: /

User-agent: Zao
Disallow: /

# Some bots are known to be trouble, particularly those designed to copy
# entire sites. Please obey robots.txt.
User-agent: sitecheck.internetseer.com
Disallow: /

User-agent: Zealbot
Disallow: /

User-agent: MSIECrawler
Disallow: /
Wrapping up
These are all the directives and techniques to guide you through implementing the robots.txt file in WordPress.
Keep in mind that robots.txt is created just to guide search bots to the pages you want (or don’t want) to be crawled.
However, it’s not guaranteed that every bot will follow every rule. It’s up to them (search bots) to choose which directives they might want to follow.
WordPress Robots.txt – FAQ
Here are the answers to some common questions about the robots.txt file in WordPress




Leave a Reply