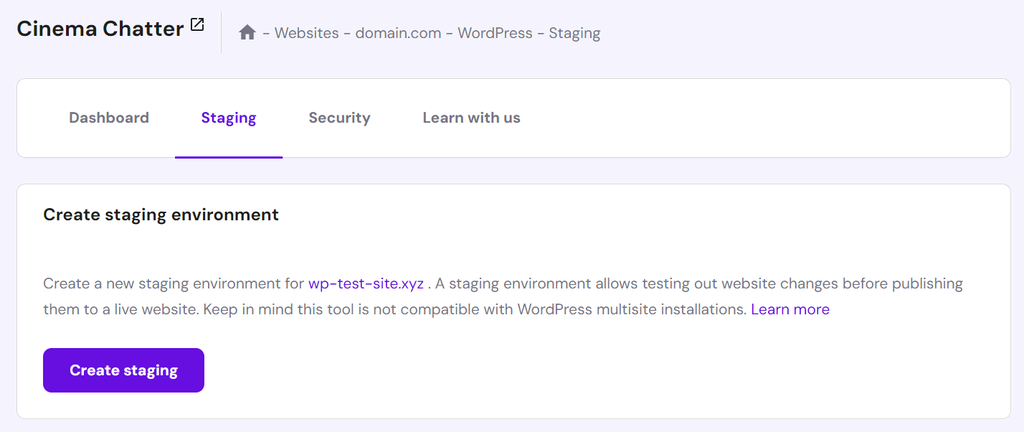
How to Create a Staging Site in WordPress

By Prosanjit Dhar
June 14, 2025
Last Modified: July 28, 2025


Ever clicked “Update” on a WordPress plugin only to see your entire site crash? Or installed a new theme that completely broke your site layout?
Changing or testing anything directly on your live site is a gamble and can bring everything down. That’s why it’s wise to create a clone of your site where you can safely test changes, fix bugs, and fine-tune updates without risking your actual site.
At Fluent Support, we use staging sites to test changes or updates before they go live. And it really helps us avoid downtime, broken features, and those last-minute fire drills.
What is a WordPress staging site?
A WordPress staging site is a clone of your live WordPress website. It gives you a safe space to test new themes, plugins, custom code, or even full redesigns without impacting the site.
You can also live this staging site (clone site) at a separate web address or subdomain, such as
So it will not be visible to any search engines or web traffic, unless you share the direct link. And once everything runs smoothly on your staging site, you can confidently push those changes to your live website.
Now, let’s create some of these staging sites in WordPress and deploy them to a live website.
Creating a WordPress staging site
You can create a WordPress staging site in several ways. However, the easiest way is to use your hosting provider’s built-in staging feature (if they offer one). You can also use a WordPress plugin or even set it up manually if you prefer more control.
No matter which method works for you, use the navigation below to jump right in and get started quickly.
Method 1: Using the web host’s built-in staging feature
Many hosting providers now offer a one-click staging site feature. If yours does, you’re in luck! You can have a staging site up and running in just a few minutes.
Popular hosts that offer staging:
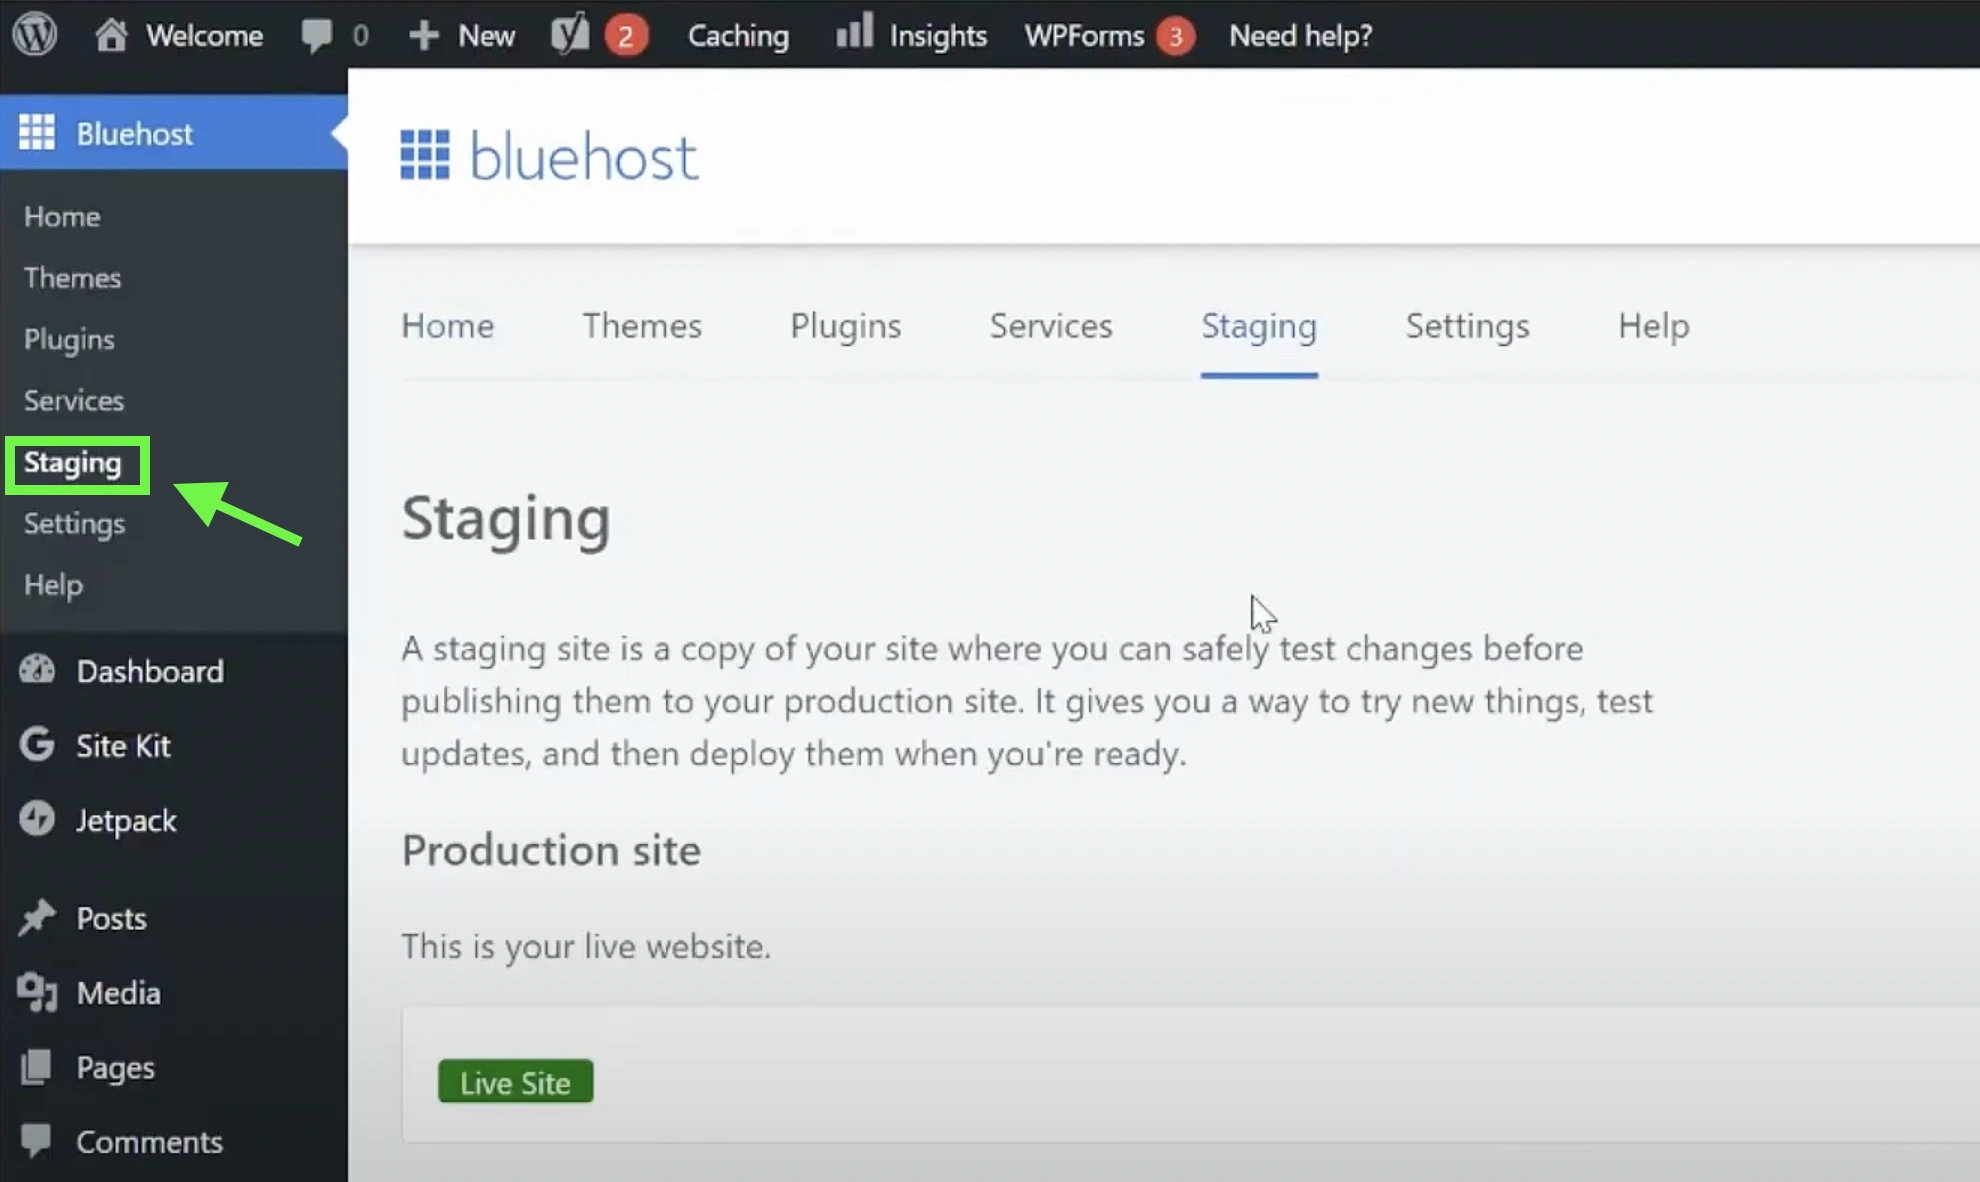
Creating a staging site on Bluehost
Bluehost offers a one-click staging feature for all its hosting plans. So if you’re hosting your site with Bluehost, we’ll show you two quick ways to create your staging site, and it takes just a few clicks.
From the WordPress dashboard
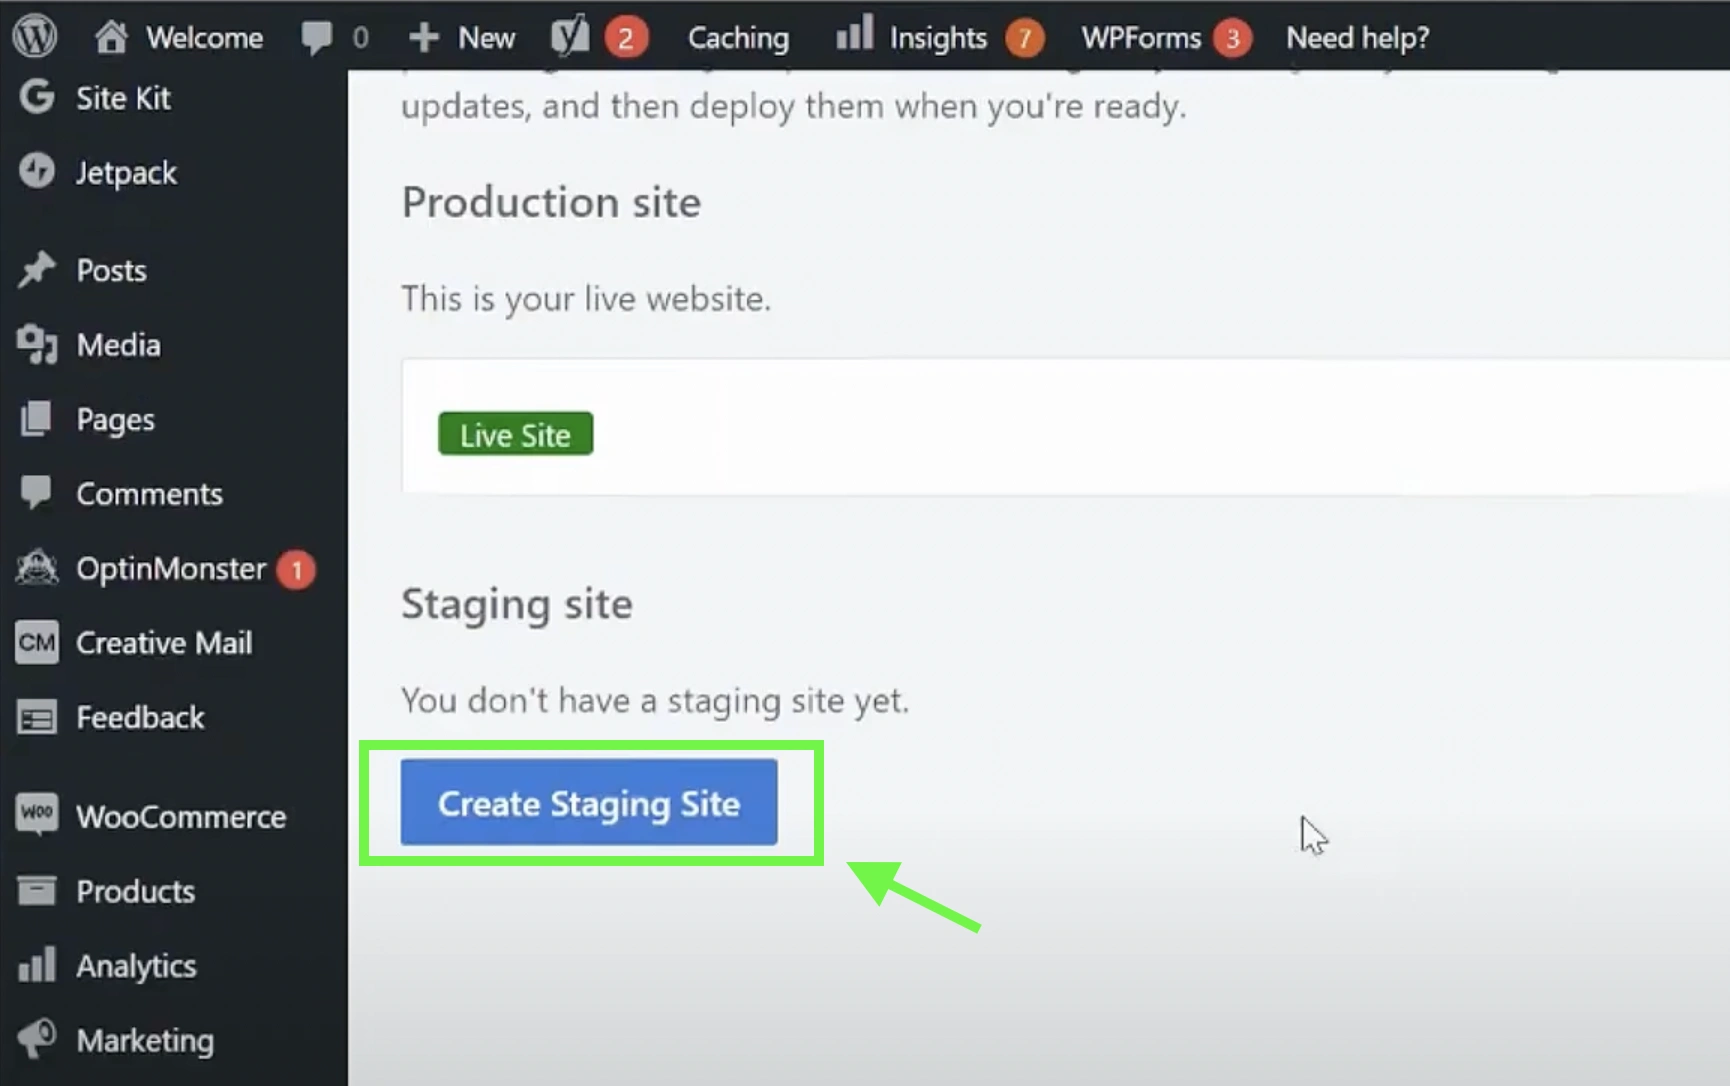
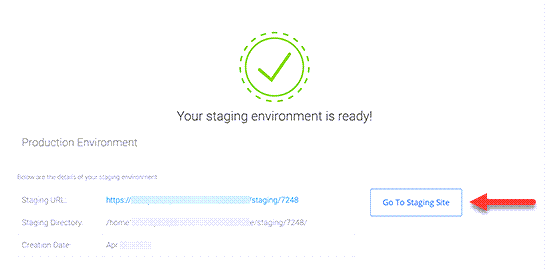
By following these, you’ll soon see that your staging environment has been successfully created. But if you’re more comfortable working through cPanel, there’s another way to create a staging site that might feel more familiar to you.
From Bluehost cPanel Softaculous app (Optional)

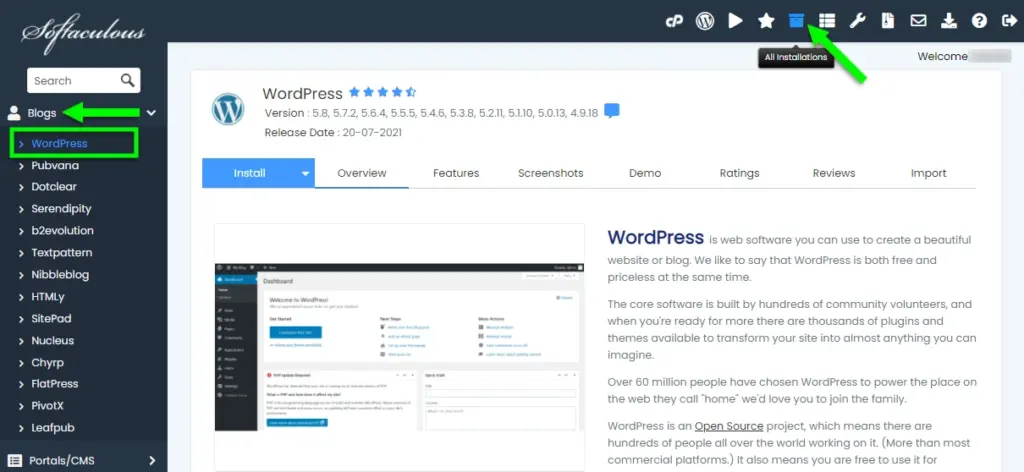
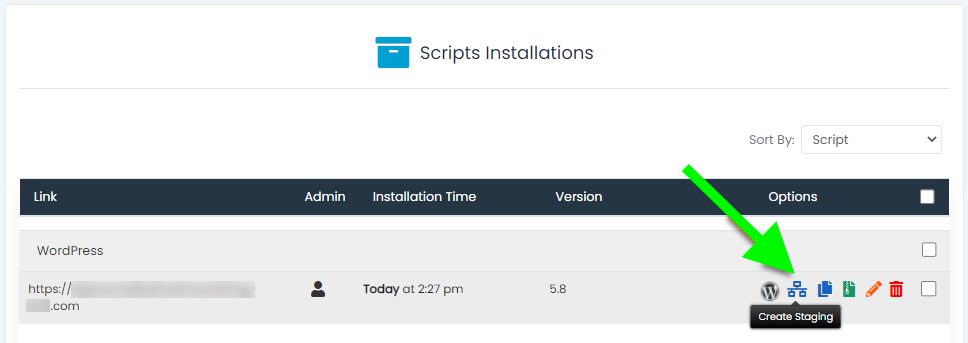
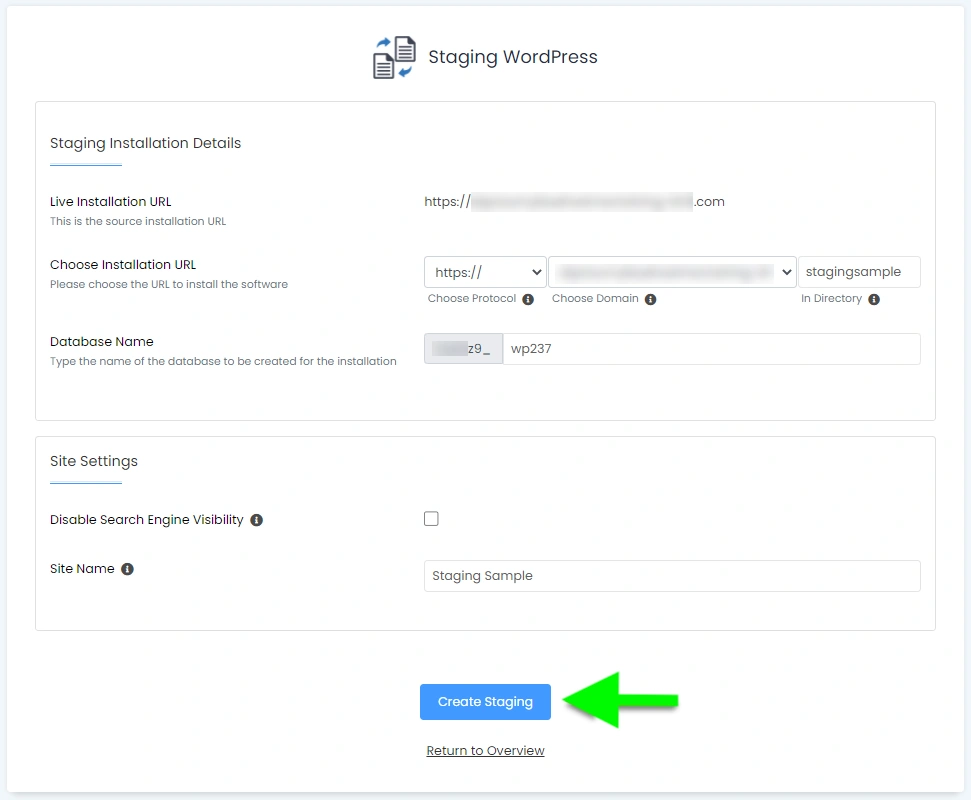
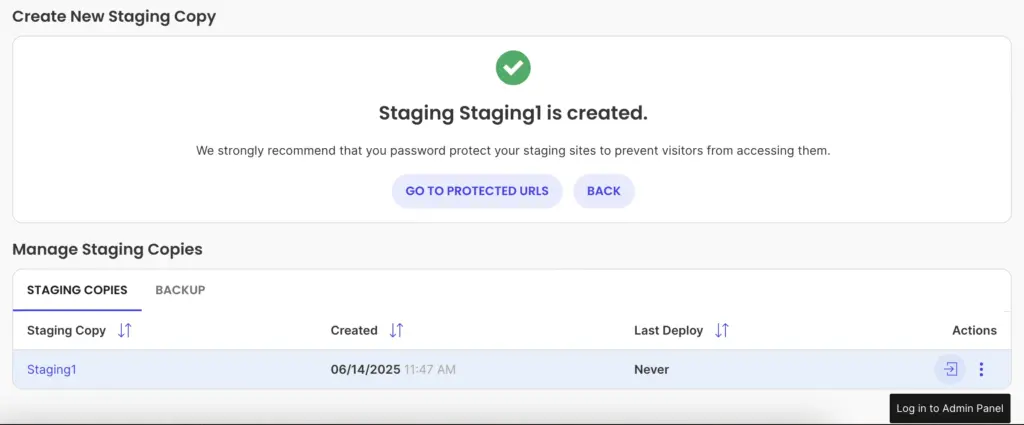
Optional: You can uncheck the Search Engine Visibility option to keep your staging site hidden from Google. You can also give your staging site a custom name.
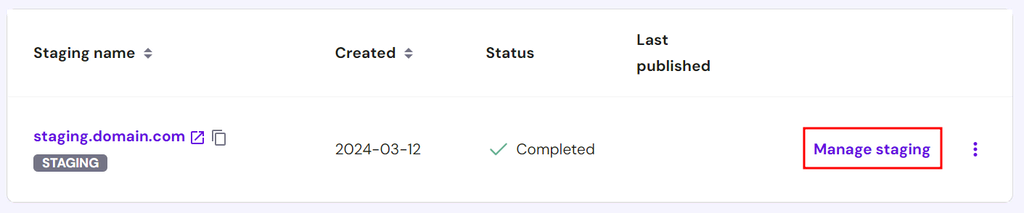
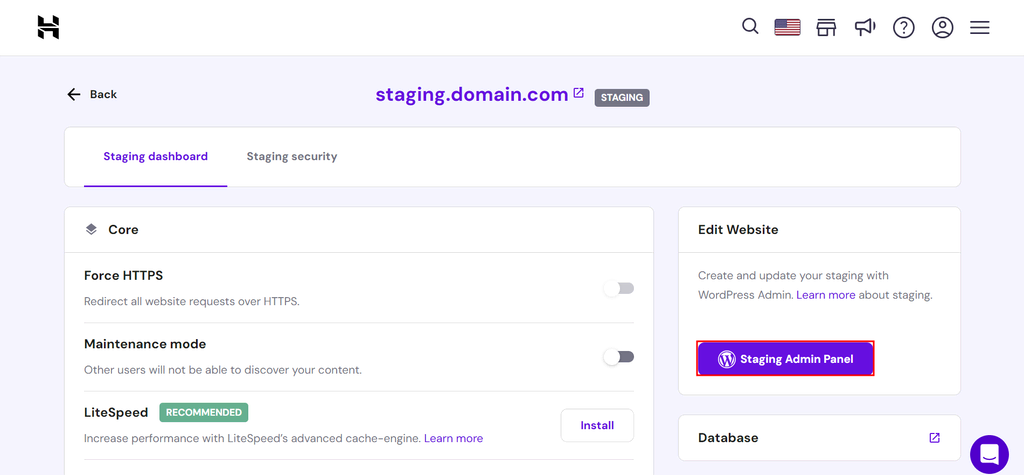
Once it’s done, you’ll see your new staging site listed along with its unique URL (usually displayed right under your WordPress admin URL). You can log into the staging site directly from the link or use the One-Click Admin option from the All Installations page.
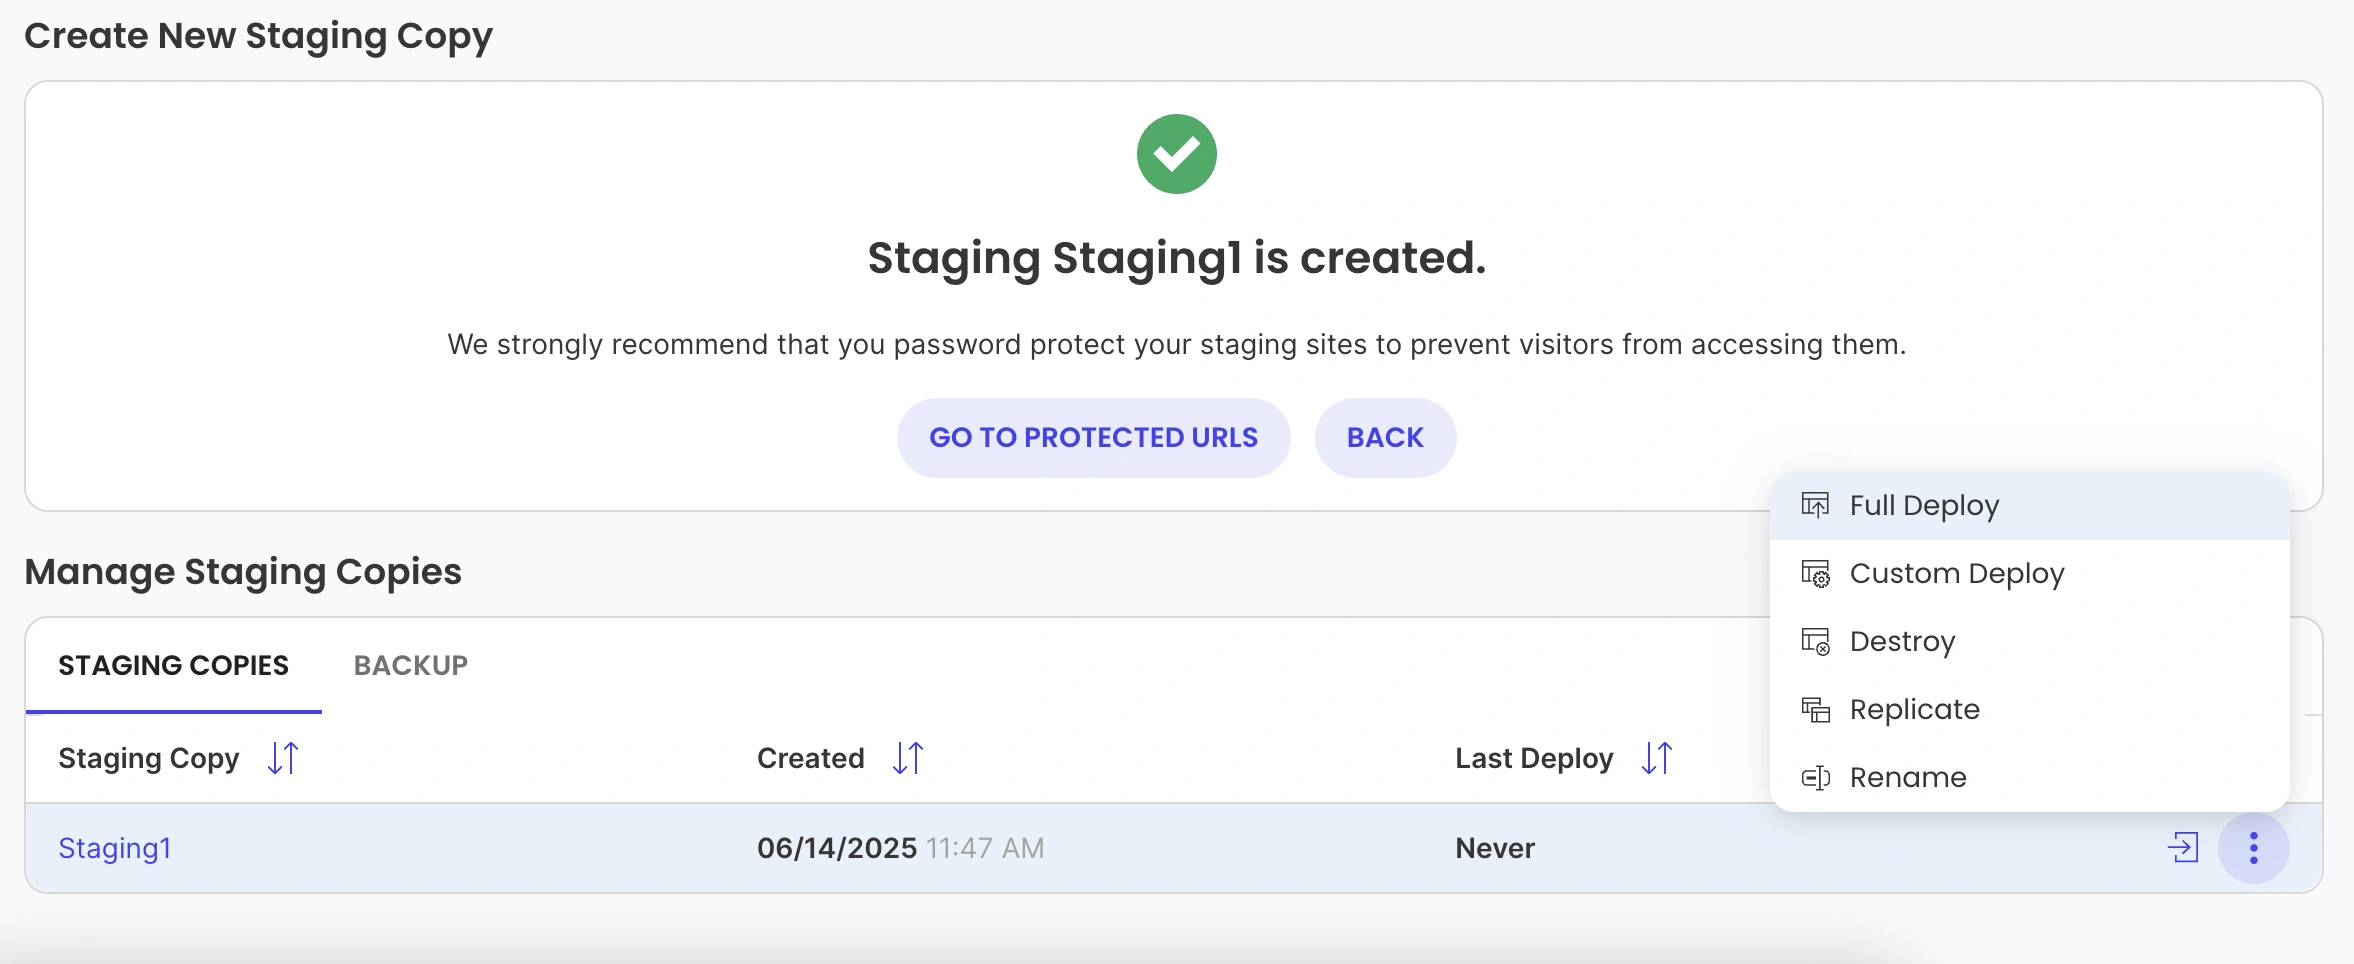
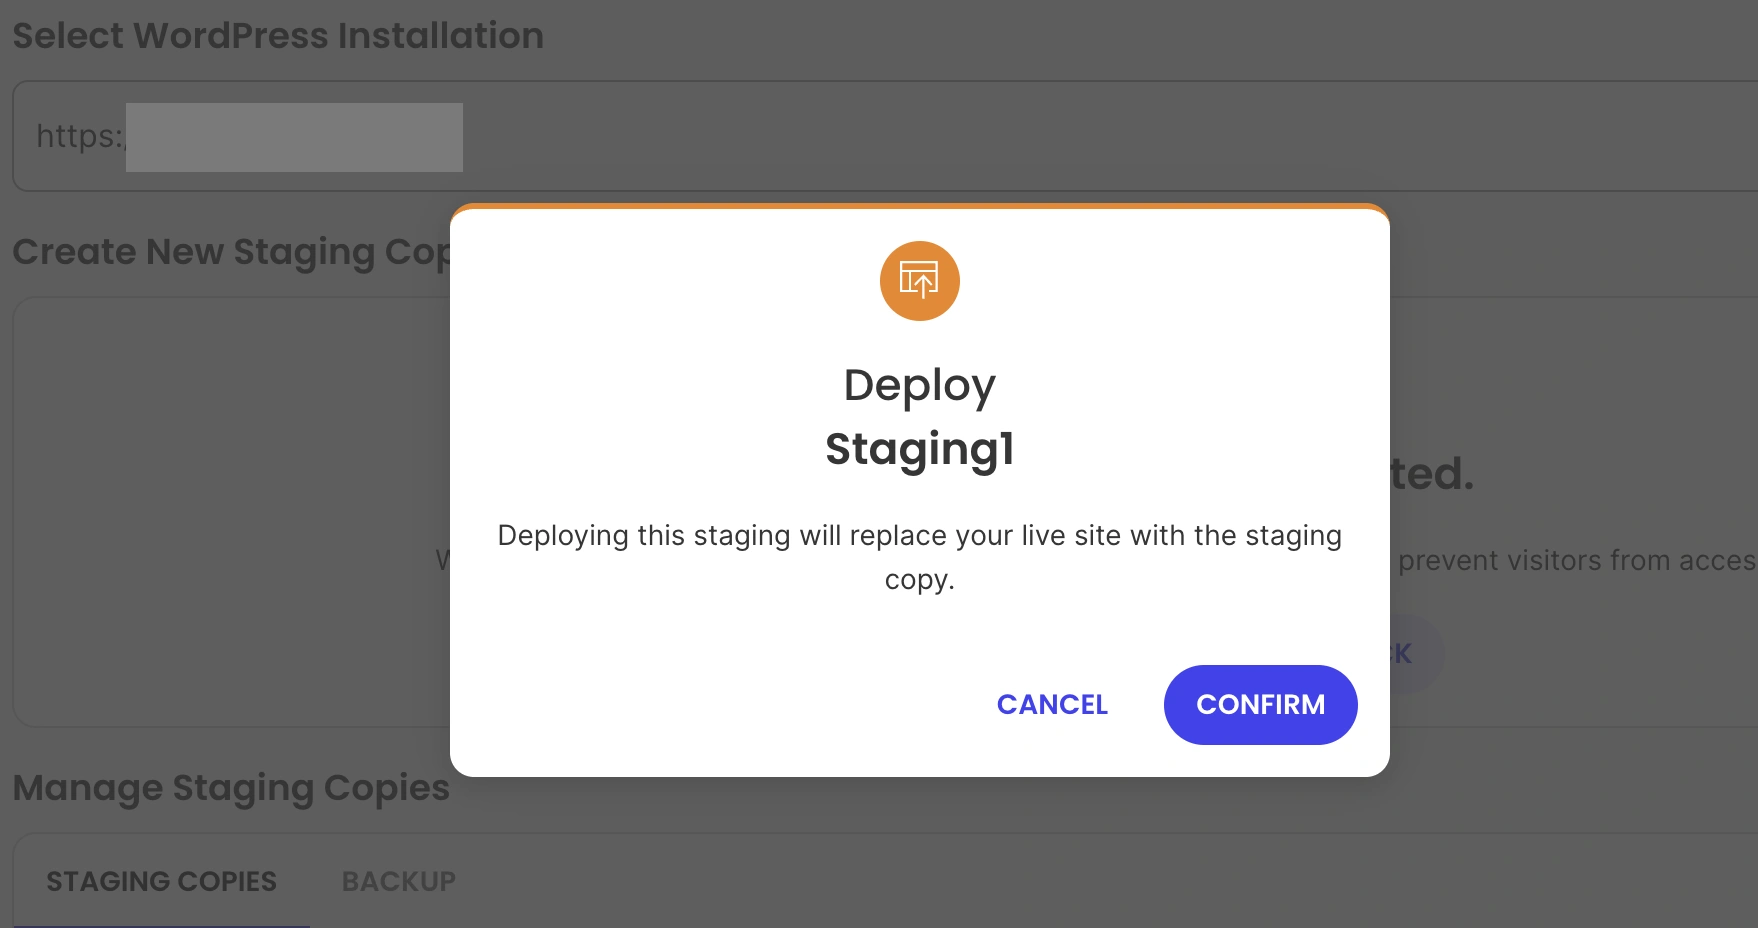
Deploying changes to the live site on Bluehost
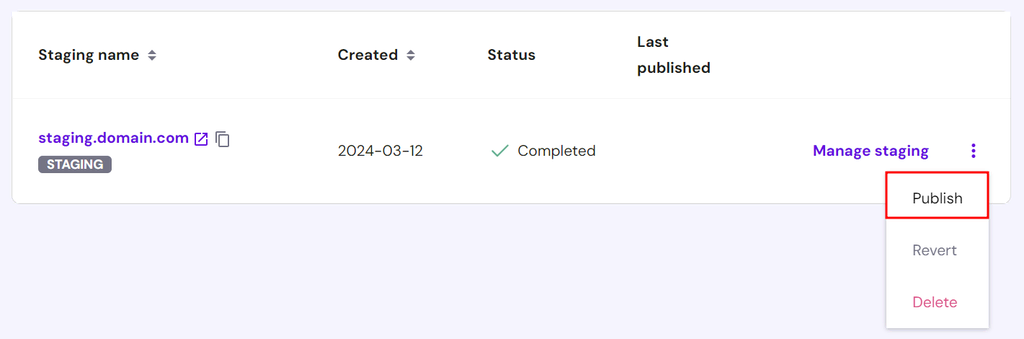
Once you’ve finished testing on your staging site and everything looks perfect, it’s time to push those changes to your live website.
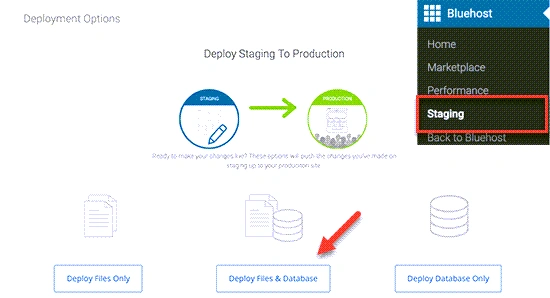
It will start to deploy your staging site to the live site. Depending on the size of your website, this may take a while. After that, your live website will reflect all the changes you tested in staging.
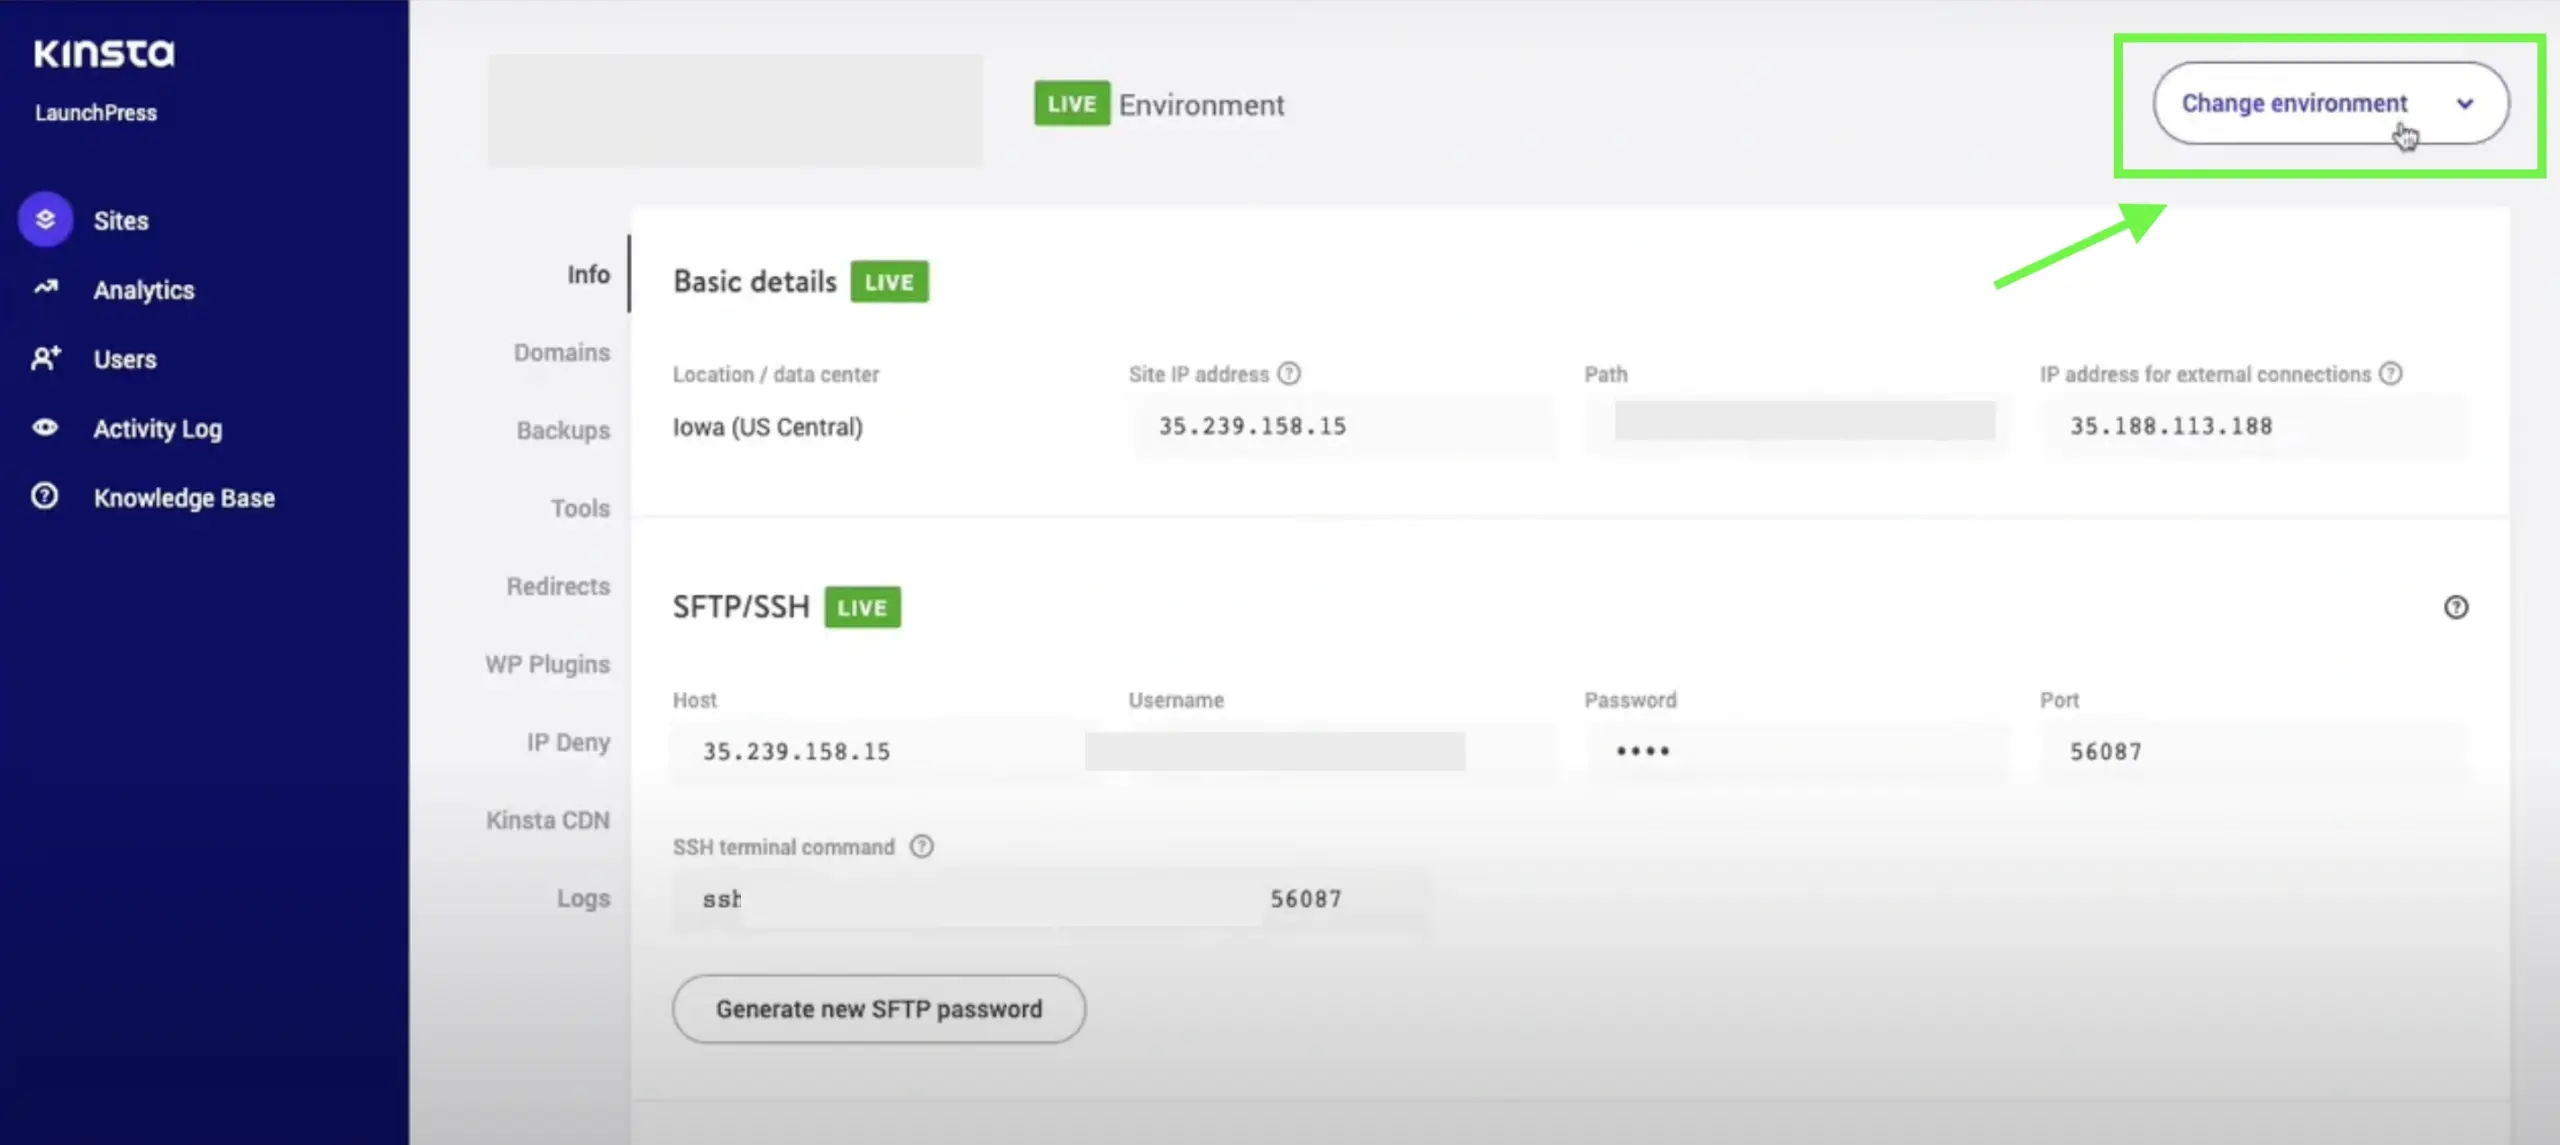
Creating a staging site on Kinsta
Kinsta offers premium staging environments with their custom MyKinsta dashboard. All Kinsta plans include staging functionality with easy one-click creation and deployment.
From MyKinsta dashboard
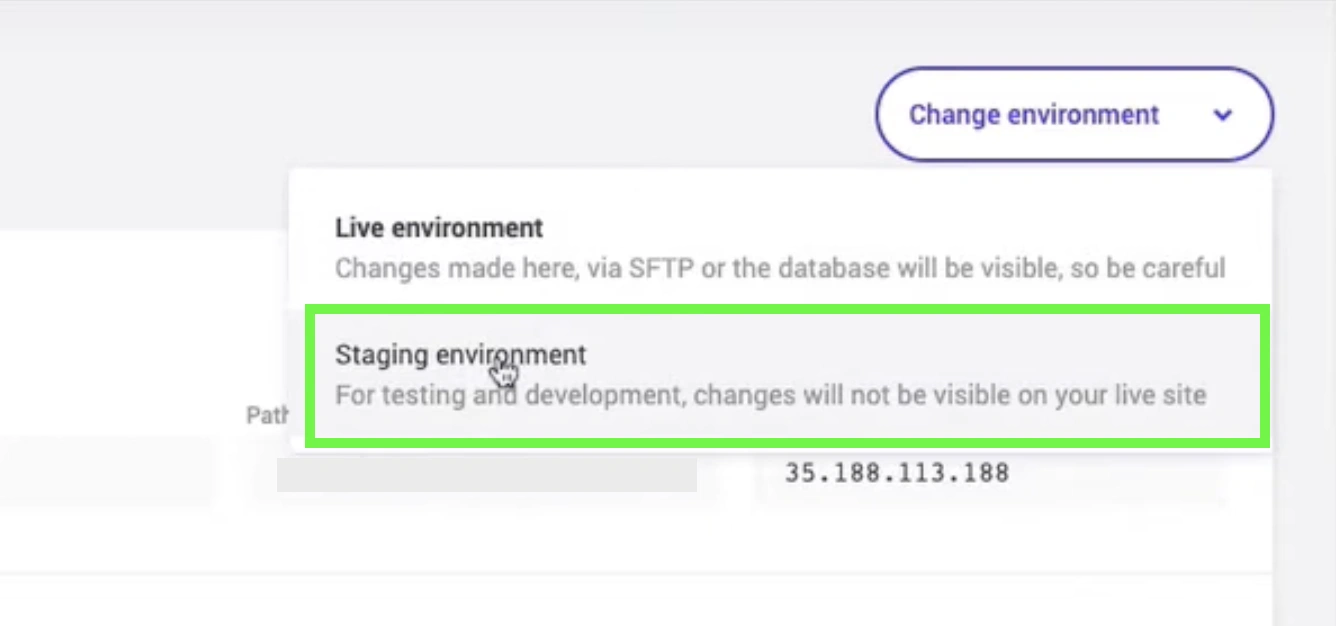
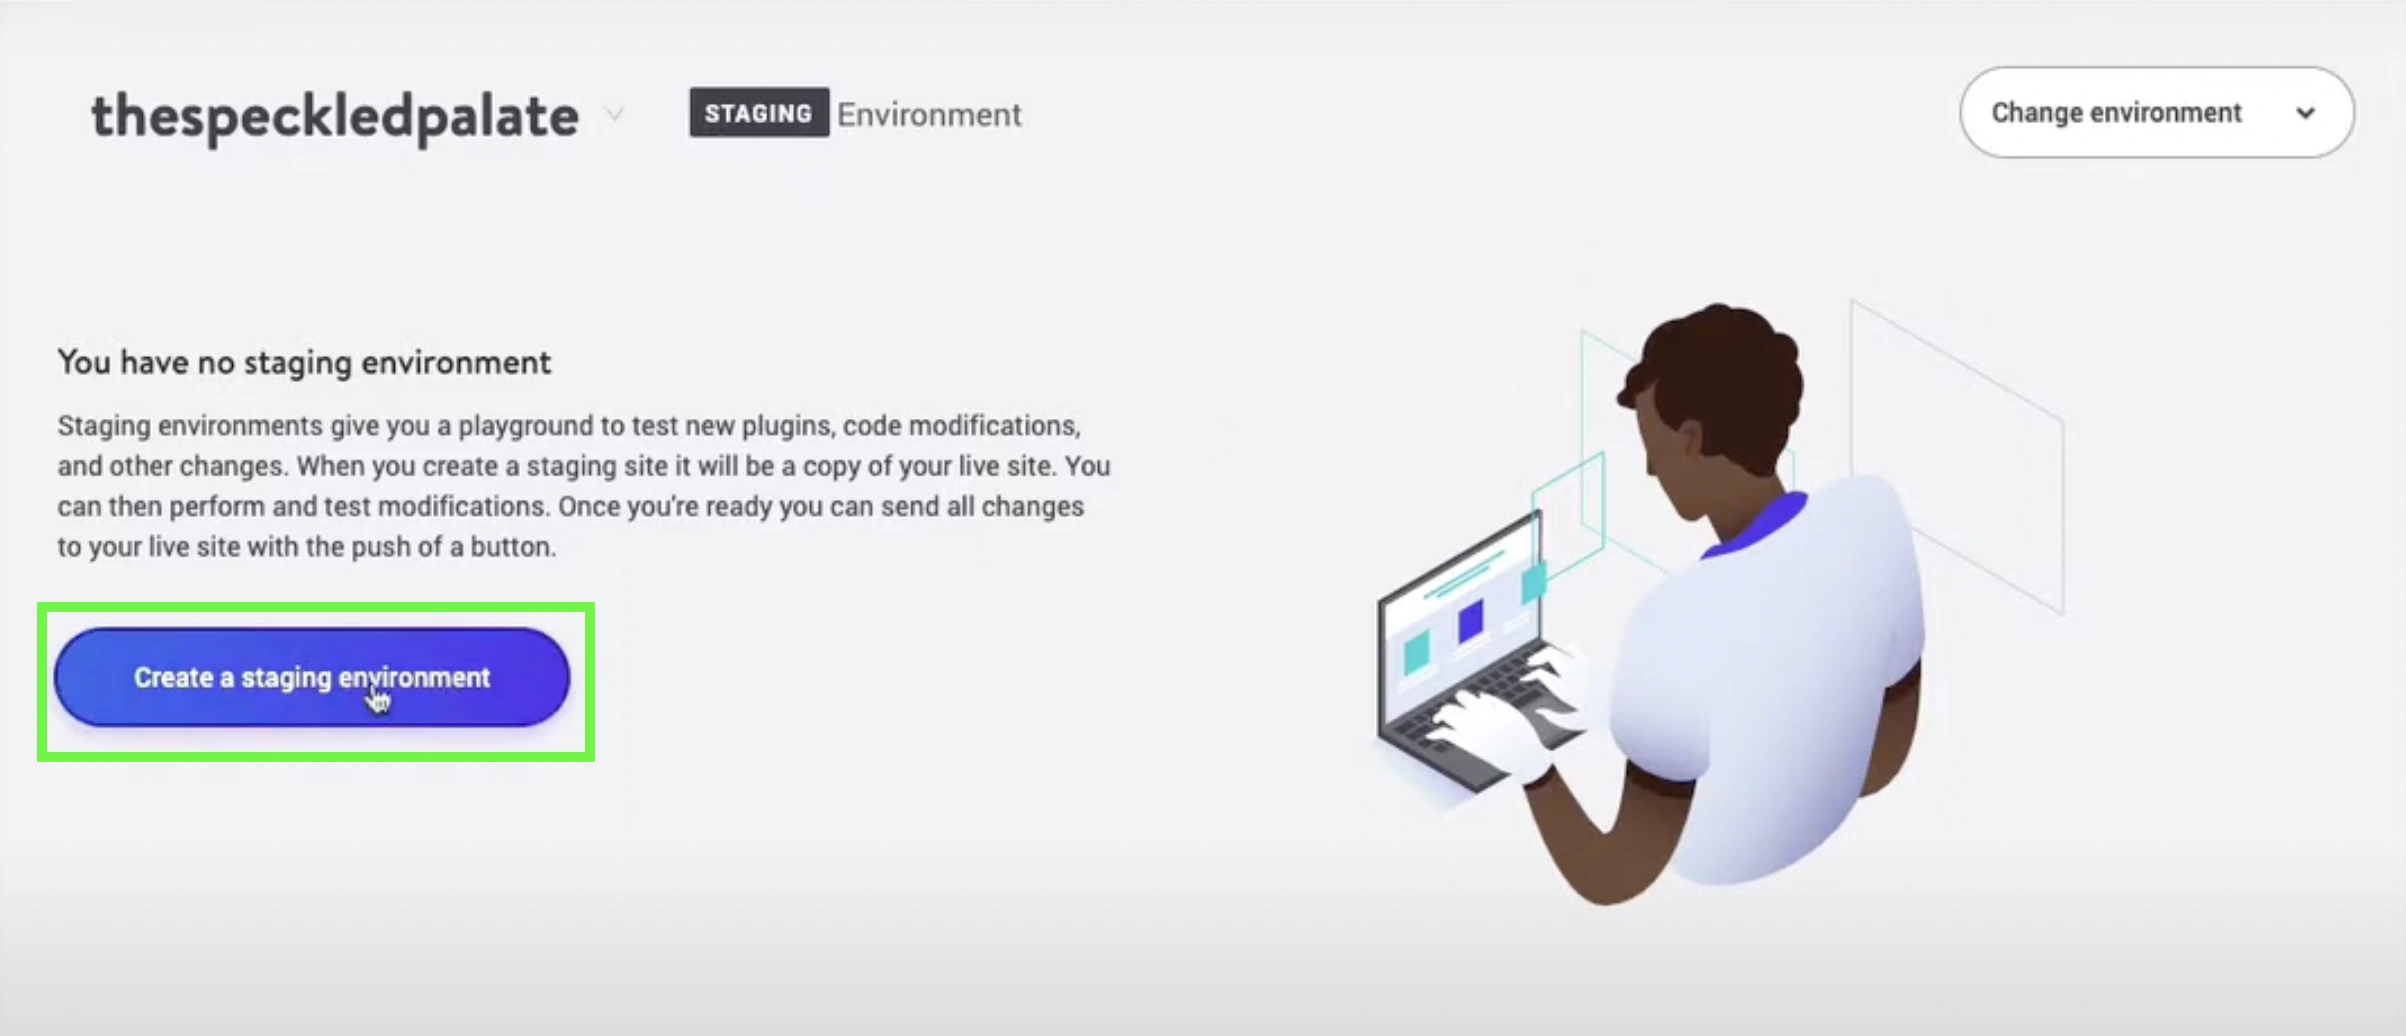

Kinsta will automatically create a staging environment with a unique URL (e.g., staging-sitename.kinsta.cloud).
This process usually takes 2-5 minutes, and you’ll receive an email notification once it’s complete. Once created, you can click WP admin to access your staging site’s WordPress dashboard, or click Visit site to view the frontend.
Deploying changes to the live site on Kinsta
Once you’ve finished testing on your staging site and everything looks perfect, it’s time to push those changes to your live website.
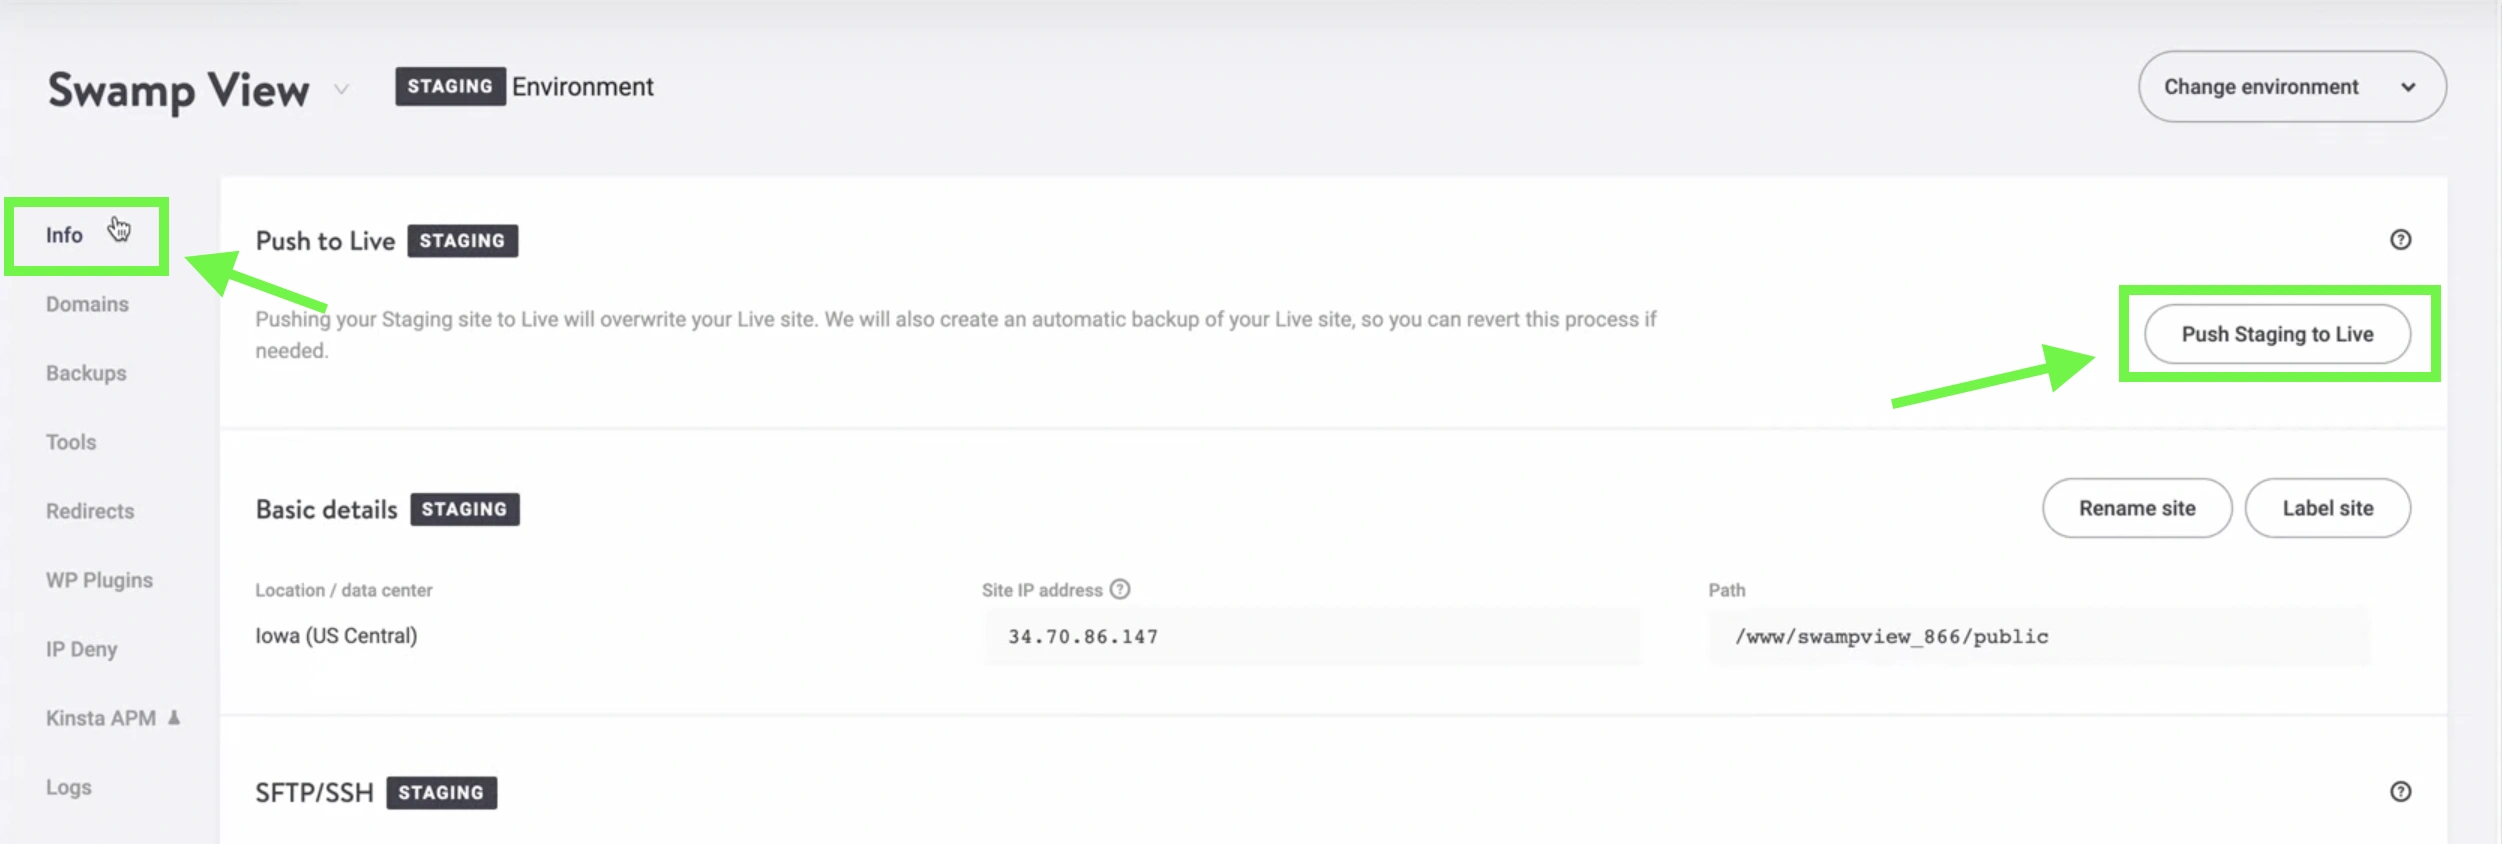
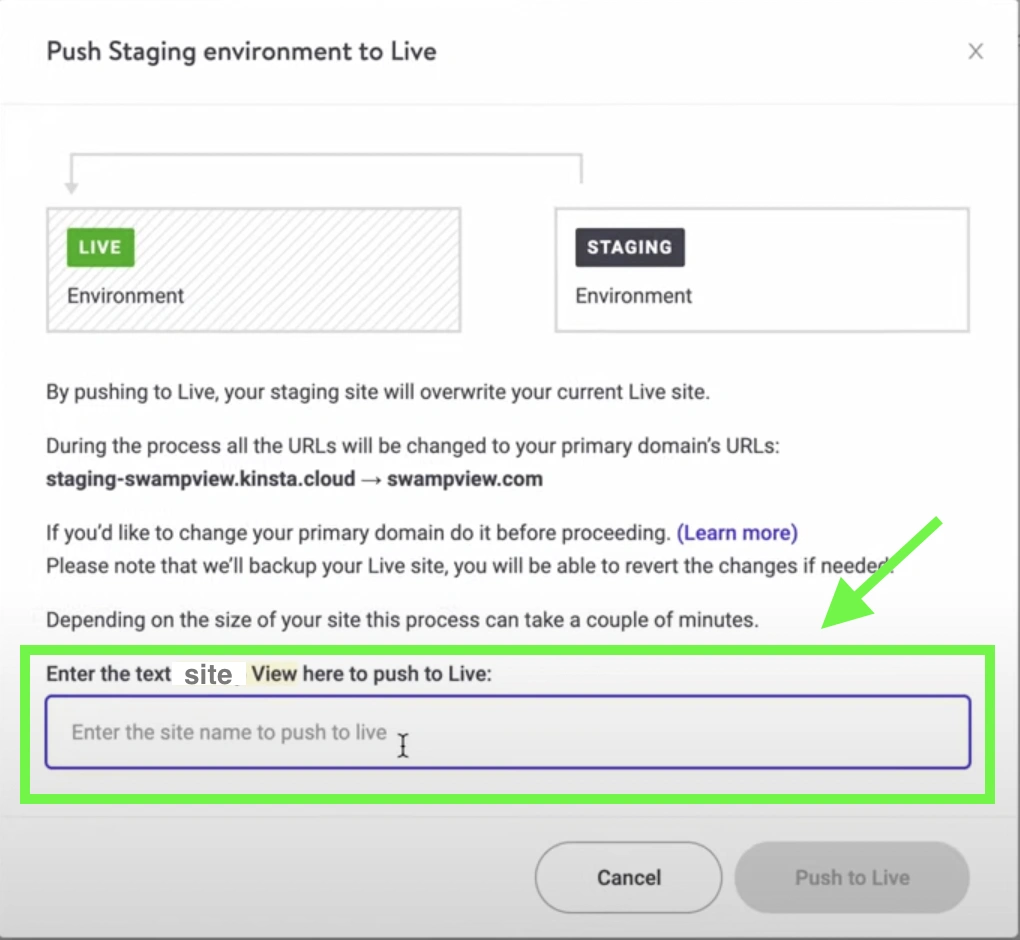
Once deployment is complete, you’ll receive a confirmation message, and your live website will reflect all the tested changes.
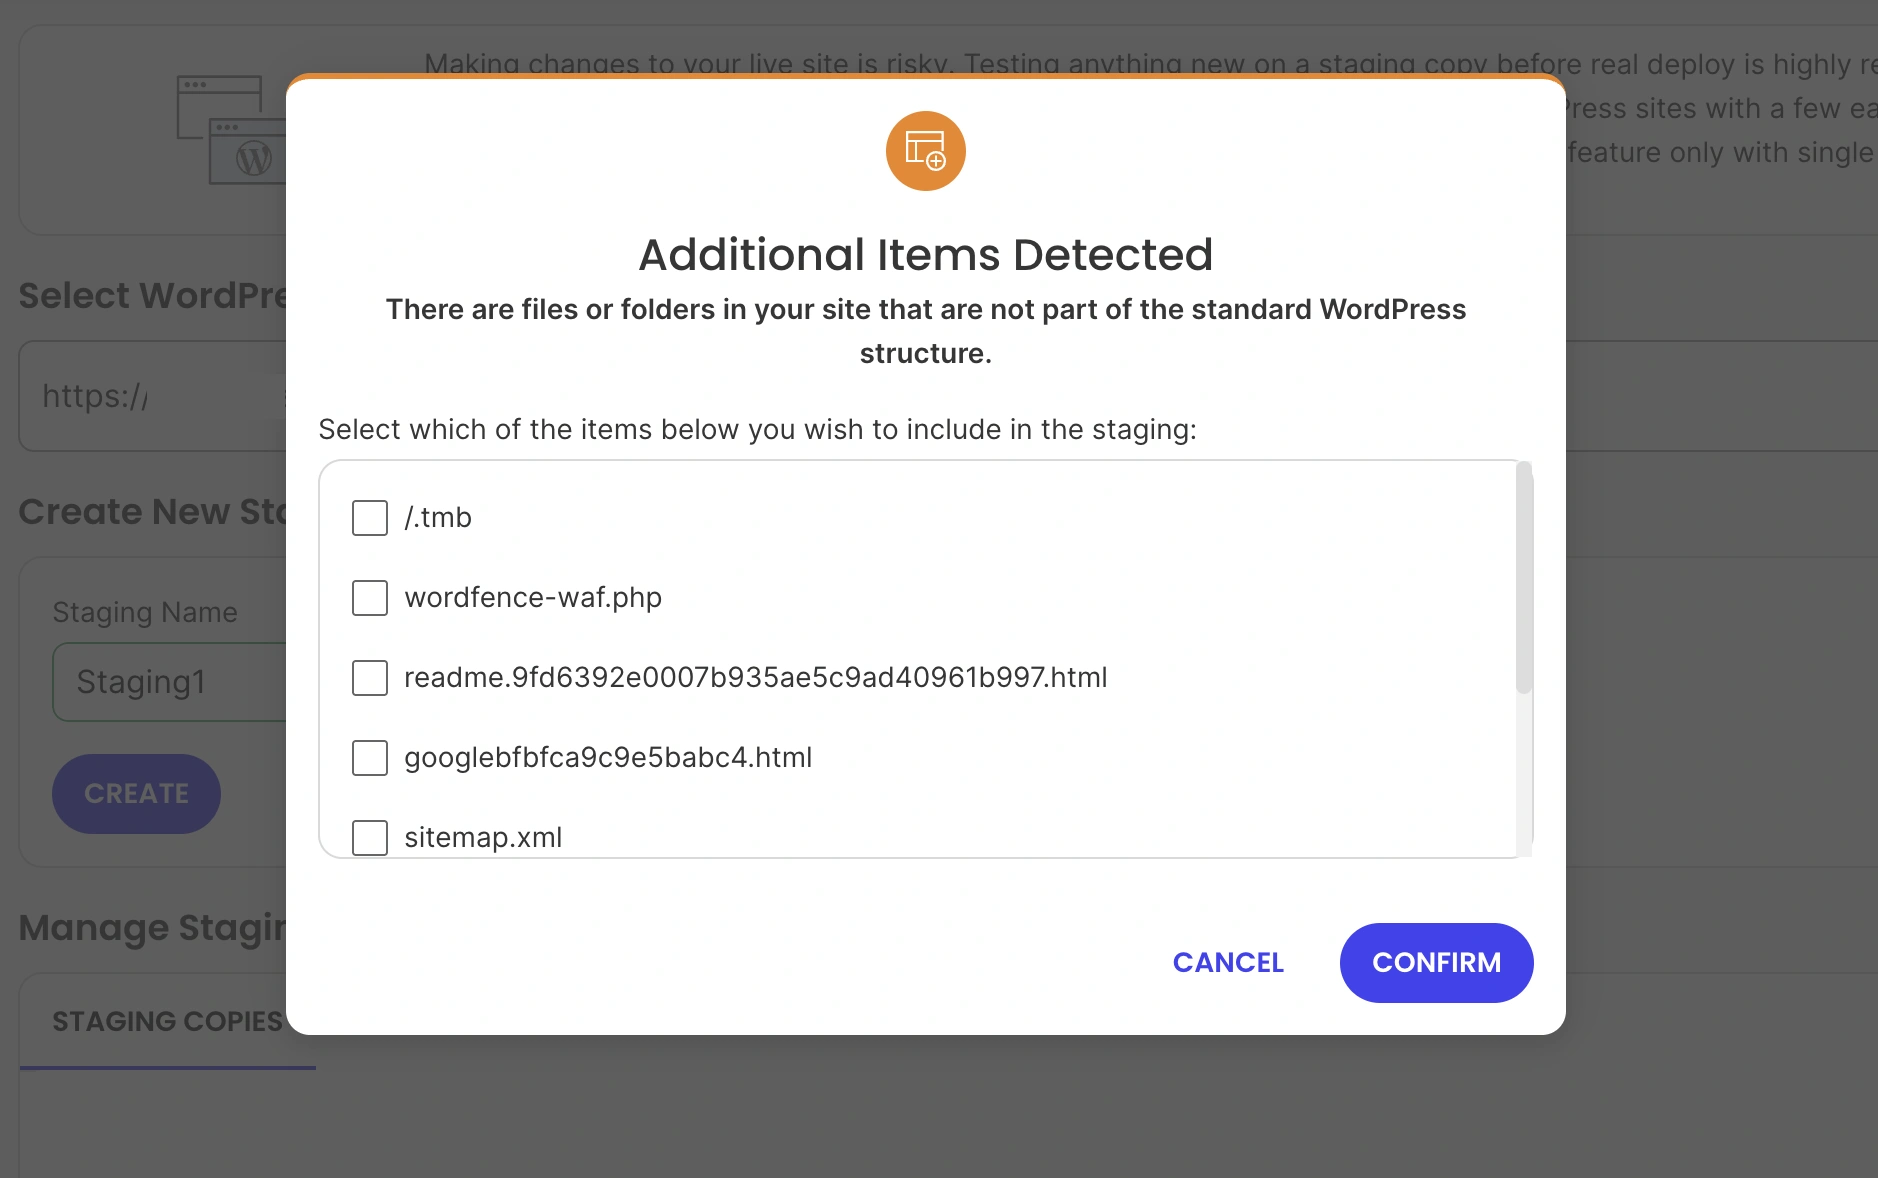
Creating a staging site on SiteGround
SiteGround makes it easy to create a staging copy with just a few clicks, right from its dashboard. If you’re hosting your WordPress site with SiteGround, follow these steps:
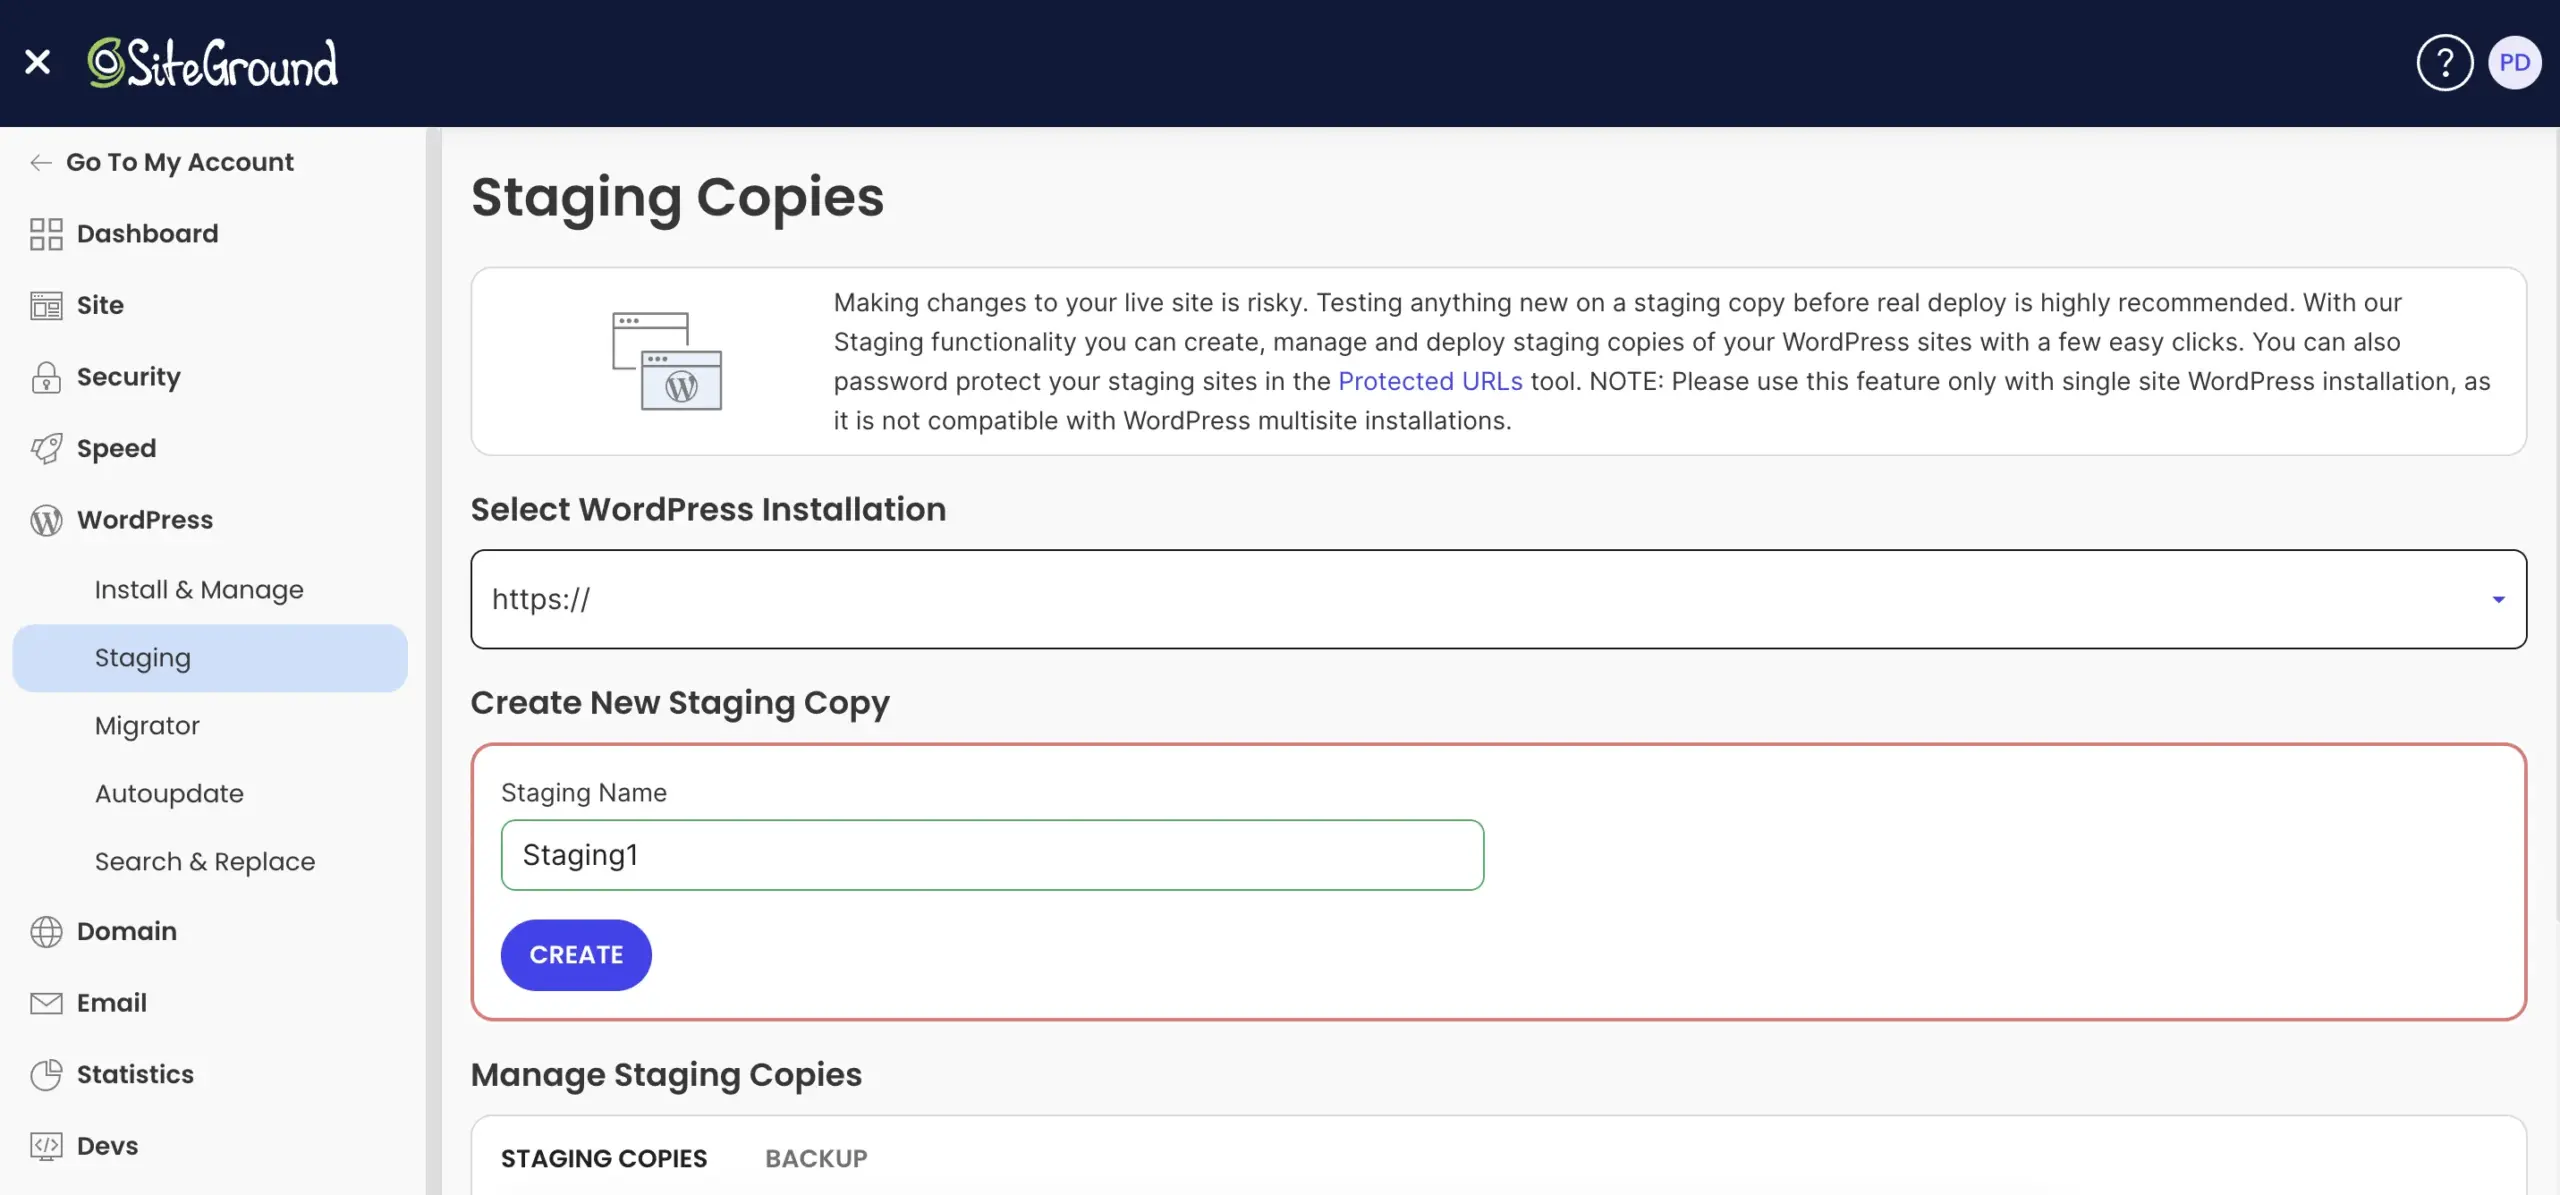
Before creating a new staging site, make sure to delete any old or unnecessary staging copies to avoid clutter or confusion.
Once it’s ready, you’ll see an option to log in to the admin panel of your staging site, where you can freely test, modify, or experiment without impacting your live website.
Deploying changes to the live site on SiteGround
Once you’ve completed all your testing and updates, pushing your staging site live is quick and simple.
Here’s how to do it:
The process may take a few minutes, depending on the size of your site or selected sections. Once completed, your changes will go live without disrupting your website or affecting user experience.
Creating a staging site on Hostinger
Hostinger makes it simple to set up a staging site using the built-in tools on hPanel.
Follow these steps to create your staging environment:

If the Staging option doesn’t appear, ensure that your WordPress installation is detected by hPanel.
After a few minutes, your staging environment will be ready to use.
Deploying Changes to the Production Site on Hostinger
Once you’ve finalized all the updates on your staging site, it’s time to push them to your live website.
Here’s how:

The process may take up to 15 minutes, depending on your website size and content.
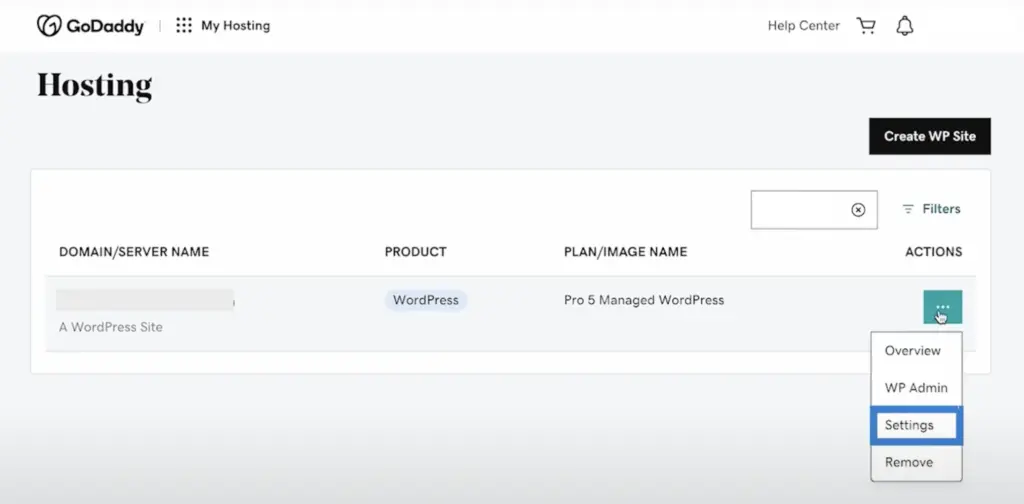
Creating a staging site on GoDaddy
GoDaddy makes it easy to test your site updates without disrupting the live version, thanks to its built-in staging environment.
If you’re on the Basic plan, you’ll need to upgrade to access staging features.
Here’s how to create a staging site:
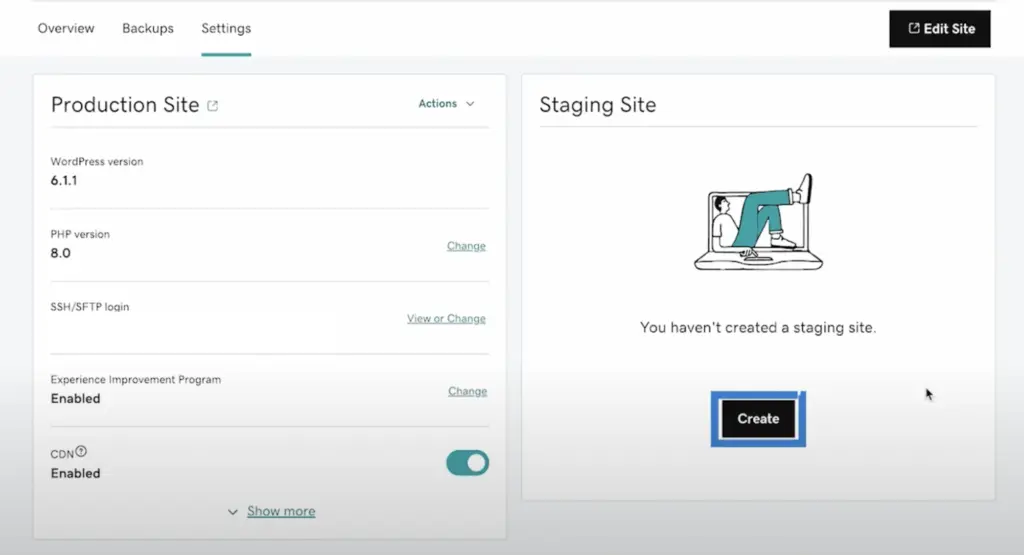
It may take a few minutes for GoDaddy to generate your staging environment. Once it’s ready, you can edit the staging site by clicking Edit staging site under the Actions button.
Pulling live site into staging (Optional)
If you want to overwrite your current staging copy with a fresh version of your live site:
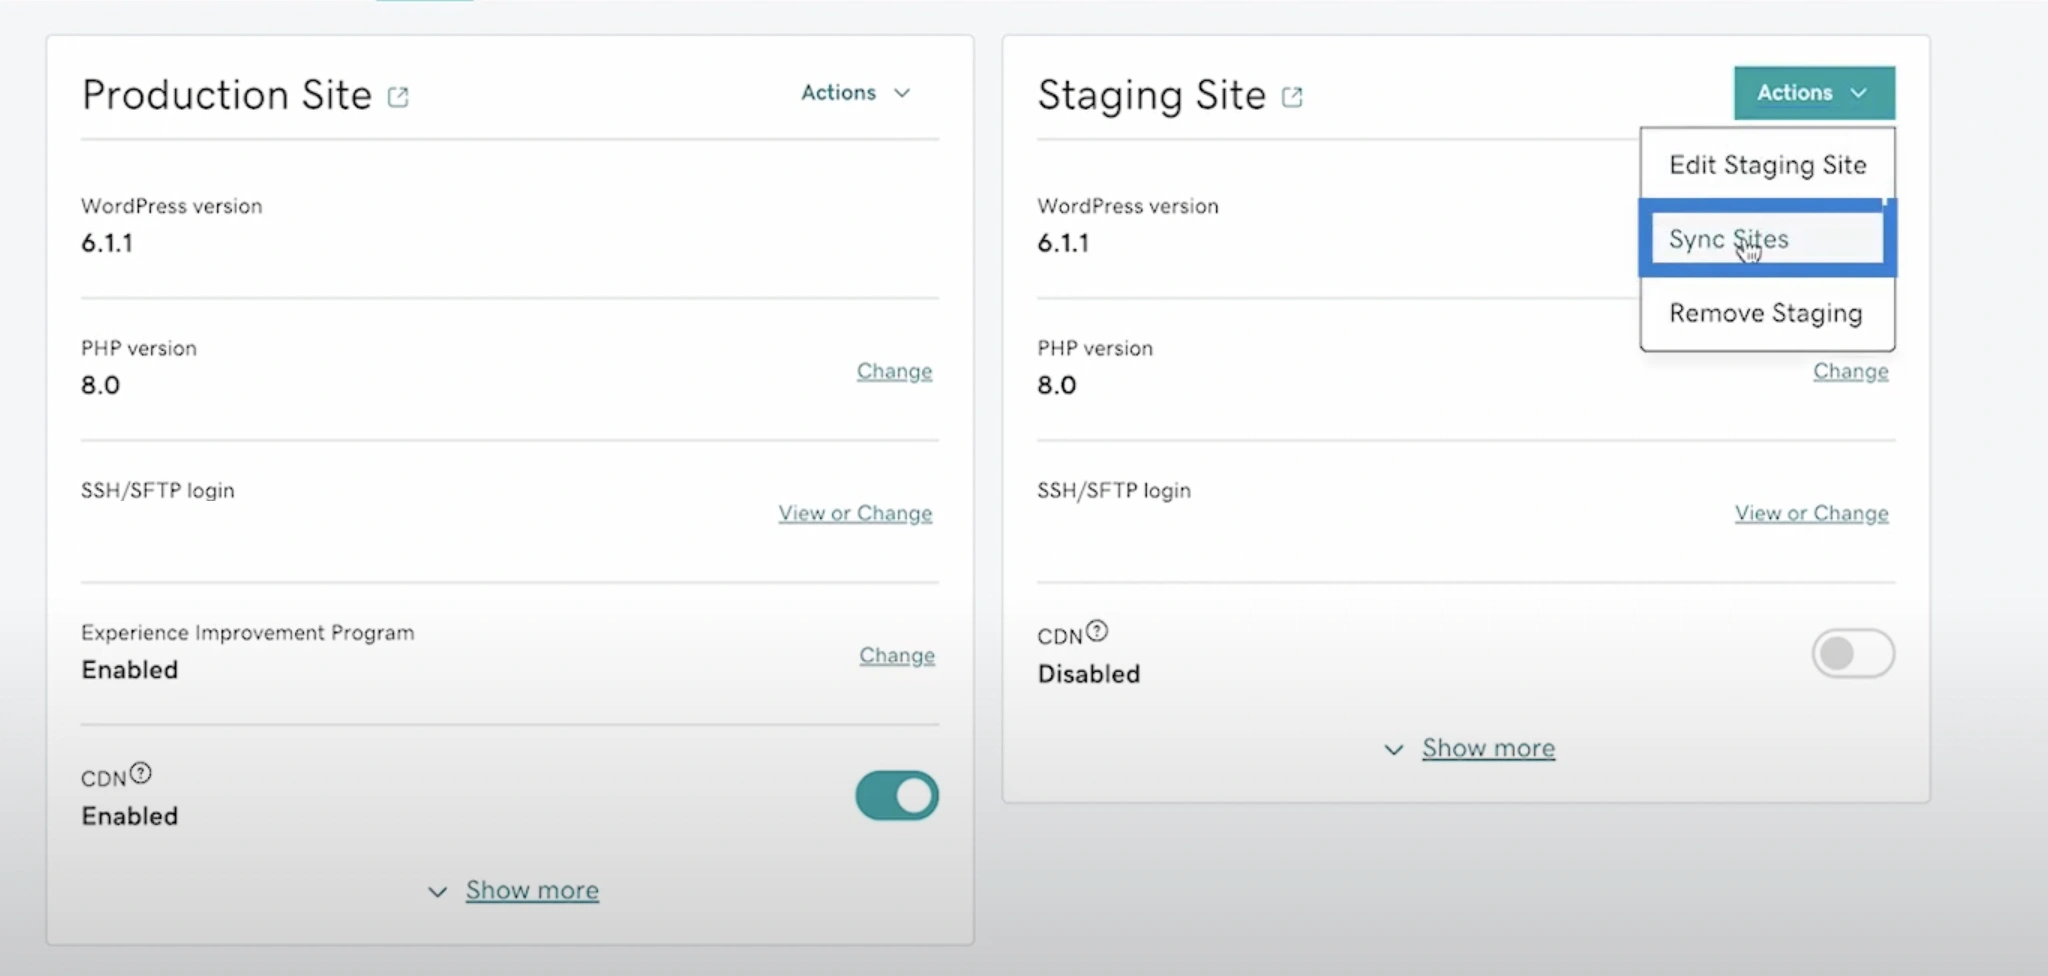
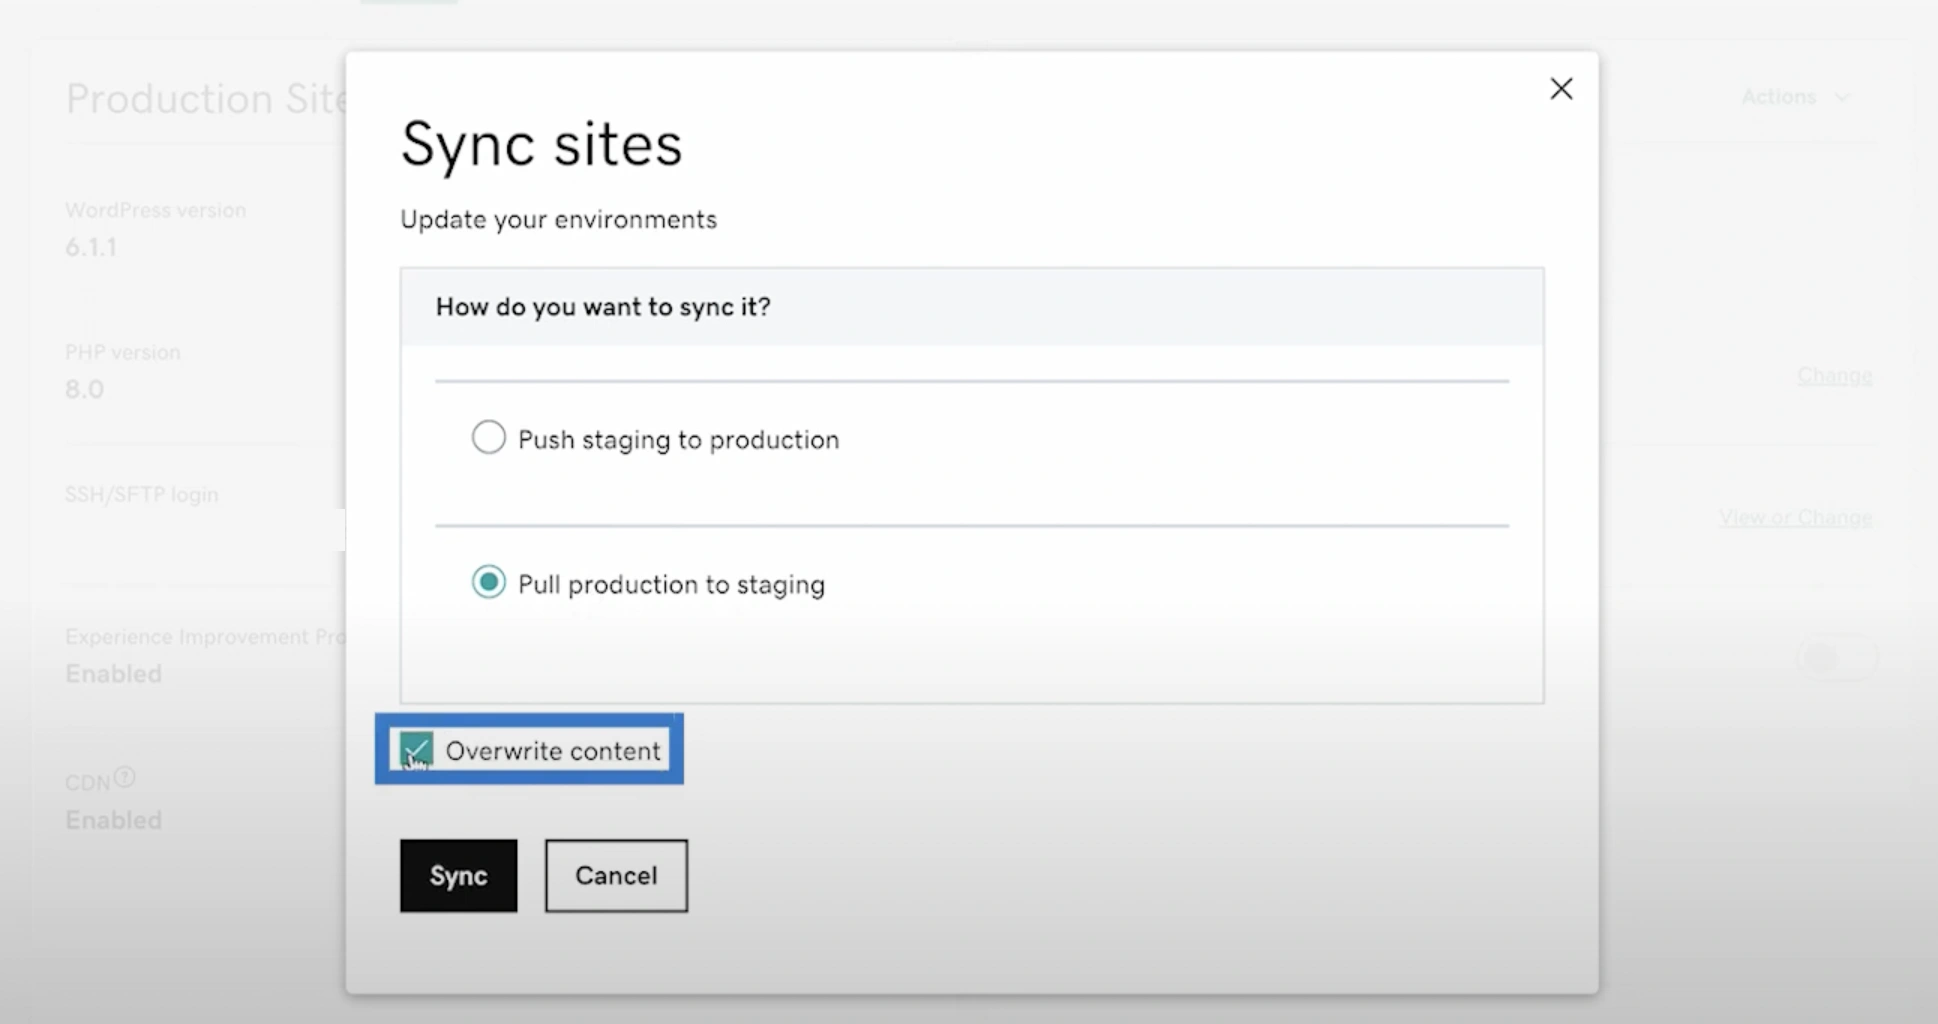
Confirm the action, GoDaddy will copy the current state of your live website into your staging environment. This is useful when your live site has newer updates you’d like to test before going public.
Pushing staging site to production on GoDaddy
After you’ve tested everything and your changes are ready to go live:
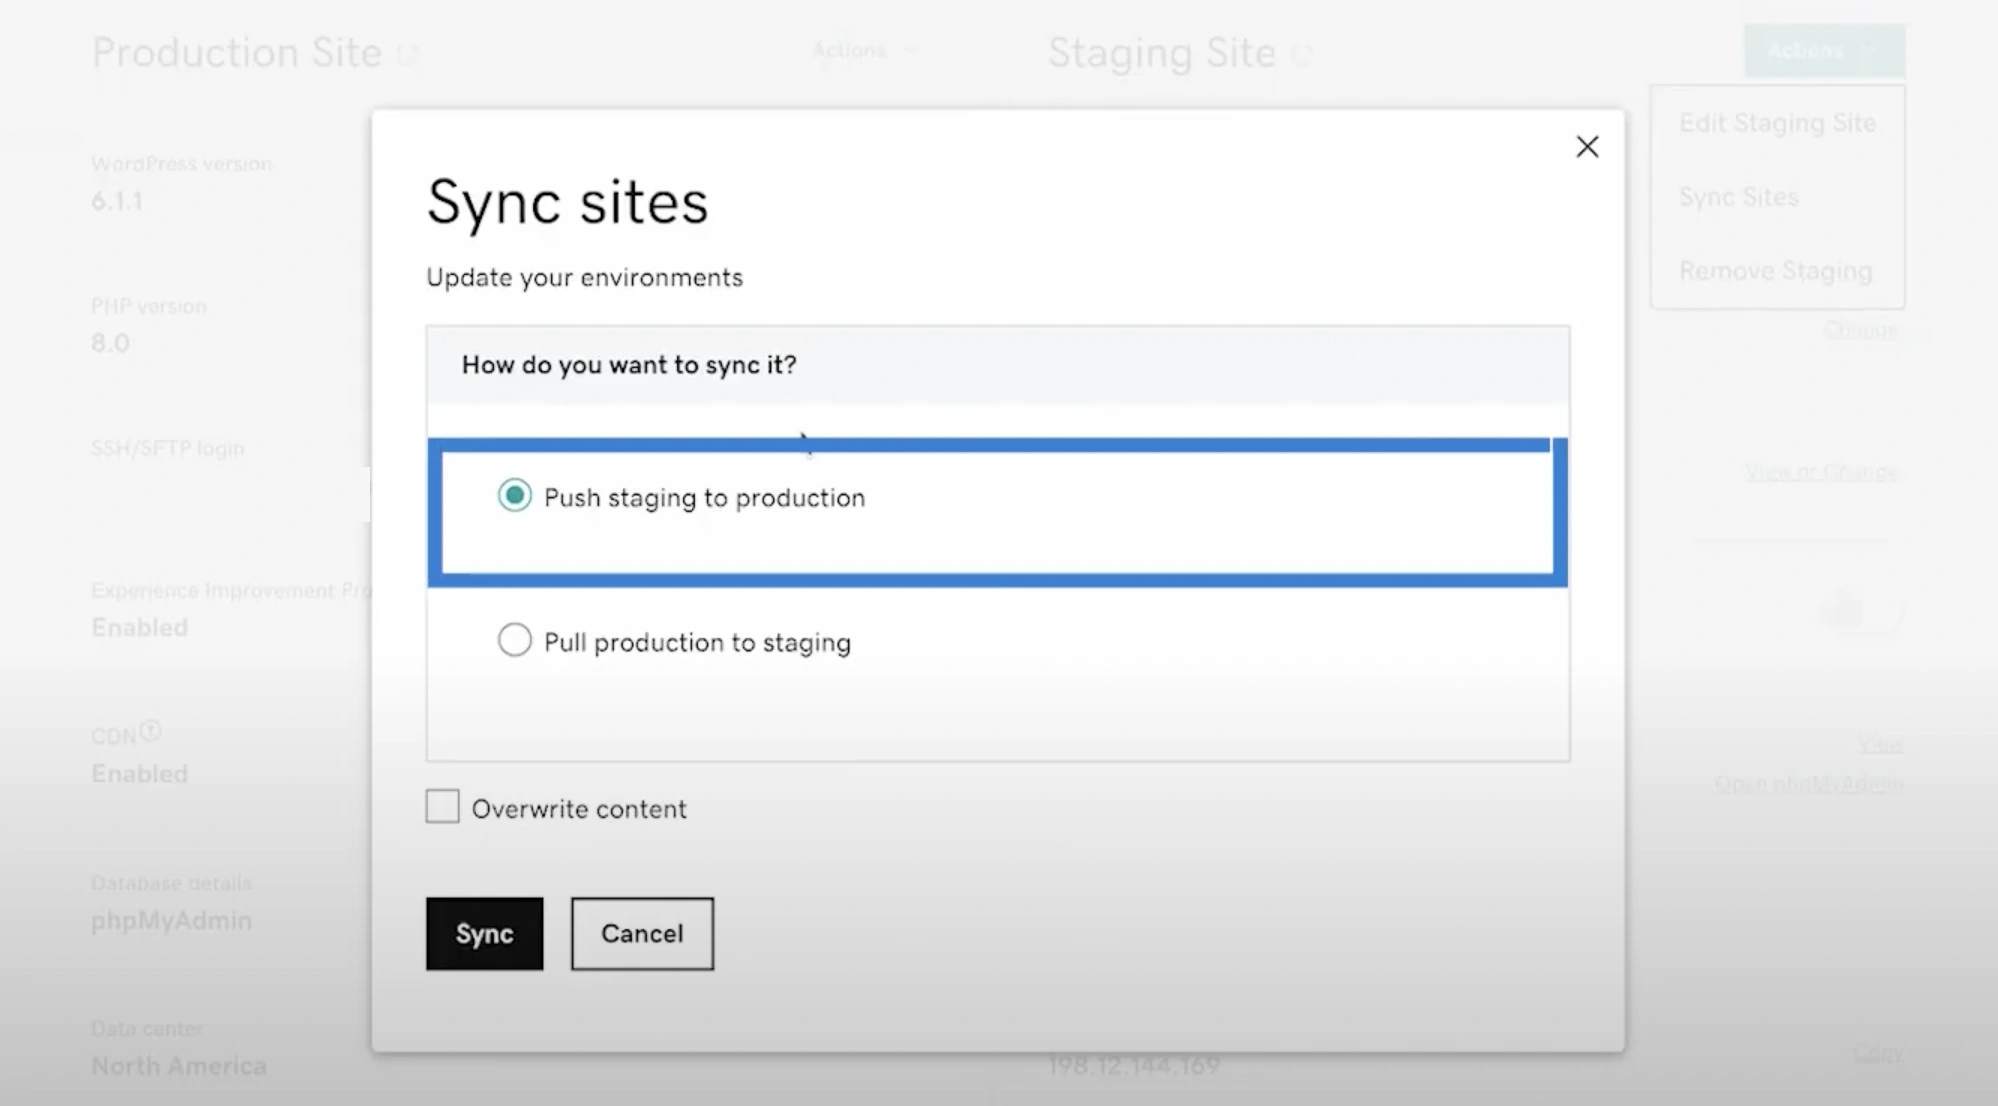
GoDaddy will begin deploying your staging changes to your live environment. This process might take a few minutes, depending on your site’s size.
Method 2: Using WordPress staging plugins
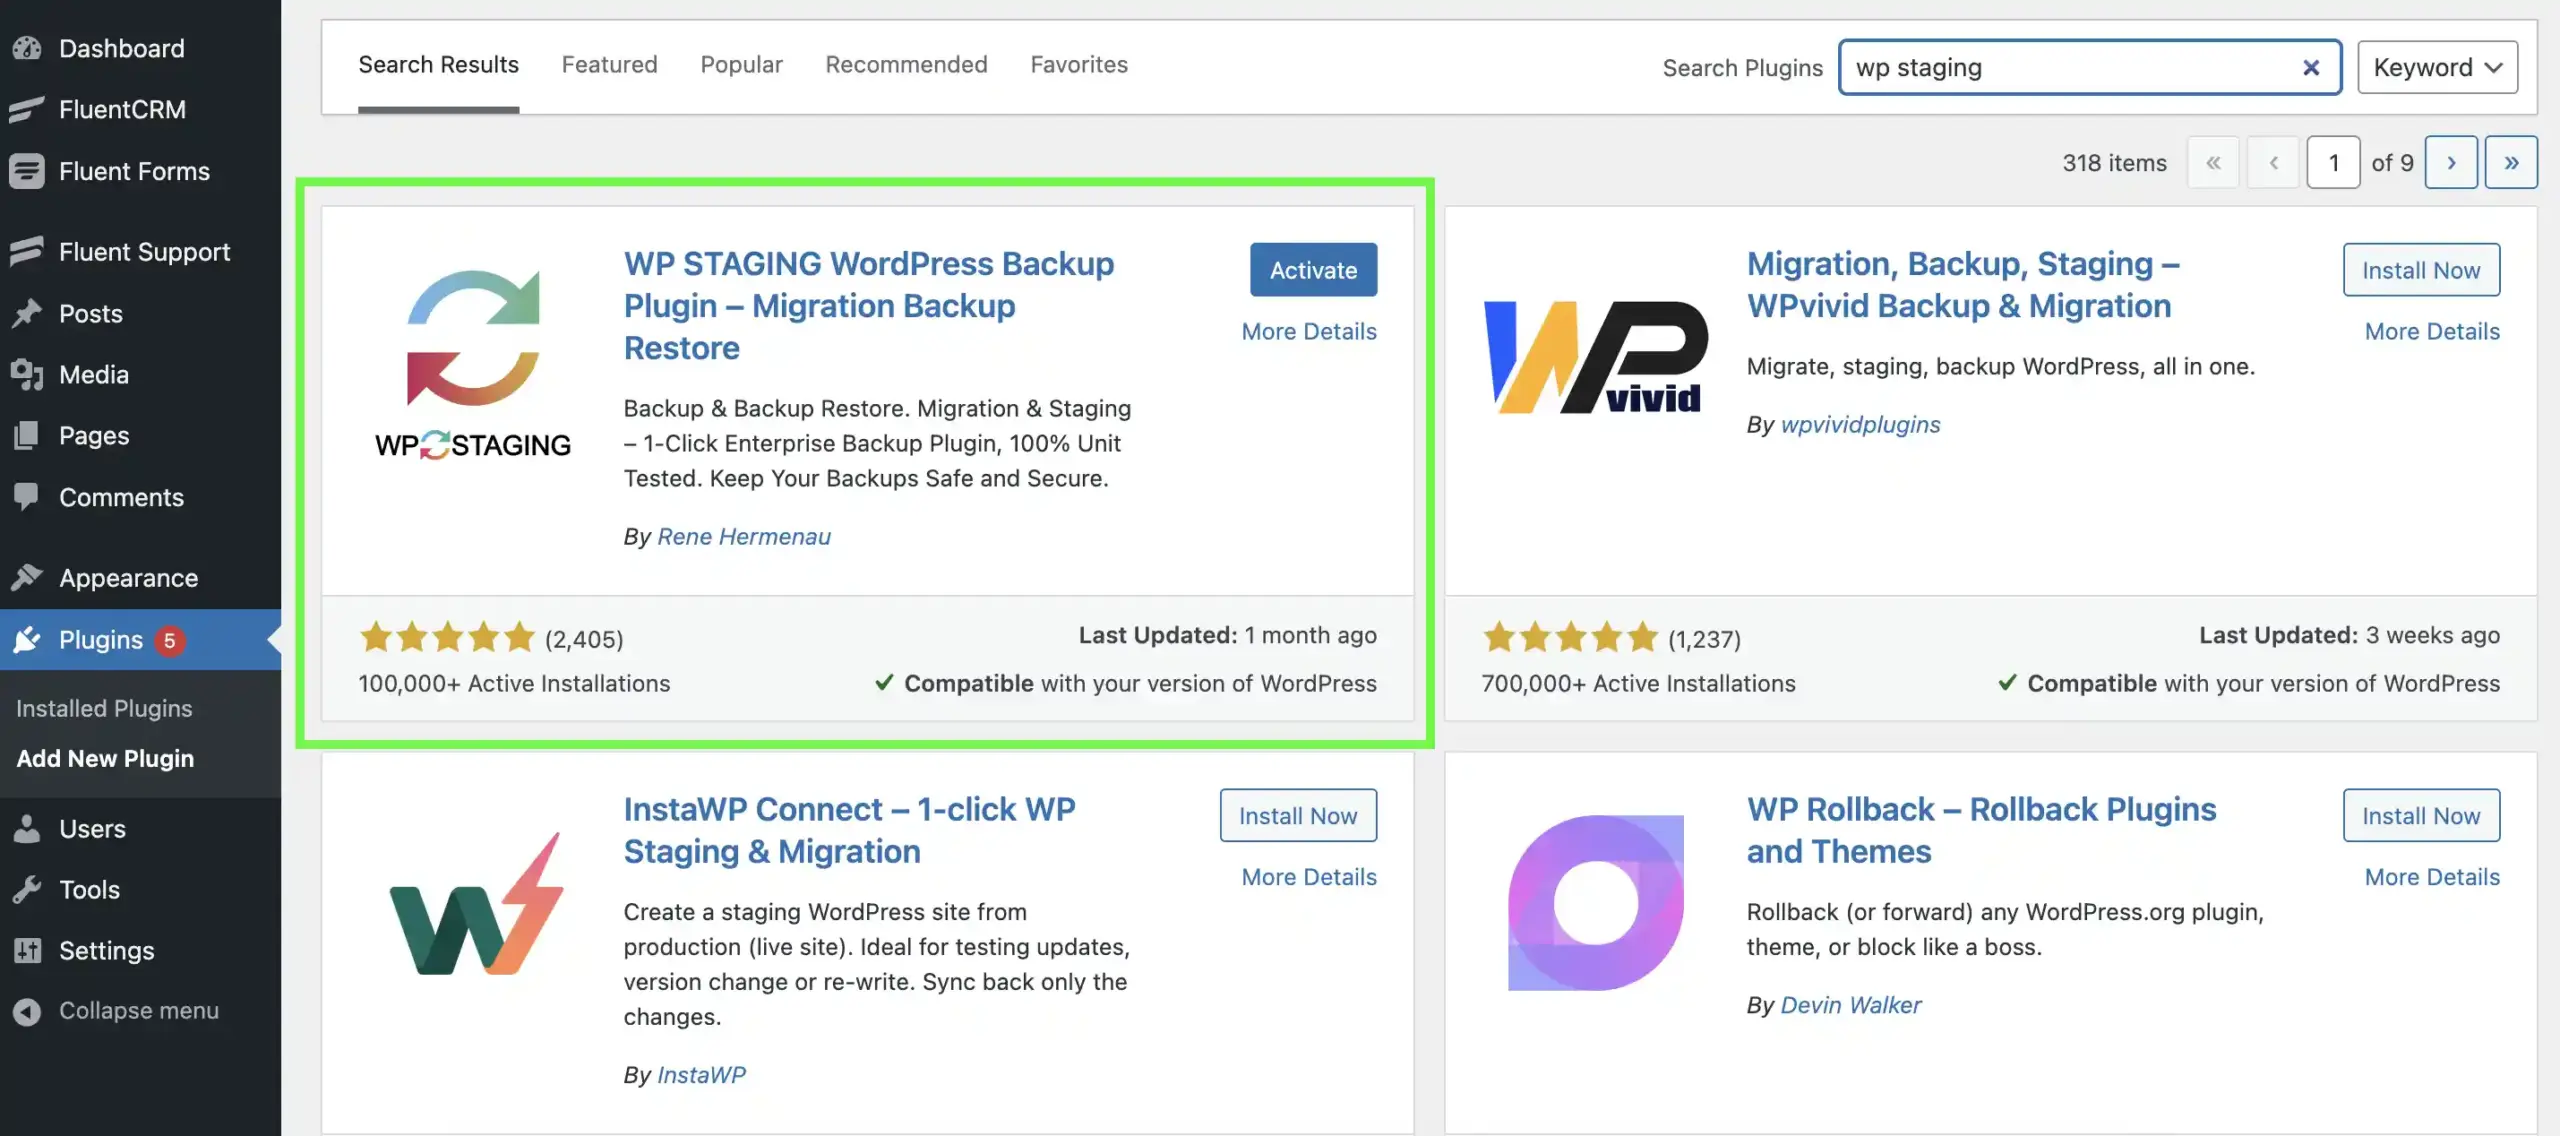
If your host doesn’t offer built-in staging, plugins are your next best friend. These tools work inside your WordPress dashboard and are designed specifically for non-technical users.
Here’s what you can use:
Creating a staging site using WP Staging plugin
WP Staging plugin is one of the easiest tools to create a staging site. It’s perfect for beginners who want a fast and simple way to clone their site for testing.
The free version lets you create a staging site, but pushing changes to your live site is only available in the Pro version.
Here’s how to get started:
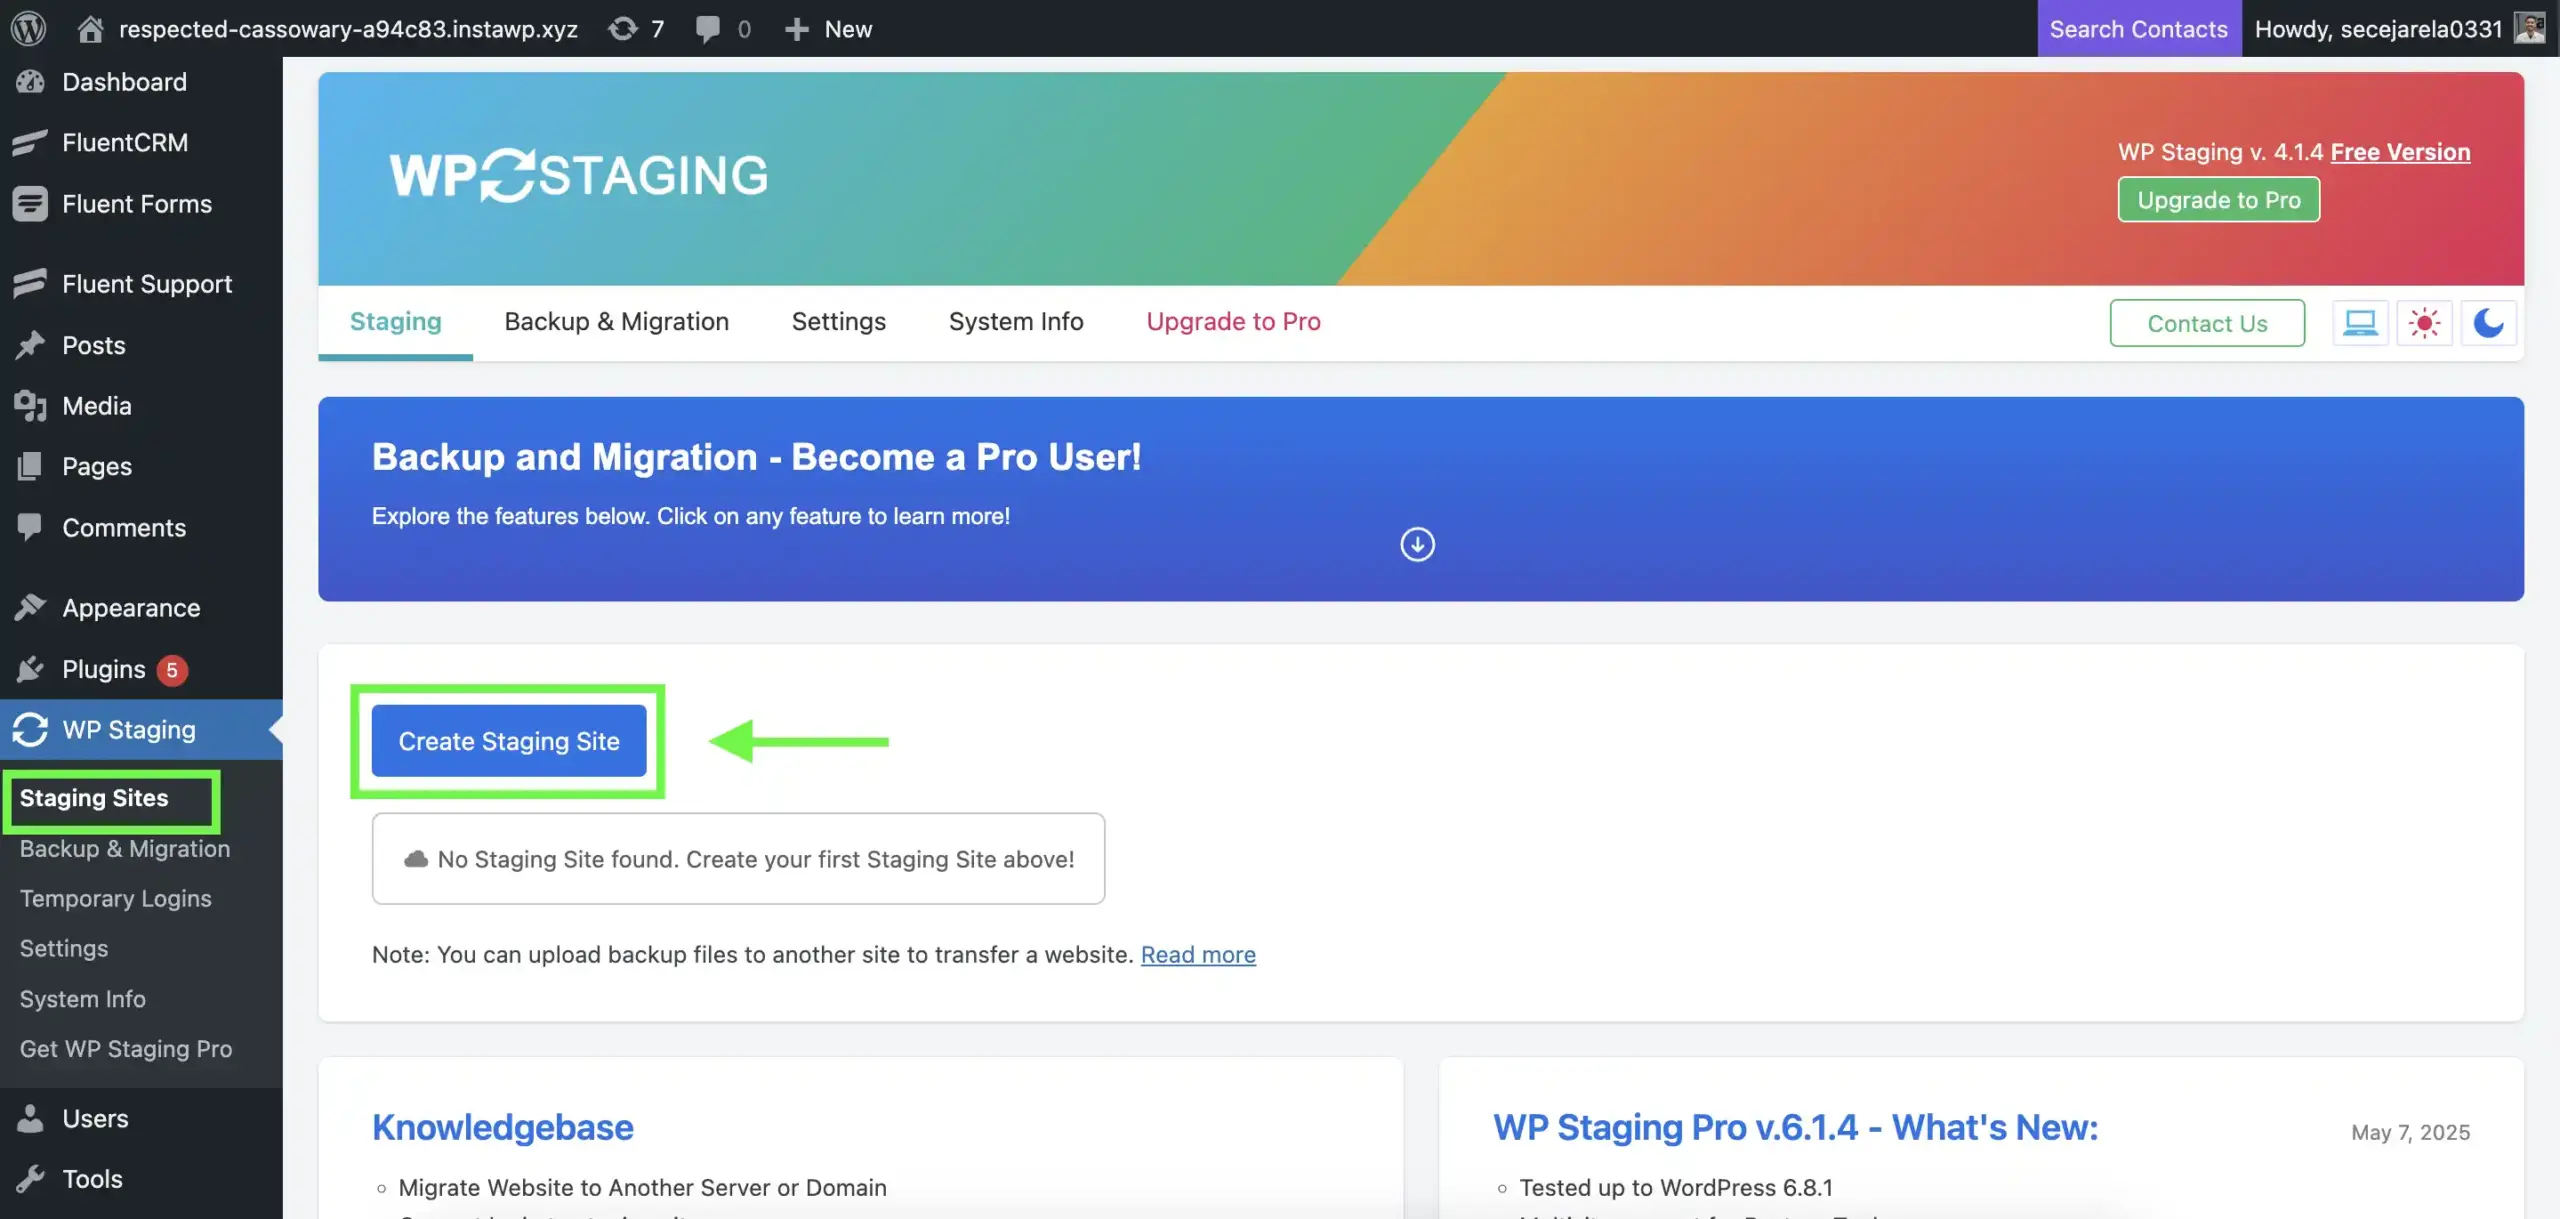
Once activated:
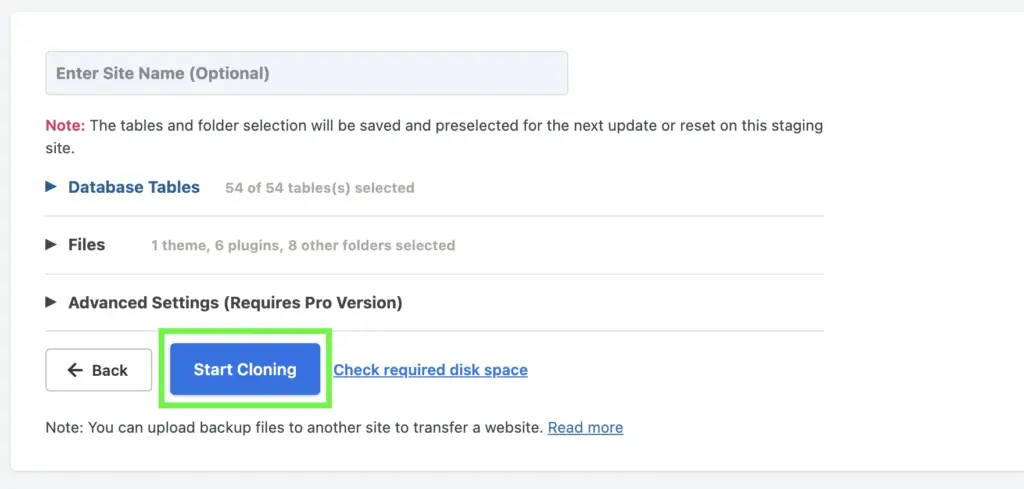
Depending on the size of your site, this may take a few minutes. After the cloning process completes, you’ll see an “Open Staging Site” button.
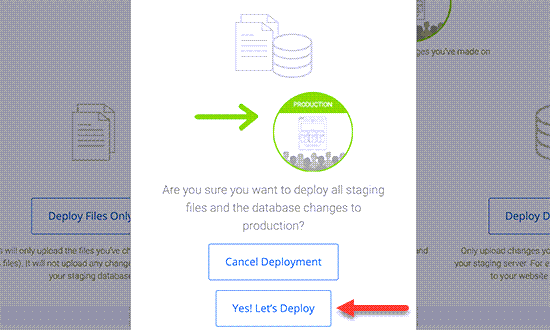
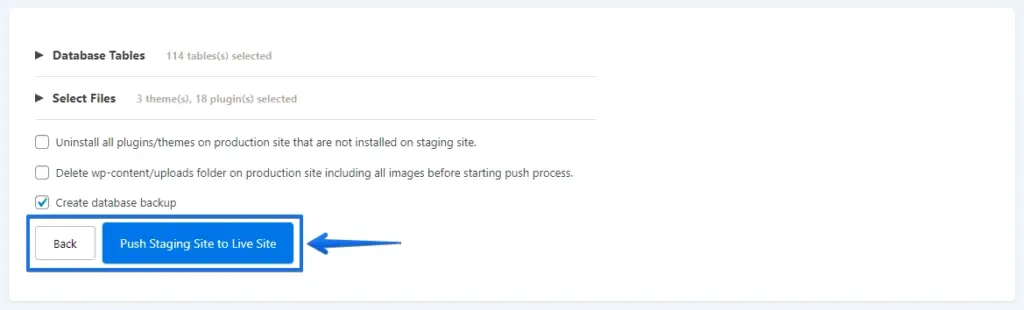
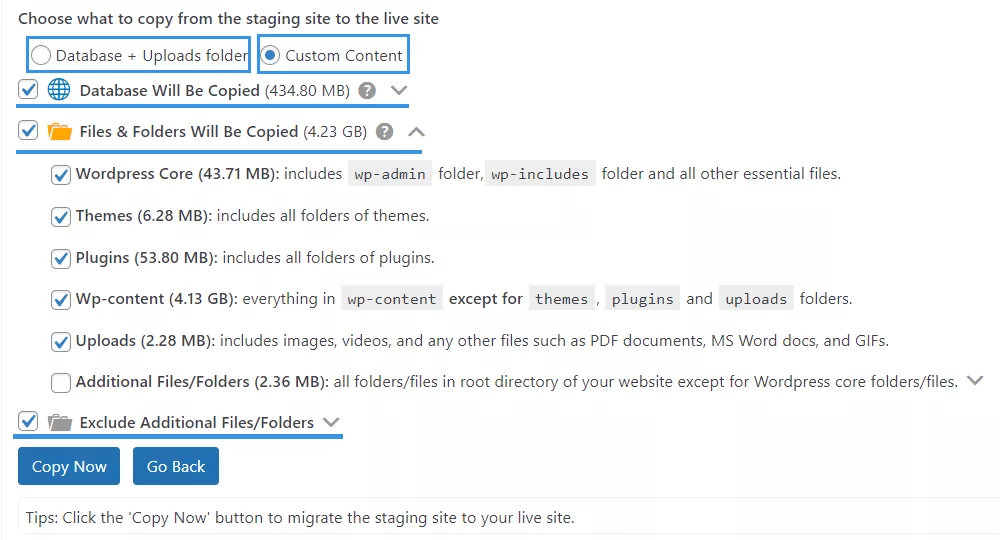
Pushing changes to live site with WP Staging Pro
If you’re using the Pro version of WP Staging, you can easily push your staging site updates to your live WordPress site.
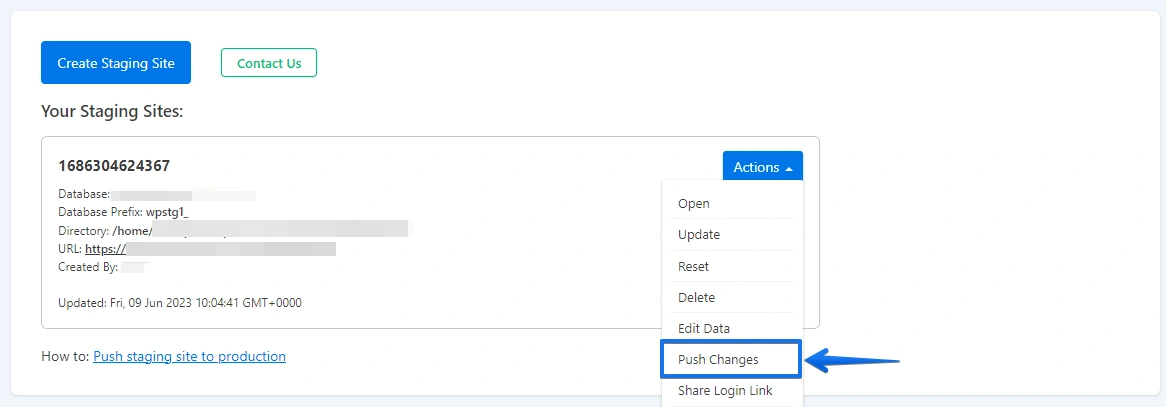
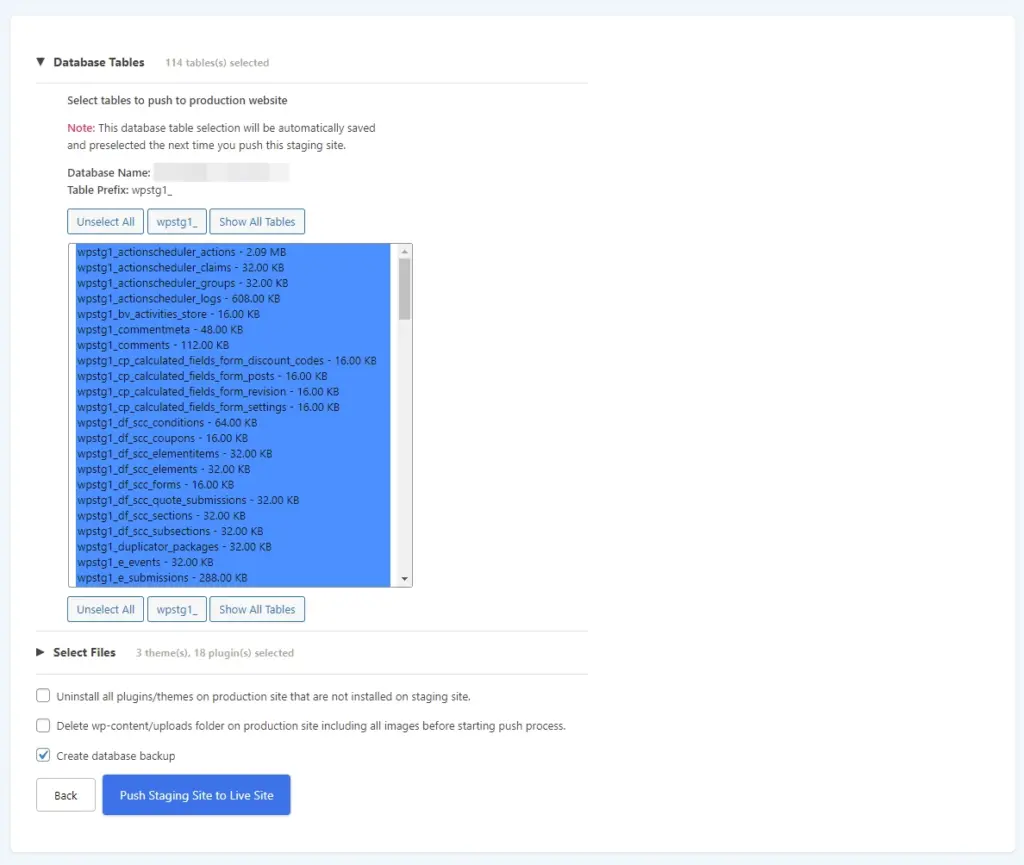
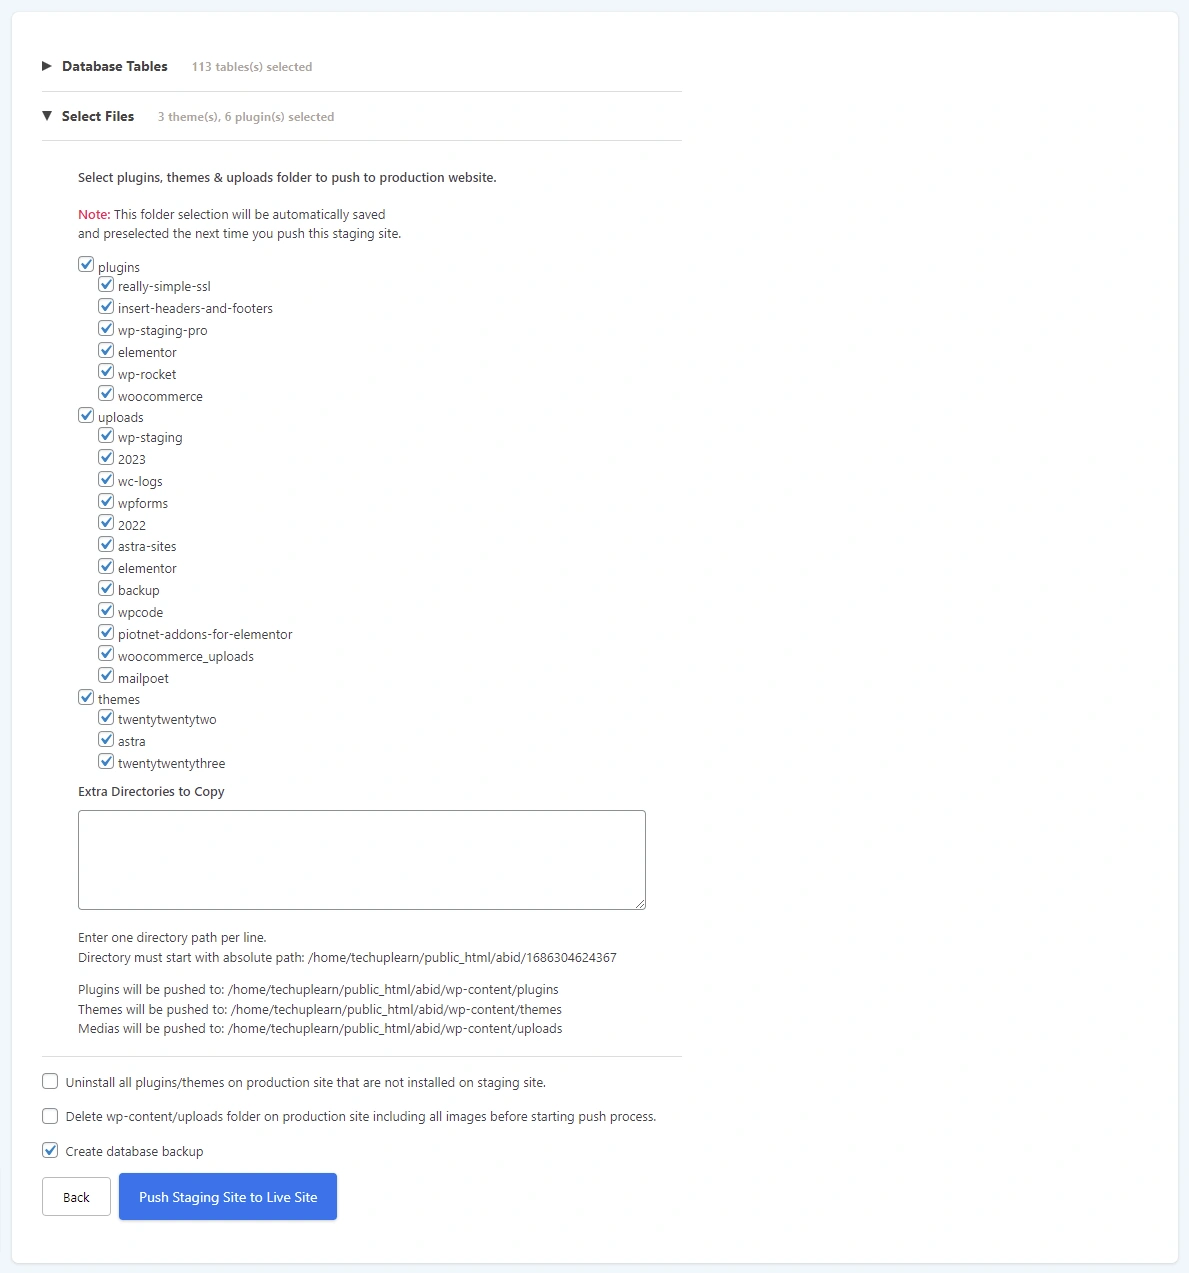
Each selected table will replace its counterpart on the live site.
WP Staging will now start transferring data from your staging environment to the live site. After the push process is complete, reload your live website to see all the updates in place. You may be prompted to log in again, which is normal after a full push.
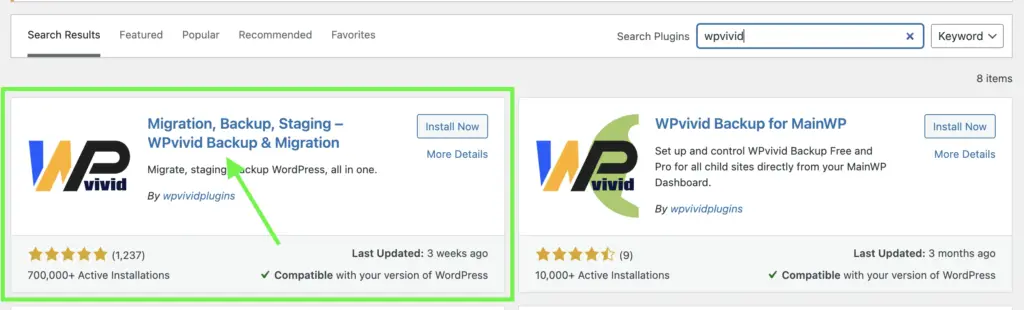
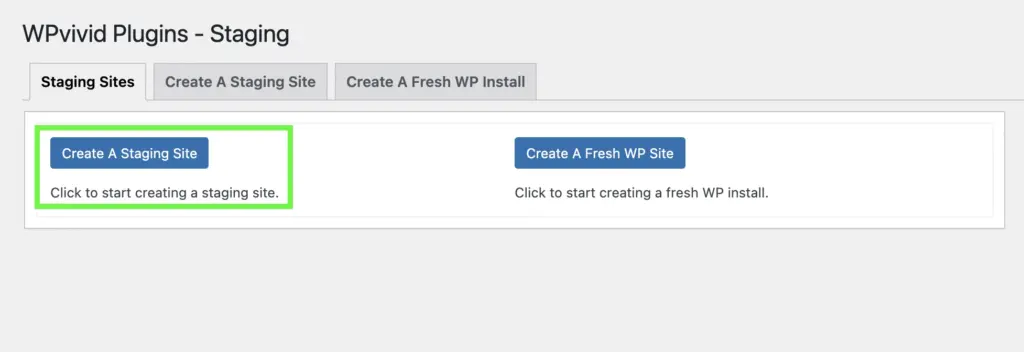
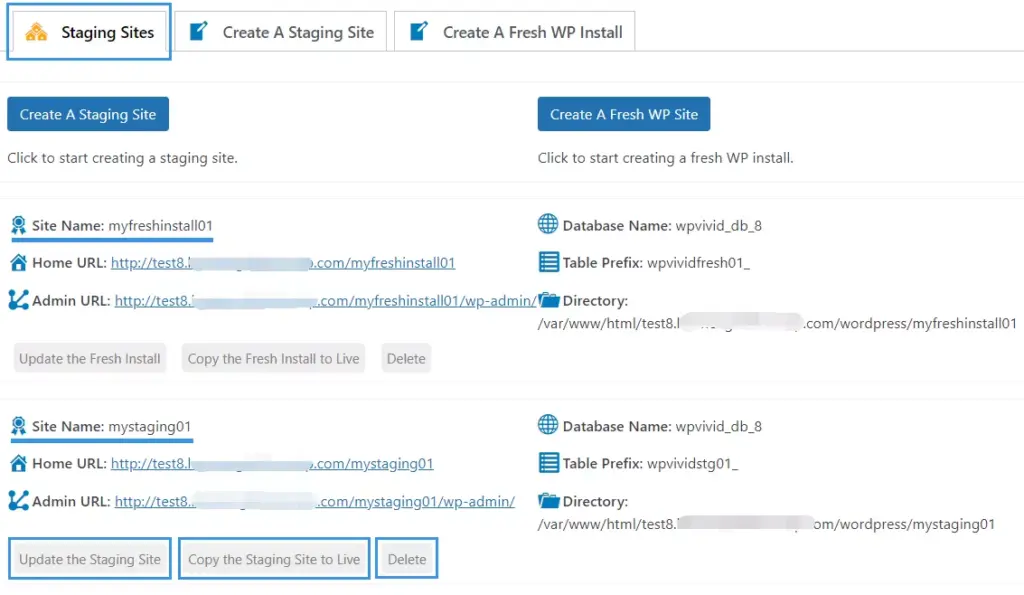
Creating a staging site with the WPvivid plugin
WPvivid is a reliable backup and migration plugin that also supports staging functionality (with some limitations).
Here’s how to create a staging site using the WPvivid plugin:
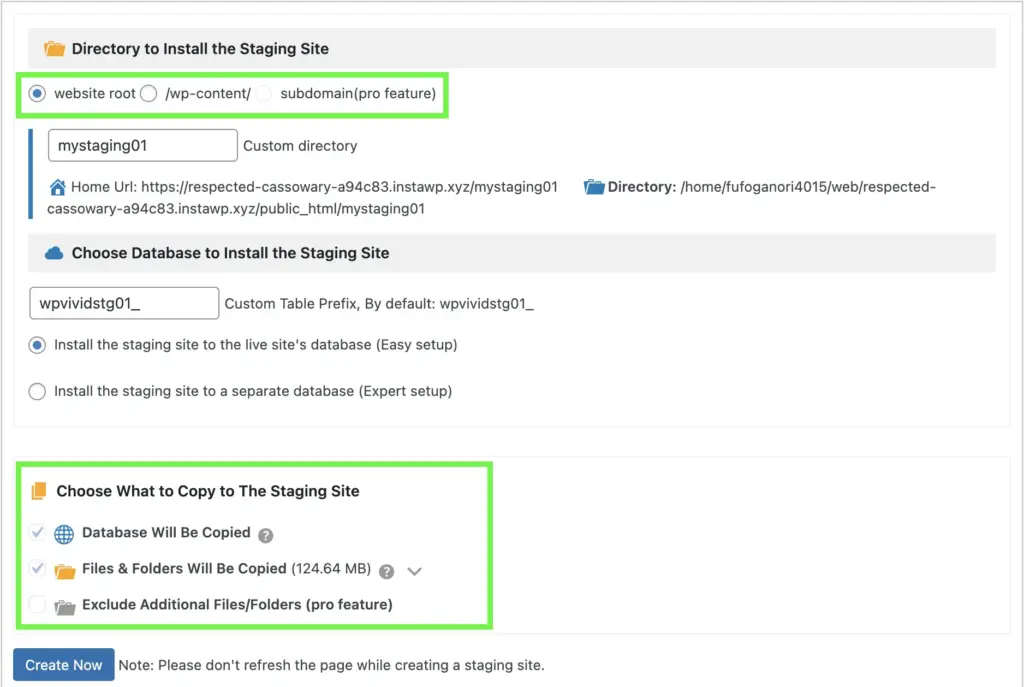
Note: Some options may be locked behind the Pro version
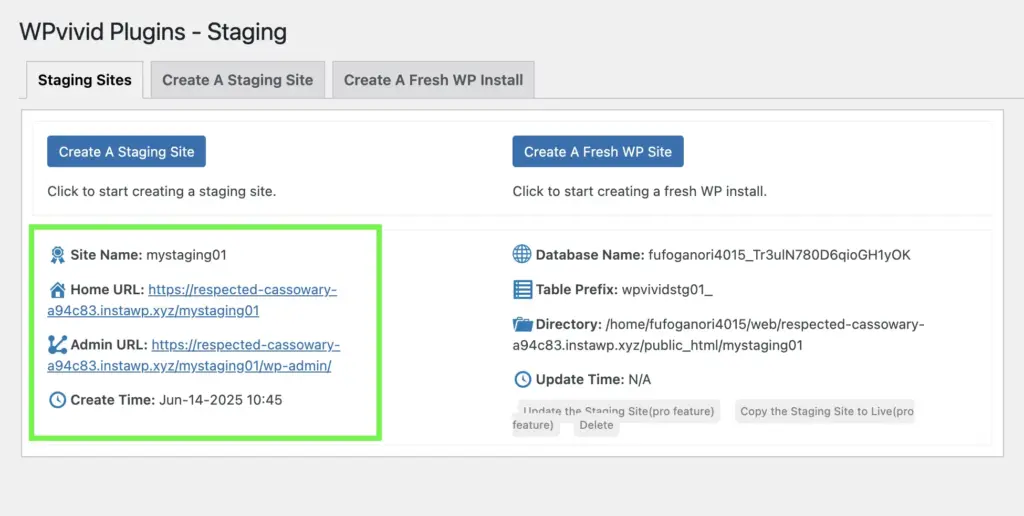
The process may take a few minutes based on your site’s size. Once done, you’ll get a direct link to your staging site. Log in using the wp-admin URL slug and the same username and password as the live site.
Push a staging site to live (WPvivid Pro)
To publish changes from your staging site to your live WordPress site:
Do not refresh or close the page during the publishing process. The time it takes will depend on your website size and internet speed.
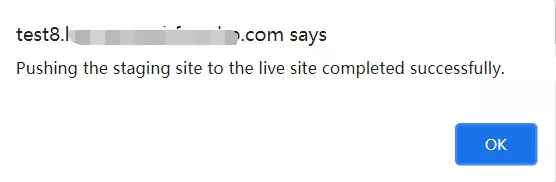
After completion, a success message will appear, confirming your staging site has been successfully pushed to live.
Creating a staging site on WordPress.com
WordPress.com now allows you to create a staging environment. It’s great for testing major design or plugin updates without affecting your live site.
Any administrator can create a staging site, but the original site owner will always be listed as the owner of the staging version.
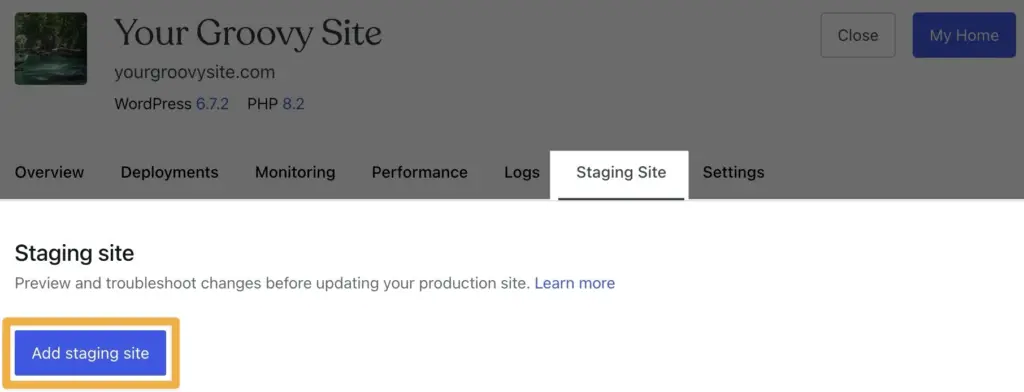
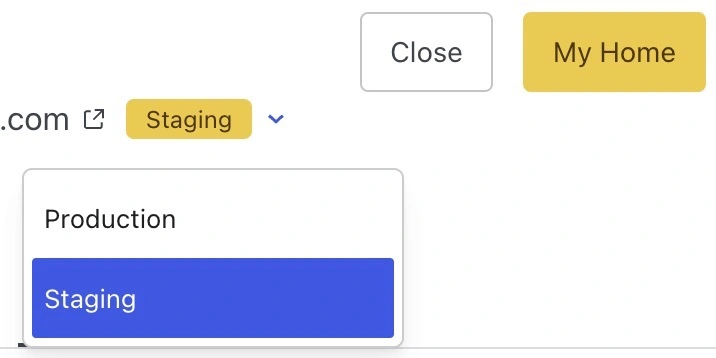
You can only create one staging site per production site. If a staging site already exists for that production site, you’ll see a Manage Staging Site button instead.
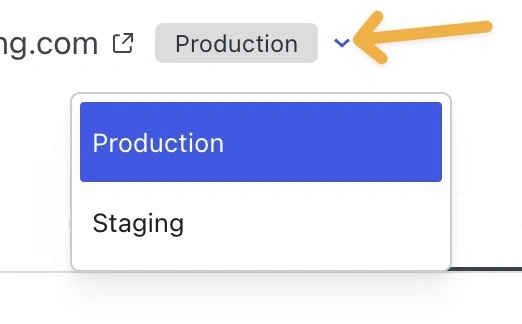
Synchronization from staging to production (WordPress.com)
Once you’re happy with the changes you’ve made in your staging environment, you can sync them to your live (production) site in just a few steps:
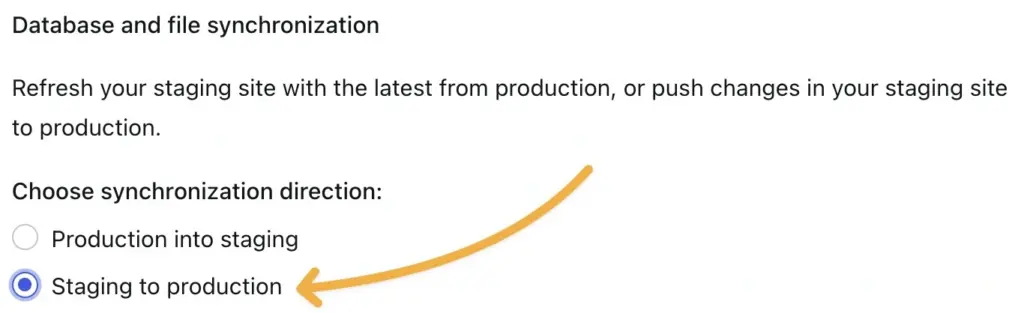
This will begin syncing your changes (including files and database content) from your staging site back to your live website.
Wrapping Up
Remember, the method you choose depends on your comfort level and needs. If you’re just starting, use your hosting company’s built-in staging tools or try the WP Staging plugin.
These options require no technical knowledge and work reliably for most situations. As you become more comfortable, you might explore manual staging or local development environments for greater control and flexibility.
Start off with a powerful ticketing system that delivers smooth collaboration right out of the box.
Related Articles
Follow the Sun Model: Run 24/7 Customer Support Smoothly
The follow the sun model is a support…Customer Service Experience: Meaning, Skills, and Real Examples
Learn what customer service experience means, why it…


Leave a Reply