9 Proven Steps to Fix “ERR_CONNECTION_RESET” Error

By Md. Sajid Sadman
July 10, 2025
Last Modified: July 22, 2025


Well, you’re browsing along as usual when suddenly this message pops up: “ERR_CONNECTION_RESET.” You know how frustrating it can be if you’ve already seen it. One second, everything is fine, and the next, your connection just… stops.
It can seem technical or even intimidating, like your computer is refusing to cooperate.
Hey, this is actually one of the most common errors people run into, and it doesn’t mean anything is seriously broken. Most of the time, it’s caused by simple connection issues or settings that are easy to fix. You absolutely don’t need to be an expert to sort it out.
And, it’s your fortune that you’ve landed on this blog. Here, we will walk you through exactly what ERR_CONNECTION_RESET is, how you can fix it with clear, simple steps, and how you can avoid it in the future with some proven precautions.
This comprehensive blog can be your straightforward roadmap to a smooth, reliable internet connection without the stress.
So, let’s deal with the error.
What does ERR_CONNECTION_RESET really mean?
When you see ERR_CONNECTION_RESET, it means the connection between your computer and the website’s server was suddenly cut off. In other words, the line was open or starting to open, and then it was unexpectedly closed.
To picture this in a simple way, think of your web browser (whether you use Chrome, Firefox, Safari, or Edge) like you’re making a phone call to a friend. That “friend” is the website’s server—the big computer that hosts the site you want to visit.
You dial the number (your browser sends a request). The phone starts to ring, maybe it even connects for a moment. But suddenly, without any warning, the line goes dead. Click. The other side hung up. That’s exactly what ERR_CONNECTION_RESET means. The connection was started, perhaps even briefly established, but then it was forcefully cut off. Not a gentle goodbye, just an abrupt hang-up.
The important thing to remember is that ERR_CONNECTION_RESET is not a sign of danger or a virus. It’s simply telling you the communication line broke unexpectedly.
The best part is that while this error can sound technical, most of the solutions are simple to apply. By understanding what’s happening behind the scenes, you’re already prepared to troubleshoot it effectively and get back to browsing without interruptions.
How is ERR_CONNECTION_RESET different from other annoying errors?
This section is specifically designed to clear up any confusion by showing you how “ERR_CONNECTION_RESET” stands apart from other common internet errors you might encounter. Let’s keep using our phone call example to make these distinctions super clear:
ERR_CONNECTION_REFUSED
This is like calling someone and immediately hearing a busy signal or a recorded message saying, “We’re not taking calls right now.” The website’s server completely refused your connection from the start. The call never even rang.
ERR_CONNECTION_TIMED_OUT
Here, the phone just keeps ringing and ringing. No one ever picks up, and eventually you hang up because you’ve waited too long. Your browser tried to connect, but it simply took too long to get any response.
ERR_EMPTY_RESPONSE
In this case, someone did pick up the phone, but then didn’t say a word. Your browser connected to the server, but no data came back: like getting an empty package in the mail.
ERR_CONNECTION_RESET
This one is unique because the connection was in progress. Even if it only lasted a split second, it was working, and then suddenly the server hung up. It’s the digital version of an unexpected click in the middle of a conversation.
We’re confident that you’re now well-informed about the error. So, we can proceed to the practical steps that can get you back to smooth browsing.
Let’s go…
9 Steps to Fix the ERR_CONNECTION_RESET error
We are confident these methods will help you resolve the issue, as they are widely recognized and effective approaches for this fix.
Step 1: Hard refresh the page
Sometimes your web browser saves old information to load pages faster. This is called “cache.” But if that data is broken or old, it can stop pages from loading. So the first thing we will do is tell the browser to forget the old stuff and get the new version.
Here is how:
Try it on the page that is not working. Did the page refresh and load fine? If yes, great. If not, do not worry. We have more steps to try.
Step 2: Check if the website is down
Before we look deeper into your computer, let’s be detectives together. What if the problem is not on your end at all? The website itself could be offline. It is like calling a friend who is not picking up the phone.
Here is how we can check:
First, open a new tab and try a very popular website that you know always works, like Google or YouTube. If those pages load fine, your internet connection is working. That is good news.
Next, we can use a simple tool to see if the website you want is down for everyone or just for you. Here are two good tools:
https://downforeveryoneorjustme.com/
or
https://www.isitdownrightnow.com/
Here’s a visual. We have shown you using the first one.
Just type the website address into the box and press enter.
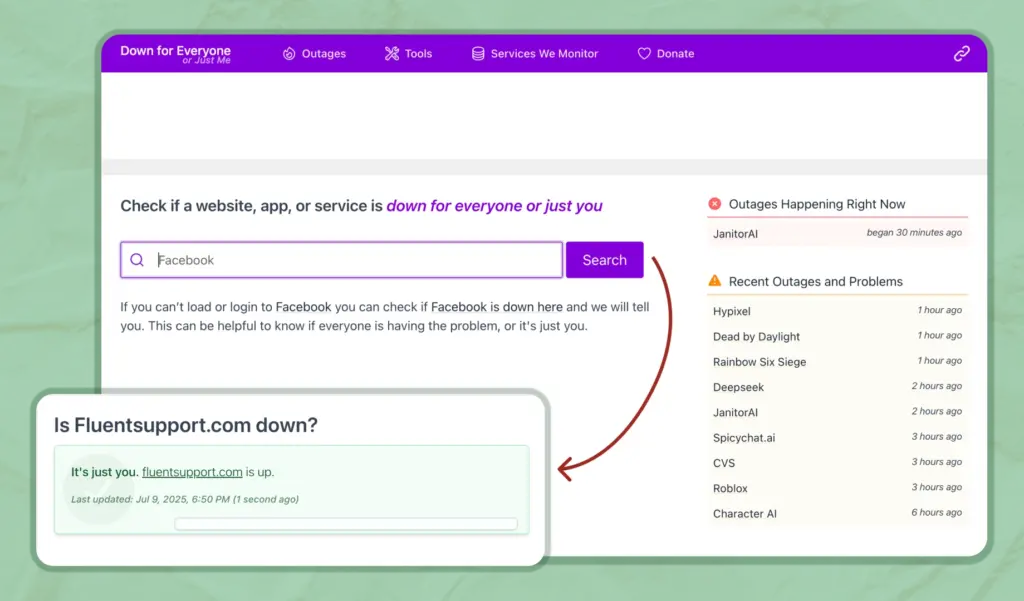
What did you find? If the tool says it is down for everyone, you can relax. The problem is not on your computer. Just wait a while for the website to come back. If it says the site is working, then the issue is on your side, and we will keep going with the next steps.
Step 3: Restart your router and device
This step is a classic for a reason. It often works better than you expect. Your Wi-Fi router and modem are like the heart of your internet at home. Over time, they can get tired or mixed up and need a fresh start.
Let’s go step by step and give them a fresh start:
- Find your router and modem. These are the boxes with blinking lights, usually near where the internet cable comes into your house.
- Unplug both devices from the power outlet.
- Wait at least 30 seconds. This pause helps them reset fully.
- Plug the modem back in first. Watch the lights until they show it is connected again. This can take a minute or two.
- Plug the router back in. Wait again for the lights to look normal.
- Restart your computer, phone, or tablet.
Once everything is powered back up, try to open the website again. You might be surprised how well this simple step can fix the problem.
Step 4: Turn off VPN or Proxy
Hey, are you using a VPN or maybe a proxy server? These tools are really helpful when you want more privacy online or need to visit websites from other countries. They work like a secret tunnel for your internet traffic. But here is the thing: even though they are useful, they can sometimes get in the way and block a website from loading. That could be why you are seeing this error.
Let’s take a minute to switch them off, just to see if that helps.
If you use a VPN app:
Go ahead and open your VPN program. Look for the button that says Disconnect or Turn Off and click it. You do not have to uninstall anything. We are just pausing it for a moment.
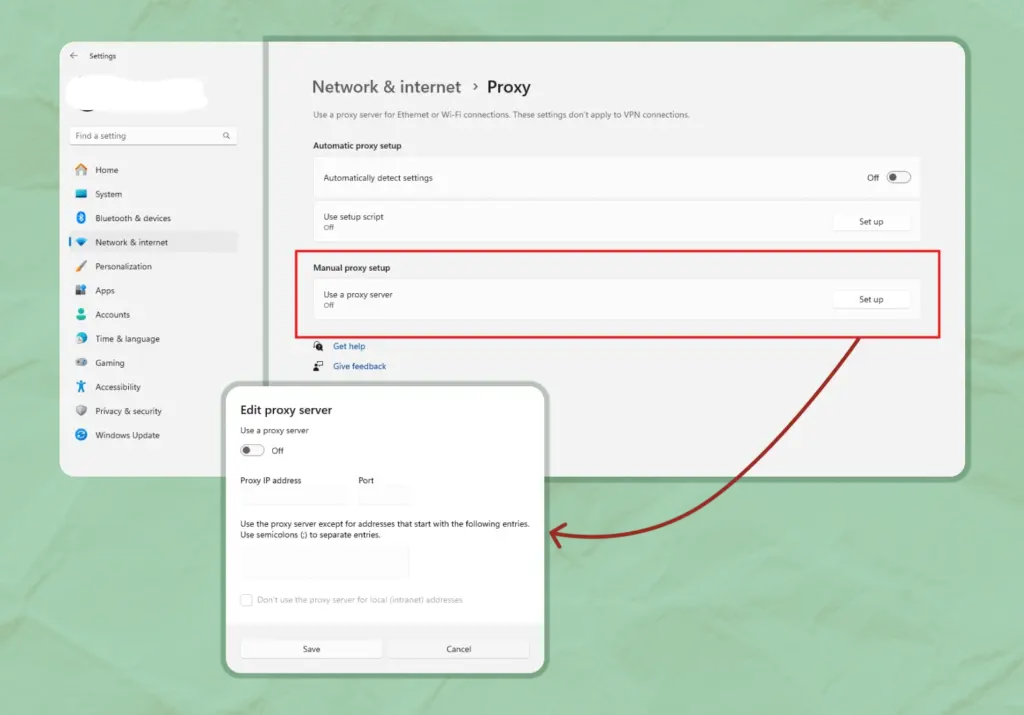
If you have a proxy set up on your computer:
On Windows:
On Mac:
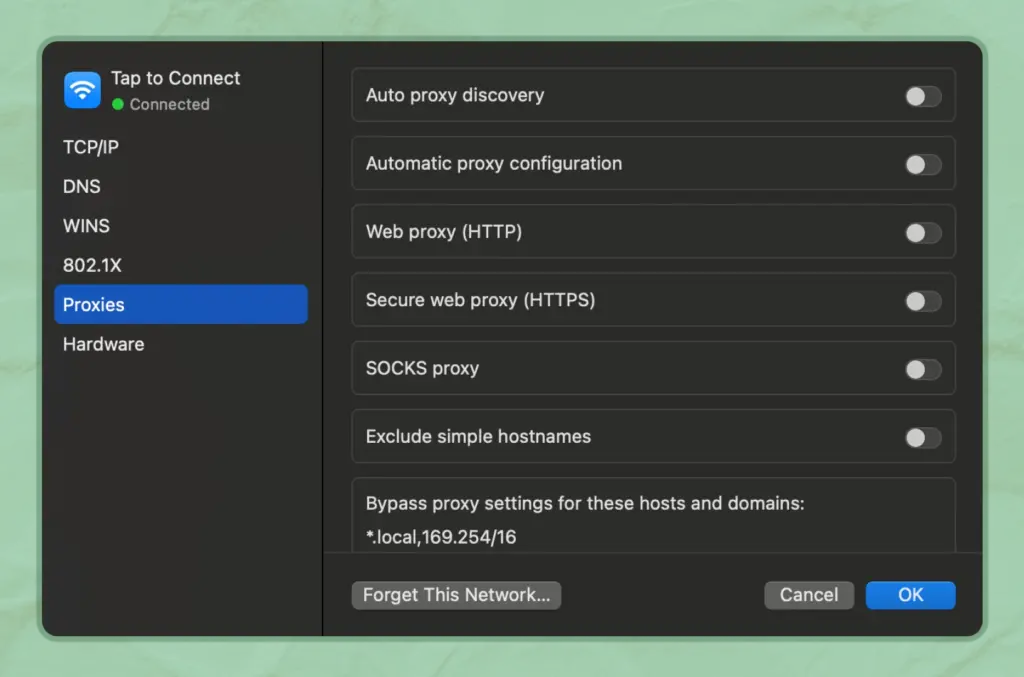
Once you have turned off your VPN or proxy, try loading the website again. If it works, that is a good sign. It means the VPN or proxy was blocking the connection. You can turn it back on later, but you might need to pick a different server or adjust some settings if the problem keeps happening.
Step 5: Clear browser cache and cookies
Let’s check if your browser has saved too much old data. Over time, it keeps files and small pieces of information from every website you visit. This is called cache and cookies. It helps pages load faster, but when that data gets messy or too old, websites can stop working right.
We will show you how to clear this in Microsoft Edge. Most other browsers work almost the same, so you can follow these steps as a guide.
Steps using Microsoft Edge:
Step 5: Clear Browser Cache and Cookies
Let’s check if your browser has saved too much old data. Over time, it keeps files and small pieces of information from every website you visit. This is called cache and cookies. They help pages load faster, but when they get too old or messy, websites can stop working the right way.
We will show you how to clear this in Microsoft Edge. Most other browsers work almost the same, so you can follow these steps as a guide.
Steps using Microsoft Edge:
- Open Edge.
- Click the three dots menu in the top-right corner of the window.
- Choose Settings.
- In the left sidebar, click Privacy, search, and services.
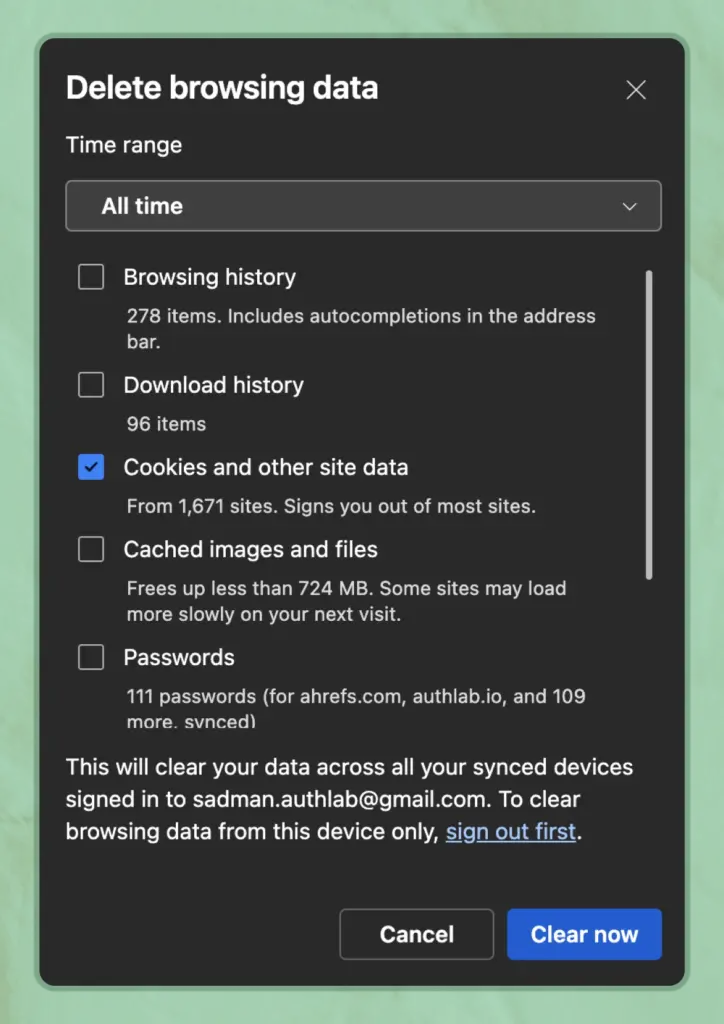
- Scroll down to Clear browsing data and click Choose what to clear.
- You can also go straight to this page by typing or pasting this link in the address bar:
edge://settings/clearBrowserData
- Set the Time range to All time so everything gets cleaned.
- Check the boxes for Cookies and other site data and Cached images and files.
- Click Clear now.
- Close Edge and open it again.
If you use Chrome, Firefox, or another browser, the steps will look very similar. Just go into Settings, find Privacy or History, and look for the option to clear cookies and cache.
After you clear everything, try going back to the website to see if it works better.
If you use Chrome, Firefox, or another browser, the process is almost the same. Just look for Settings, find Privacy or History, and look for an option to clear cookies and cache.
Here is Microsoft’s official guide if you want to read more:
Clear browsing data in Microsoft Edge
After you clear everything, try going back to the website to see if it works better.
Step 6: Turn off browser extensions
If you are still here, working through these fixes, you are doing great. We know it can be tiring to try so many steps and still see that error pop up. Hang in there. This next part is worth checking. Let’s look at the extra tools in your browser. Things like ad blockers, shopping add-ons, or other helpers can sometimes get in the way without you noticing.
To see if one of them is causing trouble, we can turn them off for a short time and test the page again.
Here, we are showing the action plan using Google Chrome. If you use Firefox, Edge, or another browser, you can follow almost the same process. You may just need to explore the settings a bit or do a quick search to find the right menu.
Steps using Google Chrome:
- Open Chrome.
- Click the three dots menu in the top-right corner.
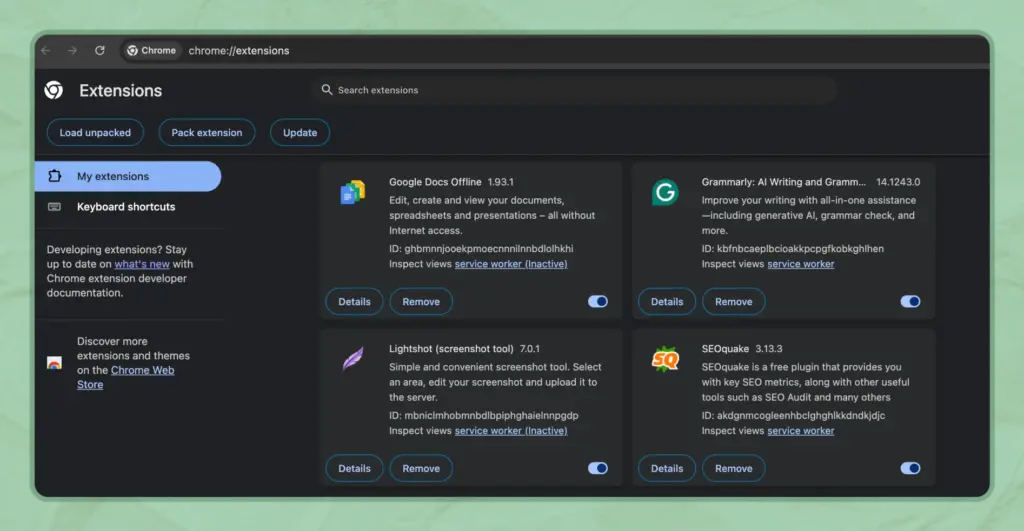
- Choose Extensions.
You can also type this link in the address bar to jump straight there:chrome://extensions - Look at all the extensions you have installed.
Find the blue switches next to each one, and click them to turn them gray. This will turn off all the extensions. - Close Chrome and open it again.
- Go to the website you were trying to load.
If the page finally opens, one of those extensions was blocking it. You can turn your extensions back on one at a time to figure out which one is the troublemaker. Turn one back on, refresh the page, and see what happens.
Step 7: Turn off the Firewall and Antivirus temporarily
You have tried many fixes by now, so let’s look at another place that can block websites without warning: your firewall and antivirus programs. They do a good job protecting your computer, but they can also block safe websites by accident. We will turn them off for a short test, just to see if they are the cause.
Action plan using Windows security:
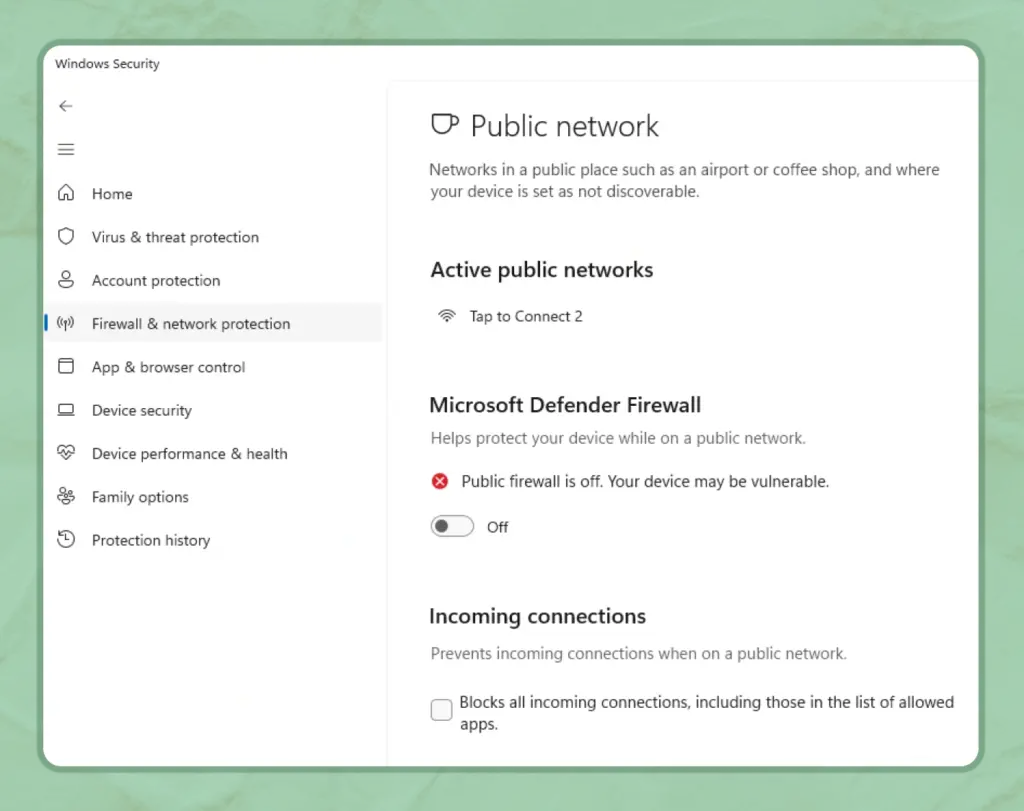
If you use another antivirus program (like Norton, McAfee, or Avast), look for its icon near your clock or in your app list. You can usually right-click it and choose Disable, Pause protection, or Turn off temporarily.
On Mac:
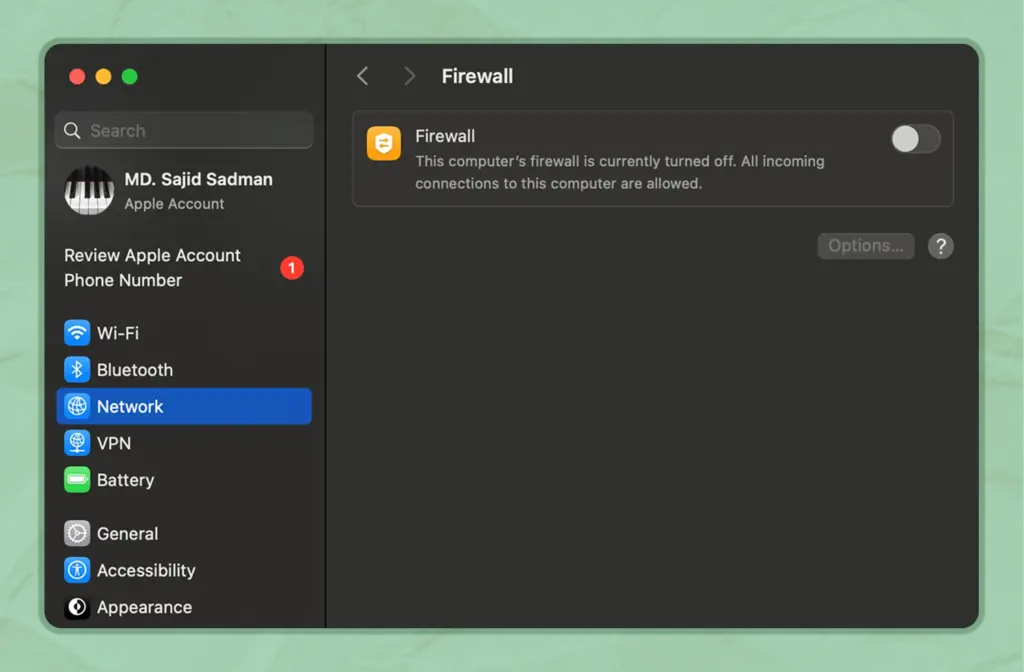
If the website works with protection off, you have found the problem. You can add an exception in your antivirus settings so it does not block the site again.
Step 8: Refresh Network Settings (Windows and Mac)
We still have two steps to show you, and we are confident that if you are still stuck (which usually does not happen), these last fixes can help you get back to smooth, free browsing again.
Some network settings can become outdated or corrupted over time or after big updates. Refreshing them helps your computer build a fresh connection to the internet.
If you are on Windows, here is your action plan:
A black window will open. One by one, type each of these commands and press Enter after each line:
pgsql
Copy
Edit
netsh winsock reset
netsh int ip reset
ipconfig /release
ipconfig /renew
ipconfig /flushdns
When you finish, restart your computer.
These commands reset important parts of your network settings and clear out old data that could be blocking your connection. After your computer restarts, try loading the website again.
If you are on a Mac:
You don’t need to run commands like these. Instead, you can refresh your network settings in a few clicks:
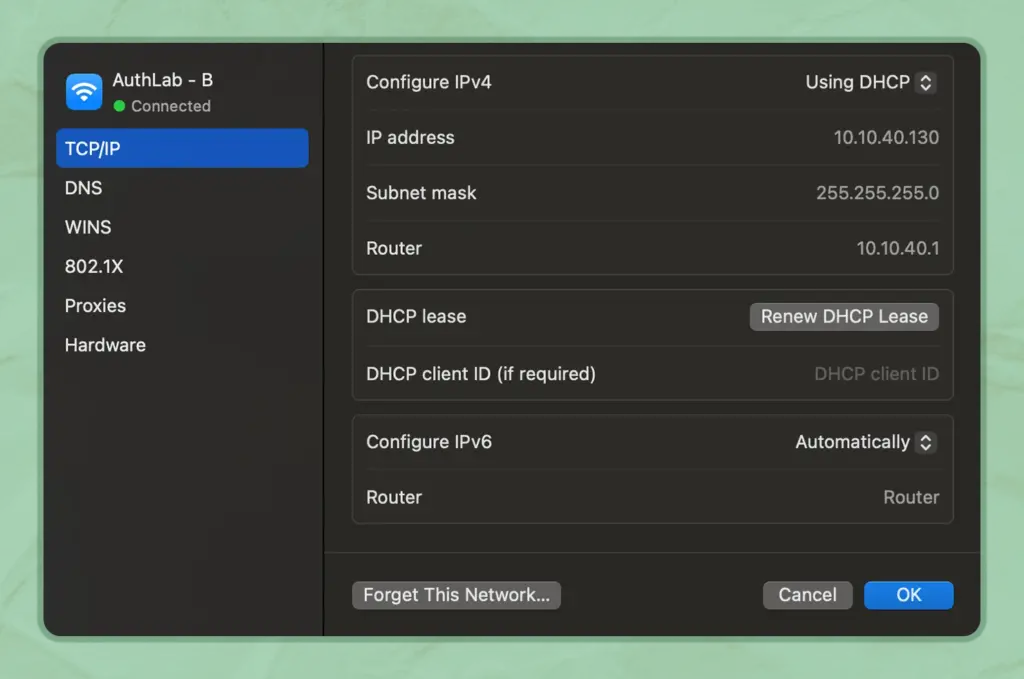
Step 9: Change DNS servers and adjust MTU settings
If you have already worked through everything from Hard Refresh the Page all the way to Refresh Network Settings, it is honestly surprising that this error is still sticking around. That suggests there may be a deeper issue with how your connection is set up.
But do not worry. This is your last fix and your final backup plan. Here comes Step 9: changing DNS servers and adjusting MTU settings, your last saviour to get things working again.
Changing your DNS servers can help your computer find websites more reliably. Adjusting the MTU setting makes sure your data packets are the right size so nothing gets blocked.
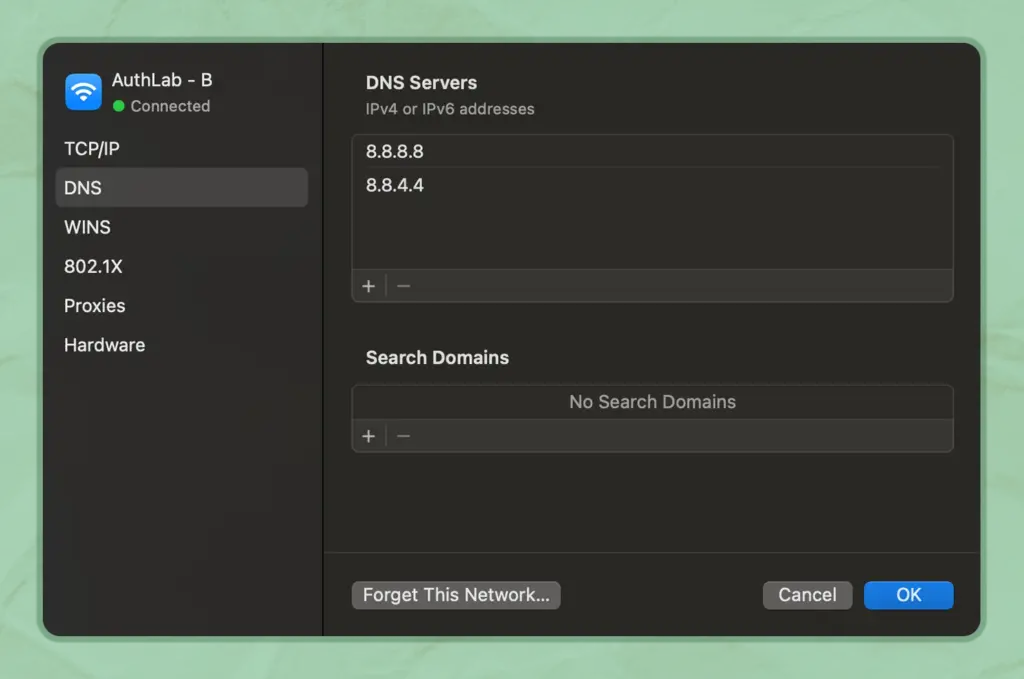
Changing DNS Servers
Your DNS servers translate website names into numeric addresses. Using public DNS can help if your provider’s servers are unreliable.
Action plan for Windows:
On Mac:
Adjusting MTU Settings (Windows Only)
If the MTU size is too big, data can get stuck or dropped. Setting it to 1472 helps avoid this problem.
Steps:
- Open Command Prompt as administrator.
- Type this command, replacing “Wi-Fi” with the name of your connection:
vbnet
Copy
Edit
netsh interface ipv4 set subinterface “Wi-Fi” mtu=1472 store=persistent
- Press Enter and restart your computer.
Once you have finished this step, try loading the website again. If you made it all the way here, you have done everything possible to solve the issue, and you should feel proud of your persistence.
Prevent ERR_CONNECTION_RESET in the future
Alright, you’ve battled that “ERR_CONNECTION_RESET” error, and hopefully, you’re back surfing the web smoothly. That’s awesome!

Now, let’s talk about how to keep it from popping up again.
Think of it this way: a little proactive care for your internet setup goes a long way. These aren’t just tips; they’re smart habits that can save you a lot of future headaches.
Let’s explore how to keep those connections stable and reliable.
1. Keep everything updated: your browser & operating system
This is the golden rule! Your web browser and computer’s operating system (Windows, macOS) constantly get updates. These aren’t just new features; they’re packed with bug fixes and performance improvements that directly tackle connection issues.
Why it helps: Old software can have hidden glitches that cause disconnections. Updated software speaks the latest, clearest language with the internet.
Your action: Turn on automatic updates for your browser and OS. If you prefer manual, make it a regular habit – even once a month helps!
2. Choose smart security: VPNs & antivirus
Your security software is crucial, but sometimes it can be too good at its job, mistakenly blocking legitimate connections.
For Antivirus/Firewall: Stick with reputable brands and keep them updated. If you ever had to disable your firewall to fix the error, remember to add exceptions for your browser or trusted sites in its settings. Avoid overly aggressive custom rules.
For VPNs: Use a well-regarded service. Cheaper or free VPNs can often introduce instability. If a specific site consistently resets only with your VPN on, try a different server location within your VPN app.
Advanced Insight: Some VPNs use less common network protocols. A quality VPN usually manages this, but if problems persist, it might be a subtle protocol conflict.
3. Clear Browser Cache Periodically
Remember how we cleaned your browser’s “digital closet”? It’s a good habit to keep it tidy! Clearing your browser’s cache and cookies every few weeks or months prevents old, corrupted files from building up again.
Why it helps: Keeps your browser nimble and ensures it always fetches fresh data, reducing “flaky” connections.
Your action: Set a reminder, or just do it whenever your browser feels a bit sluggish. (Quick reminder: Ctrl+Shift+Delete or Cmd+Shift+Delete!)
4. Give Your Router a Regular Reboot
Your Wi-Fi router and internet modem are unsung heroes, constantly working. Like any mini-computer, their internal memory can get full, leading to minor glitches that affect stability.
Why it helps: A quick reboot clears their memory, allowing them to re-establish fresh, strong connections with your internet provider. This prevents random drops that lead to resets.
Your action: Try to unplug and plug back in your router and modem once every week or two. It’s a small habit, big payoff!
5. Consider Custom DNS Servers
We tweaked your DNS settings during troubleshooting, and sticking with public DNS servers (like Google’s or Cloudflare’s) can offer lasting benefits beyond just fixing an error.
Why it helps: Your ISP’s default DNS can sometimes be slow or unreliable. Public DNS servers are typically more robust and faster, helping your computer find websites more reliably.
Advanced Insight: A consistent, fast DNS can help bypass minor regional routing issues. If your ISP’s DNS struggles to resolve a site, a public DNS often won’t, preventing that reset.
By embracing these simple, proactive habits, you’ll not only cut down on “ERR_CONNECTION_RESET” errors but likely enjoy a much smoother, more reliable internet experience overall.
Wrapping up
And just like that, the digital roadblock of “ERR_CONNECTION_RESET” is hopefully behind you. You came here looking for answers to a confusing error, and now you have the proven steps to overcome this common internet hurdle.
With these practical solutions and prevention tips, you’re equipped for a more stable, reliable online experience. We hope this guide has served you well.
Lastly, thanks for taking the time to read this blog and cheers to hassle-free browsing ahead.
Start off with a powerful ticketing system that delivers smooth collaboration right out of the box.
Related Articles
Fluent Support 2.1.0: Agent Groups, Agent Signatures, and Cloud File Storage
Fluent Support 2.1.0 is here! This is a…The Ritz-Carlton Gives Employees $2,000 to Spend on You
Discover how Ritz-Carlton’s $2,000 rule, based on customer…


Leave a Reply