FluentSupport 1.8.7: Introducing a Sleek New UI for Customer Portal

By Shahjahan Jewel
March 20, 2025
Last Modified: March 20, 2025


Hey, Fluent Support users!
We’re back with another exciting update—Fluent Support 1.8.7! This time, we’ve focused on refining the UI and UX of our customer support portal to provide a smoother, more intuitive experience for both support agents and customers.
Before diving into the update, we’re thrilled to share a major milestone—Fluent Support is now powering over 10,000 businesses! This makes us the #1 helpdesk plugin for WordPress, and we couldn’t have done it without your incredible support. Thank you for trusting us to streamline your customer support experience.
Our journey to building the most efficient and user-friendly help desk solution continues, and this update brings improvements that make navigating the support portal even easier for your customers.
We also want to acknowledge that, along the way, we’ve received valuable feedback from our users regarding certain bugs and usability concerns. We take customer feedback seriously and are committed to continuously improving Fluent Support. Every update is designed with your needs in mind, ensuring this plugin gets better day by day.
Let’s take a closer look at what’s new in this release!
UI update for Customer Support Portal
The Navigation of customer support portal is now smoother, cleaner, and more visually appealing. We’ve introduced a simple, easy-to-navigate, and eye-relaxing interface to enhance your support experience. To keep things clean and easy on the eyes, we’ve applied a balanced black-and-white color scheme.
This is just the beginning! We are gradually rolling out UI/UX improvements across the entire Fluent Support platform to ensure a seamless and modern support experience. Stay tuned for more updates in upcoming versions. Update your Fluent Support plugin today and enjoy a fresh, optimized support portal.
Let’s overview our new UI for the Customer Support Portal.
All Tickets page
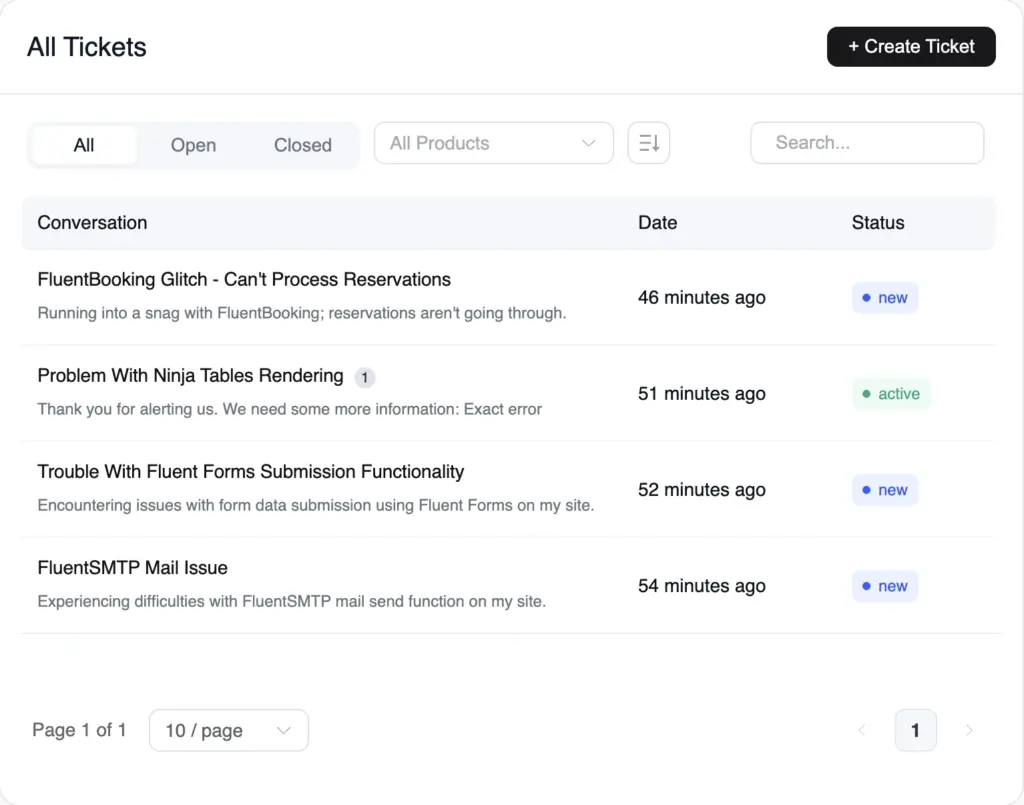
The Create Ticket button is now placed in the top right corner, slightly separated from the main content to improve navigation and make it easier to spot. In our previous version, “Create Ticket” button was within the main page which is less distinguishable from the filter options.
The ticket filter options (All, Open, Closed), All Products, Ticket Sorting Option, and Search Option are now neatly aligned within a single line for a streamlined and cohesive layout. In earlier versions, these filtering options were somewhat cluttered and disorganized, with elements positioned unevenly.
Under the ticket filtering section, we’ve adjusted the order of Conversation, Date, and Status within the ticket list for better clarity. Previously, the sequence was Conversation, Status, and Date.
We’ve also improved the usability of our pagination controls. It’s in the bottom of the ticket list of the support portal.
At the bottom left of the ticket list, customers can now choose how many tickets they want to display per page—10, 20, 50, or more—based on their preference. And, on the right of it, your customers can navigate pages seamlessly with an improved page selection system.
Note: If you want to add a Logout button to this page, you can paste the following shortcode. Here is the shortcode: [ fluent_support_portal show_logout = yes ]
When you paste this shortcode, a logout button will appear (under the three dots) in your customer support portal page right beside the “+ Create Ticket Button”.
Submit a Support Ticket page
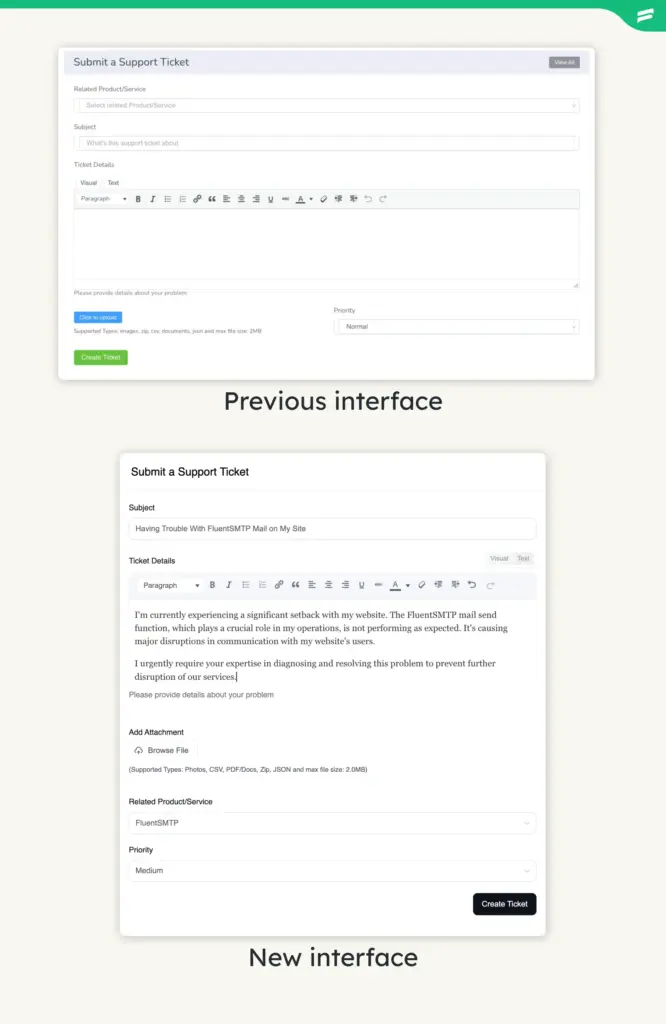
The Submit Support Ticket page has also received a UI overhaul which makes it more intuitive and user-friendly for your customers. Actually, we have made pretty changes in alignment and position on this page.
Your customers can now submit tickets effortlessly by filling out the Subject field, providing Ticket Details, adding Attachments, selecting the Related Product, and setting the Priority level.
The improved form layout ensures clarity, reducing any confusion when submitting support requests.
Previously, the input sequence followed this order: Related Product, Subject, Ticket Details, Click to Upload (now named as Add Attachments), and Priority—with the Priority and Click to Upload fields positioned on the same line. In the new UI, the Create Ticket button remains at the bottom of the page but has been shifted from the left to the right for better alignment.
Specific Ticket Page
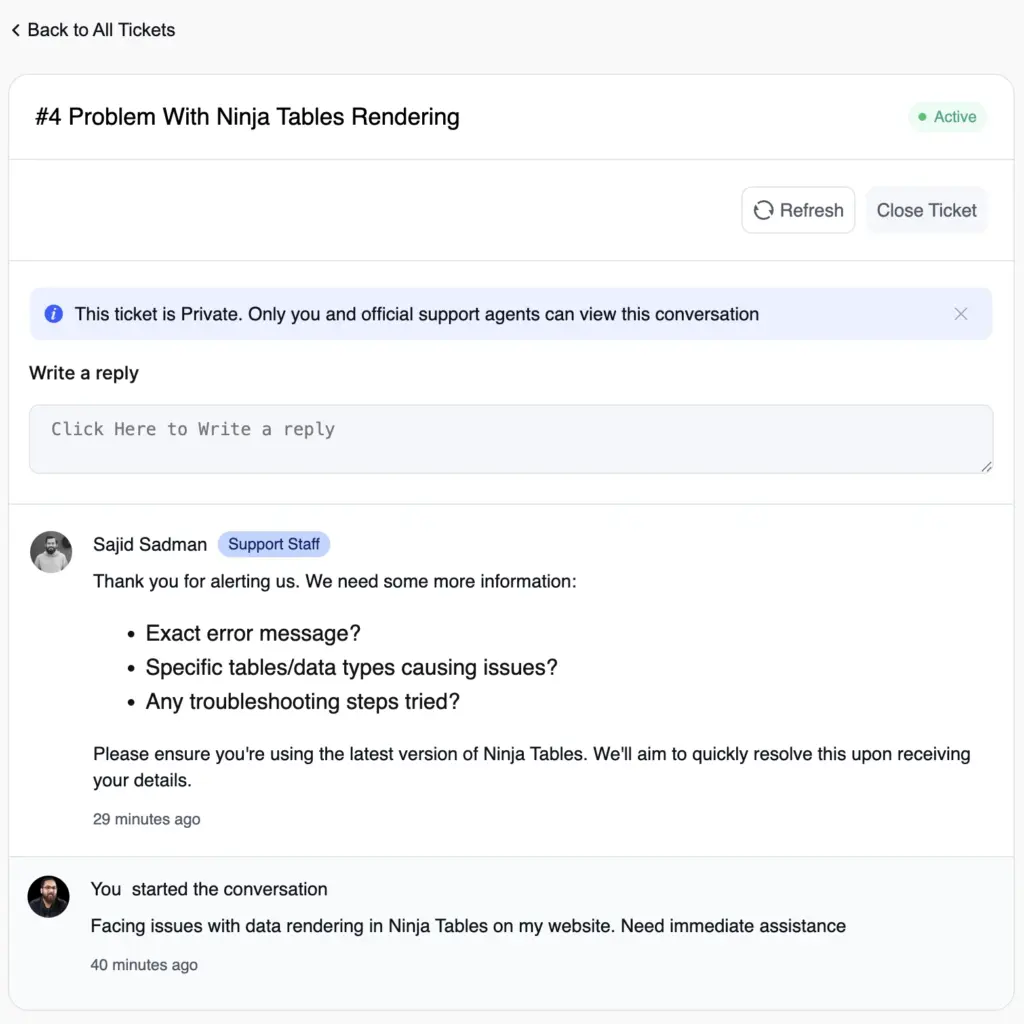
The Specific Ticket Page allows your customers to view and manage individual tickets with greater clarity. When a customer clicks on a ticket from the All Tickets Page, they are directed here to access the full conversation history of that ticket.
So, you could say it’s the core of the portal for interacting with the customer support team. That’s why we have worked on it to make the interface and UX even better.
The updated UI of this page ensures a structured and organized layout to make it easier to follow the conversations.
In the first part of this page, customers will get an overview of the ticket ID and the ticket title, as well as the current status of the ticket. Below this, they will find the Product Name (under which the ticket was created), along with the Refresh and Close Ticket buttons.
In the previous versions of Fluent Support, all these options were crammed into a single row including the “All” ticket button. Now in the latest UI, we separated the “All (ticket)” button in the top left corner of this page and renamed it as “Back to All Tickets”.
Following this, a message notification will appear: “This ticket is Private. Only you and official support agents can view this conversation.” After that, the ticket reply section is available. Your customer could remove the notification message simply by clicking the cross button available after the text (in case this one bothers your customer).
In the previous versions, the notification message was placed after the Write a reply section (not right after).
An “Add Attachment” button will appear when customers will click on the reply section button form where they could attach file types like Photos, CSV, PDF/Docs, Zip, JSON, and more according to their preferences.
Previously, this option was labeled “Click to Upload” and was always visible under the reply section. But in the updated version, when a customer clicks on the reply section box, this option will appear only.
Same goes for the “Reply Close” and “Reply” button. When a customer clicks on the reply section box, these two options will appear only. In the previous version “Reply Close” was in the check box form. Here a customer needed to check the “Close Ticket” option then needed to click on the reply to close the ticket immediately after the reply.
Finally, the conversation history between customers and support agents is displayed at the bottom, along with timestamps for easy tracking of interactions.
Customer Portal (Gutenberg Block)
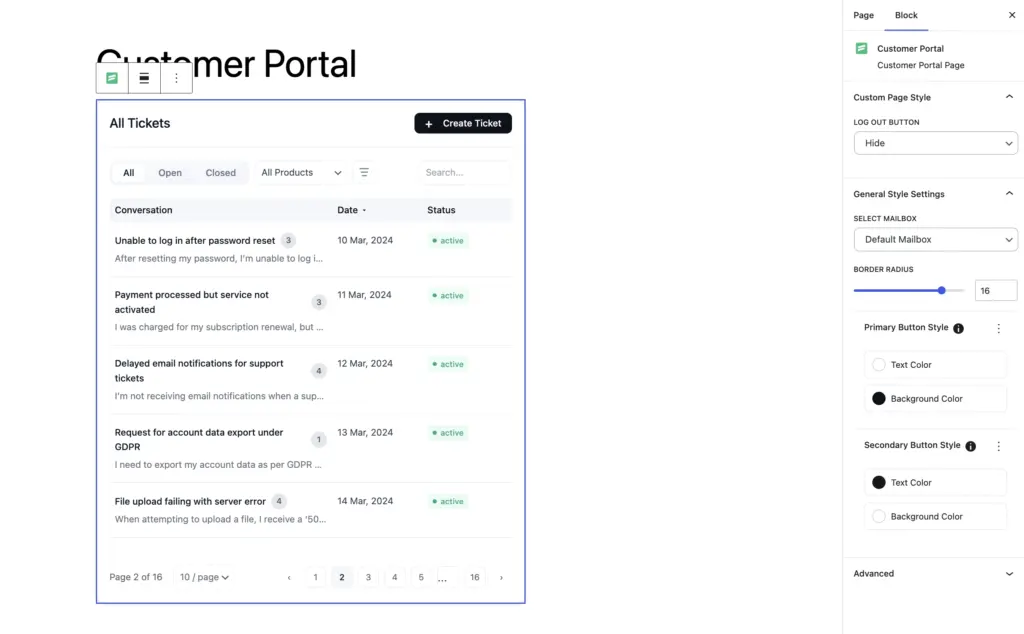
With the new Customer Portal Gutenberg Block, creating, designing, and customizing your customer portal is now easier than ever. We’ve refined the UI to make it more intuitive and seamless to use.
After adding the Customer Portal via the Gutenberg block, clicking on it will display a customization panel (in the block) on the right side of the page. This panel provides multiple options to fine-tune every element of the support portal according to your needs.
To enhance the user experience, we’ve also introduced tooltips that provide helpful guidance while customizing and designing the portal within the block editor. These improvements ensure that setting up and managing the customer portal is now more streamlined and user-friendly.
A few bug fixes
Now, take a look at the bug fixes and improvements that we’ve worked on in this version.
Image upload issues in the network site
Our users were facing difficulties pasting images on network sites. Previously, pasted images failed to upload, causing inconvenience. Now, users can smoothly paste images without any errors.
Customer information update issue
We have taken care of the issue where you couldn’t edit customer information if the customer didn’t have a name. When the name field was left empty, you couldn’t click to edit the details. To fix this, we’ve added “N/A” instead of an empty name. Now, you can click “N/A” and easily update the customer’s information.
Attachment issue in Fluent Forms
We’ve fixed an issue where attachments in Fluent Forms wouldn’t show up correctly in Fluent Support when set to store files in the WordPress media library. Previously, when a user submitted a form with an attachment, the file didn’t appear in the created ticket. Now, attachments are properly saved and linked in the media library, so they’ll appear in the ticket as expected.
We’ve fixed an issue where media file attachments weren’t properly added when creating a ticket through Fluent Forms.
Permission withdraw issue
The problem with withdrawing agent permissions has been resolved. Previously, when you deselected a main permission category option, only the first sub-option would be deselected, while the others stayed selected. You had to deselect each one manually. Now, when you deselect a main category permission option, all the sub-options under it will be deselected automatically.
Custom field enhancements
We’ve improved the custom field options to prevent blank values and give users more control. Previously, users couldn’t delete any added options when adding a new field type like radio choice, select choice, or checkboxes. If they wanted to remove an option, they had to leave it empty, which caused blank values to appear on the customer portal.
We’ve added a delete option for the field value options to fix this. Users can now delete unwanted options. Additionally, empty field value options can no longer be saved, as we’ve prevented them from being saved empty.
Duplicate actions in workflow automation
We’ve resolved a bug in the workflow automation’s action. Previously, when you added an action to a workflow, it was duplicated automatically. As a result, the same task was executed twice, leading to unnecessary or repeated actions.
This issue has now been resolved.
Advanced filter issues
Our users encountered some issues when filtering tickets using the advanced filter option. Some specific property’s items, and conditions weren’t working properly that leads to incorrect or unexpected results.
Our developer team successfully fixed these bugs to ensure all filter properties, property’s items, and conditions function as expected. Now, filtering tickets works smoothly, which makes it easier to find the exact tickets you need.
Agent Assignment Restriction
Our users encountered an issue where agents remained restricted from a business inbox even after a ticket was moved. If an agent was restricted from Business Box A, they couldn’t be assigned to a ticket in that inbox, which was expected.
However, when the ticket was moved to Business Box B, the restriction still applied, even if the agent wasn’t restricted from Business Box B.
It’s all sorted now. From now on, when a ticket is moved to a different business inbox, agent restrictions will update correctly. If an agent isn’t restricted from the new inbox, they can be assigned without any issues.
WooCommerce product display issue
We fixed an issue where WooCommerce products were not showing up properly in the ticket dashboard. Support agents can now see a customer’s full purchase history without any missing items.
Wrapping up
The Fluent Support team is dedicated to making your customer support experience seamless, efficient, and intuitive. With this update, we’ve enhanced the Customer Portal UI to give both you and your customers a smoother, more customizable support journey.
Every improvement we make is driven by your feedback. We truly appreciate your suggestions and bug reports, as they help us refine Fluent Support with each update. So, keep sharing your thoughts—we’re listening!
That’s all for now, but we’ll be back soon with more exciting updates.
Happy supporting!
Related Articles
Customer Service Philosophy: Examples & Downloadable Template
Customer service philosophy is a documented set of…How IKEA Turned AI ‘Failures’ Into €1.3 Billion in Revenue
IKEA’s Billie chatbot handled 47% of call centre…


Leave a Reply