
How to Block a Website on Chrome – All Methods [Complete Guide]

By Uttam Kumar Dash
March 21, 2025
Last Modified: April 10, 2025


Ever find yourself getting distracted by certain websites when you should be working or studying? Or maybe you’re a parent wanting to limit your kids’ internet access for safety reasons.
Whatever the case, knowing how to block a website on Chrome can be a super handy skill.
In this guide, we’ll dive into six methods that can help you manage web access and keep distractions to a minimum.
Ready to regain your focus and create a safer online environment? Let’s go!
1. Using Chrome extensions
If you’re looking for a simple and effective way to block websites on Chrome, look no further than Chrome extensions. These handy tools can be quickly added to your browser and provide a range of functionality to help you manage your browsing experience more effectively.
Let’s dive into the world of Chrome extensions and discover how you can use them to block unwanted sites.
Popular website blocking extensions
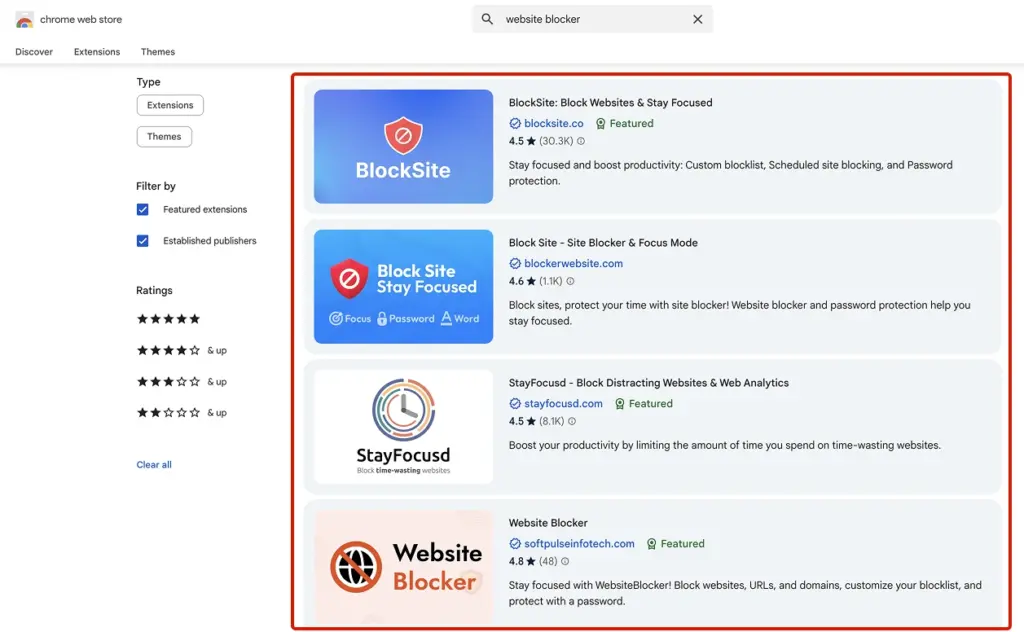
There are numerous extensions available designed to help you block websites on Chrome. Here are a few popular options you might consider:
- BlockSite: This is one of the most popular Chrome extensions for blocking websites. It’s user-friendly and allows you to block not only websites but also adult content and apps. You can also set a schedule to block sites during certain hours.
- StayFocusd: If you’re looking to improve productivity, StayFocusd is a great choice. It limits the amount of time you can spend on time-wasting websites. Once your time is up, the sites will be blocked for the rest of the day.
- WasteNoTime: Similar to StayFocusd, this extension helps manage the time you spend online by blocking distracting sites after your acceptable usage time has expired.
- SiteBlock: This extension is straightforward. It offers simple controls to keep you focused by blocking access to distracting sites. (both permanently and temporarily)
These extensions can vary in terms of features and customization, so it might be worth trying a few to find the one that best meets your needs.
Installation and setup
Setting up these Chrome extensions is simple! Here’s a simple step-by-step guide to get you blocking websites in no time:
1. Open Chrome: Launch your Chrome browser and go to the Chrome Web Store.
2. Search for extensions: Type the name of the extension you want into the search bar. For instance, you could search for “BlockSite” or “StayFocusd.”
3. Add to Chrome: Click on the extension you’ve chosen, then click the “Add to Chrome” button. You’ll see a pop-up where you’ll need to confirm the addition by clicking “Add Extension.”
4. Configuration: After the extension is added, you’ll see its icon in the top-right corner of your browser. Click on it to begin configuring your list of blocked sites.
5. Set your preferences: Input the websites you want to block. Depending on the extension, you might also have the ability to set time limits, create schedules, or define blocked keywords.
These extensions are designed to be non-intrusive, so they blend seamlessly with your browsing experience while providing the control you need.
Managing blocked sites with extensions
So you’ve installed an extension and blocked a few distracting sites—great start! Here’s how you can manage your blocked sites using extensions:
- Add or remove sites: Most extensions have a simple interface where you can easily add additional sites to your blocked list or remove them. Just click on the extension’s icon, navigate to the settings or preferences, and make your changes.
- Adjust time settings: For extensions that offer scheduling features, you can customize your online time management by increasing or decreasing allowable usage times. This is particularly useful if your schedule changes or if you notice certain times of day are more prone to distractions.
- Review site activity: Some extensions provide reports or activity logs that show you how much time you spend on each blocked site. Use this information to adjust your blocking strategy as needed.
- Enter a “Focus Mode”: Many of these tools offer specific modes designed to help you stay on task. Whether it’s a strict mode that prevents any changes during certain times or a focus mode that cuts off all distractions, use these options to optimize your productivity.
2. Modifying host files
For those who prefer a more hands-on method to block websites, modifying your computer’s host files is an effective way to manage web access. It’s a tad more complex than simply using a Chrome extension, but once you get the hang of it, it’s a powerful tool.
Understanding host files
Host files are like little black books within your computer that map domain names (like www.example.com) to IP addresses. By tweaking these files, you can redirect specific websites to a dead-end, effectively blocking them on your network.
Here’s how it works: when you type a website into your browser, your computer first checks the host file to see if there’s a specific IP address it should redirect to. If no entry is found, it then checks with DNS servers to locate the correct web address. To block a website, we’ll create a loopback entry in the host file that tells your computer to redirect that website to an IP address that leads nowhere.
Steps to modify on Windows
Ready to dive in? Here’s how you can modify the host file on a Windows computer:
1. Open Notepad as admin: Click on the Start Menu, search for Notepad, then right-click it and choose “Run as administrator.” This step is crucial for saving changes to system-level files.
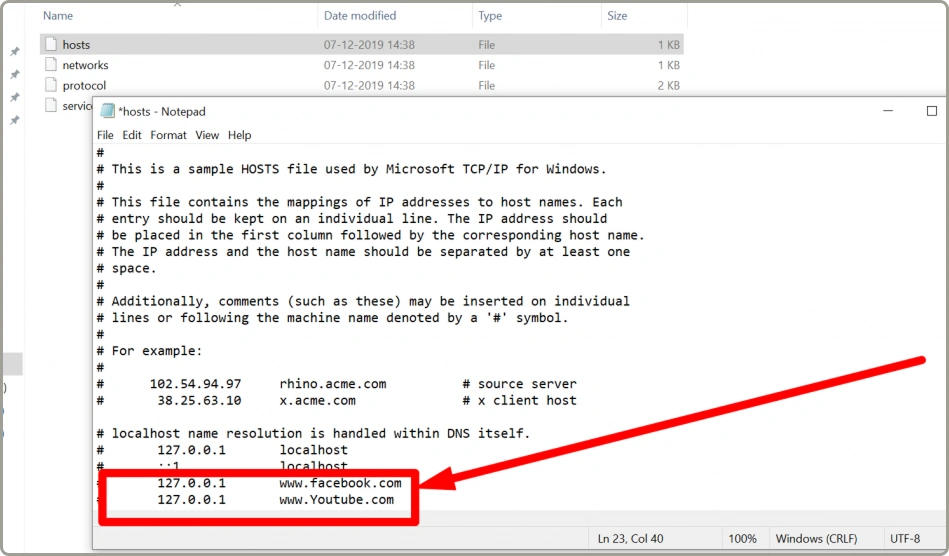
2. Open host file: Within Notepad, go to File -> Open. Navigate to \`C:\Windows\System32\drivers\etc\\`. You won’t see any files at first, so ensure that you select “All Files” from the dropdown menu. Open the \`hosts\` file.
3. Add entries: To block a website, type \`127.0.0.1 www.blockedsite.com\` at the end of the document, with each blocked website on a new line. The IP \`127.0.0.1\` is a loopback address that directs the site to nowhere.
4. Save changes: Go to File -> Save to overwrite the original host file with your changes. You may need to restart your browser or computer to see the effects.
5. Test it out: Try visiting the blocked website in your browser. You should find that the site is no longer accessible.
This method is great for people who prefer a hard-set block that can’t be bypassed easily by browser settings.
Steps to modify on Mac
If you’re on a Mac, the process to modify the host files is quite similar, though it involves using Terminal. Here’s how to proceed:
1. Open terminal: You can find Terminal through Spotlight by pressing \`Command (⌘) + Space\` and typing “Terminal.”
2. Access host file: In the Terminal window, enter the command \`sudo nano /etc/hosts\`. You’ll be prompted to enter your admin password, which gives you the required permissions to edit the file.
3. Add the entries: Navigate to the bottom of the host file using the arrow keys and enter \`127.0.0.1 www.blockedsite.com\` for each site you wish to block. Just like on Windows, each entry should be on a new line.
4. Save your changes: Press \`Control (^) + O\` , then press \`Enter\` to save the changes. Next, press \`Control (^) + X\` to exit the editor.
5. Clear the DNS cache: You’ll need to clear your DNS cache for the changes to take effect. In Terminal, type \`sudo dscacheutil -flushcache\` followed by \`sudo killall -HUP mDNSResponder\`.
6. Check your work: Now, try accessing a blocked site. Similar to Windows, you should find that your computer redirects to a dead-end.
3. Configuring router settings
When it comes to blocking websites on Chrome, one of the most comprehensive methods is configuring your router settings.
This approach doesn’t just restrict access to one device; it governs all devices connected to your network. This makes it a robust solution for families, shared accommodations, or small businesses.
Benefits of blocking at the router level
Blocking websites at the router level provides several advantages that go beyond simple convenience. Here’s why you might want to consider this method:
- Network-wide coverage: This approach affects all devices on your Wi-Fi—laptops, phones, even that tablets your kid uses for homework. It’s a great way to ensure certain content is blocked across the board without needing individual setups.
- Enhanced control: If you’re a parent or someone managing a public or shared network, keeping certain websites out of reach ensures a safer and more productive online environment.
- Device agnosticism: It doesn’t matter whether you’re browsing on Chrome or another browser. Since the restriction is set up at the router level, it covers all web browsers.
Accessing the Router Admin Panel
Before you can block websites, you’ll need to access your router’s admin panel. Here’s how to do it:
1. Find the router’s IP address: Most routers have an IP like 192.168.0.1 or 192.168.1.1. You can usually find this on a label on the router itself, or it might be in the router’s manual.
2. Open a web browser: Enter the IP address into the URL bar of your browser and hit Enter. This will bring up your router’s login page.
3. Login: Use the login credentials for your router. If it’s your first time, the default username and password might still be in place (often ‘admin’/’admin’ or ‘admin’/’password’). It’s a good idea to change this after you log in for better security.
Adding websites to the block list
Once you’re inside the admin panel, you can add specific websites to your router’s block list. Here’s a step-by-step guide:
1. Find the block or parental control section: Routers organize settings differently, but look for an option labeled ‘Access Restrictions,’ ‘Firewall,’ or ‘Parental Controls.’
2. Create a new filter: In the settings, you should be able to create a rule or filter that allows you to block certain URLs.
3. Add URLs: Enter the web addresses of the sites you wish to block. Remember to save the changes you make.
4. Test the settings: Try accessing the blocked sites from a device connected to the network to ensure that the restrictions are in place.
4. Utilizing parental control software
If adjusting your hardware sounds a bit too technical, or if you need more specialized control, using parental control software is another effective avenue.
This software gives you fine-grained control over web access, perfect for parents who need to manage what kids can access on the internet.
Plus, it’s very intuitive and user-friendly, which means you don’t have to be a tech wizard to keep your family safe online.
Features of parental control tools
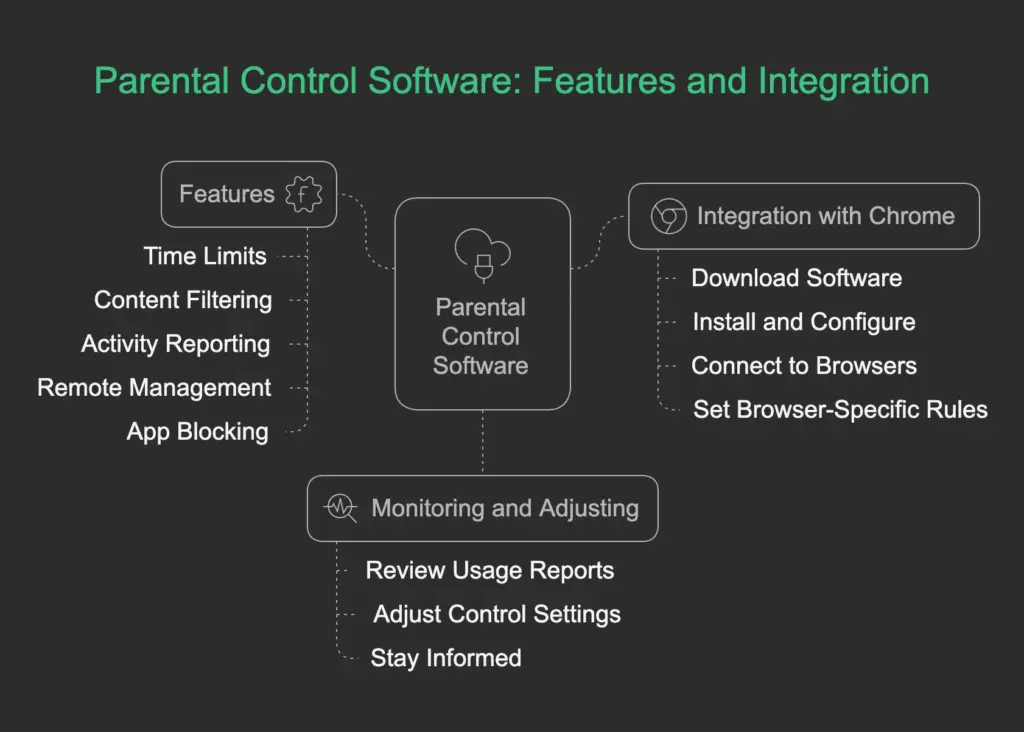
Parental control tools come with a range of features tailored to help you manage web content easily:
- Time limits: Many apps let you set time limits for internet usage, great for making sure children or even yourself don’t spend all day online.
- Content filtering: Automatically block inappropriate or risky websites, ensuring safe browsing.
- Activity reporting: Keeps track of what sites the user visits, when, and for how long—giving peace of mind and insight into browsing habits.
- Remote management: Manage settings remotely from any device, which is perfect for adjustments on the go.
- App blocking: Some options let you control which apps can be downloaded or used, adding an extra layer of oversight beyond just web browsing.
Integrating with Chrome
To maximize the usefulness of parental control software, you’ll want to integrate it seamlessly with Chrome. Here’s a quick guide on how to do just that:
1. Download the software: Choose a reputable parental control app from the web store or directly from a well-known provider’s website.
2. Install and configure: Follow the installation instructions, then set up a user profile. Here, decide what types of content to allow or block.
3. Connect to browsers: Ensure the software is integrated with all browsers on your device, including Chrome. Some programs may require a browser extension.
4. Set browser-specific rules: Tailor settings within Chrome itself for extra control, applying unique rules depending on the user or the device’s usage.
Monitoring and adjusting settings
Once your parental control software is all set, you’ll need to monitor and adjust settings periodically to accommodate changes as needed:
- Review usage reports: Regularly check the reports provided by the software. Look for any sites that might need blocking or activities that need moderating.
- Adjust control settings: Over time, you might find certain sites don’t need such strict filtering, especially as your children grow or as you change your focus.
- Stay informed: Keep an eye on updates for the software and be aware of any new features or security patches—you want to ensure the software functions as best as possible.
5. Creating a supervised user profile
One of the great ways to manage web access and ensure internet safety, especially for younger users, is by creating a Supervised User Profile on Chrome.
This feature is particularly handy for parents who want to keep an eye on their kids’ online activities or for anyone who needs to manage multiple users on a single device.
Setting up a supervised user on Chrome
Setting up a Supervised User on Chrome is fairly straightforward. Here’s how you can do it in just a few steps:
1. Open Chrome: Start by launching the Chrome browser on your computer.
2. Profile icon: Look for the profile icon located at the top right corner of your Chrome window, then click on it.
3. Add profile: Click on ‘Add’ to create a new profile. This will start the setup wizard for adding a new user.
4. Supervised account: You’ll find an option to create a supervised profile. Make sure the box is checked to indicate this is a supervised account.
5. Sign into your Google account: You’ll need to sign in with your Google account. This account will be used to manage the supervised user.
6. Follow prompts: Continue following the prompts to finalize your setup. You can customize it with a unique name and avatar for easy recognition.
Congratulations! You’ve now set up a Supervised User Profile. But the work doesn’t stop here. You need to manage these profiles to make the most of them.
Managing supervised profiles
Once you’ve set up a supervised user, you can manage their browsing activity and access to websites:
- Access permissions: Decide which websites the supervised user can visit by creating an approved list of sites. You can also block certain content that you feel isn’t appropriate.
- Daily reports: Receive a daily activity report on the supervised user’s browsing habits, making it easier to keep track of the websites they visit.
- Time management: You can even set time limits on browsing, ensuring that users are not spending too much time online.
Limitations and advantages
Like all tools, supervised profiles have their limitations and advantages. Understanding these can help you make informed decisions regarding their use:
Limitations
- Supervised profiles are not available on all devices, limiting their use to specific environments, typically desktop Chrome browser.
- As of recent updates, Chrome has incorporated most controls into the Family Link app, reducing the visibility of supervised profiles as a standalone feature.
Advantages
- Customized Control: These profiles allow for granular control over browsing permissions, keeping unwanted content at bay.
- Activity tracking: With real-time activity reports, you stay informed about the sites that are visited, ensuring transparency.
Note: It pairs best with a comprehensive tool like the Google Family Link.
6. Using Google Family Link
For a more advanced approach to internet safety and management, the Google Family Link app is a worthy tool that parents or guardians can use. It offers more features than just managing websites, including screen time controls and app management.
Setting up Google Family Link
To begin with Google Family Link, you need to set it up, which involves a few straightforward steps:
1. Download the app: First, download the Google Family Link app from the Google Play Store or Apple App Store onto your device.
2. Create an account for your child: Follow the setup prompts to create a Google account for your child if they don’t have one. If your child already has a Google account, link it through the app.
3. Configure settings: Customize the settings based on the age and needs of your child, ensuring a tailor-fit experience for their usage.
Once you’ve completed these setups, you can start utilizing the app’s robust features to manage browsing and other app usage.
Controlling website access
Google Family Link provides excellent features for controlling website access:
- Site blocking: Within Family Link, you can block specific websites or categories that you deem inappropriate. This ensures a safer browsing environment.
- Approve or disapprove sites: Sometimes, a particular website may get flagged mistakenly. You have the power to approve such sites, ensuring that false positives don’t hinder your child’s exploration.
These controls ensure your child has access only to safe, educational content, providing you with peace of mind.
Monitoring activity with family link
Monitoring your child’s online activity is vital in today’s digital world, and Google Family Link makes this a breeze:
- Activity reports: Get detailed reports on your child’s screen time, websites visited, and how long they spend on each app. This information is critical to understanding and managing their digital lifestyle.
- App management: You can also control which apps your child downloads or uses, helping you prevent exposure to inappropriate content.
We hope you’ve already found the best method that works for a smoother browsing experience.
Happy browsing!
Start off with a powerful ticketing system that delivers smooth collaboration right out of the box.
Related Articles
10 Best Zendesk Alternatives to Scale Customer Support [2026]
Zendesk alternatives that are built to make customer…Fluent Support 2.0.5: Dark Mode, GPT-5.2 Support, Performance Improvements, and Fixes
Fluent Support 2.0.5 introduces Dark Mode, GPT-5.2 support,…


Leave a Reply