Ticket Tagging: Complete Guide for Efficient Customer Support

By Md. Sajid Sadman
October 23, 2025
Last Modified: November 13, 2025


Every support team struggles with one thing: clarity. When tickets arrive without proper context or structure, even the best agents waste time figuring out what’s what before they can start solving.
Ticket tagging changes that. It gives every ticket a clear identity so your team instantly knows what the issue is, how urgent it feels, and who should handle it.
It’s one of those small systems that make a huge difference. Once you start tagging your tickets, support becomes faster, smarter, and far more organized.
In this blog, we’ll break down what ticket tagging really means, how it works, and how to use it to build a more efficient support process. You’ll also learn proven methods, real examples, and best practices that top support teams follow.
TL;DR
What is ticket tagging?
Ticket tagging means adding descriptive labels to support tickets so your system can categorize, organize, and route them correctly. These tags might show what the ticket is about, how important it is, or which team should handle it.
Think of it like putting a label on every incoming request. Instead of digging through a pile of unknown tickets, your agents get a clear, organized list ready for action.
Here’s how it works in real life. A customer writes in saying, “My payment failed.” The system tags it as “Billing” and “Payment issue,” so your billing team sees it first.
Or maybe the message says, “Feature X is not working.” That ticket gets tagged as “Bug” and “Technical,” which sends it straight to the engineering team.
There are two ways to make this happen. You can tag tickets manually, where agents add the right labels themselves. Or you can set up automated tagging, which applies tags based on keywords, customer type, or even the message tone.
Manual tagging is fine if your team handles a small number of tickets. But once you’re dealing with high volume, automation keeps things consistent and lightning fast.
Tags also act as a hidden layer of data for your support team. They show which issues come up most often, which types of customers report them, and how quickly they’re solved.
This information powers powerful reports and dashboards. It helps managers track performance, spot trends, and solve recurring problems before they grow.
And when tagging is done right, it just works in the background. Tickets get to the right place. SLAs stay on track. Your support inbox feels clean and under control.
That’s why every modern help desk, from startups to enterprise teams, relies on ticket tagging as a core part of their support process.
What ticket tags actually tell you?
Tags might look small and simple, but they carry a surprising amount of useful information about every support ticket. They don’t just help you categorize. They give your team instant context before anyone even clicks “open.”
When done right, a quick glance at the tags can tell an agent what the ticket is about, how urgent it is, and what action to take next. That means less time reading through messages and more time solving problems.
1. Status of the ticket
The first thing tags often show is where a ticket stands in your workflow. Is it new and waiting for attention, or already in progress? Maybe it’s resolved, but pending confirmation.
Status tags give your team visibility into every ticket’s journey. That helps prevent forgotten requests and ensures nothing slips through the cracks.
2. Priority level and SLA needs
Some tickets are simple questions, and others are hair-on-fire emergencies. Priority tags make that clear right away.
Labels like “Low,” “High,” or “Critical” help agents decide what needs attention first. And when tied to SLAs, they also set response time expectations without needing to open the ticket.
3. Issue type or category
Not all tickets are created equal. A “Billing” tag means something very different from a “Bug” or “Login Issue.”
By tagging tickets based on their topic, you help agents route them to the right team quickly. It also makes future reporting and troubleshooting a whole lot easier.
4. Department or expertise area
Some issues are best handled by billing. Others go to engineering, product, or customer success. Department tags make that routing automatic.
They also keep your inbox clean by ensuring every ticket lands with the right specialist the first time.
5. Customer segment or type
Support isn’t one-size-fits-all. A ticket from a trial user might be handled differently than one from a VIP customer.
By tagging tickets with customer segments like “New User,” “Enterprise,” or “VIP,” your team can personalize responses and prioritize based on business value.
6. Time sensitivity or deadlines
Sometimes, it’s not just about what the issue is. It’s about when it needs solving. Time-based tags show you how quickly action is required.
For example, a “24-hour SLA” tag signals that the clock is ticking, while “Scheduled follow-up” helps teams keep long-term tasks on track.
7. Product or feature context
If your company offers multiple products or features, tags can show exactly where the problem lies. Maybe it’s a “Mobile App” issue or a “Checkout Page” bug.
This helps teams route tickets more accurately and track trends within specific products over time.
In short, tags act like a ticket’s identity card. They summarize everything you need to know before you dive into the details.
And when your support system consistently uses these types of tags, agents stay focused, customers get faster resolutions, and reporting becomes far more powerful.
Up next, let’s look at some real examples of ticket tags and how teams actually use them in day-to-day support.
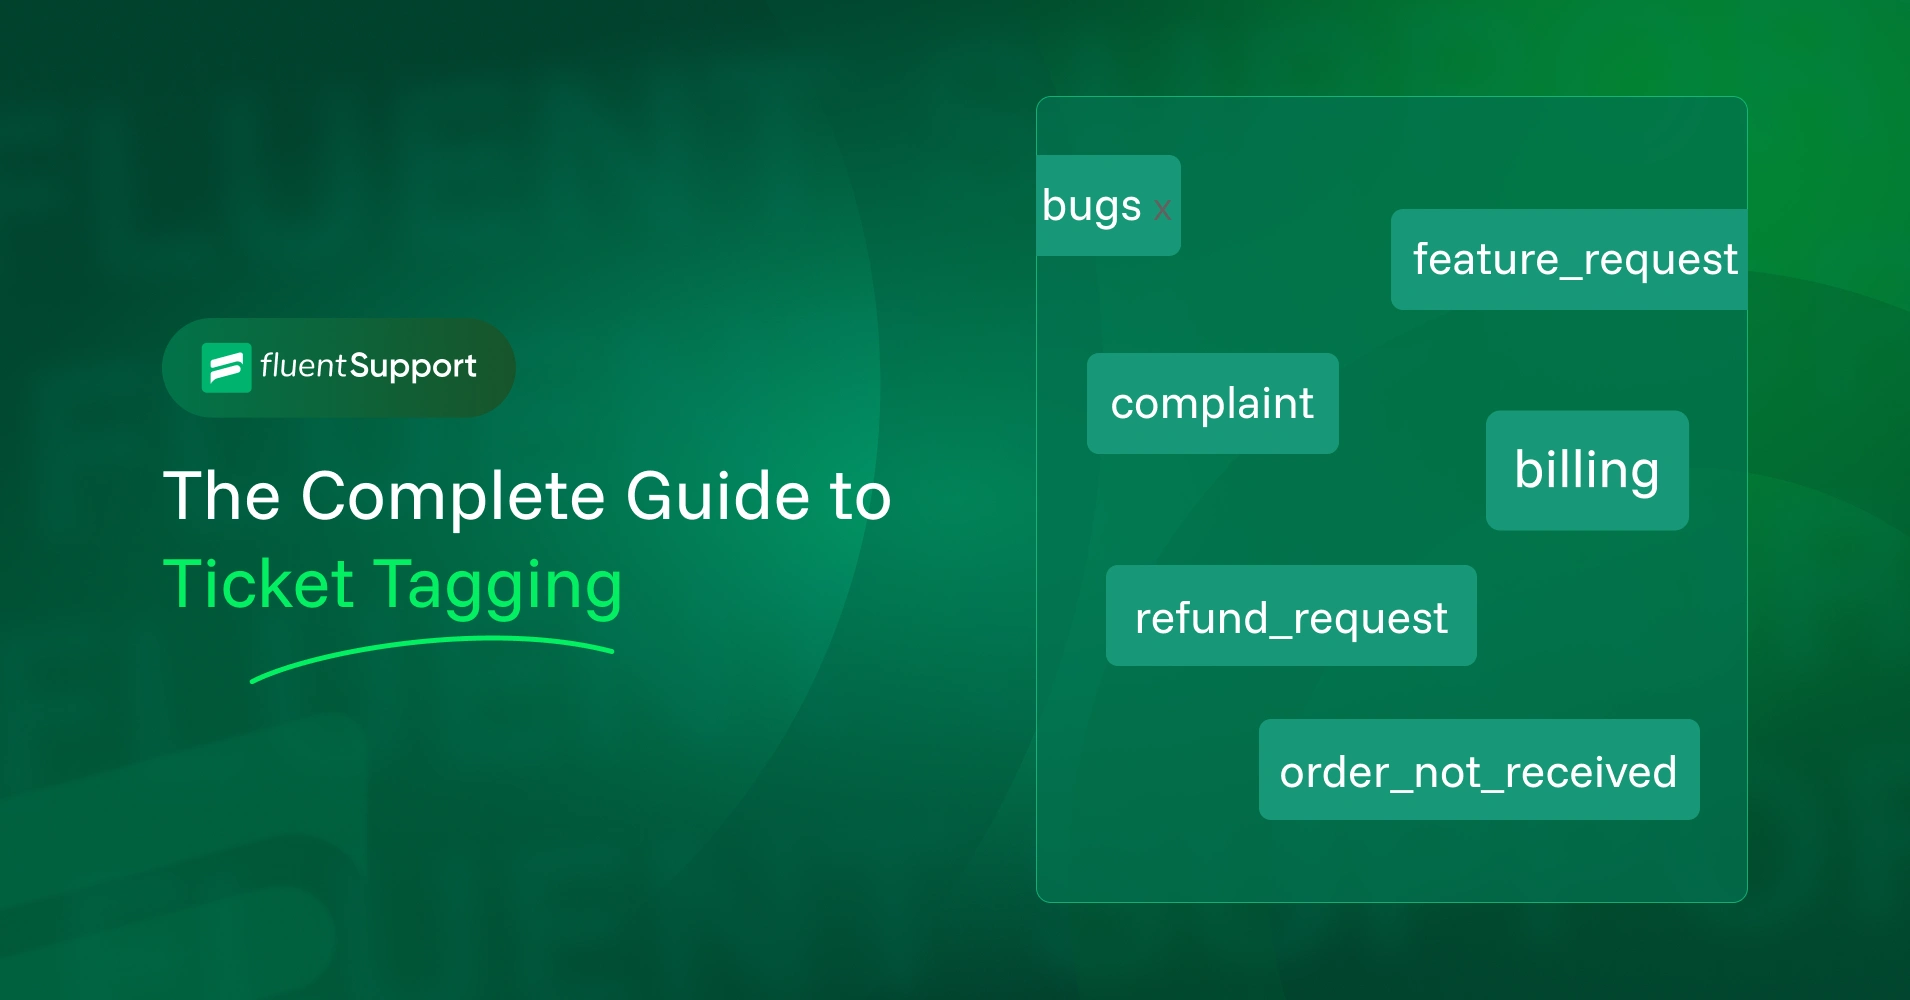
Examples of common ticket tags
Now that you know what tags tell you, it’s time to see them in action. Every support team uses tags a little differently, but most fall into a few common categories. These examples will give you a solid starting point to build your own system.
And remember, there’s no “one perfect list.” The right tags are the ones that reflect your customers, your product, and the way your support process works.
Technical issues
These are the tickets reporting bugs, errors, or broken features. They help engineering or product teams quickly identify problems and track recurring issues.
Examples: bug, login_error, feature_not_loading
Escalations
Some issues need more experienced hands. Escalation tags help your team flag tickets that require senior-level support, manager review, or a deeper investigation.
Examples: escalated, tier2_needed, urgent_escalation
Billing and payment
Anything related to invoices, failed transactions, refunds, or payment methods gets tagged here. These make it easy to route tickets to your finance or billing team without confusion.
Examples: billing, payment_failed, refund_request
Customer feedback
Support isn’t only about problems. Tags here capture user suggestions, complaints, compliments, or feature ideas. They’re valuable both for your product and marketing teams.
Examples: feature_request, complaint, positive_feedback
General inquiries
These are the catch-all tickets that don’t fit neatly into other buckets. They’re often simple questions, FAQs, or account-related queries.
Examples: account_help, how_to, general_question
Updates and ongoing tickets
Some tickets represent ongoing work, projects, or investigations. These tags help your team track long-term issues without losing context.
Examples: ongoing, follow_up, investigation
Security and access
Security-related tickets often need immediate attention. Tagging them separately ensures they’re prioritized and routed correctly.
Examples: password_reset, security_alert, phishing_report
Product or feature-specific tags
If your company offers multiple products or modules, tagging them separately gives instant clarity on where the issue lies.
Examples: mobile_app, checkout_page, dashboard_bug
Alright! Now you’ve seen what ticket tags look like. But examples alone won’t move the needle.
The real value comes when you start using them inside your help desk. In the next part, we’ll explore how tags actually work in action and how you can apply them in two different ways: manually and automatically.
We’ll walk you through the whole process inside one of the top WordPress ticketing systems, Fluent Support.
How to use ticket tags manually and automatically in Fluent Support
Well, you’ve now reached the most crucial part of this blog. Pay close attention to this section, because this is where you’ll learn the practical side of ticket tagging in action.
So, let’s get straight to the process.
Creating tags in Fluent Support
Before you can tag any ticket, you need to create the tags first. Think of this step as building the label system your team will use to organize and track tickets later.
Yes, Fluent Support makes the setup easy and straightforward for the users. Here’s how you can do it step by step.
First, go to your Fluent Support dashboard and click on Global Settings. Inside that menu, you’ll find the Ticket Tags option, where you can view, add, or organize all your tags.
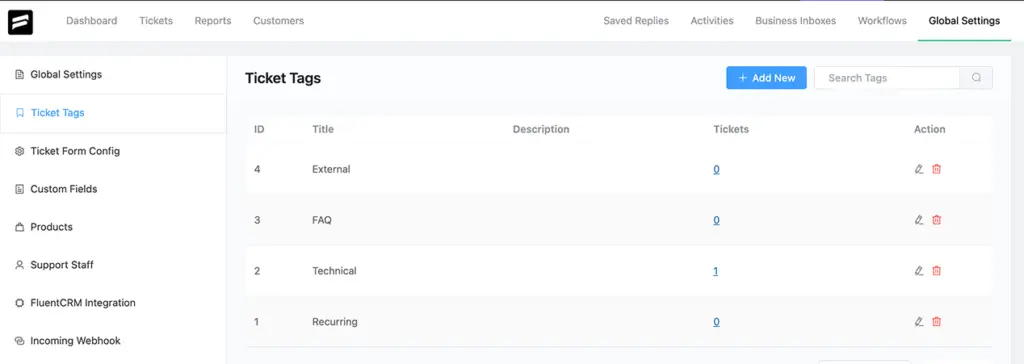
Click on the + Add New button to create a tag. A simple form will appear where you’ll enter a Title and a short Description for your tag. Keep both clear and specific so agents understand exactly when to use it.
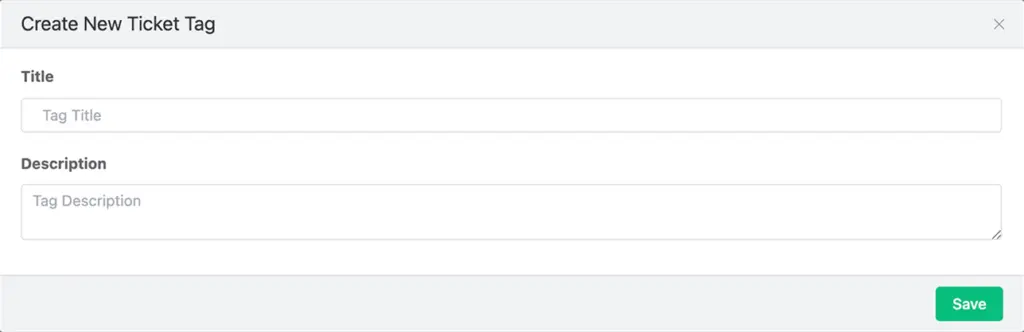
Once done, hit Save. Your new tag is now ready to be used across your help desk. You can create as many tags as you need to categorize different types of tickets.
And if something changes later, no problem.
You can edit or delete any tag at any time by clicking the Pencil or Trash icons under the Actions column.

Pro tip: Start with a small list of essential tags like “Billing,” “Bug,” “VIP,” or “Feature Request.” That keeps your system clean and helps your team stay consistent when tagging tickets.
Manual tagging in Fluent Support
Once you’ve created your tags, adding them manually is the simplest way to start using them. It’s a quick and flexible option, perfect for smaller teams or for tickets that need a more human touch.
To do it, open any ticket from your Fluent Support dashboard. On the ticket page, you’ll see a plus icon “+” for adding tags right after the ticket title. From there, you can choose an existing tag from the list.
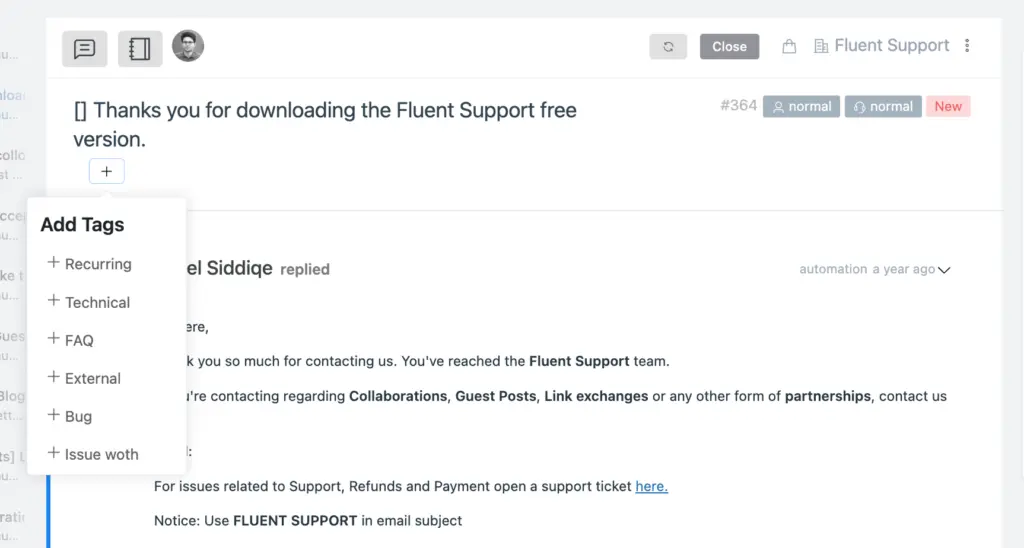
With just a click, the tag attaches to the ticket. This lets you instantly label the ticket, so it’s easier to find, sort, and follow up on later.

If you ever add a tag you don’t need or want to clean things up, removing it is just as simple. All you have to do is click the small cross icon (x) next to the tag text, and it will disappear from the ticket right away.
Manual tagging works best when agents understand the purpose of each tag. It’s also a great way to add context that automation might miss, like marking a ticket for follow-up or flagging unusual customer feedback.
Pro tip: If your team uses manual tagging often, keep your tag list short and clear. Too many options can slow agents down or cause inconsistent tagging.
Automated tagging in Fluent Support
Manual tagging works well when your ticket count is small. But as the number grows, automation steps in to keep things smooth and fast.
In Fluent Support, this happens through the Workflow Automation feature.
With automation, tags are applied the moment a ticket lands in your inbox. You don’t have to open the ticket or touch anything. The system handles it for you based on the rules you set.
Here’s how it works. You create a workflow inside Fluent Support and define specific conditions. For example, if a ticket’s title contains the word “refund,” the system can automatically tag it as “Billing” and “Refund Request.”
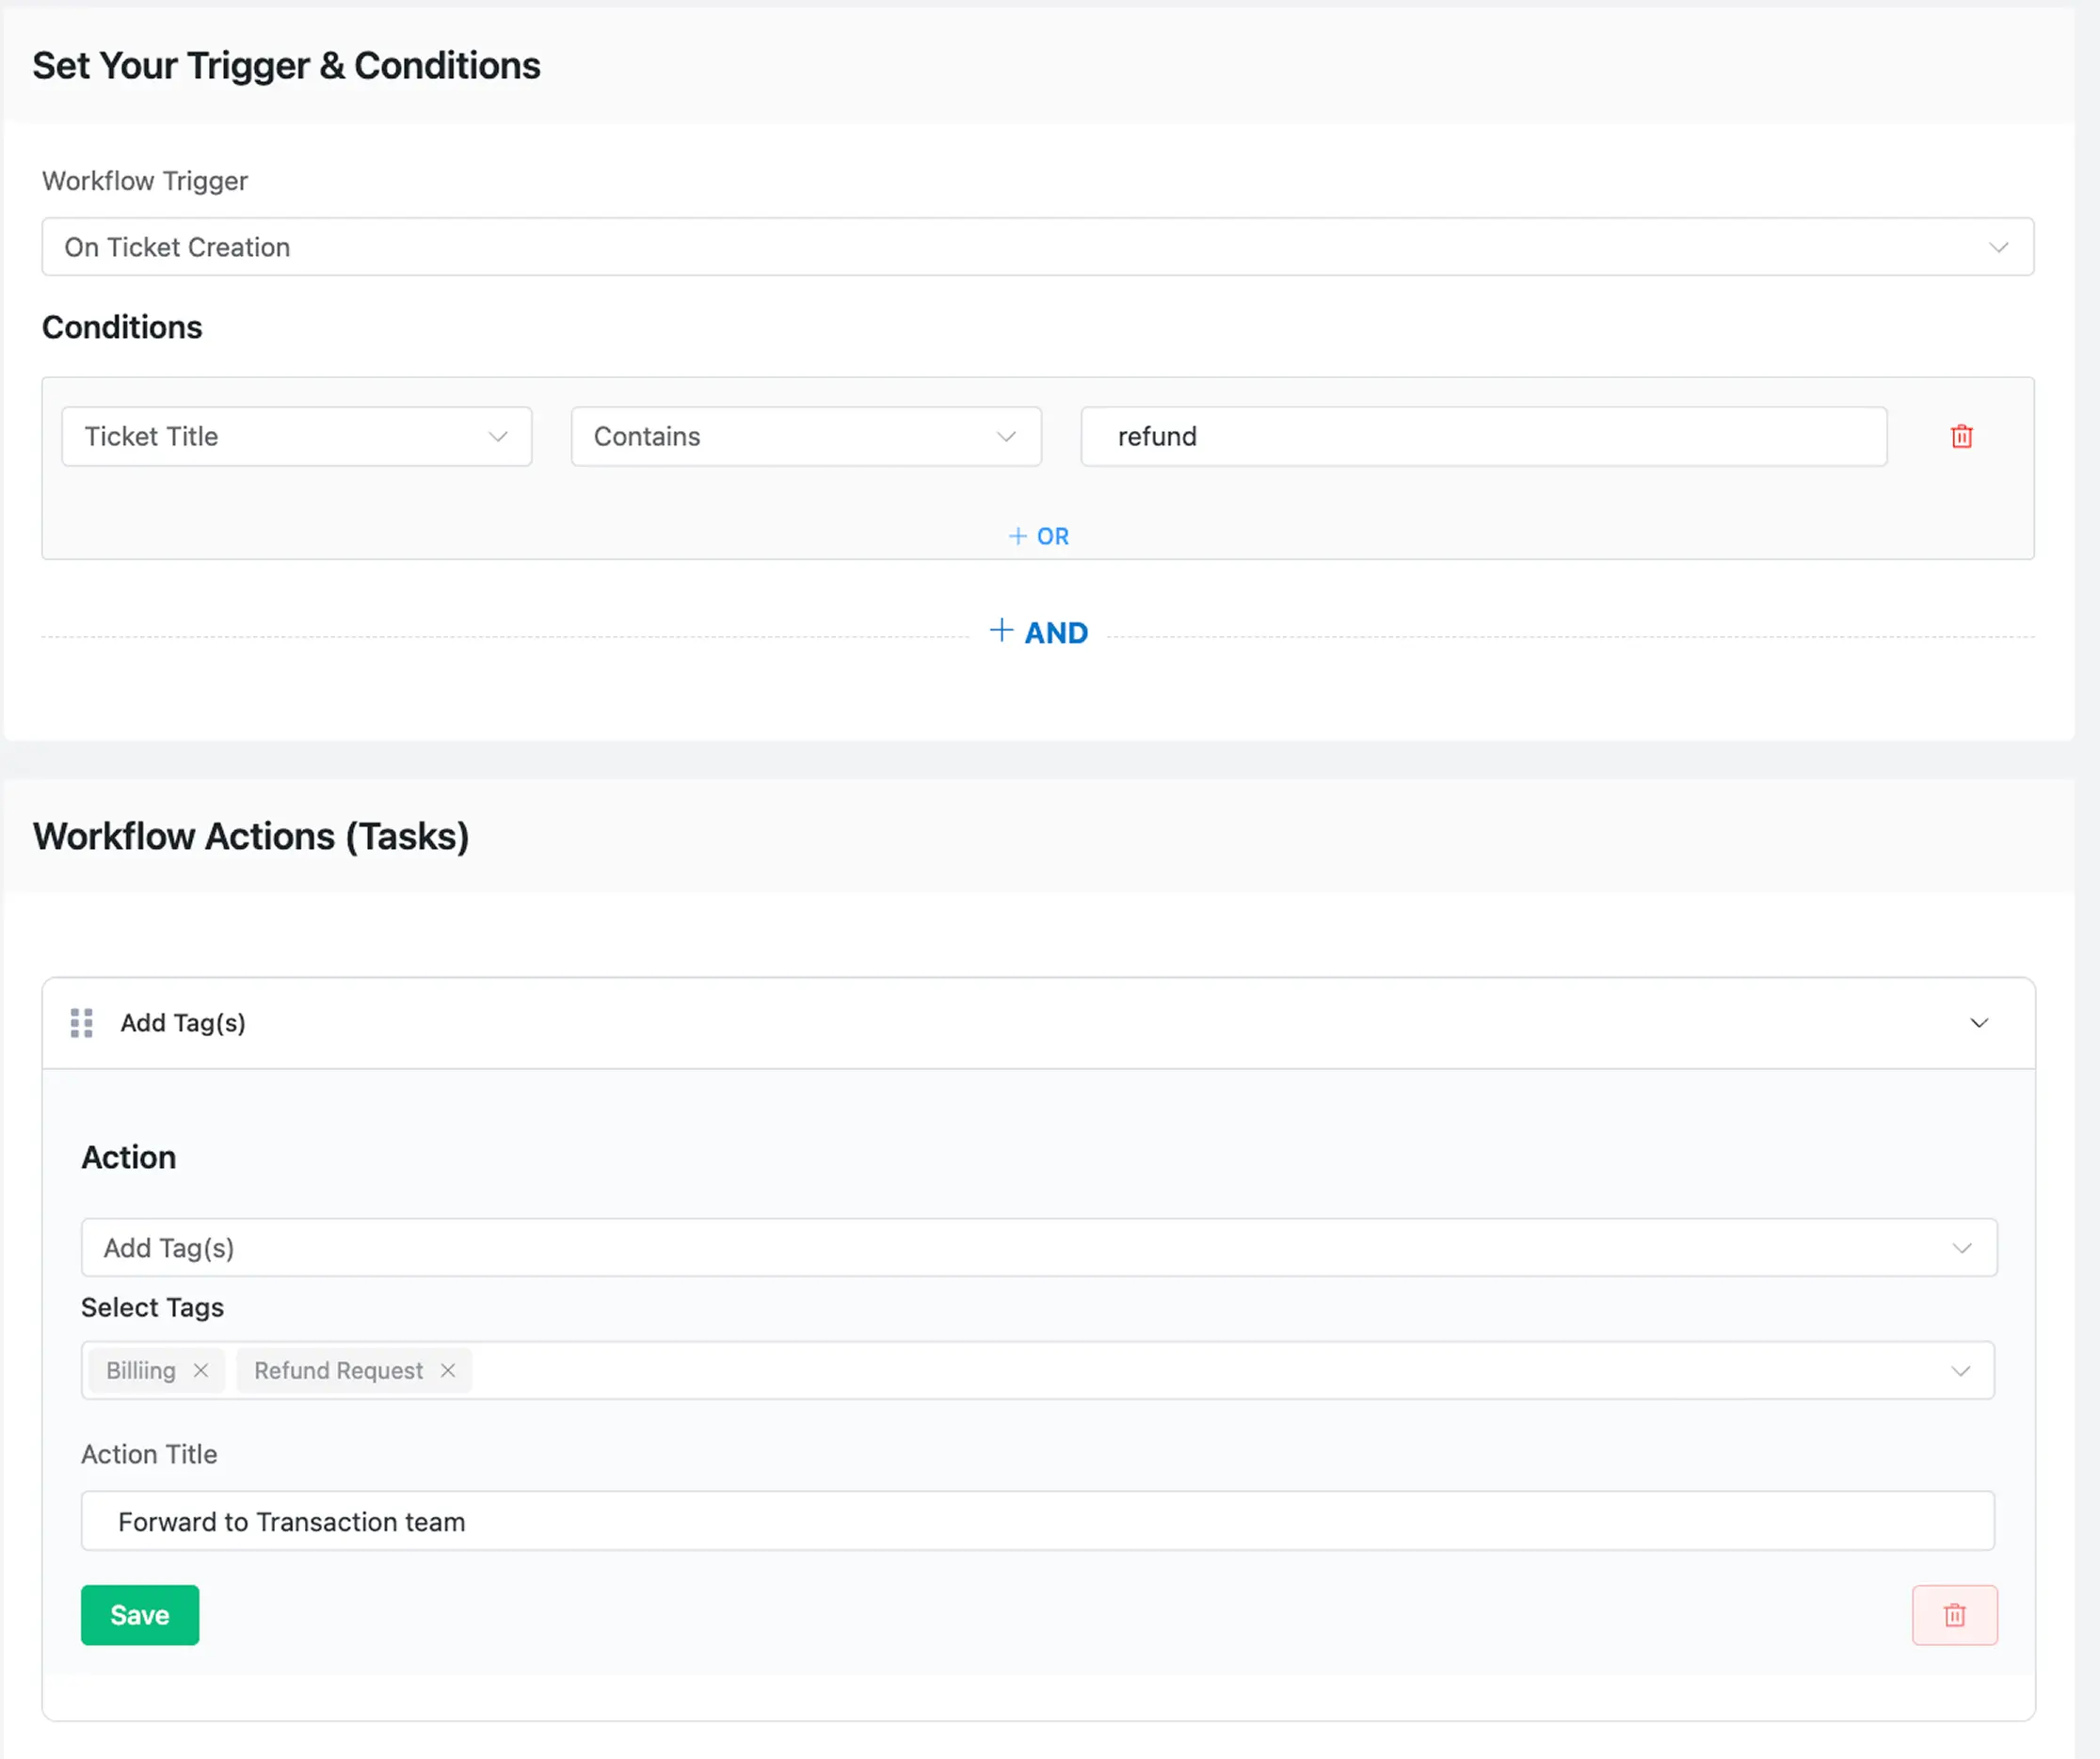
You can build workflows based on various conditions, such as message content, customer email, selected product, ticket title, and so on. Once a condition is met, the automation instantly applies the tags without any manual work.
Following the same way, you can also use automation to remove tags when needed.
For example, if a ticket status changes from “Pending” to “Resolved,” or you don’t need a specific tag, you can set a rule to remove the “Follow-up” tag automatically. This keeps your ticket data clean and up to date without manual work.
This saves your team time and keeps tagging consistent across every ticket. Tickets stay organized automatically, so your agents can focus on solving issues instead of sorting them.
Pro tip: Start with a few automation rules for your most common ticket types. You can always expand later as your tagging system grows stronger.
Sorting tickets using tags in Fluent Support
After setting up your tags and using them both manually and automatically, the next step is seeing them in action. This is where tags really start to shine by helping you filter and sort tickets faster than ever.
Go to your Tickets tab in Fluent Support. At the top of the ticket list, you’ll see multiple filtering options like Status, Inbox, Product, Support Staff, Tags, and others.
Since your goal is to work with tags, click on the Filter by Tags option. A dropdown will appear showing all the tags that have been applied to your tickets, both manually and automatically.

Now, select one or more tags you want to filter by. Instantly, Fluent Support will display all the tickets that match those tags.
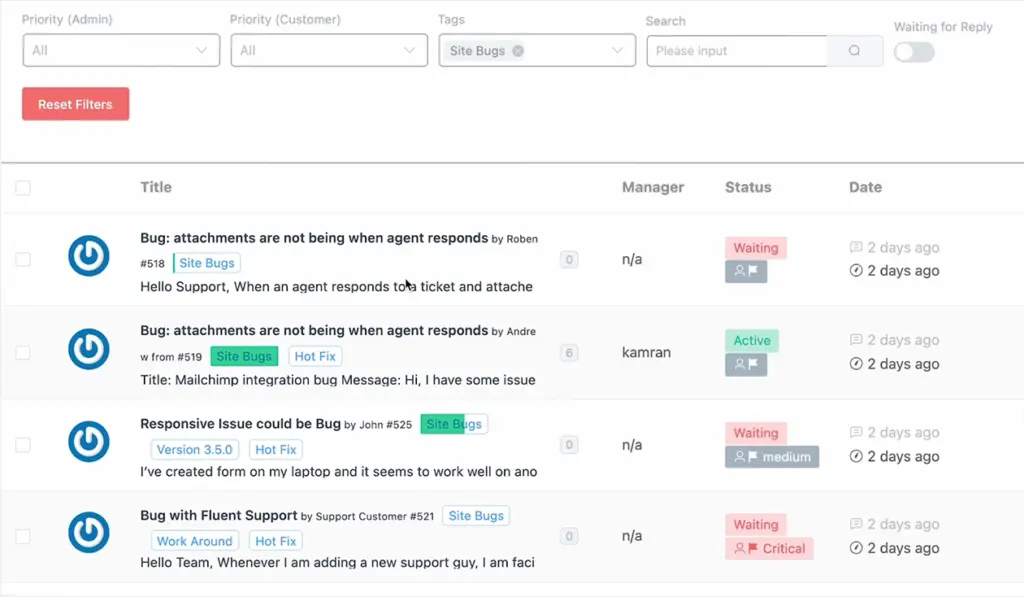
This view helps you focus on a specific group of tickets, whether they’re marked as “Billing,” “Bug,” or “VIP.” It’s perfect for prioritizing issues, tracking similar requests, or reviewing progress on a particular category of tickets.
Pro tip: Try grouping similar tags together, like “Billing” and “Refund Request,” when filtering your tickets. It helps you catch related issues in one view and makes tracking specific topics much easier.
Also, have a look at this embedded video so that you can know better about ticket tagging on Fluent Support we’ve discussed.
Manual vs automated tagging: which one should you use? (expert talk)
If you’ve worked in customer support long enough, you already know this: “not every ticket deserves the same approach”. The same goes for tagging. The smartest teams don’t pick one method over the other. They balance both to get speed, accuracy, and control.
Manual tagging gives you flexibility. It’s the method your agents will rely on when a ticket feels a little different or needs extra context. Maybe a customer’s tone hints at frustration, or the request doesn’t fit any usual pattern. That’s where human judgment still wins.
It’s also a solid choice for smaller teams that manage fewer tickets each day. In those cases, automation can feel unnecessary, and quick manual tagging works just fine.
But when ticket volume starts to climb, automation becomes your real timesaver. Automated tagging keeps things consistent and ensures every ticket lands with the right labels before an agent even opens it. That alone can shave minutes off every response.
It’s also how you keep workflows predictable. Routing, reporting, and prioritizing become easier because tags are already in place, and agents can jump straight into solving.
The truth is, great support teams don’t choose between manual and automated tagging. They make both work together. Automation handles the repetitive stuff. Manual tagging adds the context that automation can’t catch.
Pro tip: Let automation handle most of the tagging work for consistency and speed. Keep manual tagging for the special cases where agents need to make smart, context-based decisions.
Ticket tagging best practices
Tagging looks simple on the surface. But once your inbox starts filling up, you’ll realize that the real challenge isn’t adding tags, it’s managing them smartly. A messy tagging system can create more confusion than clarity, while a clean, structured one can make your support flow feel effortless.
Here’s how to keep your tagging system efficient, consistent, and easy to scale.
1. Start with a clear tagging plan
Every good tagging system starts with a plan. Decide what categories you truly need, such as “Billing,” “Bug,” “Feature Request,” or “VIP.”
When you plan your tags from the start, it keeps your team aligned and avoids confusion later. Everyone knows what each tag means and when to use it.
2. Keep your tag names short and clear
A tag should make sense instantly. Avoid long names that take effort to read or remember. For example, use payment_failed instead of customer_payment_did_not_go_through. Simple, short tags are easier to scan, search, and report on.
3. Avoid over-tagging your tickets
More tags don’t always mean better organization. Adding too many can make things harder to manage.
Stick to what’s essential. Around three to five tags per ticket usually works best and keeps your system clean.
4. Use automation to stay consistent
Manual tagging is great, but humans make mistakes. Automation doesn’t.
Set up workflows that automatically tag tickets based on conditions like message content, customer type, or selected product. That way, every ticket is tagged correctly before an agent even opens it.
5. Audit and clean up your tags regularly
As your business evolves, some tags will lose relevance. If you never revisit them, your list will grow messy fast.
Schedule regular reviews to remove duplicates, merge similar ones, and retire old tags. A clean tag list makes reporting sharper and saves your team from confusion.
6. Train your team on tag usage
Even the best tagging structure can fail if the team isn’t trained to use it properly. Make sure everyone understands the meaning and purpose of each tag.
A short internal guide or visual cheat sheet is often all you need to keep things consistent.
7. Combine tags to get deeper insights
Don’t just tag for sorting. Tag for insight. Pair tags like billing with VIP or bug with urgent to track meaningful patterns.
This helps you see which issues affect key customers most and gives your team context that goes beyond a simple label.
Real-world use cases of ticket tagging
Understanding ticket tagging in theory is helpful, but seeing how it works in real scenarios makes the idea truly click. In real-world support, tags are not just labels. They drive faster responses, better insights, and smoother workflows that scale with your business.
Let’s look at how different teams use ticket tagging to solve real problems and improve their overall support process.
1. SaaS support teams: Tagging for product visibility and faster fixes
SaaS teams often handle tickets covering multiple features, products, or bugs. Without tagging, everything lands in one giant, confusing inbox.
By tagging tickets based on feature, function, or bug type like dashboard_error, email_notification_bug, or API_integration, they instantly know which part of the product needs attention.
That helps them route tickets to the right engineer or product lead faster.
Tagging also helps them track feedback trends. For example, a tag like feature_request_analytics can show that users want better reporting tools. Over time, these patterns shape the product roadmap and guide future updates.
2. E-commerce support: Tagging to streamline order management
In e-commerce, speed and clarity matter the most. Customers want answers right away, especially when it’s about their orders or payments.
Tags like payment_failed, refund_request, order_not_received, or delivery_update help teams organize tickets by topic and route them to the right department. A refund-related tag might go to the billing team, while a shipping delay tag alerts the logistics team.
It also helps detect bigger issues. If refund_request tags suddenly spike after a new sale, it might signal a product quality or fulfillment problem worth looking into.
3. IT help desks: Tagging for incident management and SLA tracking
IT teams depend on clear priorities and deadlines. Tags help them manage incidents faster and ensure SLA targets are met on time.
A ticket tagged as critical_outage is handled differently from one tagged password_reset. Teams can filter by urgency, resolve high-priority tickets first, and even combine tags like network_issue and P1 to alert the right on-call engineer instantly.
Over time, these tags also help managers identify recurring issues. That insight helps with better planning, resource allocation, and even future training sessions.
4. Customer success teams: Personalizing support through segmentation
Not every customer needs the same level of support, and tags make sure each one gets what they need.
Tickets tagged as vip_client can go directly to senior agents for priority service, while ones tagged trial_user can trigger a follow-up with onboarding resources. A tag like renewal_risk this helps the team identify accounts that might need extra care before renewal time.
This kind of segmentation helps customer success teams strengthen relationships, reduce churn, and build long-term loyalty.
5. Product and strategy teams: Using tags as a feedback engine
Tags don’t just make customer service easier. They’re also a great way to collect real feedback at scale.
By tagging tickets with labels like feature_request, usability_feedback, or pricing_concern, companies can track what customers care about the most. If integration_request tags start showing up more often, that’s a clear sign users want better platform connections.
These insights help every team focus on what customers value most and turn that into better products and experiences.
Quick takeaway:
Smart teams treat tagging as more than just a way to organize tickets. They use it to bridge support with every other department, from product to marketing. That’s how tagging evolves from a basic system tool into a real driver of growth and collaboration.
Wrapping up
By now, you know exactly what ticket tagging is, why it matters, and how to use it effectively. You’ve learned how to create tags, apply them manually or automatically, and use them to filter and manage tickets faster.
All of this comes together to make your support process more organized and efficient. Ticket tagging might look simple at first, but when used right, it brings structure, speed, and insight to every part of your workflow.
Start small, stay consistent, and keep refining your tags as your support system grows. The smoother your tagging gets, the better your entire customer experience becomes.
Lastly, thanks for your time reading the blog.
Start off with a powerful ticketing system that delivers smooth collaboration right out of the box.
Related Articles
Someone Else’s Cloud Broke Your Customer Support Again
Your customers don’t know AWS failed. They just…9 Best AI Agent Builders You Need to Try in 2026
Here are the best 9 AI agent builders:…


Leave a Reply