“Tickets” allows you to view and manage all ticket entries in Fluent Support. Also, you can have some specific user summary & customer info in one place. This article will help you to learn about the overview of this “Tickets” feature.
Tickets #
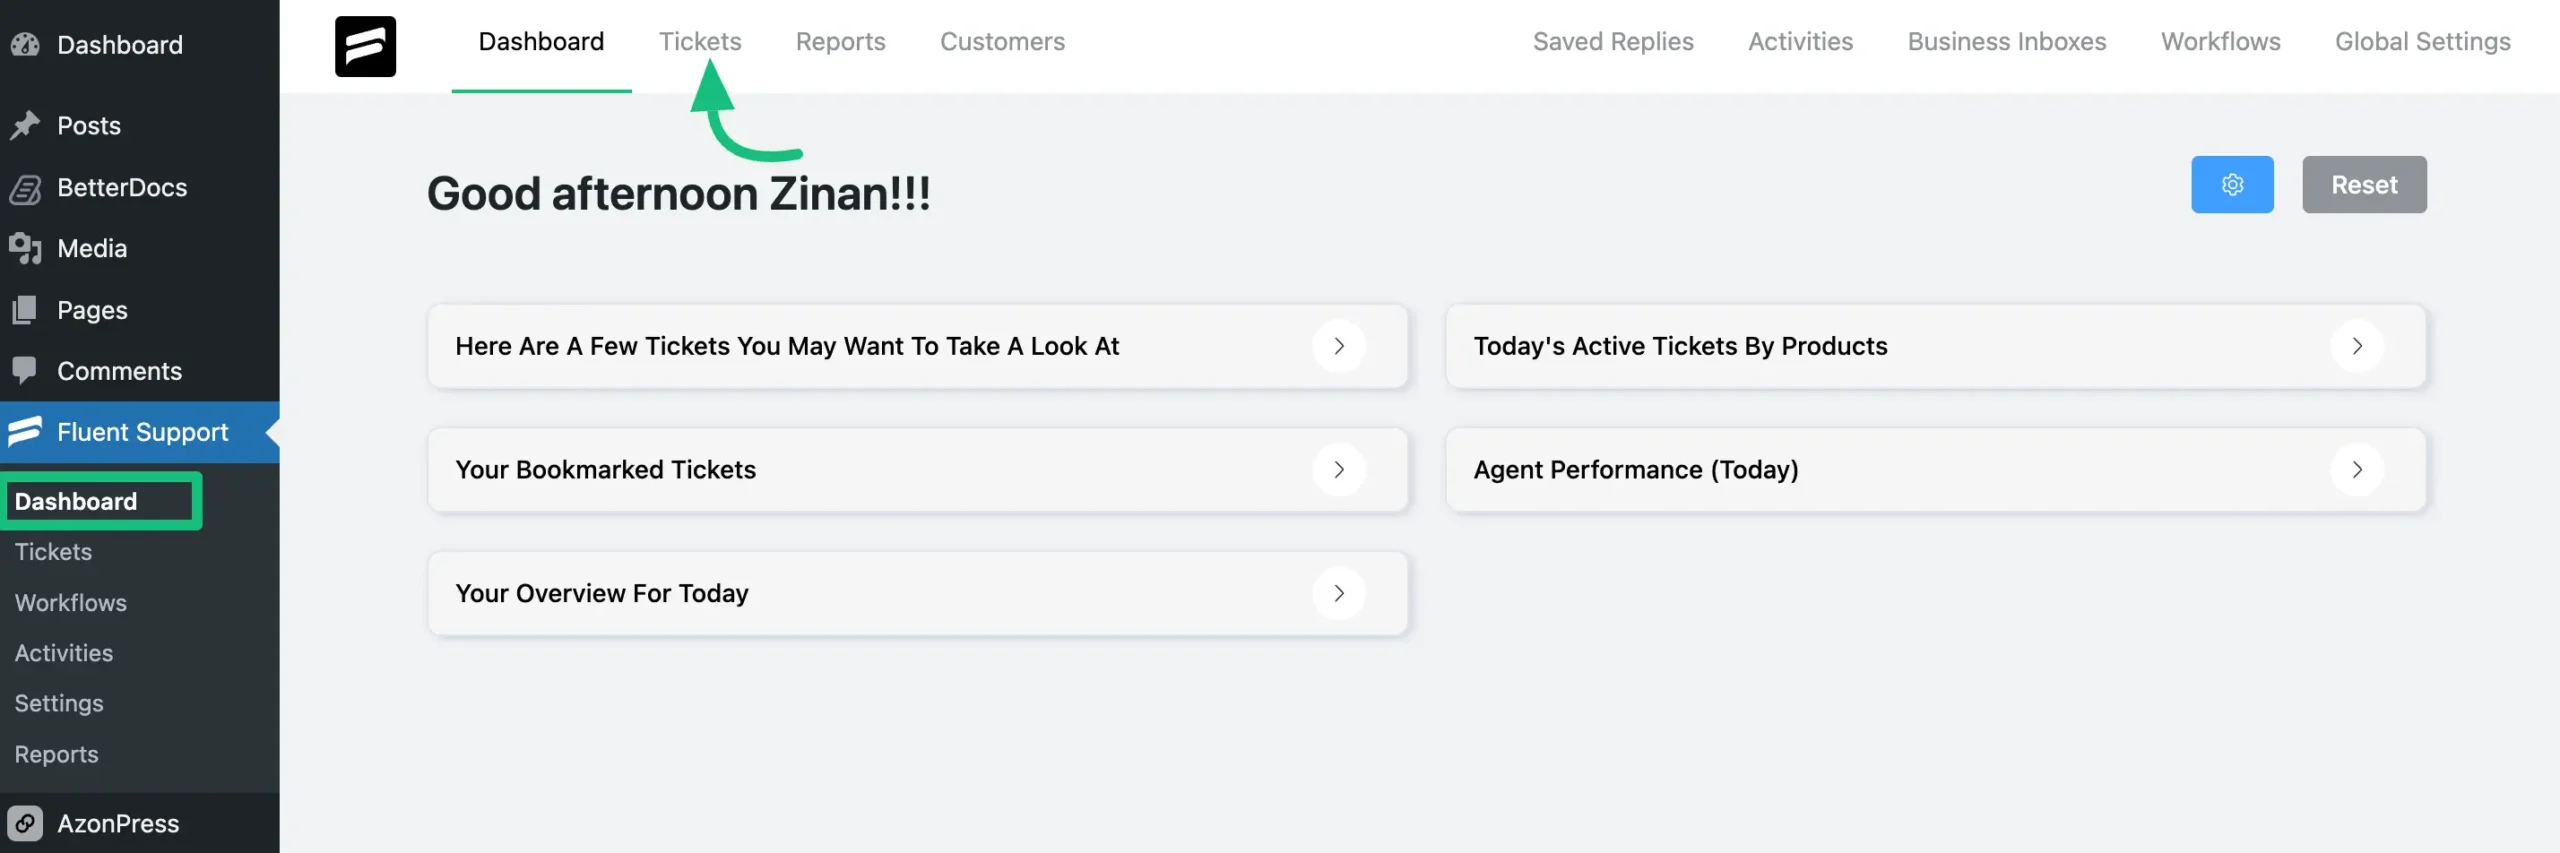
To learn where you can easily View Tickets using Fluent Support, follow the steps with the screenshots below —
Go to your Fluent Support Dashboard & click on Tickets.
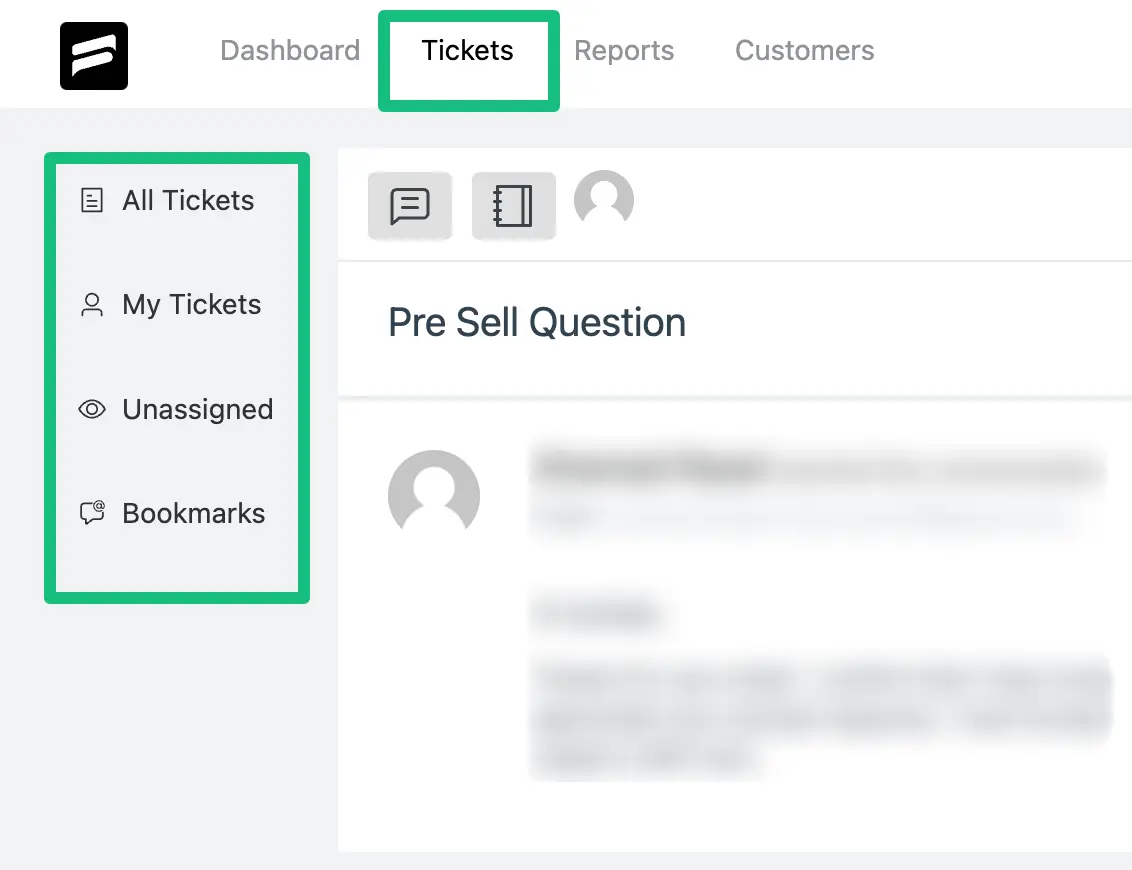
After going to “Tickets” you will find another four Sections to view and manage your overall tickets. These are —
- All Tickets: You will find every ticket here that you can easily view.
- My Tickets: You will only see the tickets that are assigned to you i.e., one specific agent.
- Unassigned: You will find tickets that are not assigned to any agents.
- Bookmarks: All the bookmarked tickets will be stored in this section.
Settings Inside A Specific Ticket #
To learn about all settings inside a specific ticket, follow the guidelines below —
Click on the preferred ticket from the list of tickets, and then the individual ticket page will open up, displaying the ticket entries along with all the customer data.
Settings Located On The Left-Hand Side Of A Ticket #
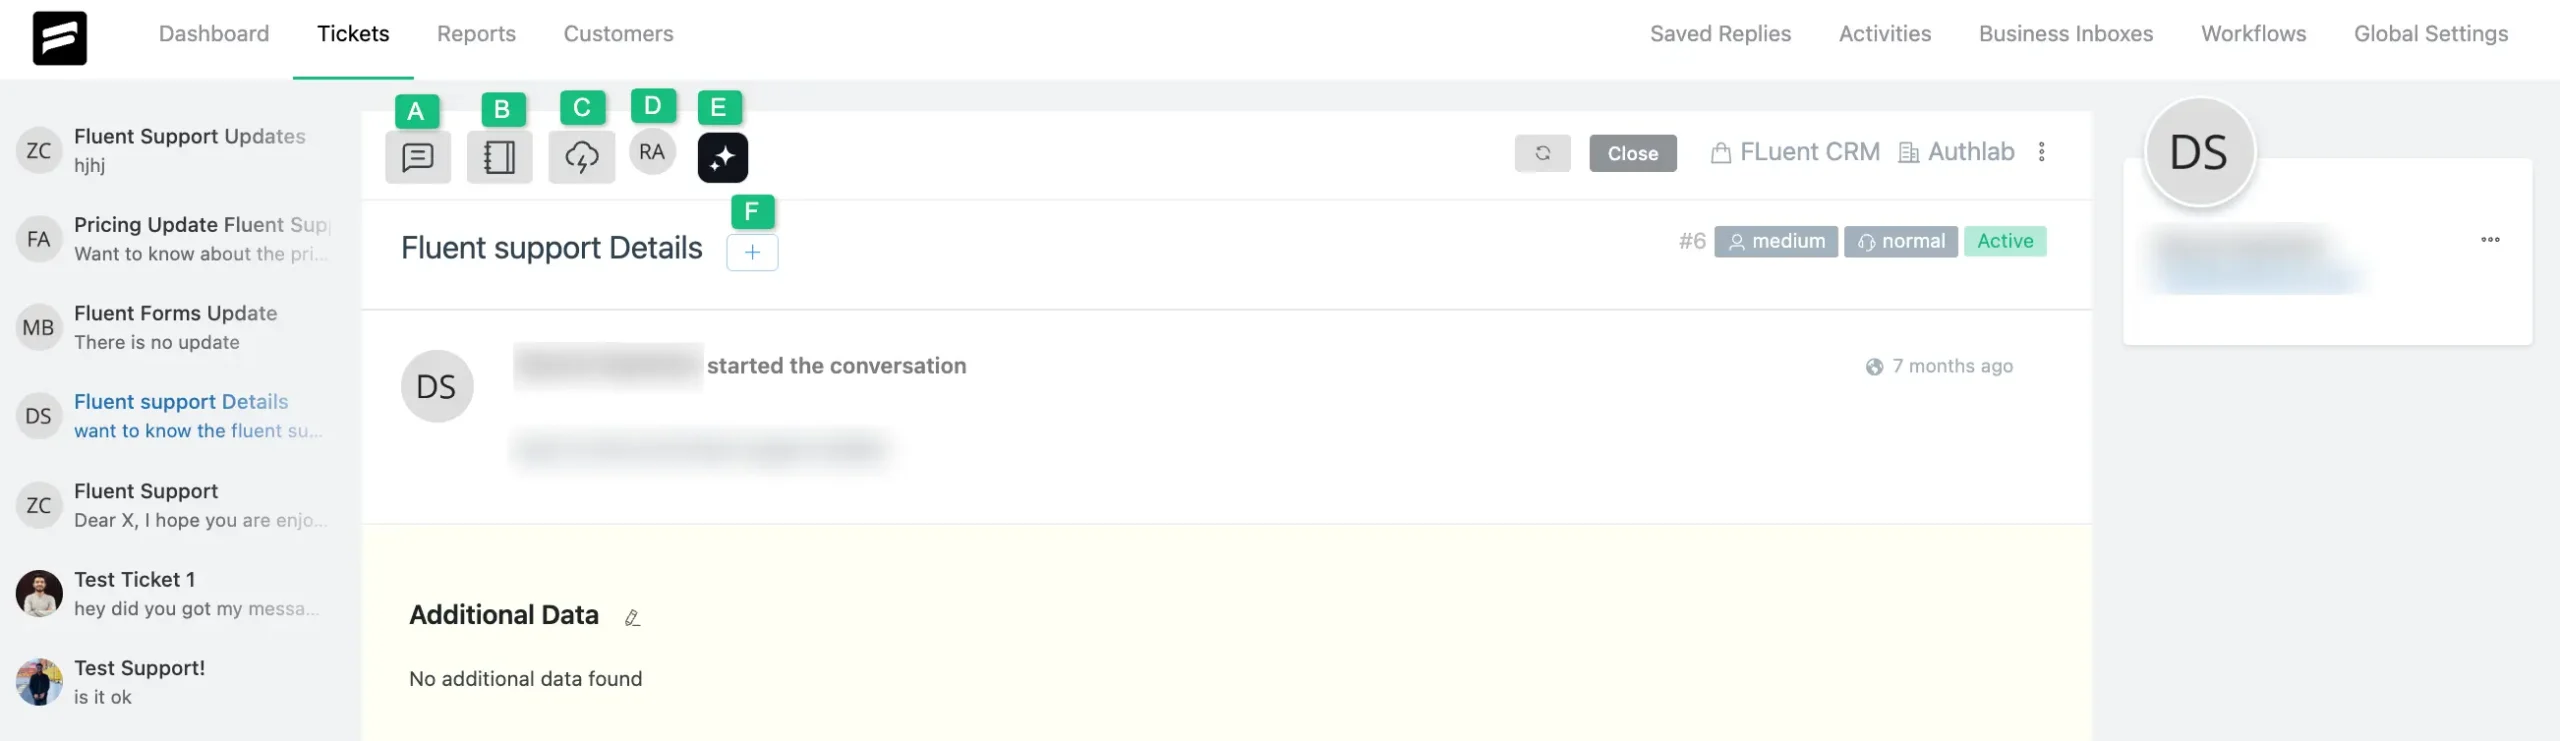
A brief explanation of the settings shown in the screenshot above is given below —
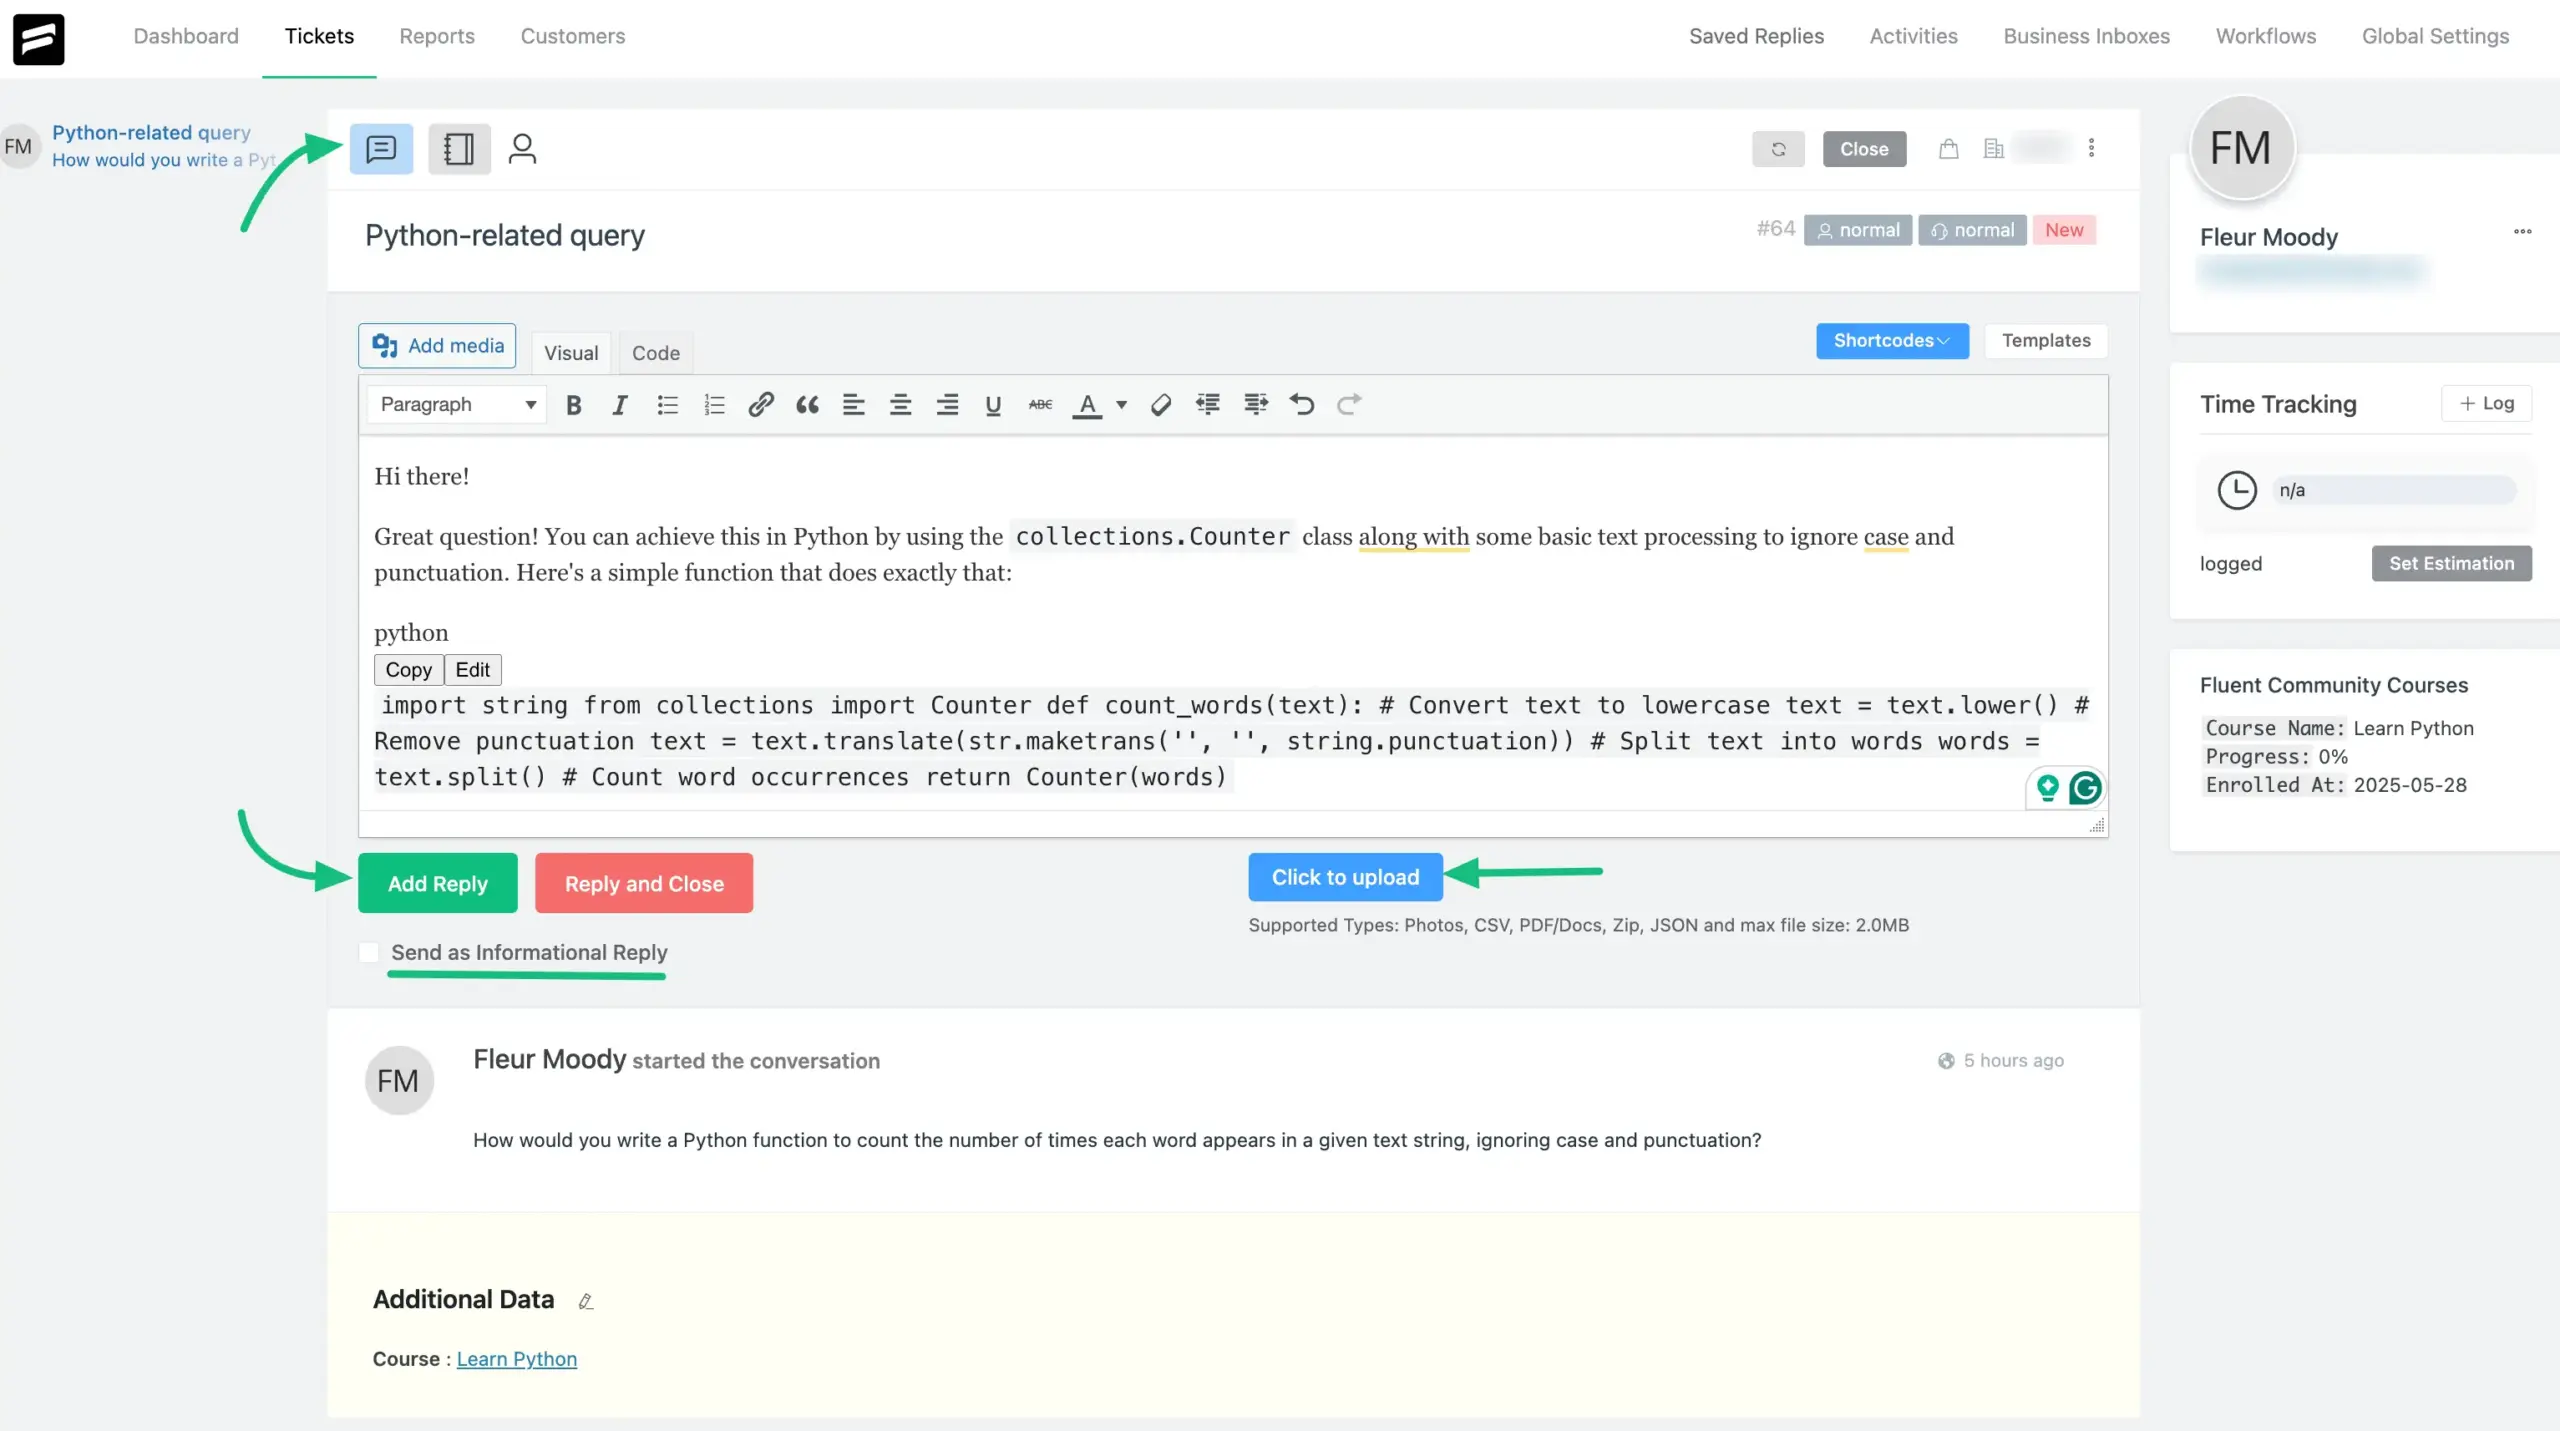
A) Reply: This allows you to provide the Reply/Replies to your ticket. To reply to a ticket, use the “Chat Icon” to open the text editor. You can format your response in bold and italic. You can attach Links.
You can add media with the “Add Media” option or click the Click to Upload to upload any file externally.
Or, you can directly Paste/Attach any copied files by typing “Command+V” (for MAC) or “Ctrl+V” (for Windows) on your keyboard.
Send as Informational Reply: This option lets you respond to a ticket without changing its status. It’s used to share updates or general info, and by selecting this option, your ticket will still remain in the “Waiting” timestamp.
Once you are done, click the “Add Reply” or “Reply and Close” to finish and reply to the ticket.
B) Internal Note: This lets you keep notes internally for better responses. Click the “Notebook Icon” at the top to add notes about your users for better ticket management. Only Support Agents can see the notes. To learn more about Internal Notes, click here.
C) This icon allows you to run Automatic Workflows you have created.
D) This “👤” setting allows you to change the agent assigned to this ticket at any moment.
E) This is an “AI Assistant” icon that will give you two options for summarizing an entire ticket conversation including their satisfaction status level
F) This “+” icon can help you categorize the tickets and assign certain tags to mark any tickets.
Settings Located On The Right-Hand Side Of A Ticket #
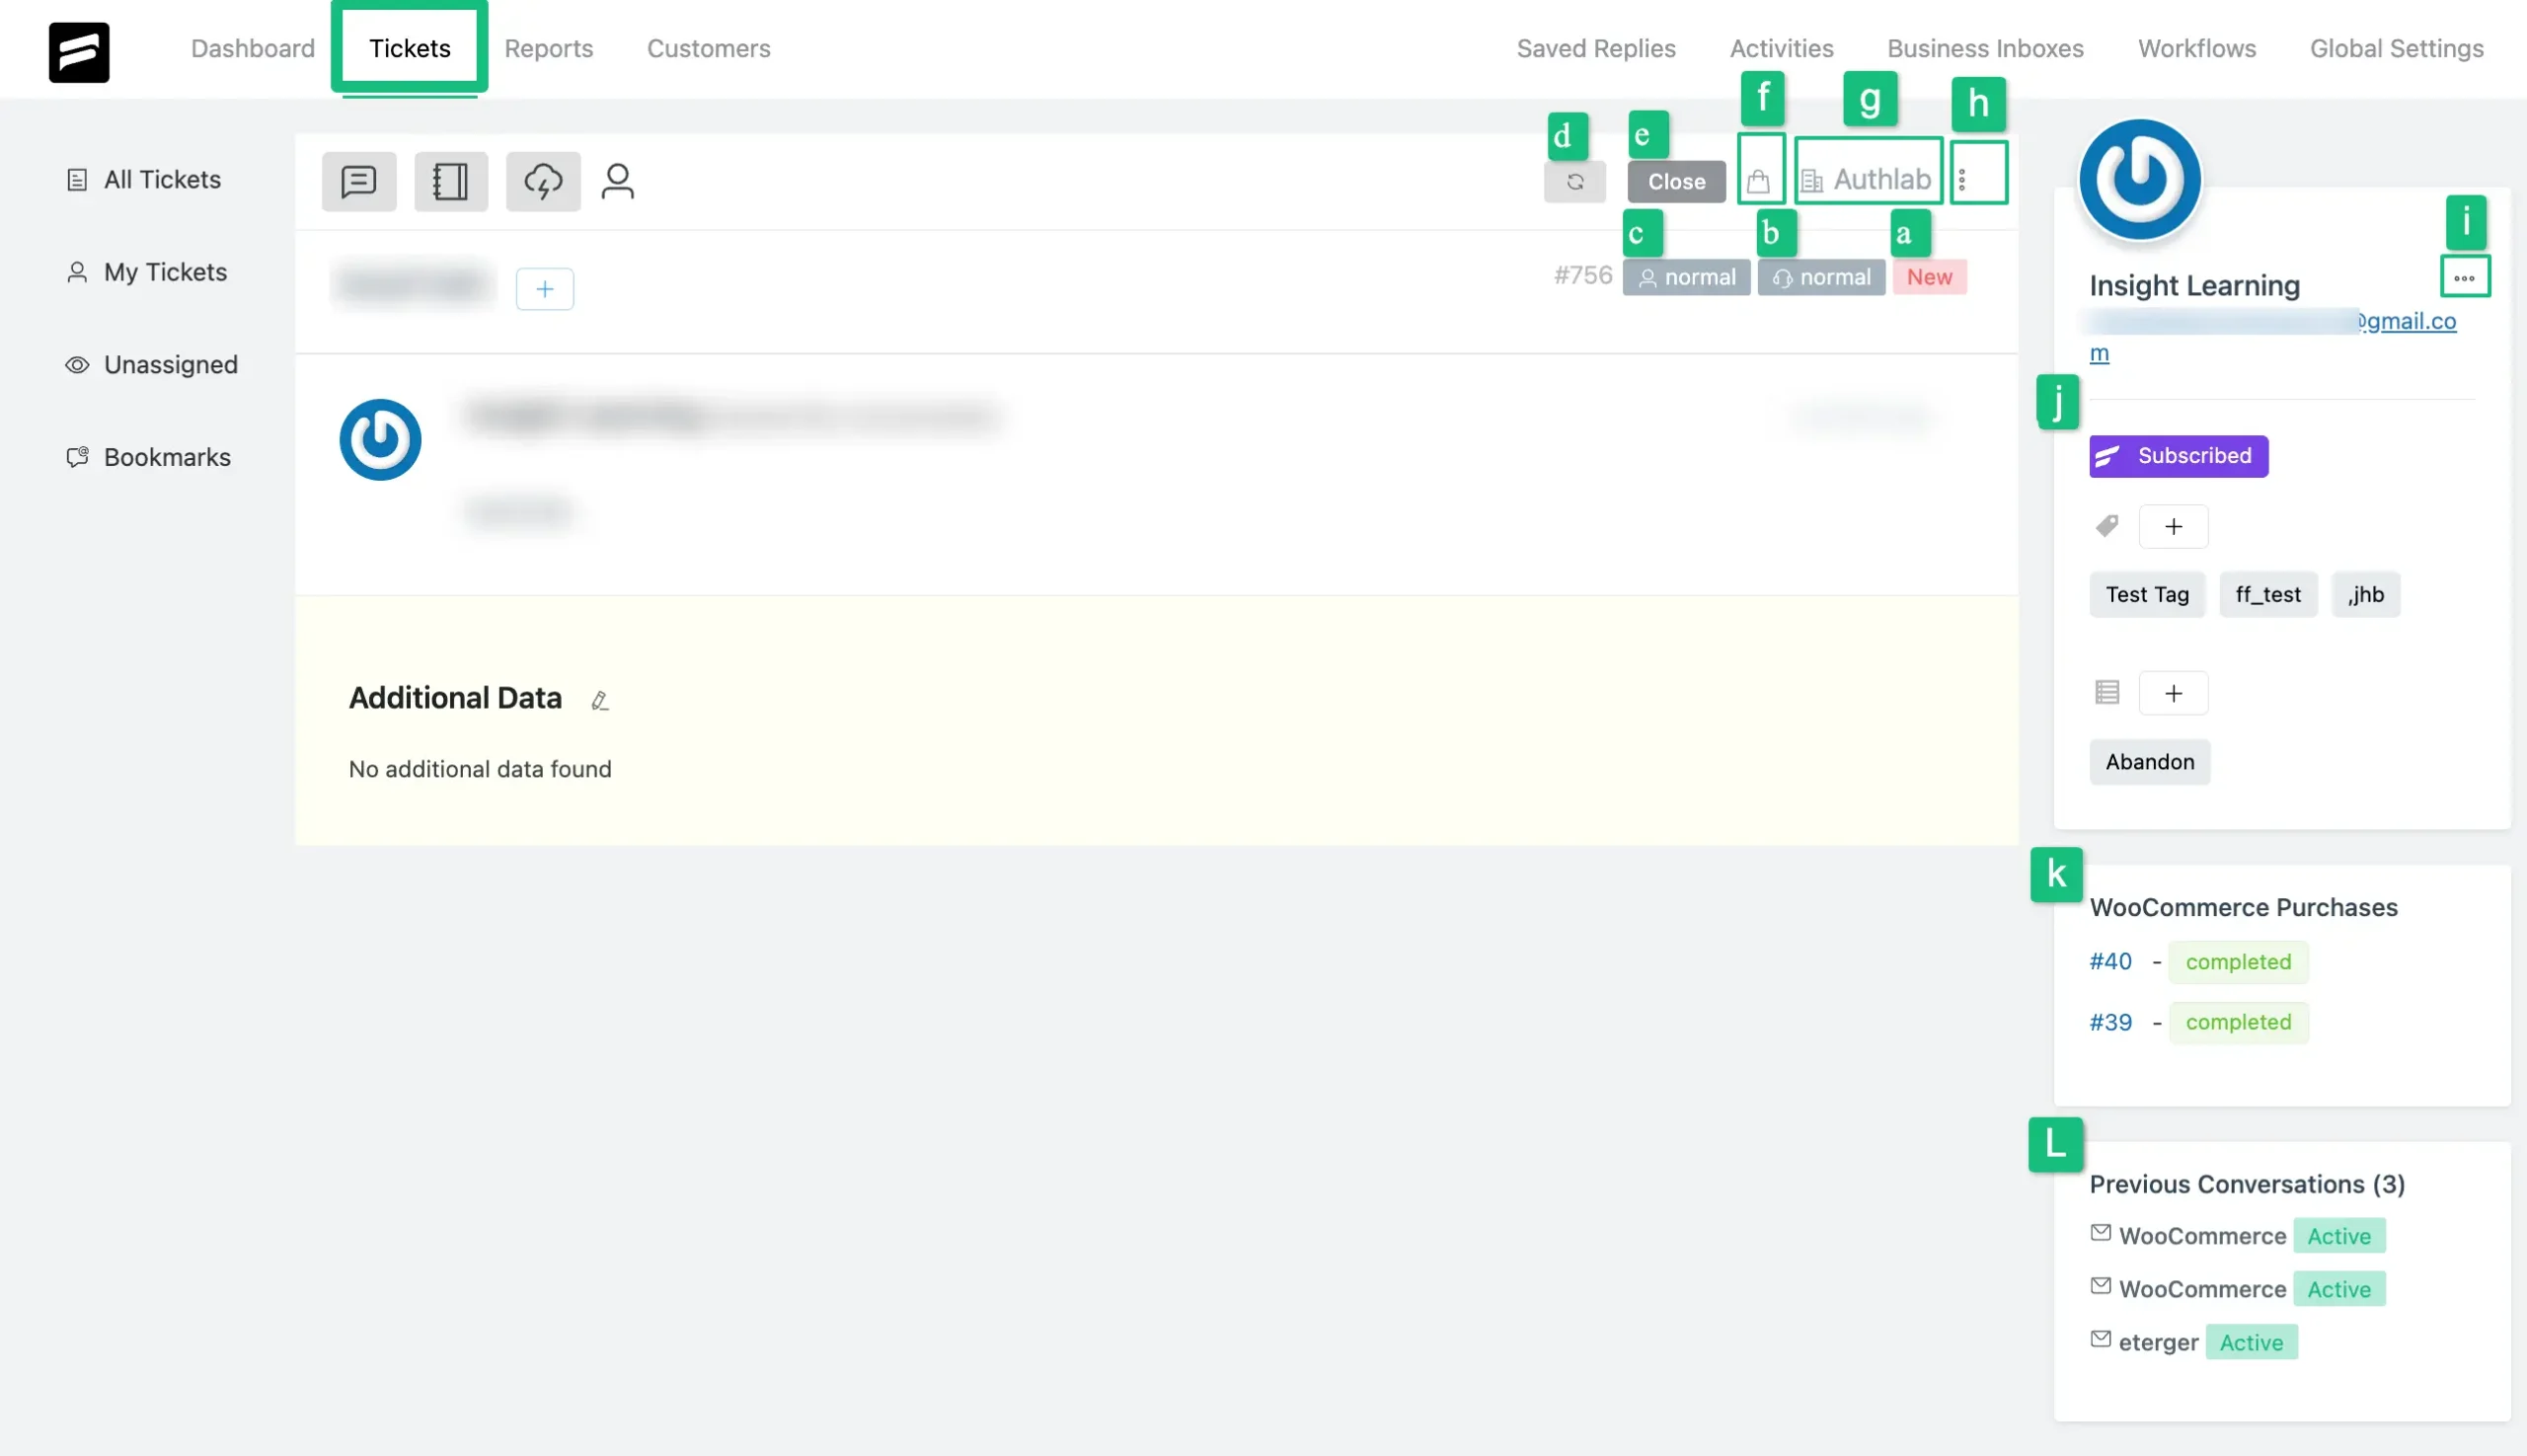
A brief explanation of the settings shown in the screenshot above is given below —
- a ) This displays the current Status of your ticket, which can be either Active, New, or Closed.
- b ) This shows your ticket’s priority level (Normal, Medium, Critical), which the support agent sets.
- c ) This also shows your ticket’s priority level (Normal, Medium, Critical), which the customer/client sets.
- d ) This “Refresh Icon” lets you update ticket entries with the latest information.
- e ) This “Close” button lets you close an active or open ticket.
- f ) This allows you to sort your tickets based on the product associated with your ticket.
- g ) This allows you to sort your tickets based on the Business Inbox associated with your ticket.
- h ) This allows you to Merge/Bookmark/Close tickets silently/Delete your ticket.
- i ) This allows you to update/change the basic information of your customer profile. Also, using this setting, you can block the customer profile if you want
- j ) In this section, you can view the customer profile, which includes the customer’s name, email, subscription status, user ID, overall ticket statistics, and FluentCRM data.
- k ) This section shows all the data related to the Integrations. For instance, if a user is a Woocommerce customer, their Woocommerce purchase ID will also be displayed here. Similarly, any LMS or membership integrations will show the related data here.
- L ) This section shows all the Previous Conversations with the customers.
If you have any further questions, concerns, or suggestions, please do not hesitate to contact our @support team. Thank you.


