In Fluent Support, you can easily Filter, Sort, and Search through your tickets, which makes it easier for you to find any tickets, and arrange the tickets in any order that is convenient for you. This article will guide you through the process of Filtering, Sorting, And Searching Tickets.
Filtering, Sorting, And Searching Tickets #
To learn how to Filtering, Sorting, And Searching Tickets, follow the steps with the screenshots below —
Go to your Fluent Support Dashboard & click on Tickets.

After going to “Tickets” you will find various options for filtering and sorting your tickets.
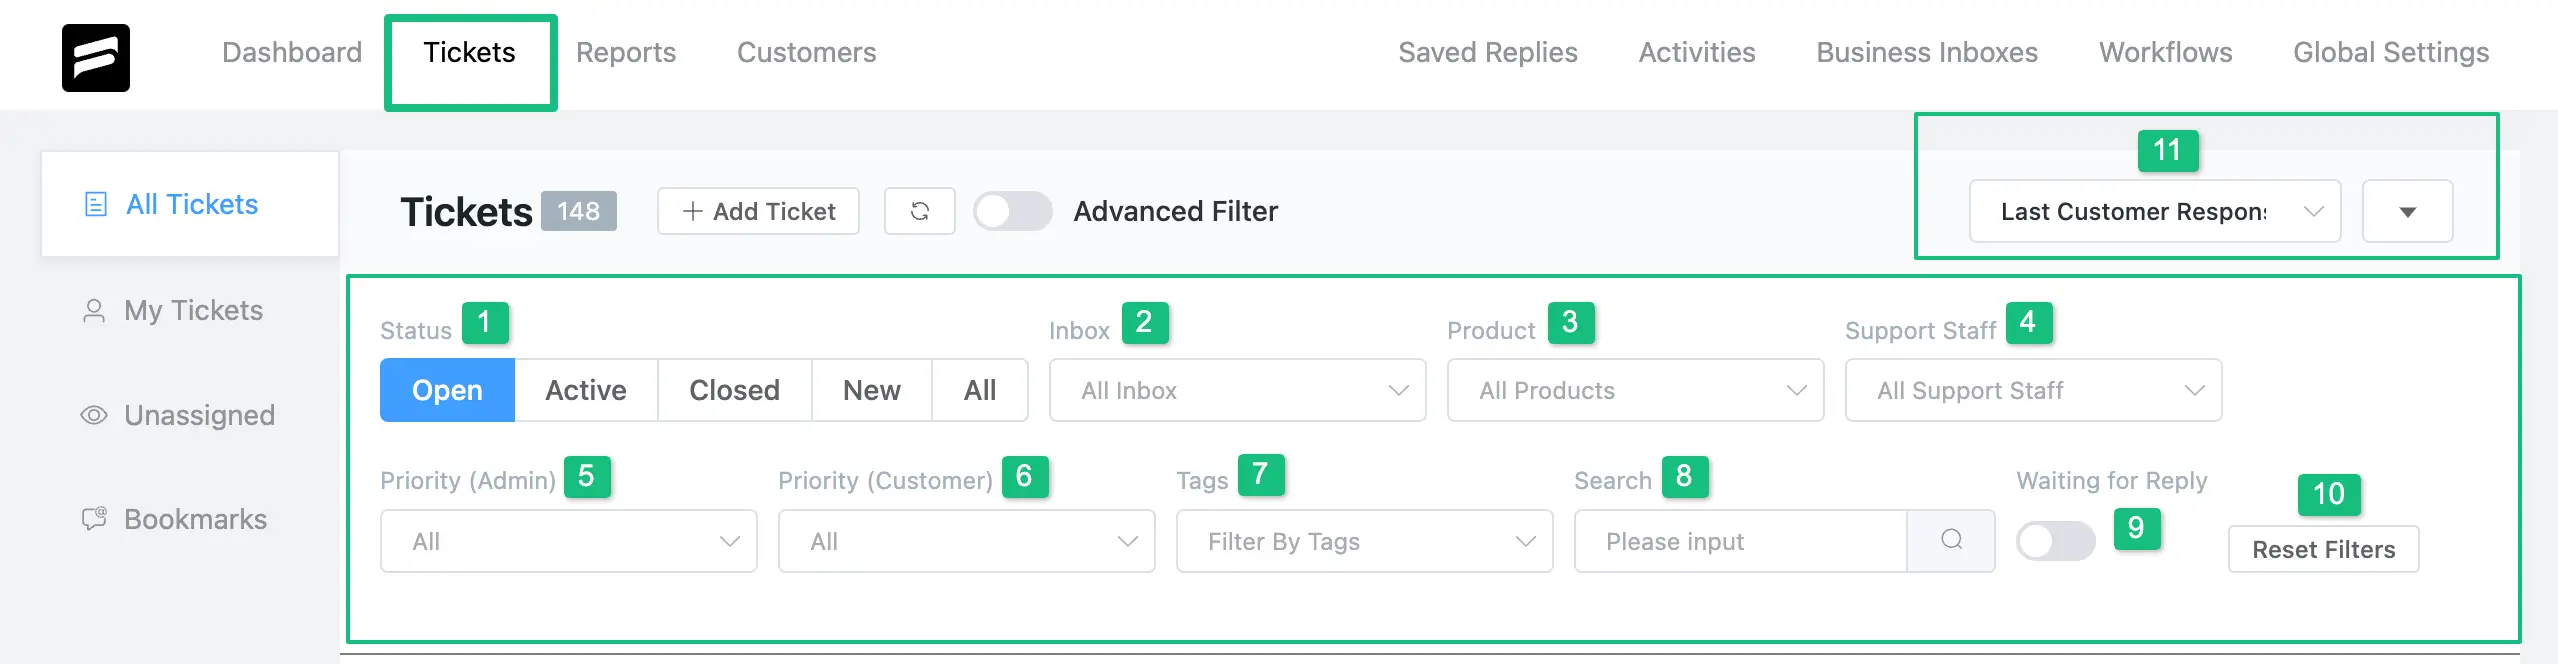
A brief explanation of the settings shown in the screenshot above is given below —
1. Status #
The Ticket status displays the current state of the tickets, indicating whether a ticket is resolved or not. The status updates automatically e.g., if an agent closes a ticket, the status will be marked as Closed. Similarly, a new ticket will have the status New. All the available statuses are – Open, Active, Closed, New, and All.
Custom Ticket Status
Fluent Support allows adding custom ticket statuses to the dashboard using Fluent Support’s Filterhook feature. This feature helps support teams prioritize tickets effectively and manage their workload by sorting them based on custom status.
To create a Custom Status, go to functions.php & add the code given below which you can also customize according to your requirements —
add_filter(‘fluent_support/ticket_status_groups’, function($statuses){

$statuses[‘unread’] = [‘Unread’];

return $statuses;

});
2. Inbox #
This filter allows you to filter the tickets based on your Business Inboxes. If you have multiple business inboxes, then you can filter those from here.
3. Product #
This option lets you filter the tickets based on the type of Products. By clicking on the dropdown, you can choose your preferred product. Then, a list of tickets will appear with the particular assigned product.
Active Tickets for Products
Now, you’ll also be able to identify which products generate the most tickets and manage agents. and you can do this with the help of Active status. To do this, go to the All tickets → Active button & search for your desired Product in the Product field.
4. Support Staff #
Using the Support Staff setting, you can filter the tickets depending on the Support Agent i.e., only those tickets will appear which are assigned to a particular agent.
5. Priority(Admin) #
This setting allows you to filter the tickets based on the priority set by the admin/support agent. There are three levels of priority available: Normal, Medium & Critical. Remember, that the tickets will be filtered here by the priority level set by the Admin.
6. Priority (Customer) #
This setting allows you to filter the tickets based on the priority set by the customer. There are three levels of priority available: Normal, Medium & Critical. The tickets will be filtered here by the priority level set by the Customer.
7. Tags #
This option allows you to filter the ticket based on the tags. By clicking on the dropdown, select your preferred tag. Then, a list of tickets will appear with the particular tag assigned.
8. Search #
This setting allows you to easily search for a ticket by typing a relevant keyword. But, if you want to search more precisely, you need to use some specific parameters before the search term.
Here is a list of available search parameters –
- Title: Search any tickets based on the ticket title.
- Content: Search any tickets based on the ticket content.
- Id: Search any tickets based on the Ticket ID.
- Customer_id: Search for any tickets using the customer ID. To do this, enter the customer ID in the following format: example: customer_ID: 29. This will display a list of tickets opened by that specific customer.
9. Waiting for Reply #
You can turn on this option to view the tickets that are currently waiting for a reply. If a customer opens a new ticket or replies to a particular ticket, then it will show up when filtering using this option.
10. Reset Filters #
The Reset Filters button allows you to set the tickets filter to its initial state again. All the filters you apply will be removed, and the filtering will return to the default state.
11. Sorting Tickets #
Fluent Support also allows you to Sort the tickets with its default sorting options. Here, you can view tickets based on the categories available.
Given below are the current categories by which you can sort the tickets –
- Ticket ID
- Product ID
- Priority
- Client Priority
- Title
- Last Agent Response
- Last Customer Response
- Waiting Time
- Response Count
- Created At
If you have any further questions, concerns, or suggestions, please do not hesitate to contact our @support team. Thank you.


