Skip to content

Better support, fewer sighs. Grab a flat 20% discount on Fluent Support

Fluent Support logo
  • FeaturesExpand
    • FluentSupport All feature Menu iconFluentSupport All feature Menu icon

      All Features

      Explore the full Fluent Support features list

      • Ticketing
      • Setting Up & Migration
      • Business
      • Agents
      • Power Usage
      1

      AI-Powered

      Fluent Support + OpenAI = Faster replies, polished tone, better conversations

      AI-Powered
      2

      Automation

      Automate support tasks with triggers, conditions, and predefined actions.

      Automation
      3

      Migration

      Migrate your helpdesk data to Fluent Support quickly, safely, and with total ease.

      Migration

      Power user

      • Rest API
      • Incoming Webhook
      • Outgoing Webhook
      • Classes
      • Devs Documentation
      • Reports & Analytics

      WPManageNinja

      Contact Us

      Support

      Current Deal

  • IntegrationsExpand
    • integration mega

      All Integrations

      Unlock Fluent Support’s full potential with LMS, CRM, eCommerce integrations, and more.

      Fluent Suite Integration

      Fluent Forms The Fastest WordPress Form Builder

      The Fastest WordPress Form Builder

      FluentCRM Marketing Automation For WordPress

      Marketing Automation For WordPress

      FluentCommunity Fastest WordPress Community Plugin

      Fastest WordPress Community Plugin

      Paymattic WordPress Payments and Donations Made Simple

      WordPress payment and donation plugin

      FluentBoards Simplest WordPress Project Management Plugin

      Simplest WordPress Project Management Plugin

      FluentSMTP The Smartest WordPress SMTP Plugin

      Smart, Secure & Free Email Delivery for WordPress

      FluentCart A New Era of eCommerce with WordPress

      A New Era of eCommerce with WordPress (Coming Soon)

      COMMUNICATION APPS

      WhatsApp

      Telegram
      Slack

      Discord

      Third-party Automation

      n8n

      ZohoFlow
      SureTriggers
      See All

      WPManageNinja

      Contact Us

      Support

      Current Deal

  • Pricing
  • ResourcesExpand
    • Learn & Progress

      Blogs icon mega menuBlogs icon mega menu

      Blogs

      Find helpful tips in Fluent Support’s comprehensive blog posts.

      What's New
      Women In SupportWomen In Support

      Women in Support

      Build Support teamBuild Support team

      Build Support Team

      Top IT HelpdeskTop IT Helpdesk

      Top IT Helpdesk

      Comic:FlashBackComic:FlashBack

      Comic: Flashback

      change logchange log

      Change log

      get inspired

      Customer Support

      Learn support tips and tools to boost satisfaction and build long-term customer relationships.

      Comparison

      Make smart choices with guides. Compare WordPress plugins, themes, tools, and more side by side.

      Small Business

      Learn to shape your business for success with budget-friendly tools, tips, and growth hacks.

      E-commerce

      Get eCommerce insights to optimize your store, boost sales, and improve user experience.

      CRM

      Use CRM insights to connect with customers through personalization, data, and smart tools.

      Statistics

      Discover support statistics that help enhance your customer service and decision-making.

      Documentation

      Detailed documentation to set up, customize, and get the most out of Fluent Support.

      Customer’s Story

      See how our customers achieve more with Fluent Support


      WPManageNinja

      Contact Us

      Support

      Current Deal

  • Pricing Calculator
  • Account
Buy Now

Better support, fewer sighs. Grab a flat 20% discount on Fluent Support

Fluent Support logo

Getting Started

  • How to Install & Activate Fluent Support
  • How to Install & Activate Fluent Support PRO
  • Deactivate Or Delete the Fluent Support

Business Management

  • Create Business Inbox Initially
  • Adding Multiple Business Inboxes
  • Creating Products to Categorize Tickets
  • Setup Customer Support Portal With Global Settings
  • Adding Support Staff/Agents
  • View & Manage Ticket Entries
  • File Attachment Regulations
  • Permission Management for Agents
  • Adding a Custom Ticket Submission Form
  • Ticket Form Customization
  • File Upload Integrations
  • Web-Based Settings In Business Inbox
  • Web and Email-Based Settings In Business Inbox
  • Customer Support Portal Dashboard

Productivity

  • Ticket Tags (Custom Tags)
  • Saved (Templated) Replies
  • Filtering, Sorting & Searching Tickets
  • Agent Specific Tickets (My Tickets)
  • Internal Notes
  • Bulk Action in Tickets
  • Creating A Ticket On Behalf Of The Customer
  • Custom Fields
  • Outgoing Webhook
  • Merge Tickets
  • Bookmark Tickets
  • Shortcodes
  • Split Reply in New Tickets
  • Frontend Agent Portal
  • Automatic Ticket Closing
  • Close Ticket Silently
  • Advanced Filter Fluent Support
  • Add More Attachments Type
  • Add and Customize Customer Portal using Gutenberg Block
  • Advanced Filter Save Search Feature
  • Agent Time Tracking
  • Navigate With the Keyboard Shortcut 

Activities & Reports

  • Dashboard Overview
  • Reports and Stats
  • Overall Activities
  • Dynamic Dashboard

Ticket Importer

  • Ticket Importer
  • HelpScout Ticket Migrator
  • Freshdesk (Freshworks) Ticket Migrator
  • Zendesk Ticket Migrator

Email Management

  • Managing Email Notifications
  • Auto-forward From Google Workspace (G Suite) to FluentSupport
  • Email Piping For Email-Based Support Tickets
  • Forward From Microsoft 365 Outlook Web Access (OWA)
  • Change Amazon Lambda Cloud Processing Service for Email Piping

Workflow/Automation

  • Workflows & Automations
  • Manual Workflow
  • Automatic Workflow

Ticket Management using Third Parties

  • Managing Tickets Using Slack
  • Managing Tickets using Telegram
  • Managing Tickets Using Discord
  • Managing Tickets Using WhatsApp

Integrations

  • FluentCRM Integration
  • Easy Digital Downloads (EDD) Integration
  • LifterLMS Integration
  • LearnDash Integration
  • WooCommerce Integration
  • TutorLMS Integration
  • BuddyBoss Integration
  • WishList Member Integration
  • Restrict Content Pro Integration
  • Paid Membership Pro Integration
  • Fluent Forms Integration
  • Incoming Webhook
  • BetterDocs Integration
  • LearnPress Integration
  • Google reCAPTCHA Integration
  • Google Drive Integration
  • Dropbox Integration
  • MemberPress Integration
  • FluentBoards Integrations
  • Integration Statuses
  • SureTriggers Integration  
  • FluentCommunity Integration

AI-Powered Assistance

  • OpenAI Integration With Fluent Support
  • Features Of OpenAI Integration In Fluent Support

Change Log

  • Change Log
View Categories
  • Home
  • Docs
  • Ticket Management using Third Parties
  • Managing Tickets using Telegram

Managing Tickets using Telegram

FluentSupport allows you to manage your tickets using Telegram. You can see your New Tickets Notification in your Telegram groups or a person’s Inbox and can also reply from your Telegram inbox. This article will guide you through how to connect your Fluent Support with Telegram to manage your tickets in Telegram.

Fluent Support Telegram Settings #

To make your Telegram Integration running, you need to get the Bot Token and Group Chat ID from Telegram. To learn how to Manage your Tickets using Telegram, follow the guidelines accordingly –

Get Bot Token #

Simply follow the steps to get the Bot Token from Telegram.

First, send a text to @BotFather or click the start button to start the bot in your Telegram application.
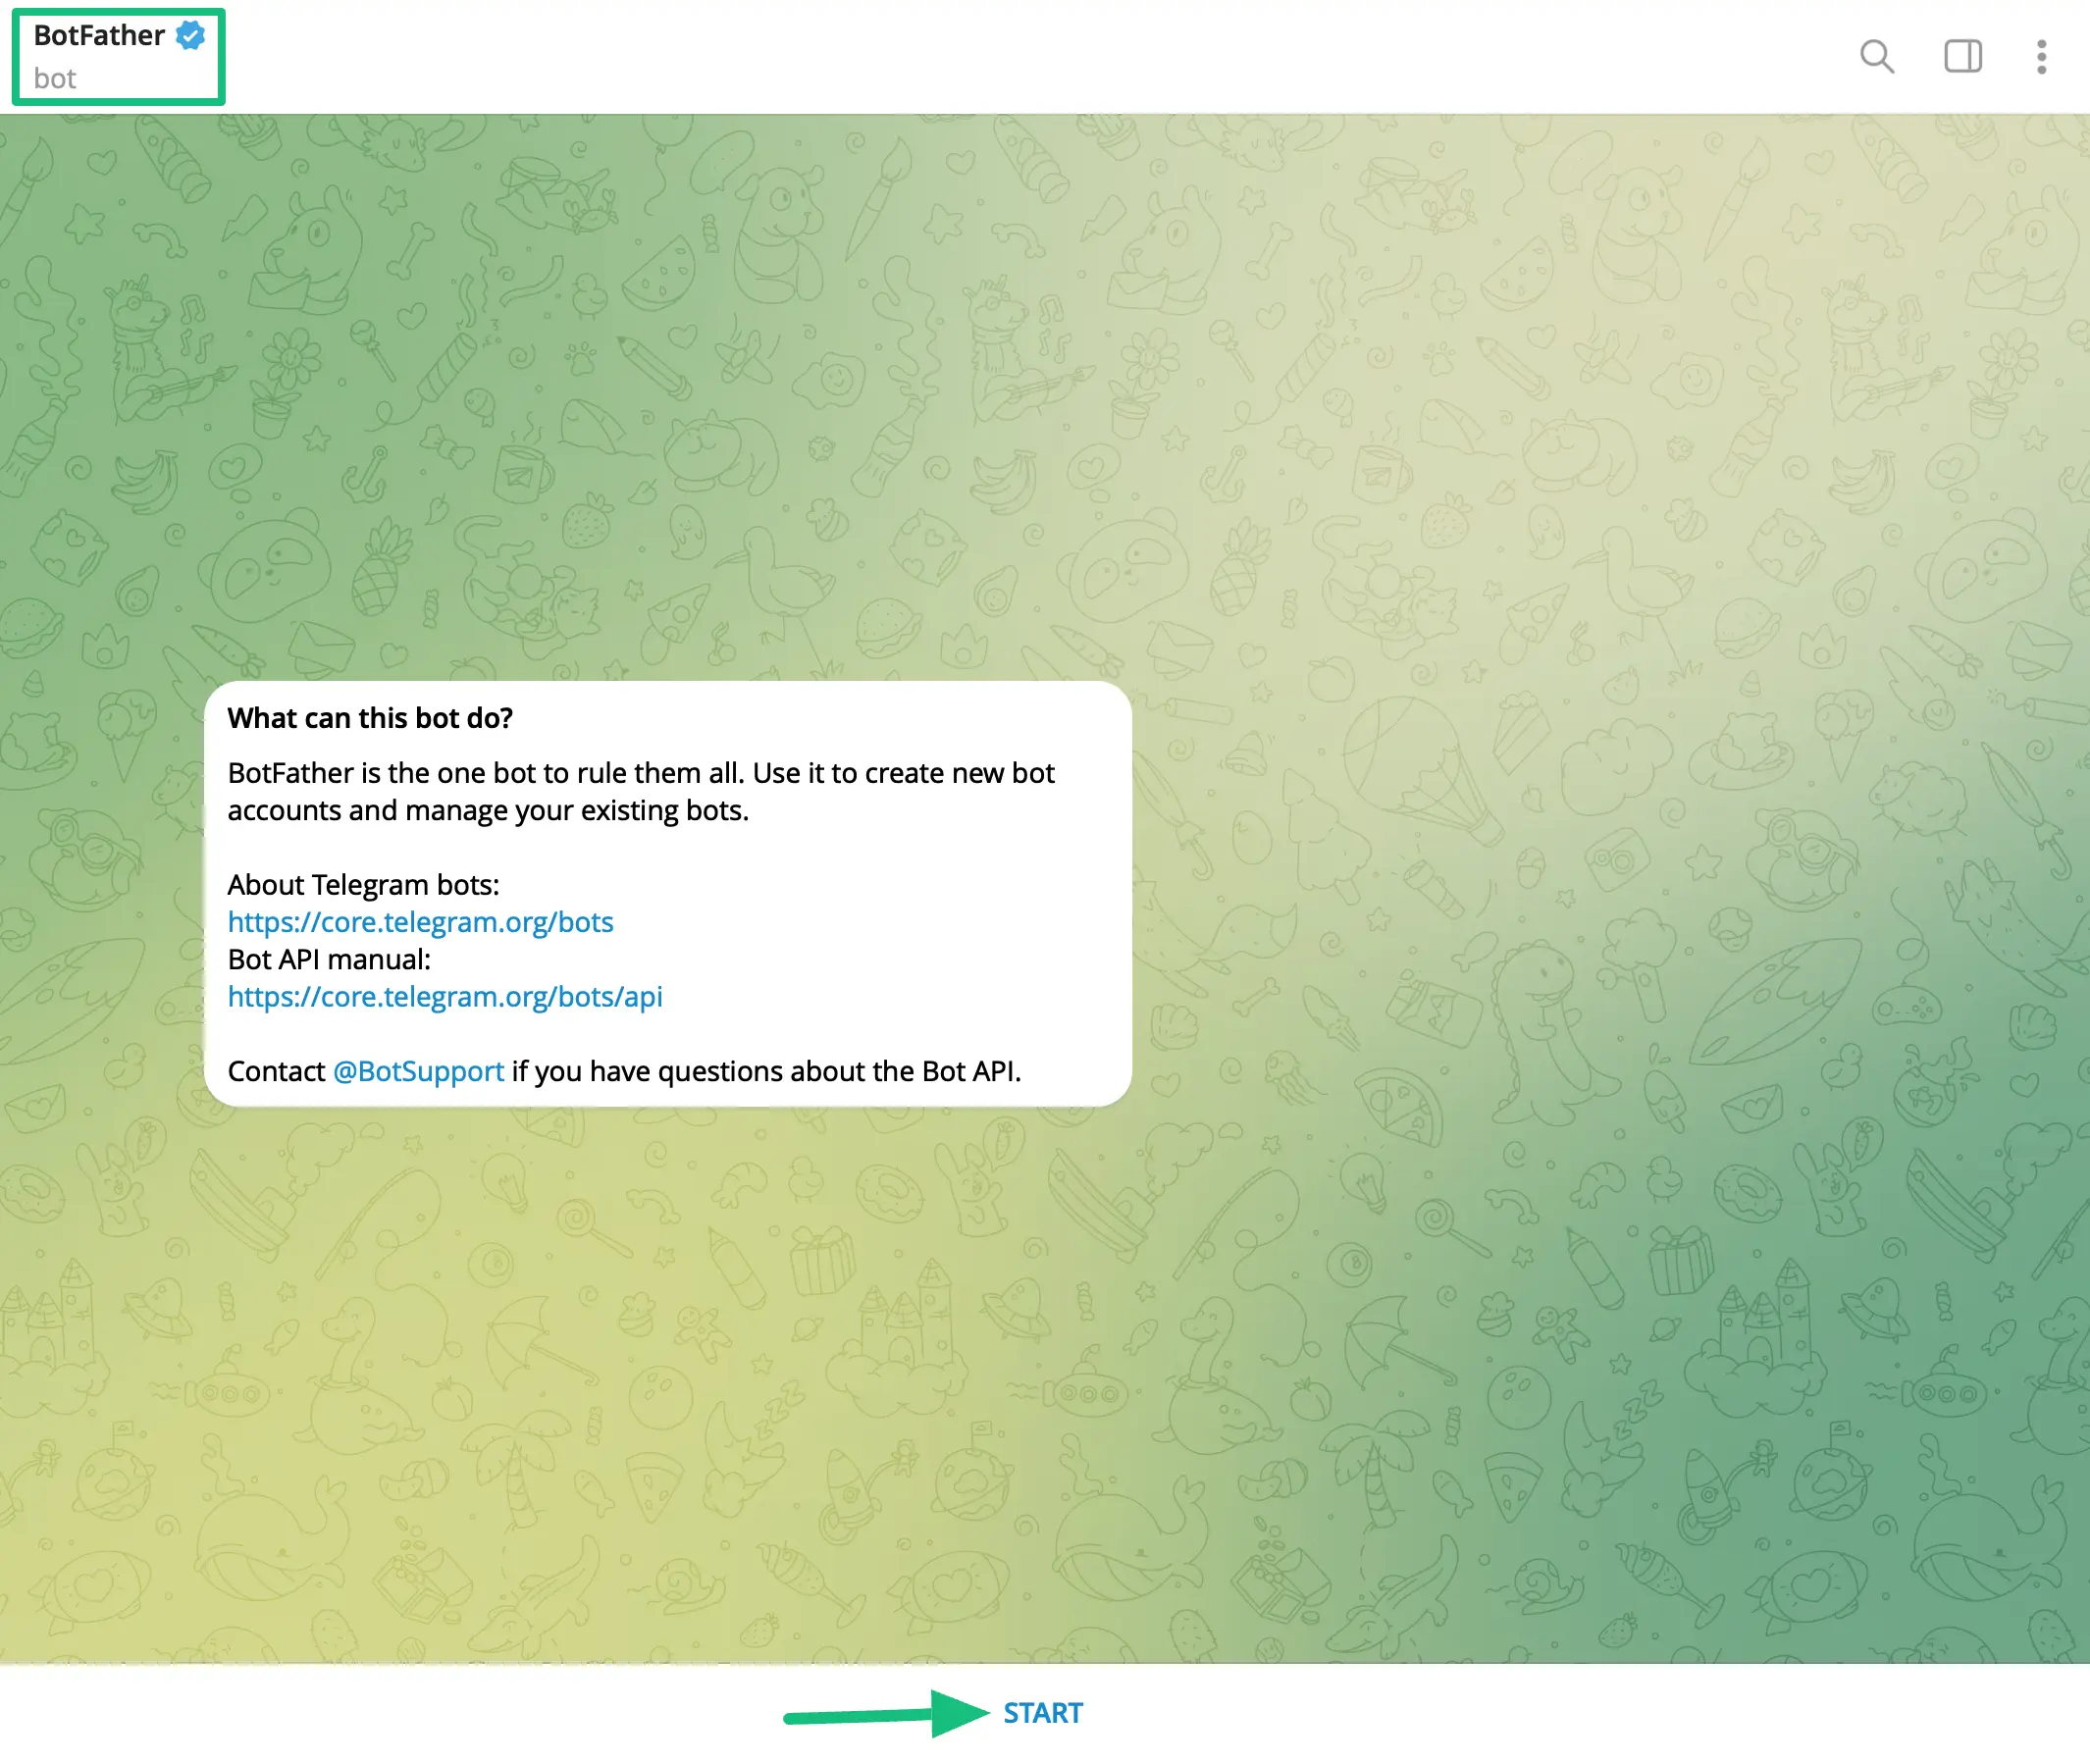
Start button

Then create a Bot by sending the ‘/newbot’ command using the help message.
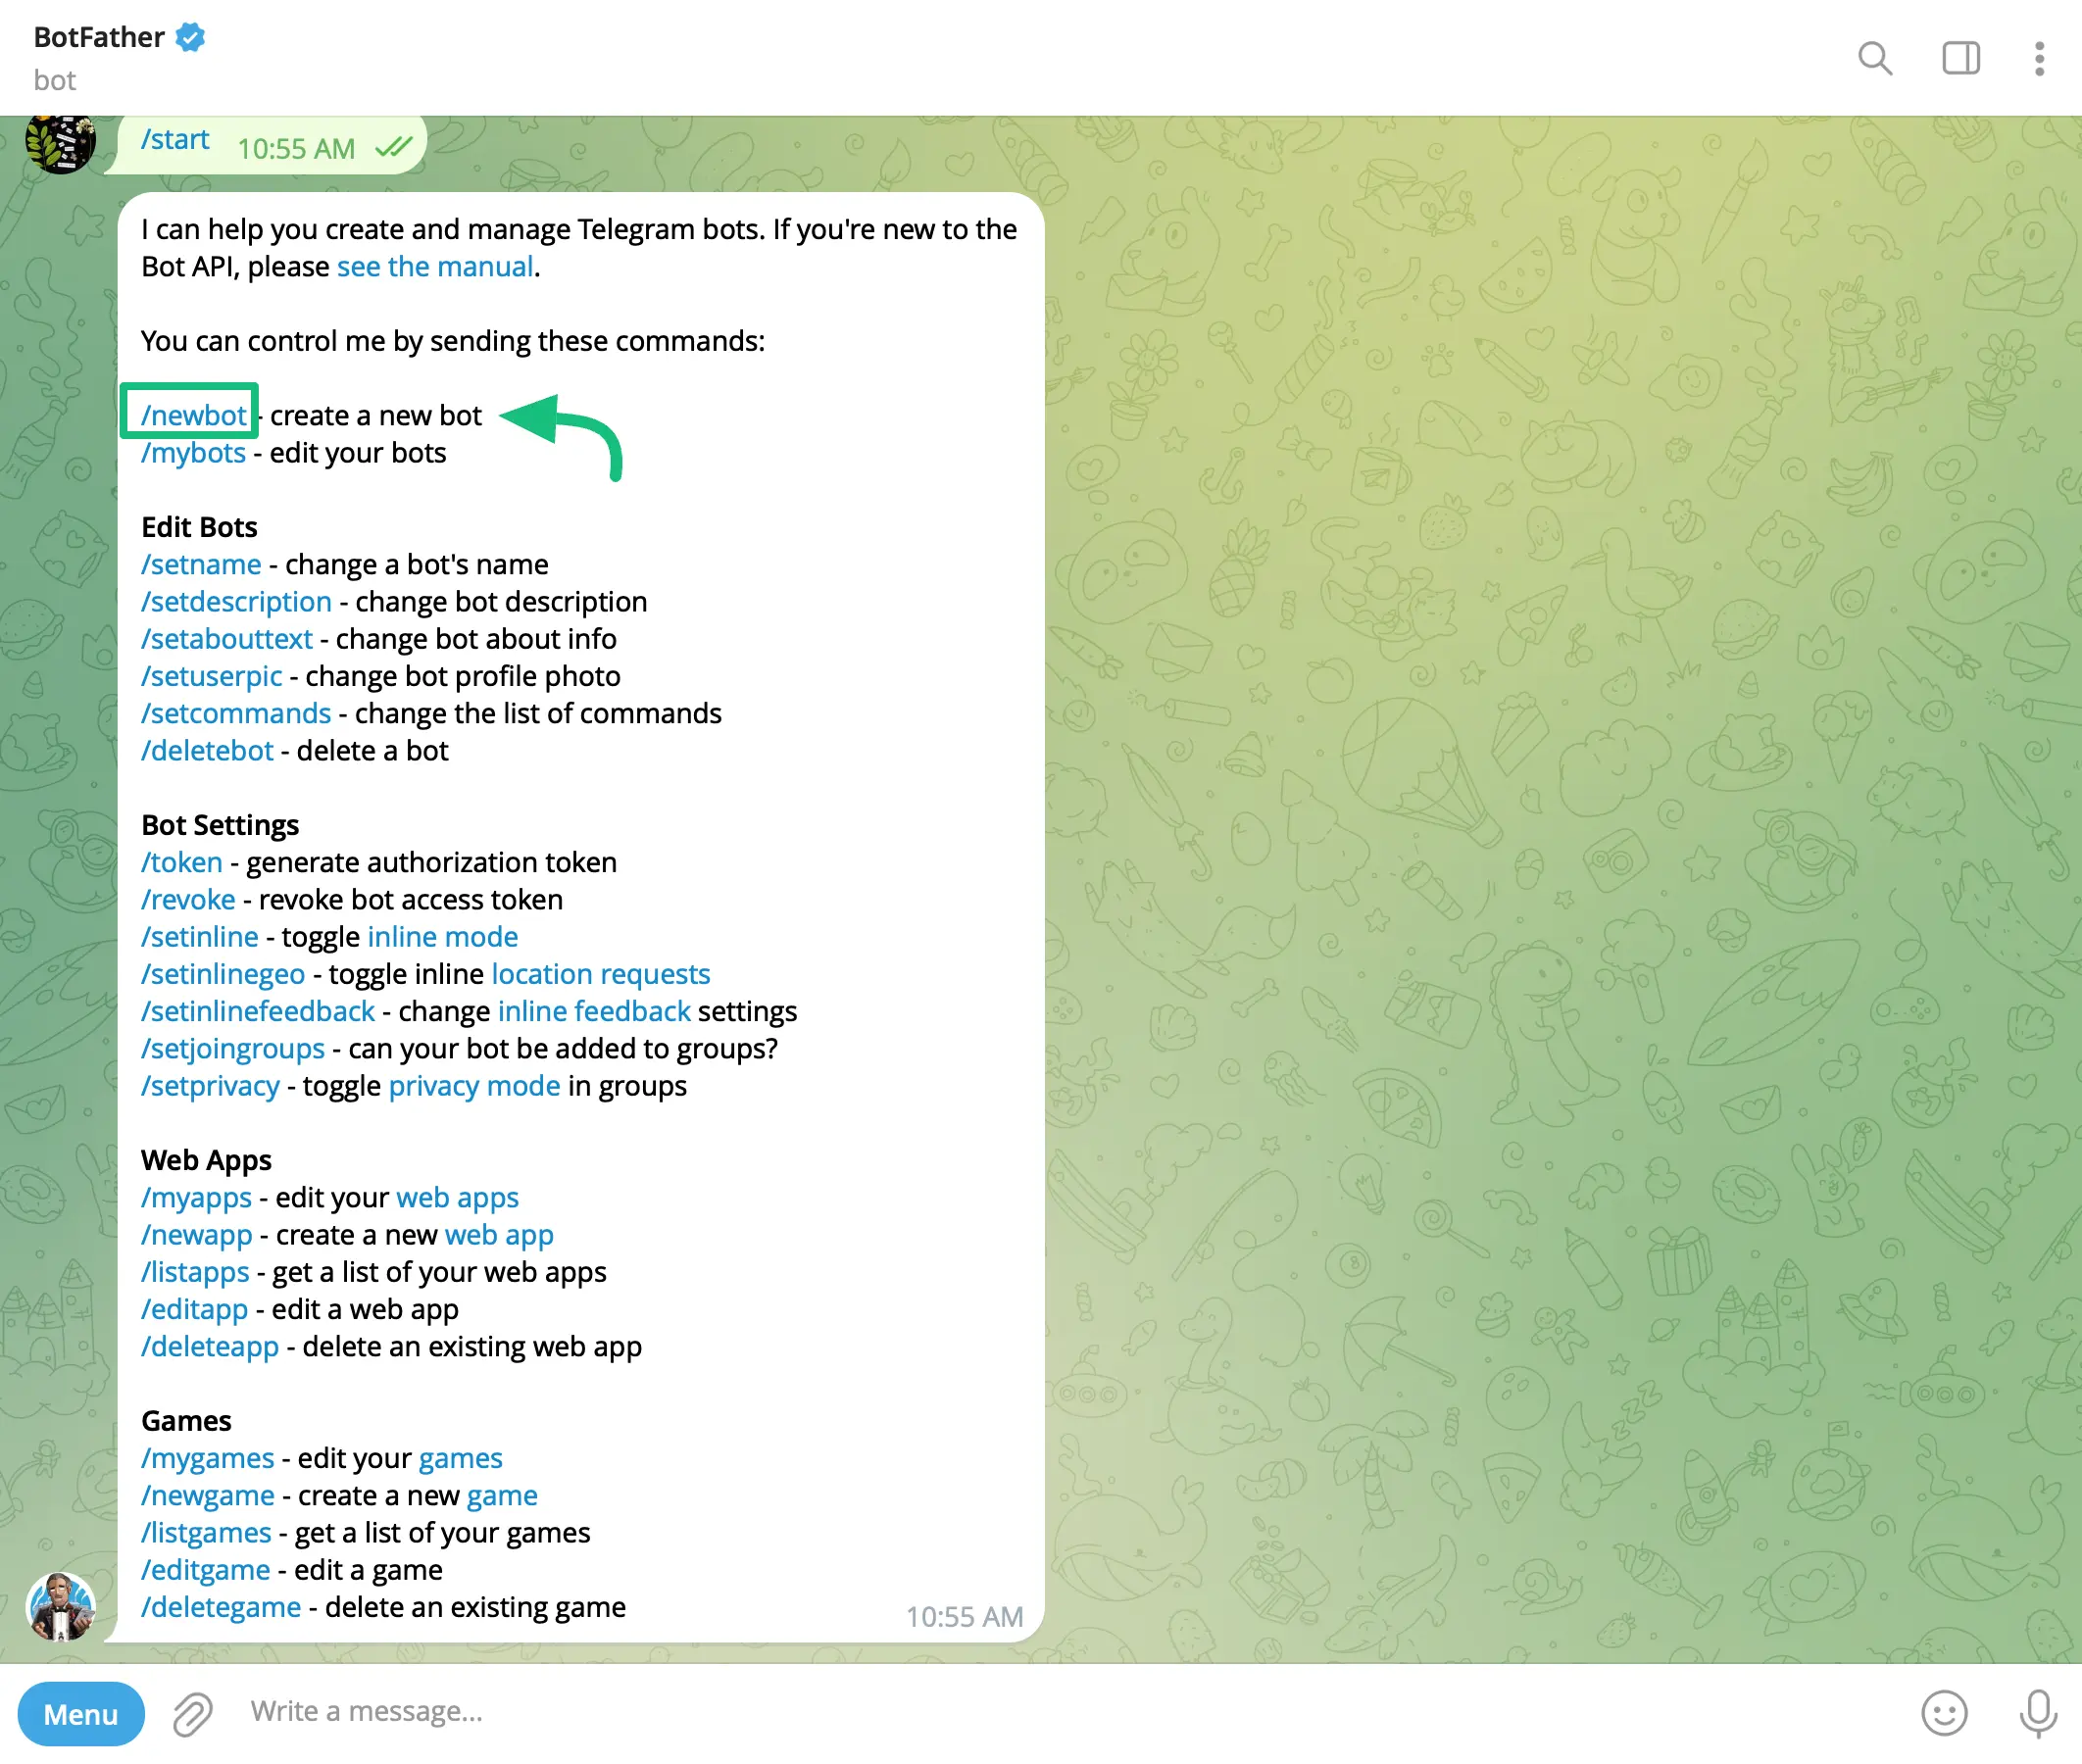
Newbot command

Provide a relevant name for your bot. Next, choose a username for your bot that must end with the text ‘bot’.
After finishing these steps, @BotFather will provide you with the Bot Token that you need to complete the next step.
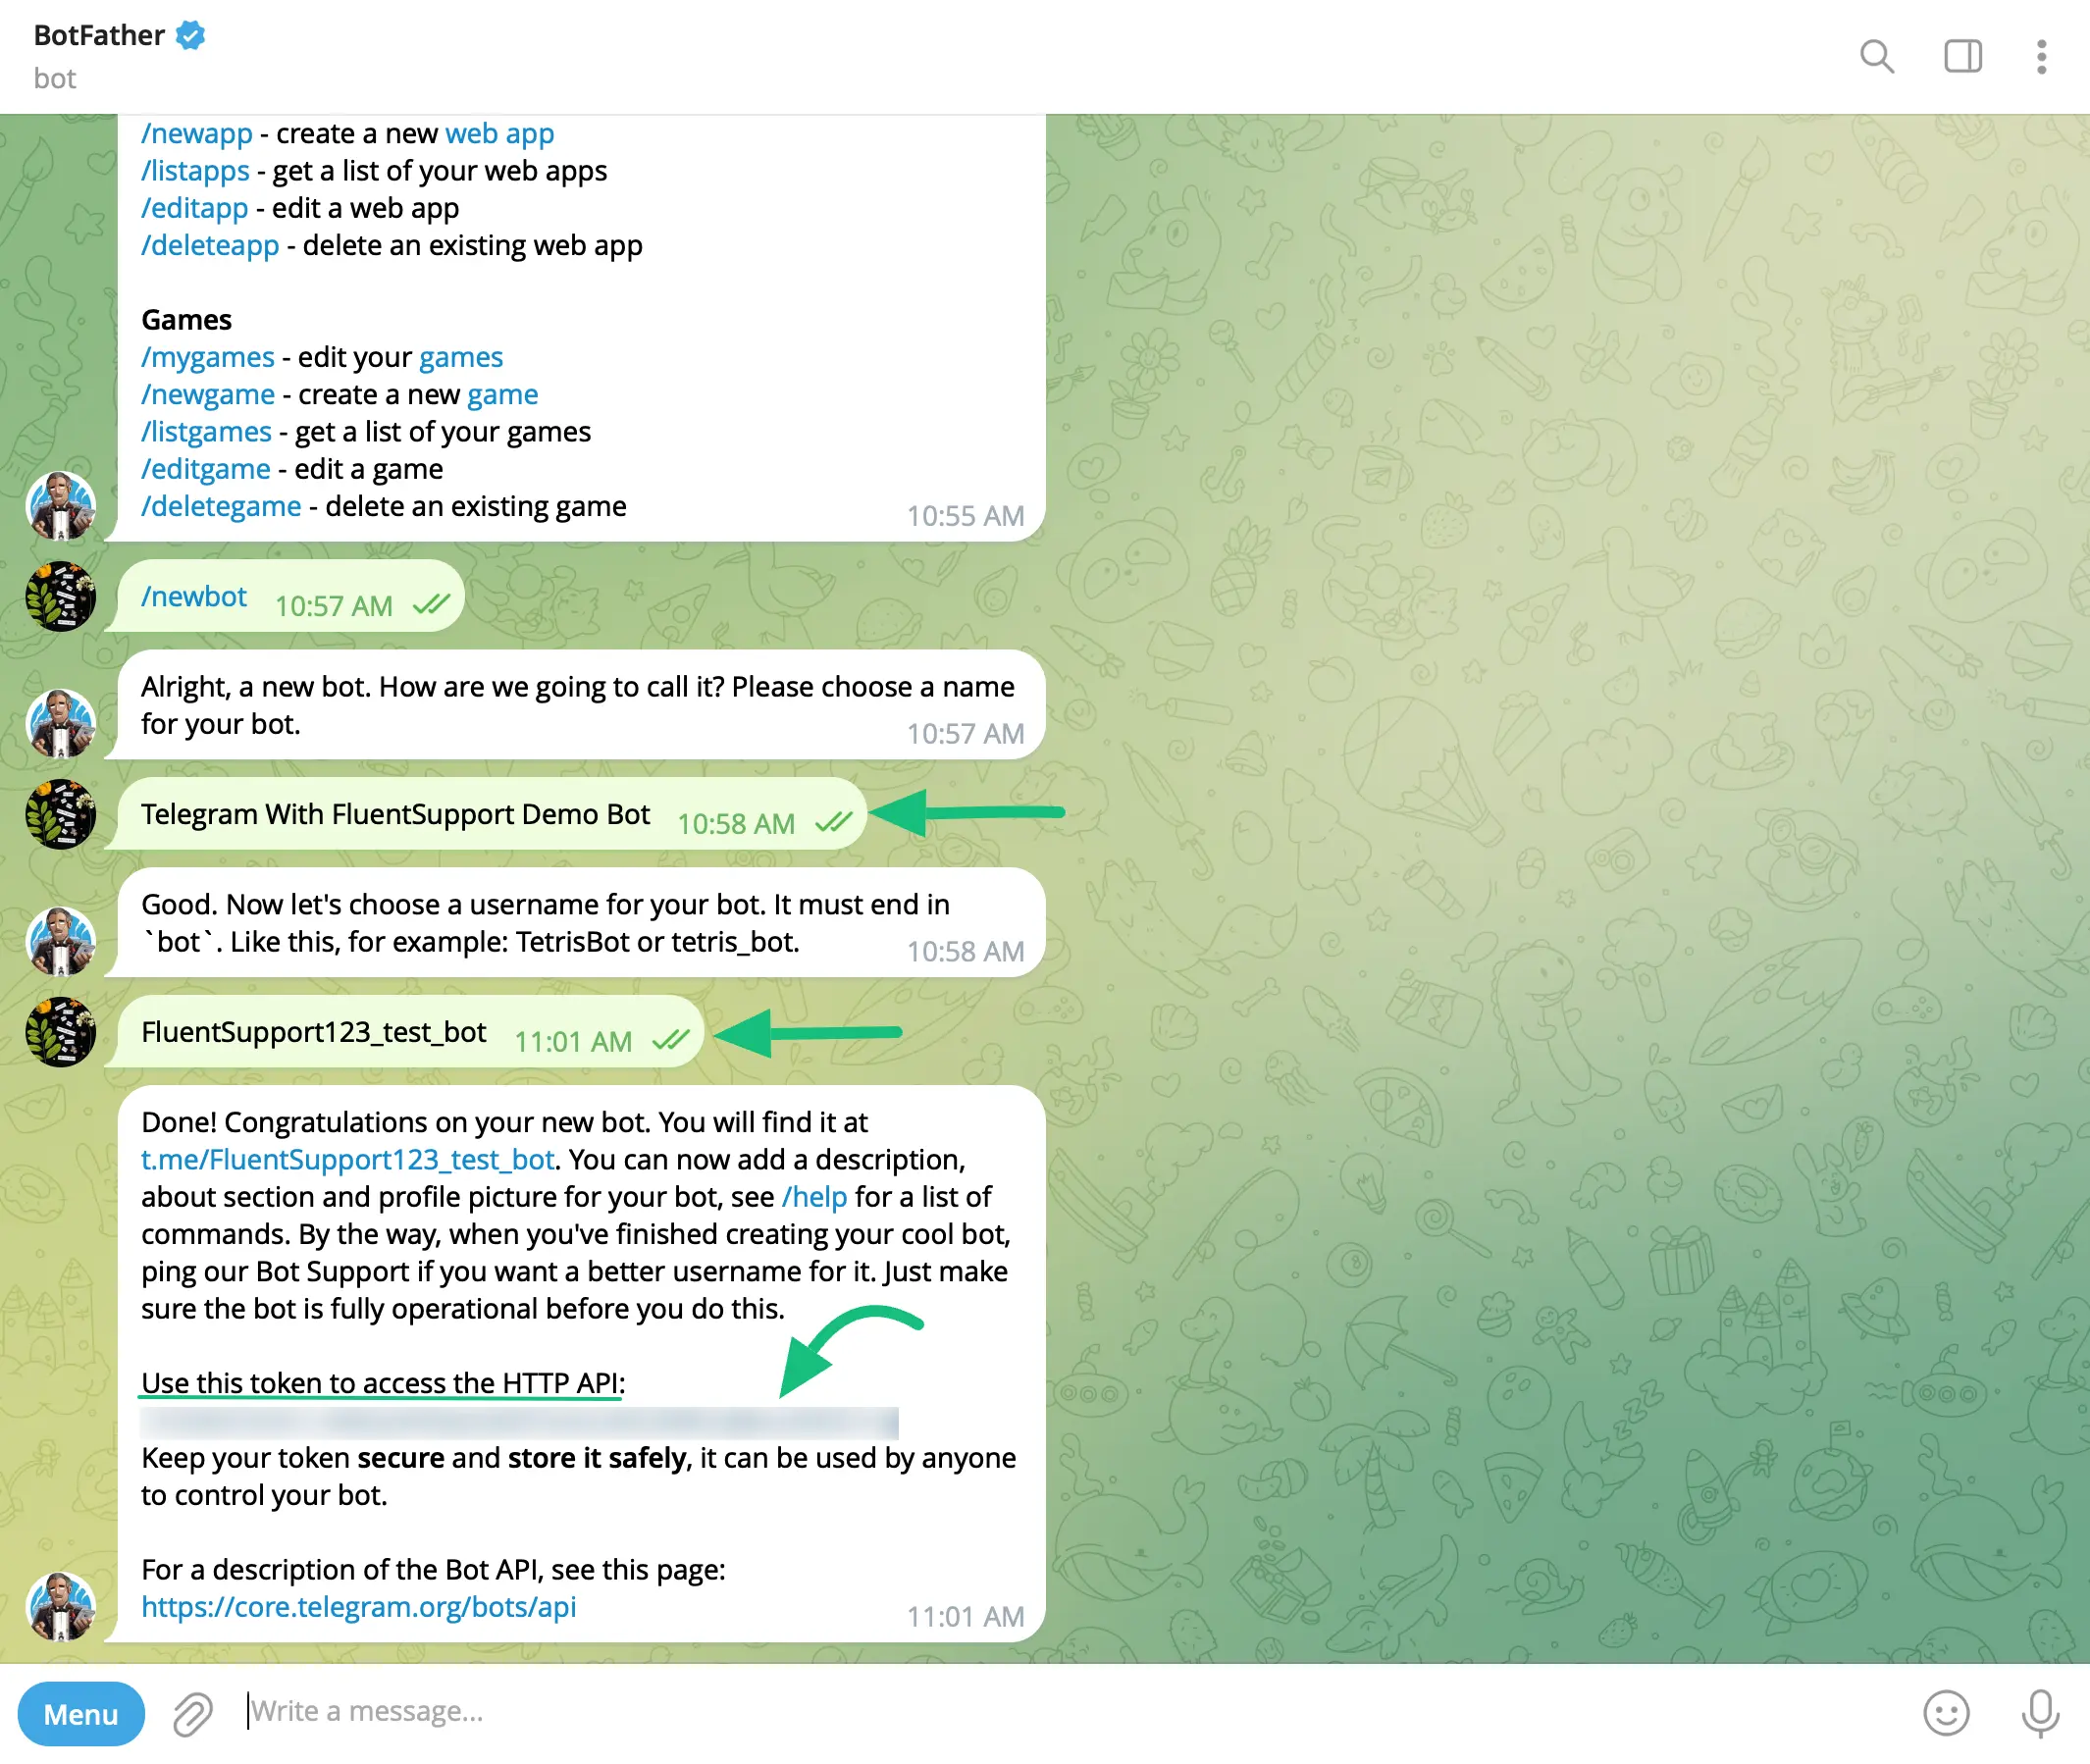
Get the Bot Token ID

Get Group Chat ID #

Now you will need a Group Chat ID to send your notification. To do this, first, you need to Create a Group in Telegram.

Creating A New Group On Telegram #

To create a new group in Telegram, follow the Screenshots & GIF below –

First, click the New Group button from the left-side Editor.
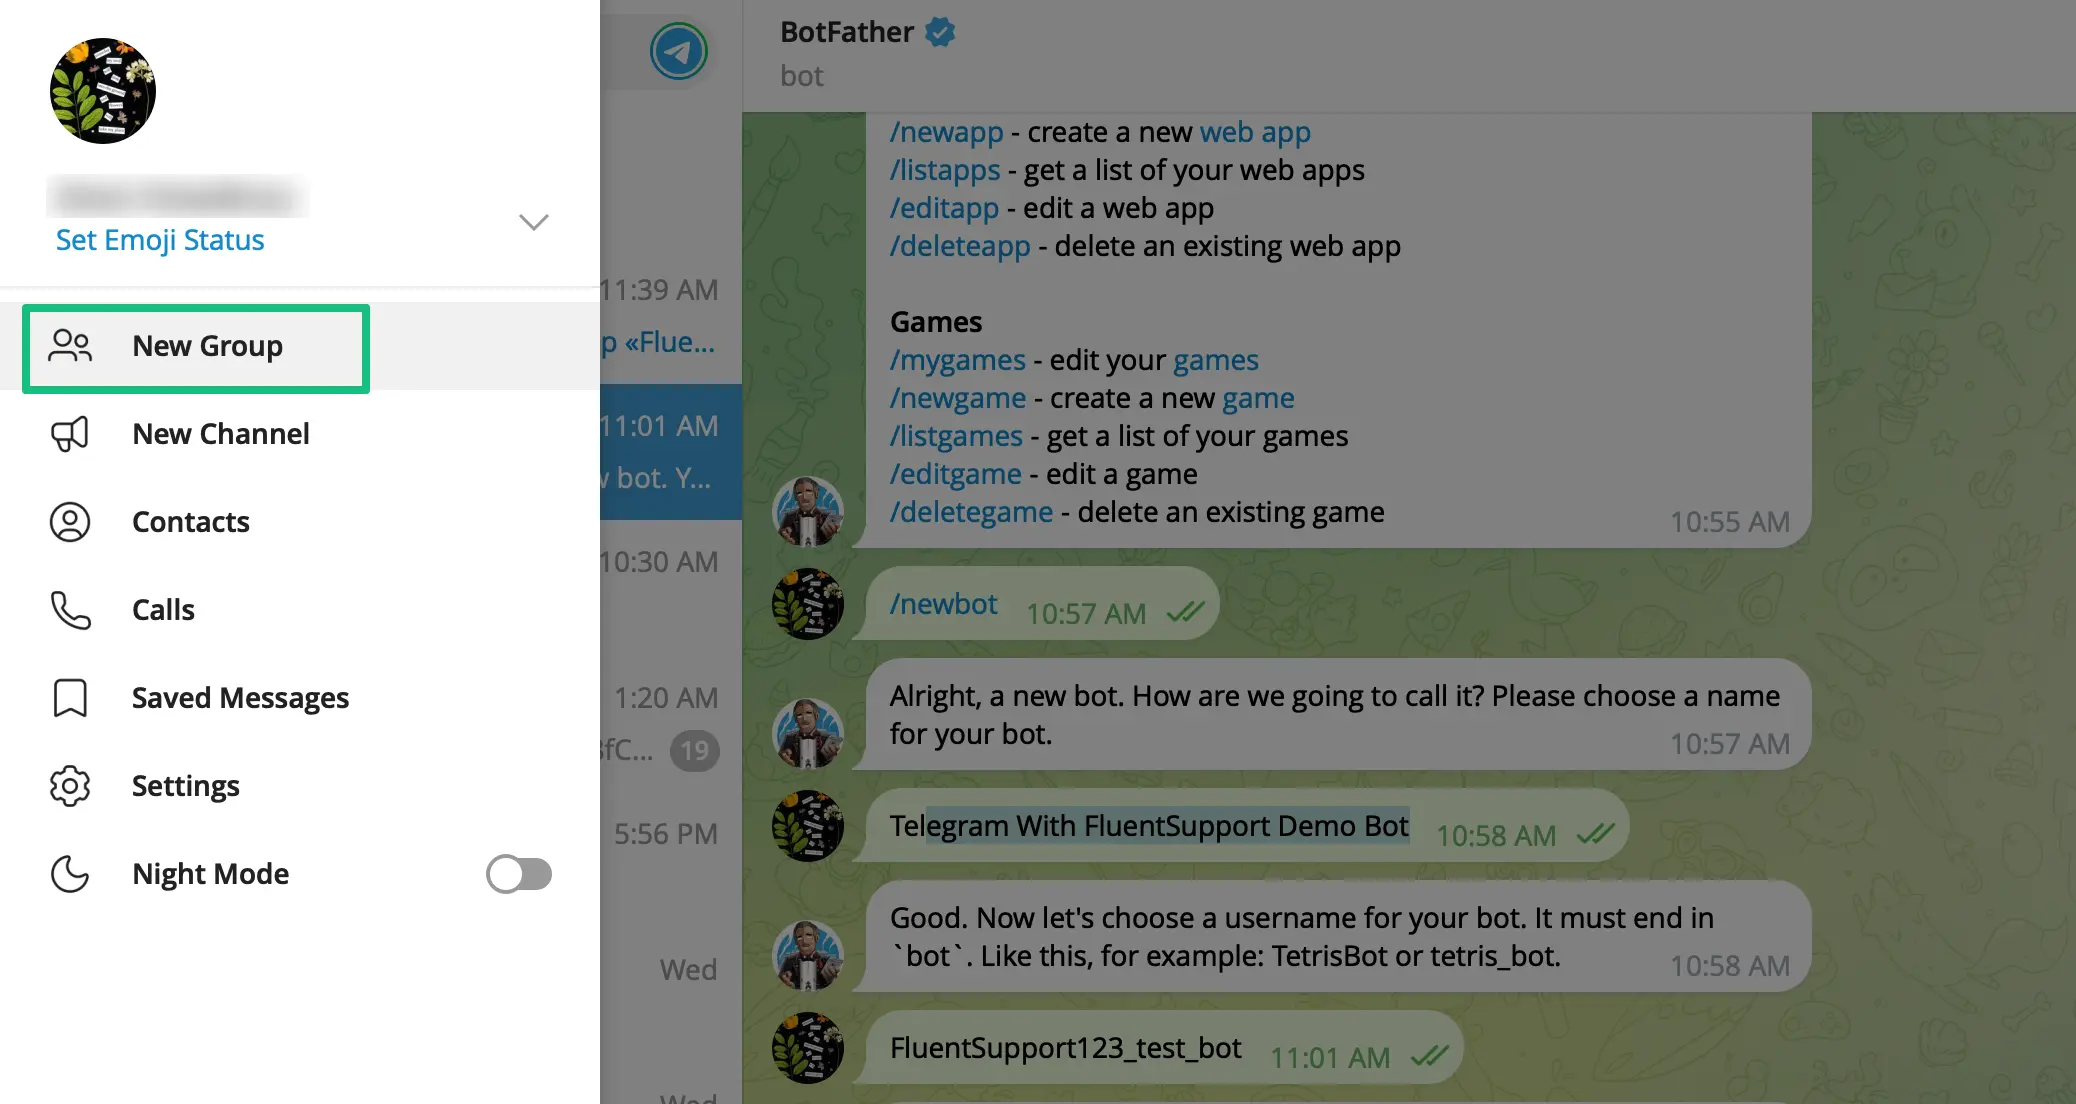
New Group option

Now, give a name to your group and Add the Bot that you created in the previous step as a member of the group. Press the Create button and your group will be created.
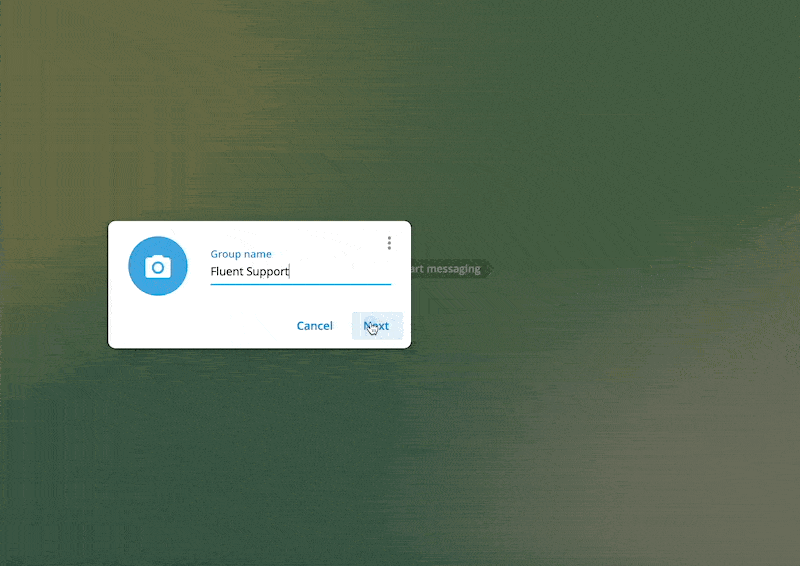
Create new telegram group

Now, give your bot “Admin Acces” i.e., simply make the bot admin of your group chat.
Follow the GIF below, to learn how you can make your Bot Admin of your group.

Give Admin Access to Your created Bot.gif

After giving your Bot the “Admin Access” you can see the preview from View group info by clicking the three-dot from the right-side corner
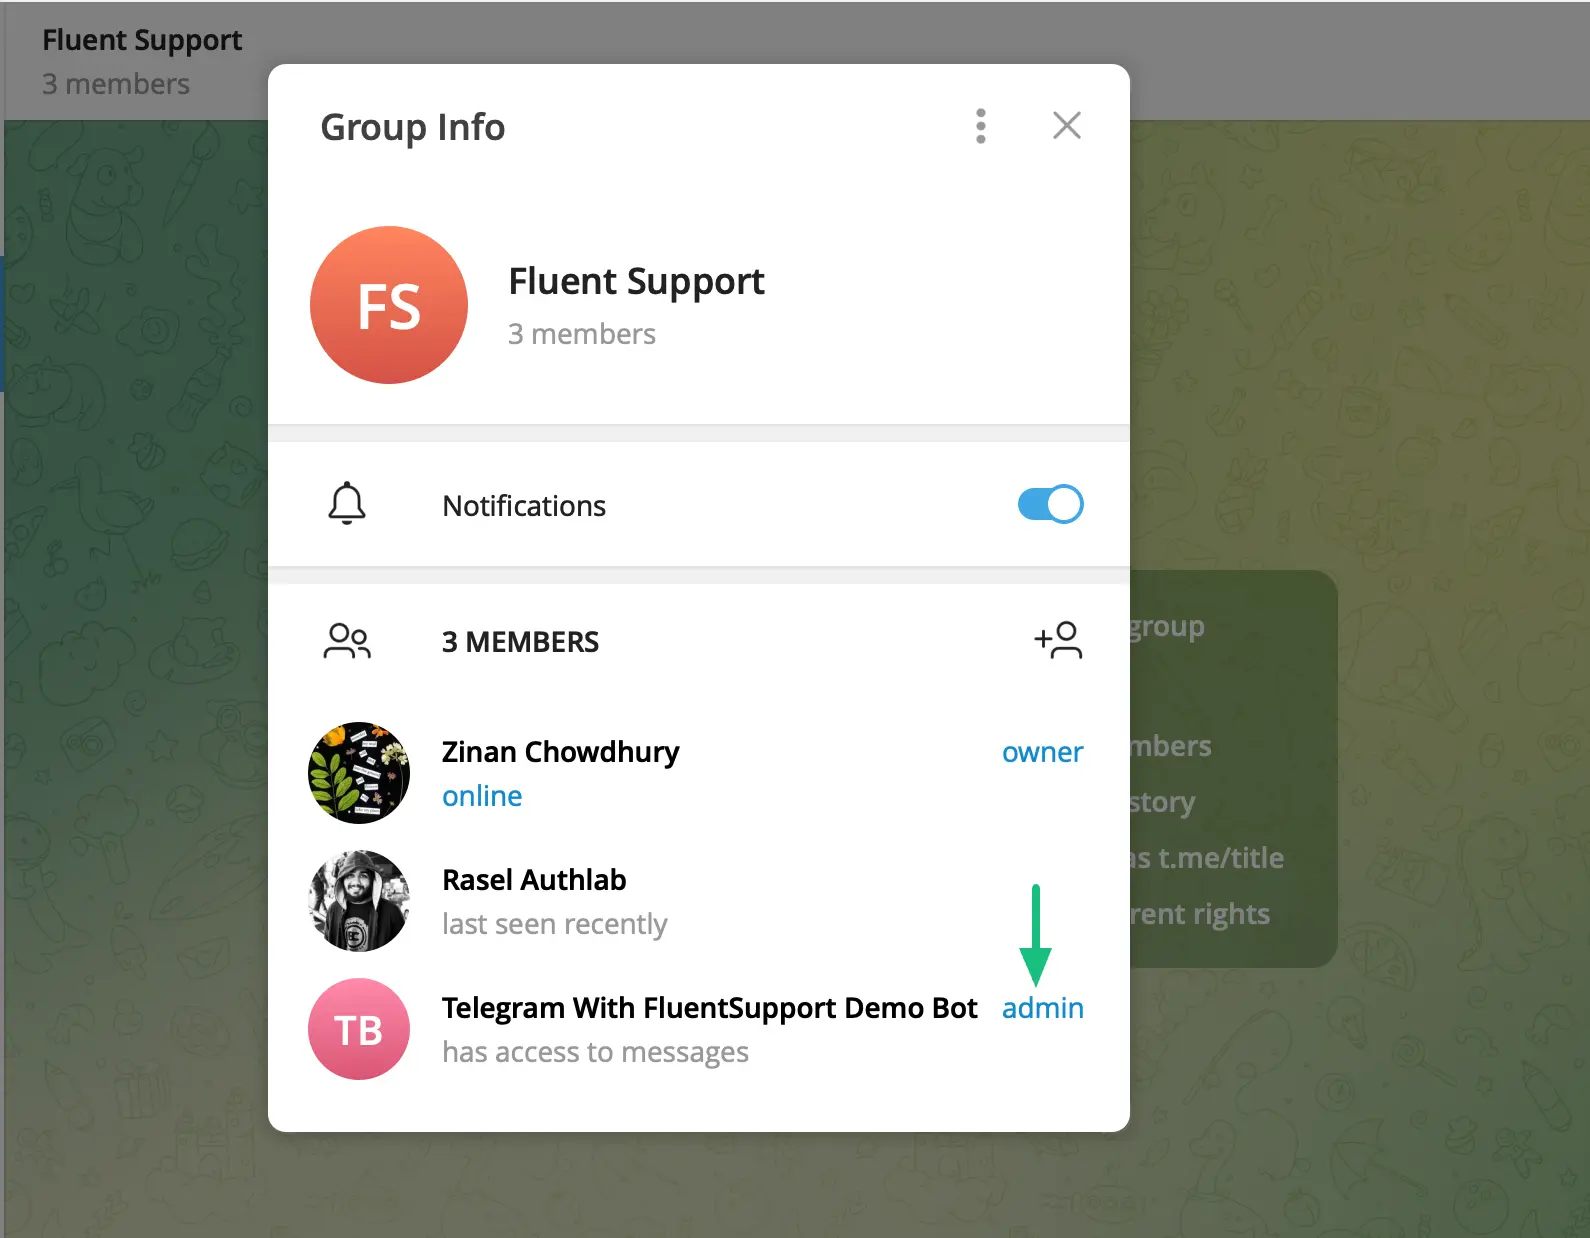
Admin Preview

Get Group Chat ID #

Finally, to get the Chat ID of your group, add @GetIdsBot as a member of this same newly created group.

To do this follow the Screenshots & GIF below step-by-step –

Add GetIDs Bot as a Member

After adding the GetIDs Bot as a member, it will send a message to the group with the Group Chat ID.

Remember, the Chat ID starts with a minus sign (-), and you would have to copy the code exactly provided by the GetIDs bot.
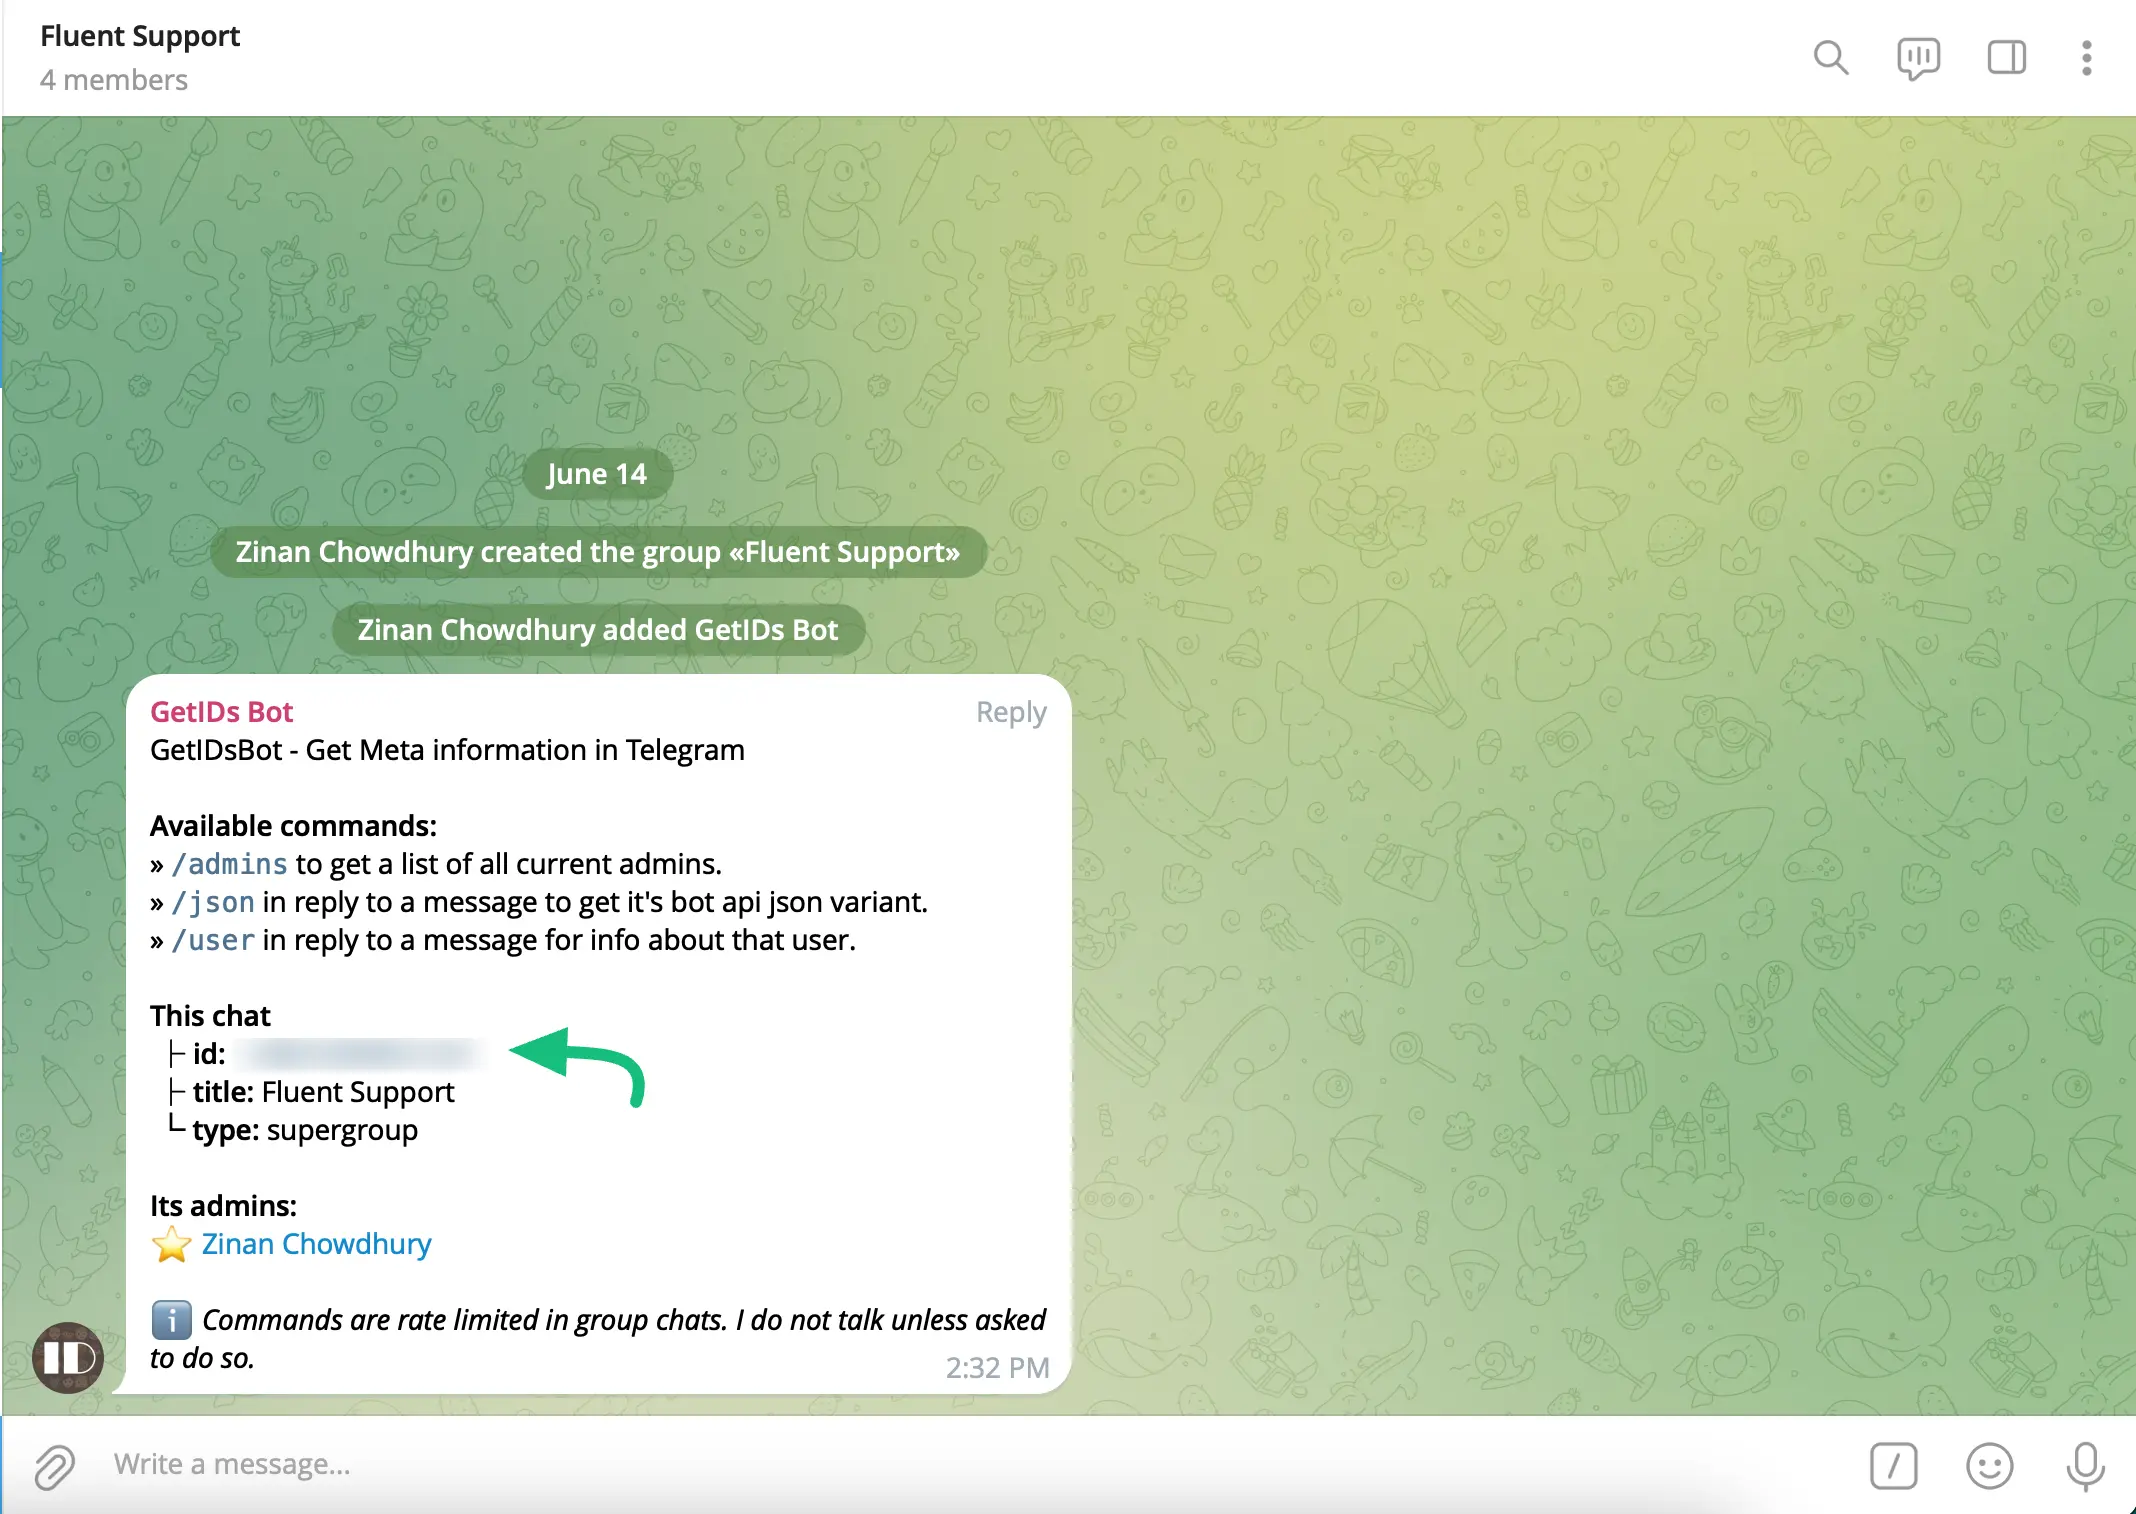
Get the Group Chat ID code

Configure Telegram in Fluent Support #

From your Fluent Support Dashboard, go to Global Settings, and click the Notification Integrations from the left sidebar. This will open the Telegram Integration Settings tab.

Then, paste the Bot Token & Group Chat ID that you have copied before into the Bot Token & Default Channel/Group Chat ID field. Finally press the Save Telegram Settings.

Remember, the Chat ID starts with a minus sign (-), and you would have to copy the code exactly provided by the GetIDs bot.
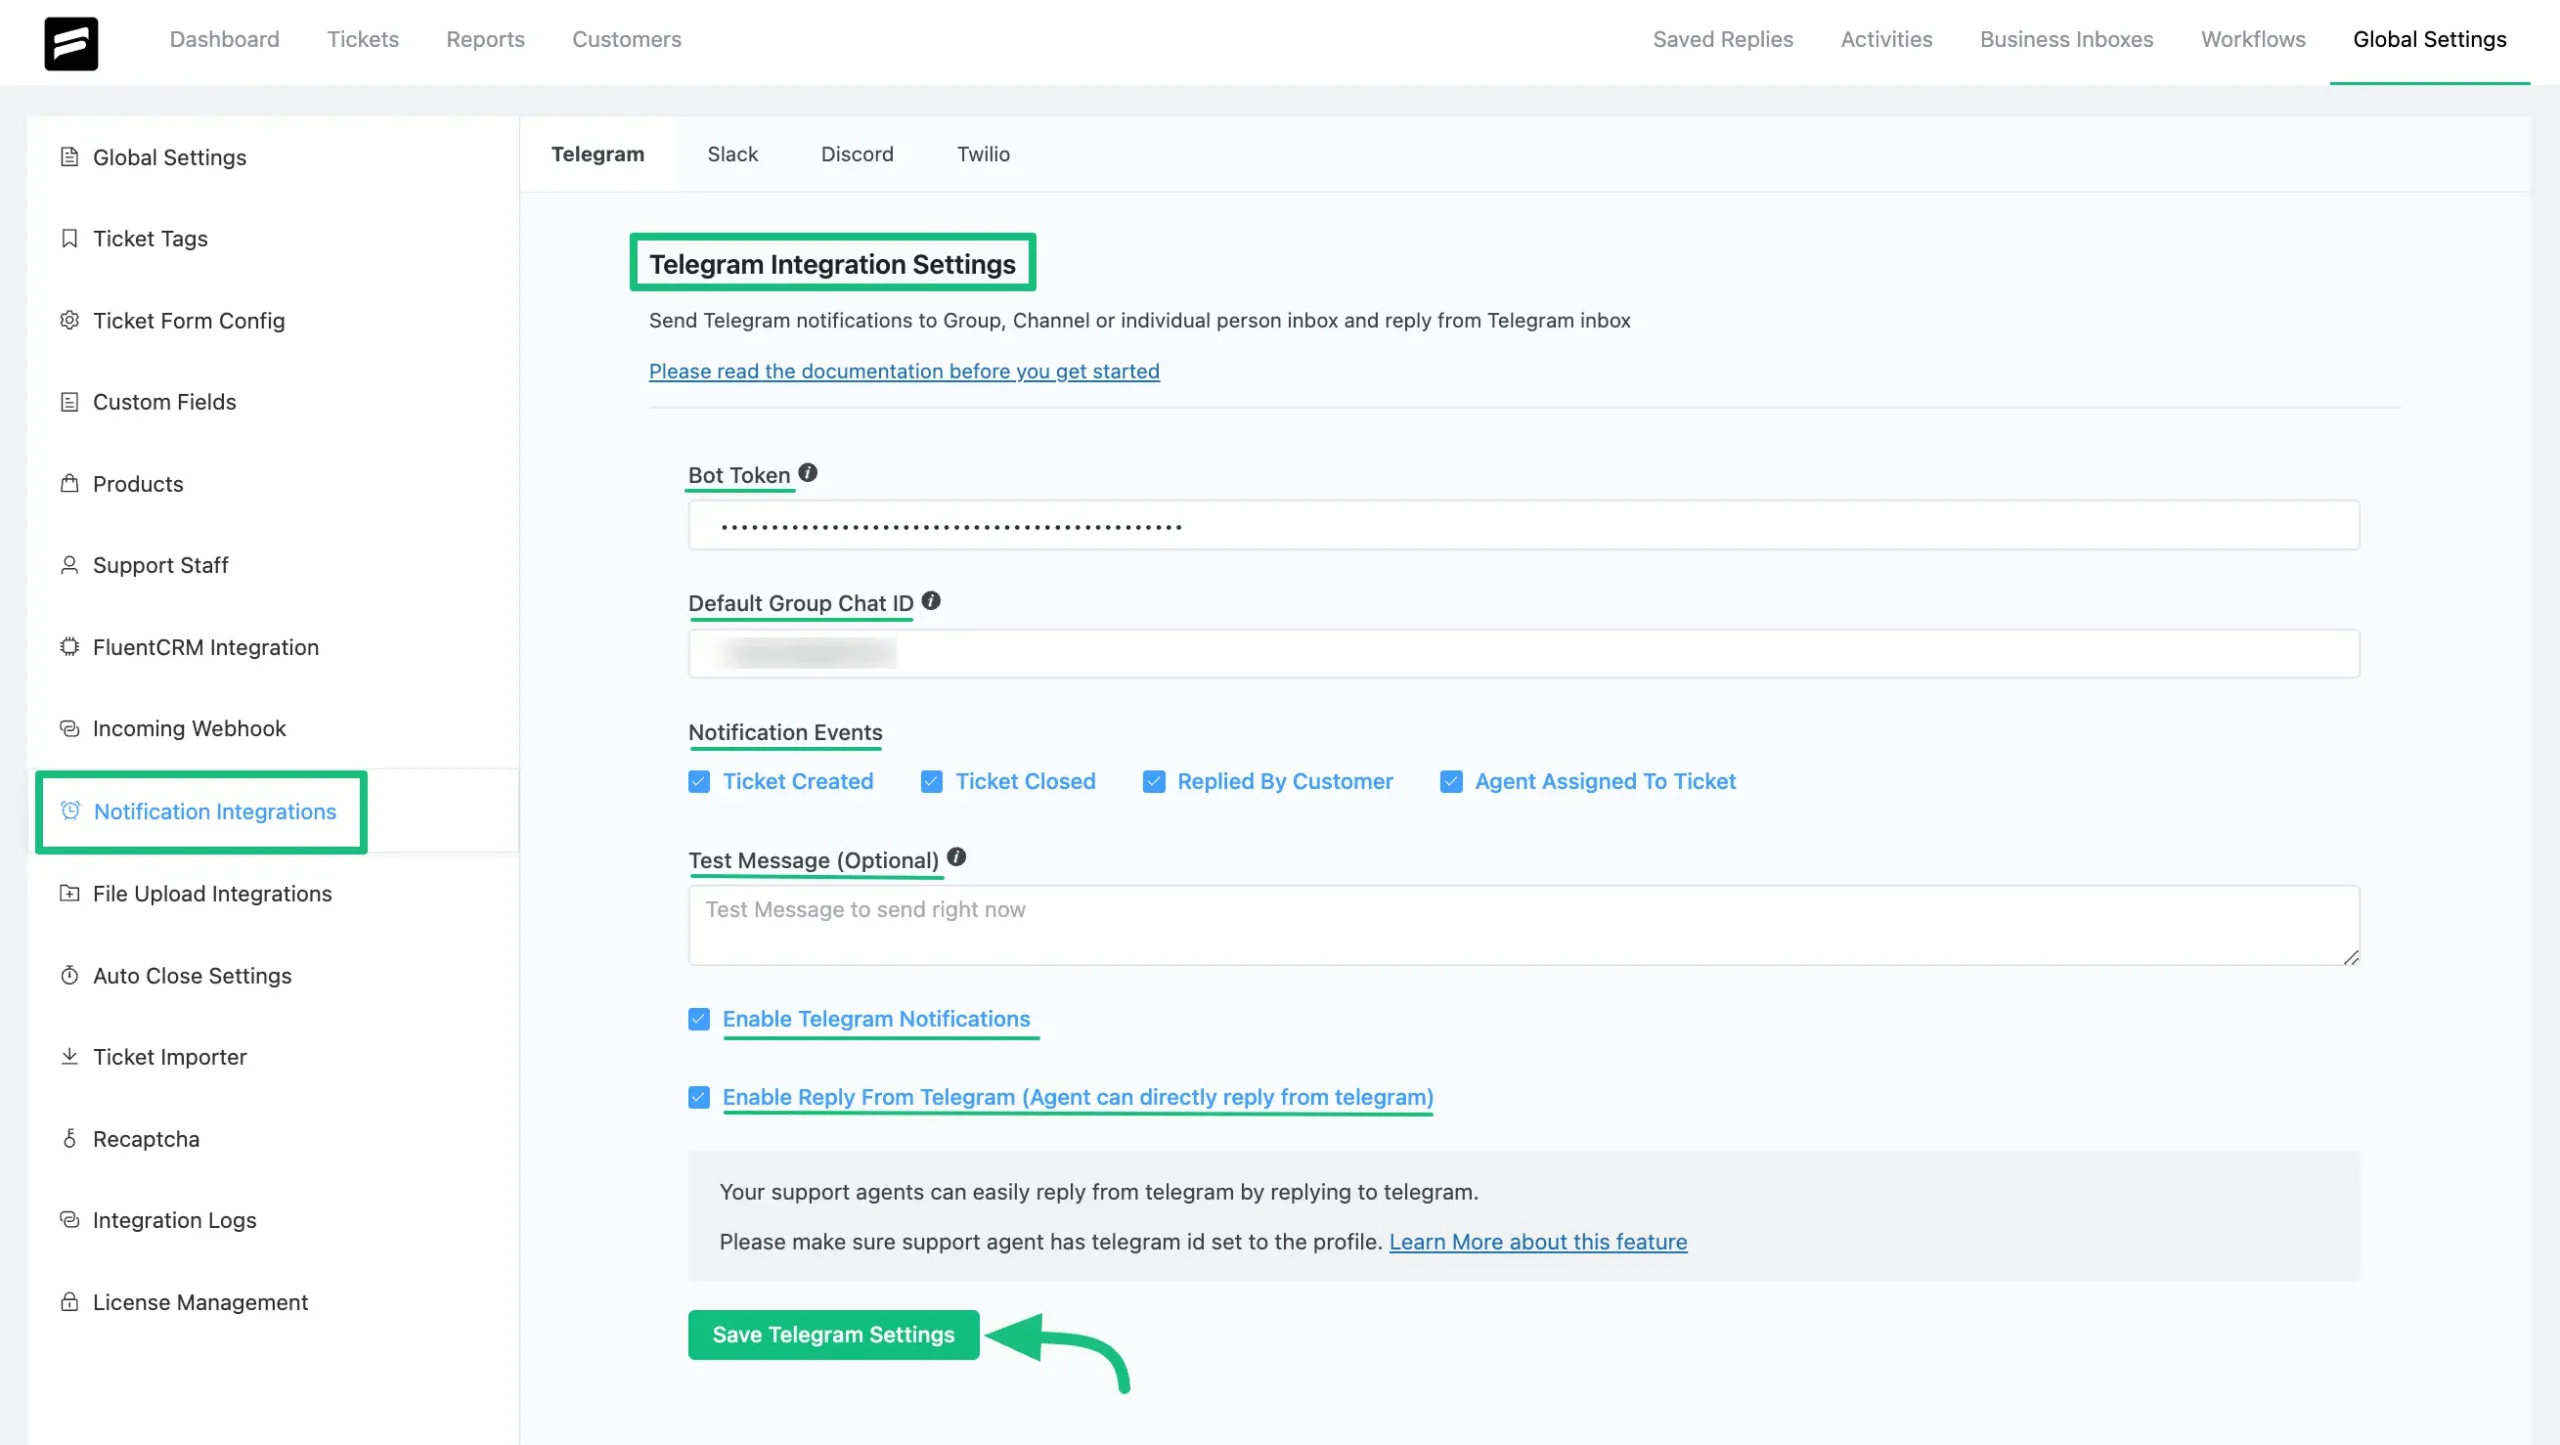
Configure Telegram Group with FluentSupport

A brief explanation of other options mentioned above –

  • Notification Events: Using this option, choose for which instances you want to be notified through Telegram. The available notification events are – Ticket Created, Ticket Closed, Replied by Customer, and Agent Assigned To Ticket.
  • Test Message: You can also insert any text message to test whether you connected your telegram successfully or not. After you click the Save Telegram Settings if the settings are correct, you will see a message in your Telegram, and the settings will be saved.
  • Enable Telegram Notifications: Enable this option, to make sure you get the telegram notifications.
  • Enable Reply From Telegram (Agent can directly reply from telegram): You can also enable this option, so that your support agents can directly reply from Telegram.

Reply Tickets From Telegram #

To reply to any tickets directly from Telegram, follow the steps with screenshots below –

Note: If you or your agents want to get notifications in your/their individual inbox, you or any agents must send a test message (e.g., Hi) to the Bot that you have created and added to the group. This will enable the bot to forward telegram replies to the original tickets in the support portal. 

First, you need to add your support agent’s Telegram Chat ID to their profile.
To get the Telegram user chat ID, send a message to @GetIdsBot and it will return the message with the ID. Copy the Chat id.
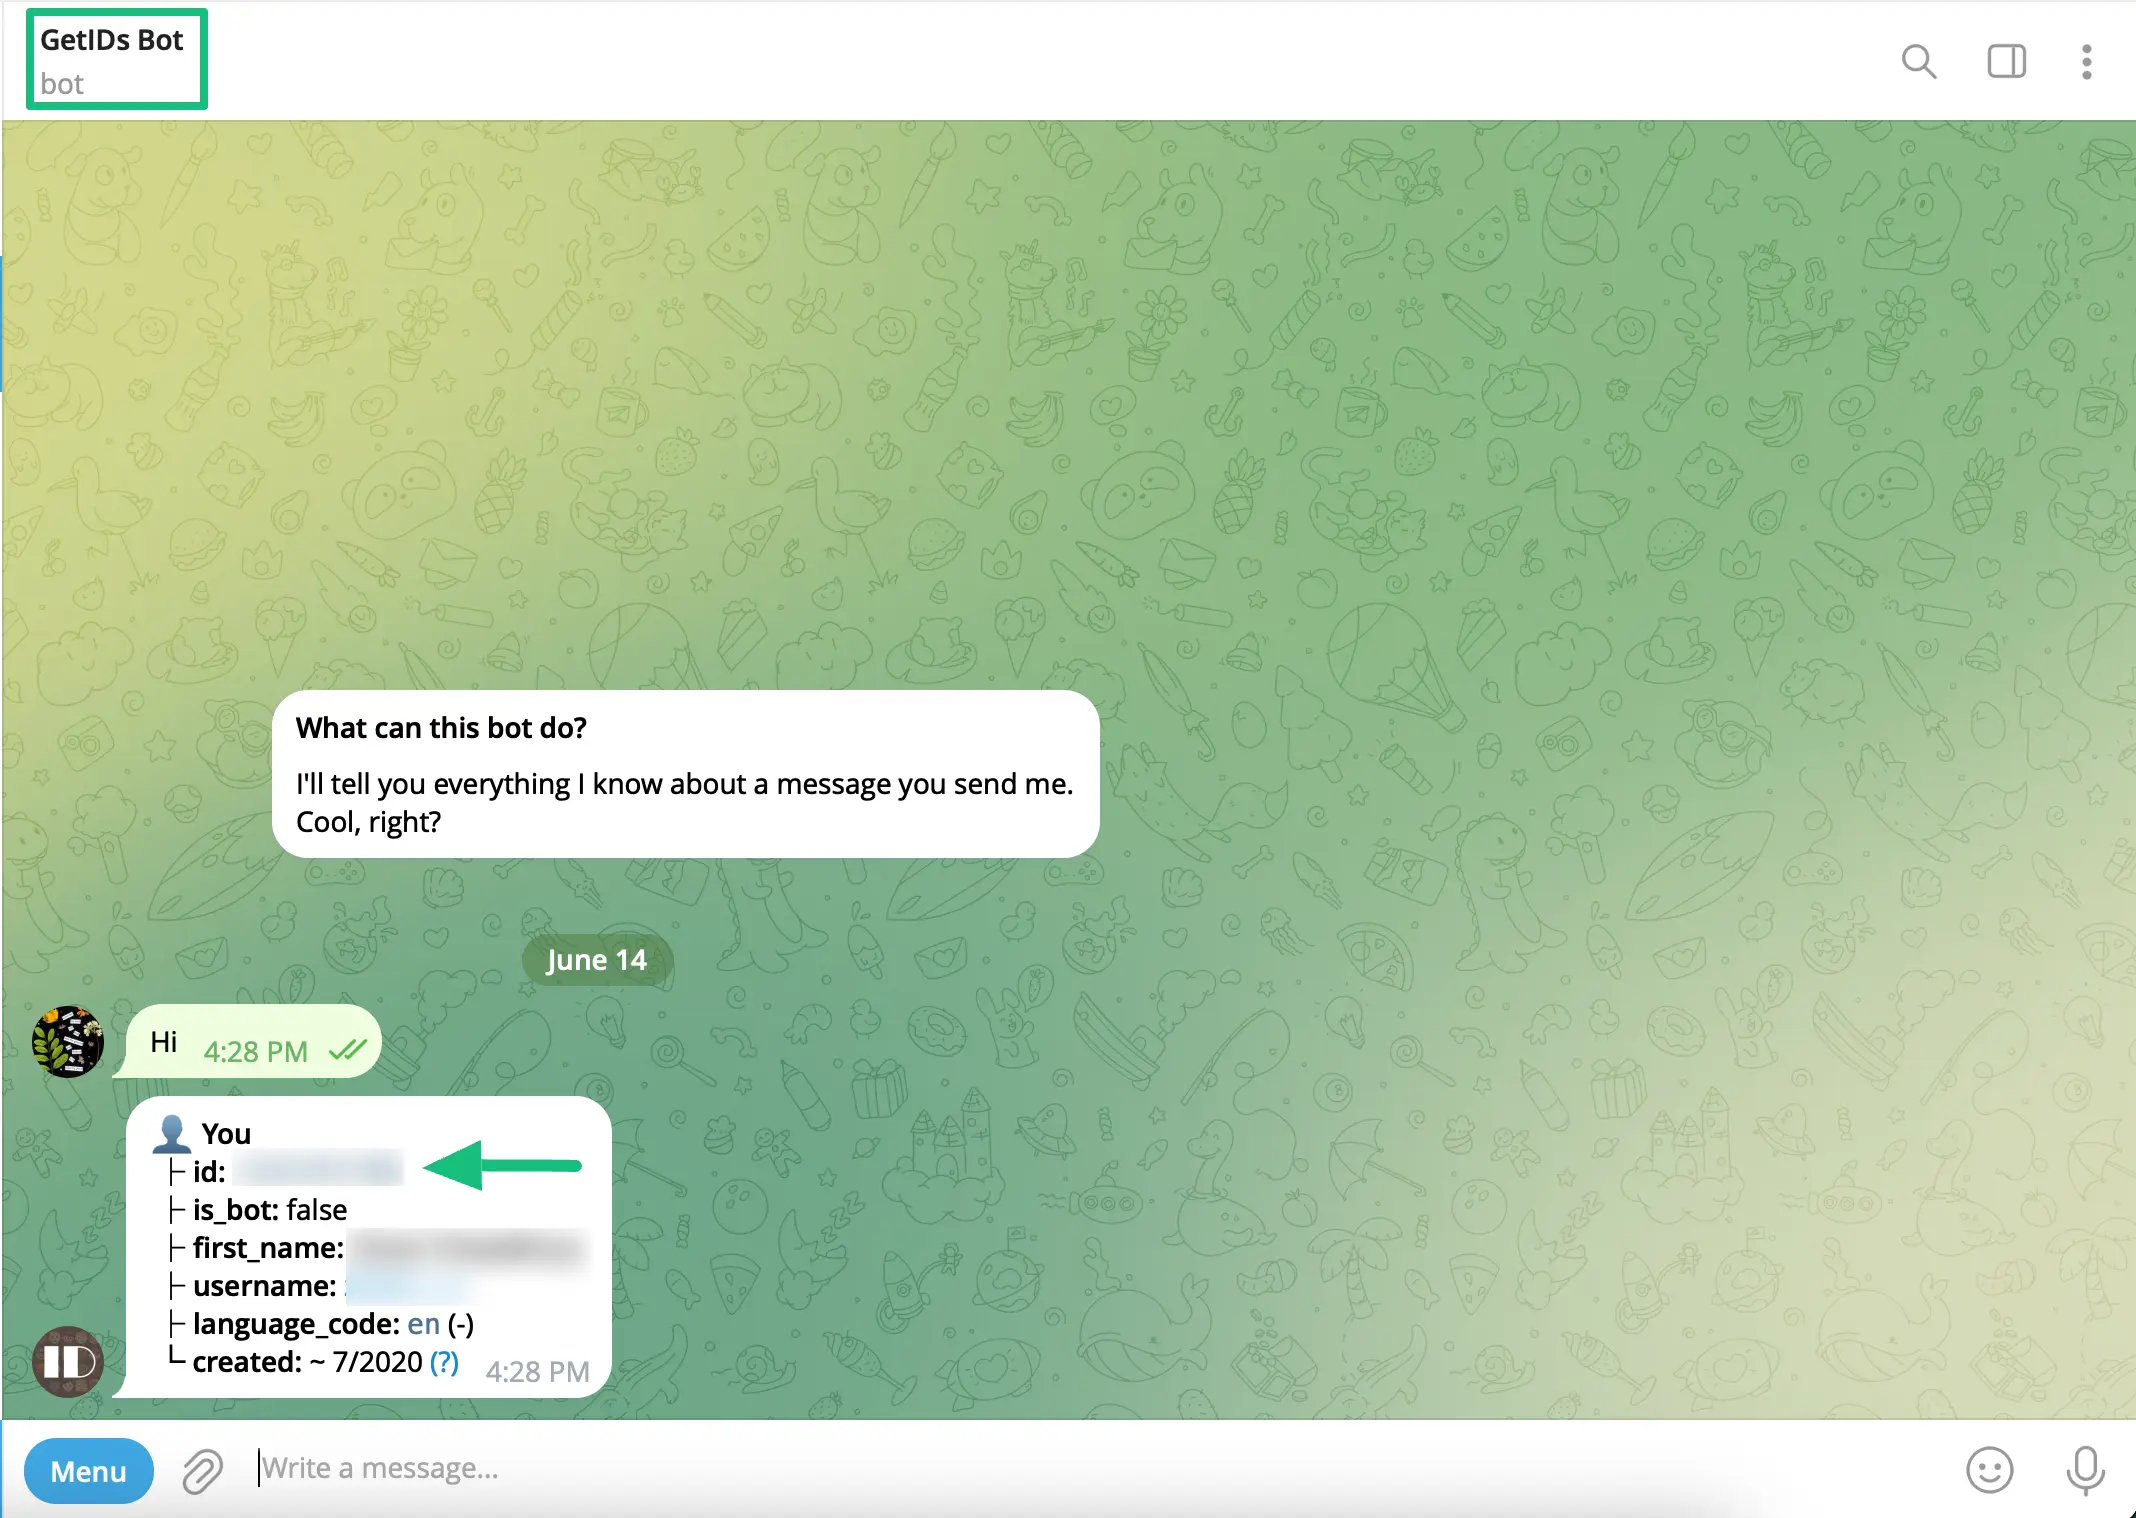
Get Telegram Chat ID from GetIDs Bot

Now, go to Support Staff under the Global Settings from your Fluent Support Dashboard, and click on the Pencil Icon of your desired agent/s whom you want to give access to reply tickets directly from telegram.
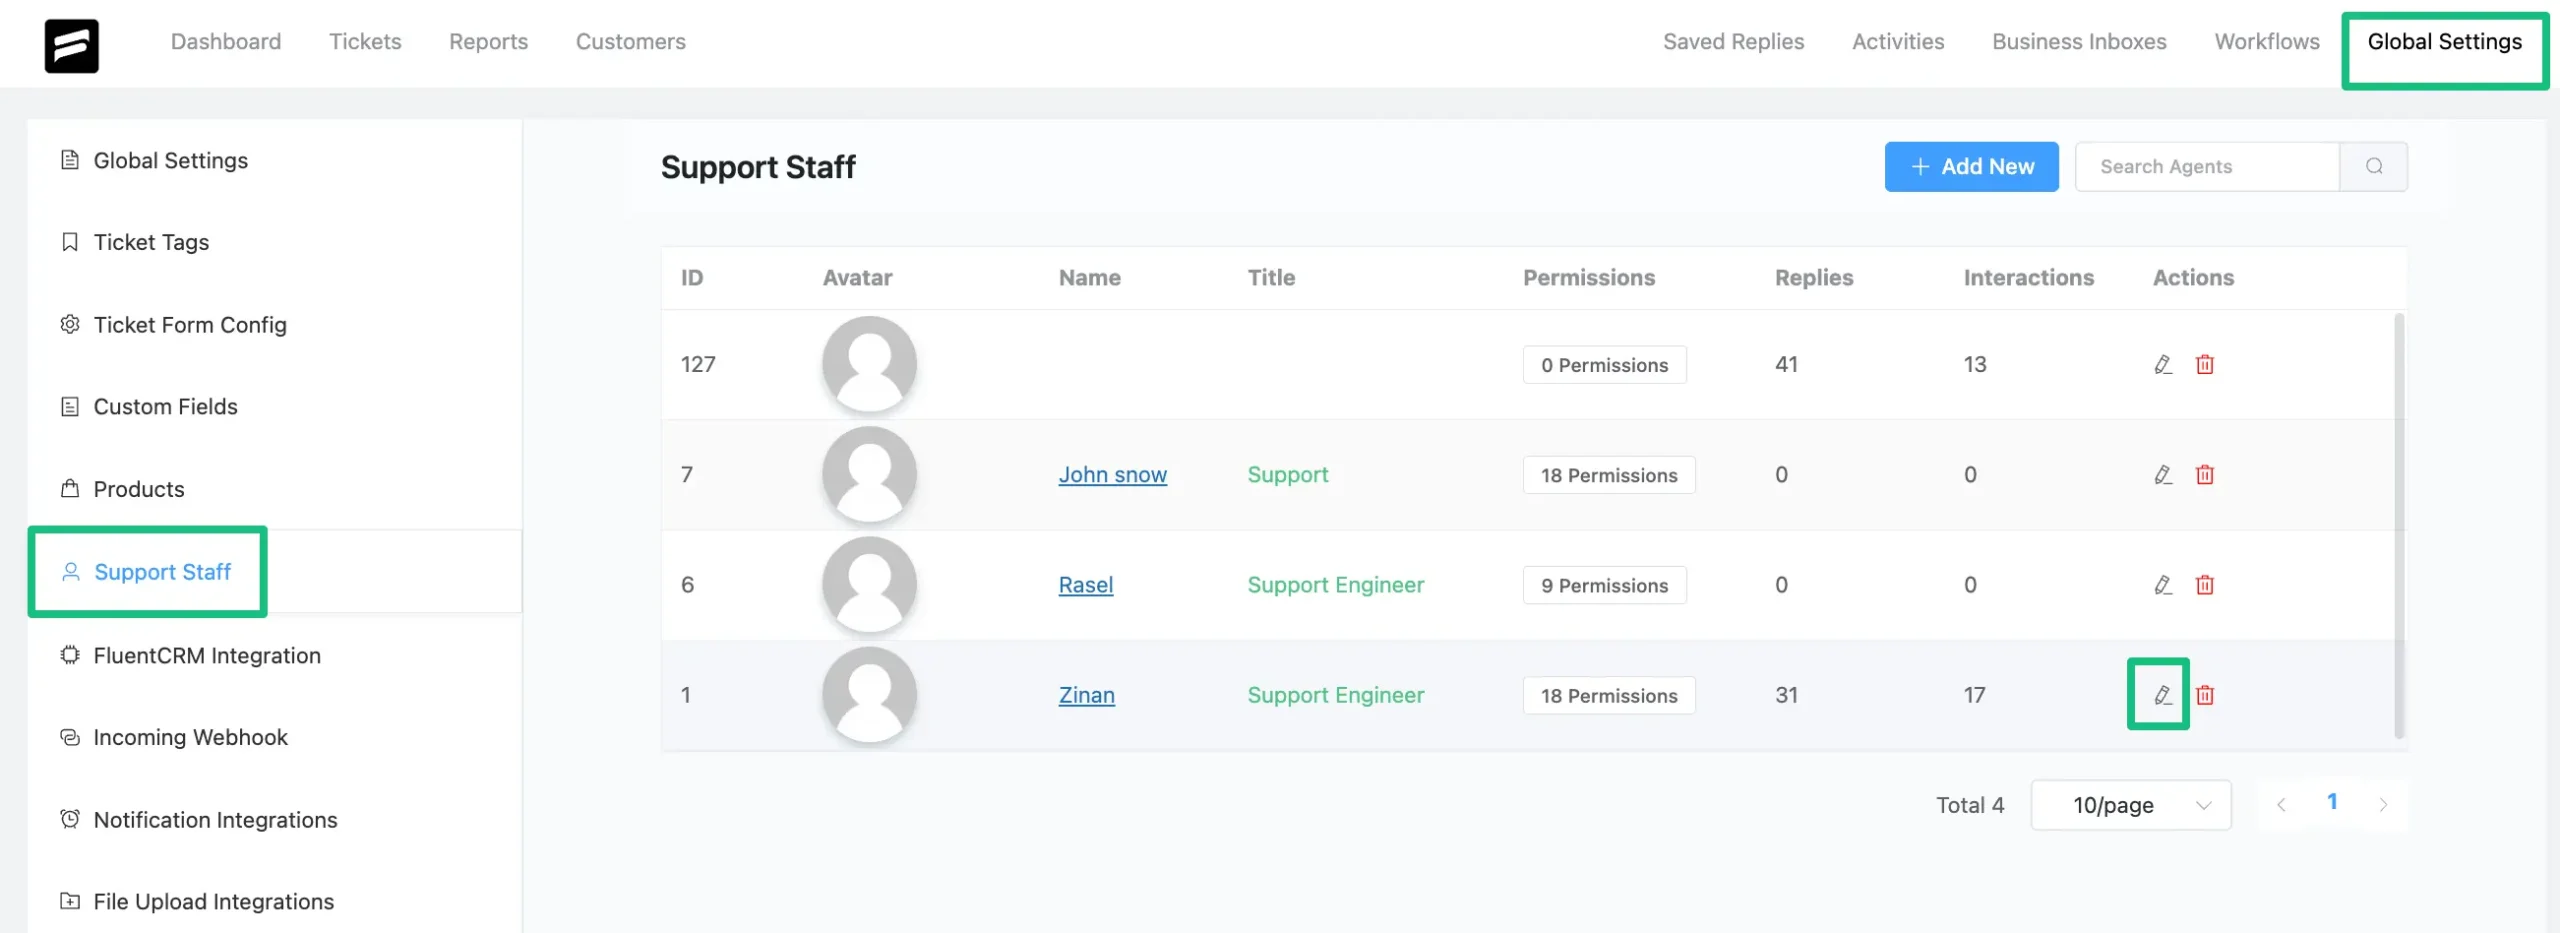
Support Staff from Global Settings

Scroll down to the Telegram Integration option, paste the Chat Id you have copied before into the Telegram Chat ID field, and click the Update button. Now your chosen agent/agents can reply to tickets from Telegram.
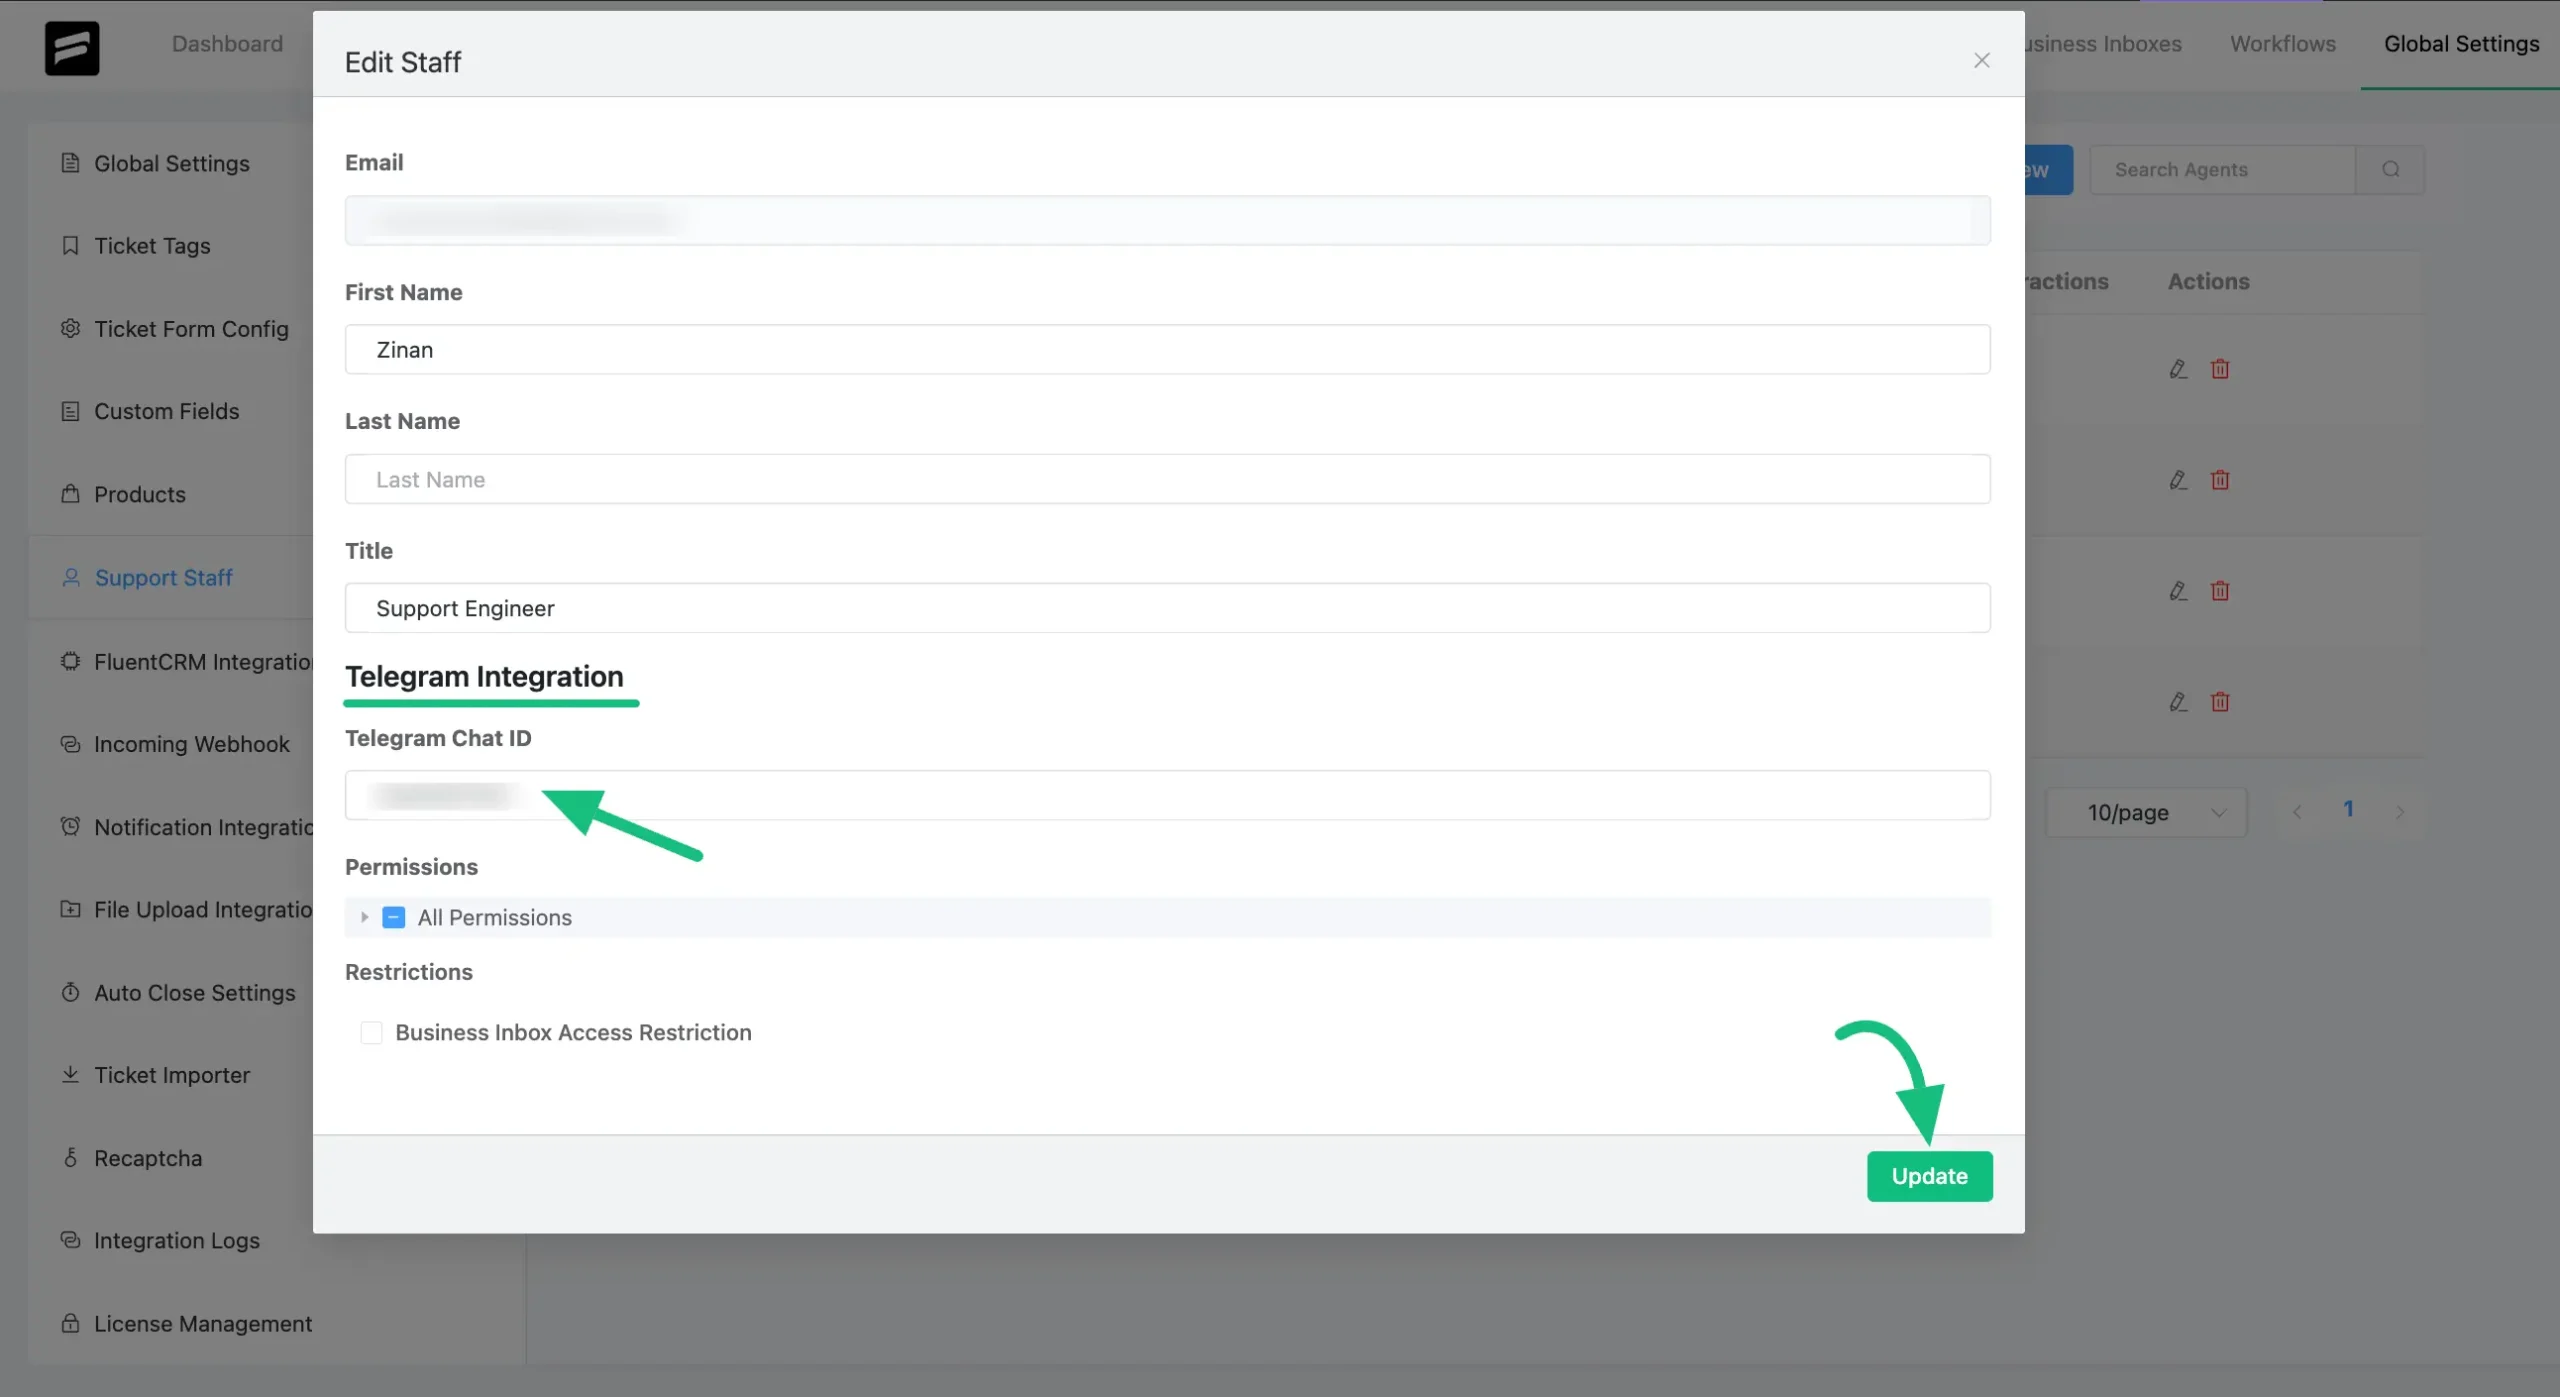
Telegram Chat ID Field

If you have any further questions, concerns, or suggestions, please do not hesitate to contact our @support team. Thank you.

Updated on November 19, 2024

What are your Feelings

  • Happy
  • Normal
  • Sad
  • Facebook
  • X
  • LinkedIn
  • Pinterest
Managing Tickets Using SlackManaging Tickets Using Discord
Table of Contents
  • Fluent Support Telegram Settings
    • Get Bot Token
    • Get Group Chat ID
      • Creating A New Group On Telegram
      • Get Group Chat ID
  • Configure Telegram in Fluent Support
  • Reply Tickets From Telegram
Fluent Support logo

Fluent Support smoothly integrates with popular e-commerce, membership, CRM, and LMS apps.

Weekly Email Newsletter

weekly newsletter
We won't send you spam. Unsubscribe at any time.

  • Facebook
  • Instagram
  • Twitter
  • LinkedIn
  • YouTube

Get Help

  • Automation
  • Migration
  • Comparison
  • Free Vs Pro
  • Documentation
  • REST API Doc
  • Developers
  • Brand
  • Support
  • Report a Security Issue

Integration

  • OpenAI Tools
  • WooCommerce
  • Easy Digital Downloads
  • FluentCRM
  • Fluent Forms
  • Slack
  • Telegram
  • WhatsApp
  • Discord
  • Tutor LMS

Resources

  • Success Stories
  • New
  • CS Trends 2024
  • Fluent Support 101
  • Blog
  • Mission and Vision
  • About Us
  • Terms & Conditions
  • Privacy Policy
  • Email Piping Data Policy
  • Contact

Our Products

  • FluentCommunity
  • Ninja Tables
  • Fluent Forms
  • FluentCRM
  • FluentBooking
  • WP Social Ninja
  • Paymattic
  • AzonPress
  • FluentSMTP
  • FluentBoards
  • FluentSnippets

© 2025 Fluent Support


Drop Your Info & Grab the Discount
FreshDesk Migration Form
  • Features
  • Integrations
  • Pricing
  • Statistics
    • Customer Service Statistics
    • Customer Support Statistics
    • Customer Experience Statistics
    • AI Customer Service Statistics
  • Resources
    • Blogs
    • Fluent Support 101
    • Build A Support Team
    • Free Vs Pro
    • Comparison
    • Documentation
    • Pricing Calculator
    • Brand
  • Contact Us
  • Account